Eggs in a cast iron skillet are a different thing than eggs in anything else. I say this after years of trying to convince myself that a nonstick pan was just as good — it isn’t, and eventually I stopped arguing with myself about it.
The lace-edged, slightly crispy bottom on a fried egg that comes out of a properly preheated cast iron skillet? You cannot get that from Teflon. The way a shakshuka or frittata finishes evenly from stovetop to oven in one pan, with golden edges and a barely-set center? Also not happening in nonstick. I cook eggs in cast iron almost every morning now. My brother thinks I’m too particular about it. He’s probably right, and I don’t care.
These 12 recipes are the ones I’ve settled into — some weekday standards, a couple of weekend projects, one that came from a near-empty fridge situation that I’ve now made on purpose at least two dozen times.
Table of Contents
- 1 The Fundamentals of Cooking Eggs in Cast Iron
- 2 Essential Tools for Cast Iron Egg Cookery
- 3 Classic Fried Eggs in Cast Iron
- 4 Savory Vegetable Frittata
- 5 Huevos Rancheros Skillet
- 6 Shakshuka: Middle Eastern Egg Delight
- 7 Bacon and Egg Breakfast Pizza
- 8 Skillet Egg and Potato Hash
- 9 Crustless Quiche Lorraine
- 10 Spanish Tortilla with Caramelized Onions
- 11 Breakfast Skillet with Sausage and Eggs
- 12 Egg White Frittata for Health-Conscious Eaters
- 13 Sweet Skillet French Toast with Berries
- 14 Caprese Breakfast Skillet
- 15 Tips for Perfect Cast Iron Skillet Eggs Every Time
The Fundamentals of Cooking Eggs in Cast Iron
Skipping the preheat is the mistake. Full stop. I know that sounds like something people say because they have to say something — but it’s genuinely the thing that separates good cast iron egg cookery from frustrating cast iron egg cookery.
Five to eight minutes over medium heat before anything goes in. Not medium-high. Not high. Medium. And yes, I said five to eight — not the three to four minutes you’ll see cited most places. Cast iron doesn’t distribute heat the way a thin aluminum pan does; it stores heat and radiates it, which means the edges of the skillet lag significantly behind the center for the first several minutes on a burner. True edge-to-edge equalization takes closer to five minutes minimum, and eight if you want to be sure. Rushing it means sticky spots, uneven cooking, and eggs that look fine on the outside and are raw in the middle.
Here’s the hierarchy, and this matters: temperature is king, seasoning is the safety net. I used to tell people their eggs were sticking because the skillet was under-seasoned. That’s not wrong exactly, but it’s incomplete. You can fry a perfectly slidey egg in a brand-new, minimally seasoned skillet if your temperature and fat usage are right. Conversely, you can stick an egg to a 50-year-old heirloom pan that looks like a black mirror if the pan is too cold or the heat is wrong. If your eggs are sticking, check the temperature first — that’s almost always the culprit. Seasoning the skillet is important and worth doing properly, but it’s the backup system, not the primary one.
One thing I didn’t expect when I started taking this seriously: the nutritional angle is genuinely interesting. According to the National Institutes of Health, a review of high-quality evidence found that 7–14 eggs per week within a varied diet could benefit most of the population — improving nutrient density and providing high-quality protein that protects lean body mass. Eggs are also one of the few complete proteins in a standard diet, meaning they contain all nine essential amino acids. In a near-empty fridge situation — the shakshuka story below being the obvious example — that’s actually meaningful nutritional information. The idea that eggs are inherently bad for you isn’t supported by the current research. That settled a lot of arguments I’d been having at breakfast.
One more thing worth noting: the iron-leaching benefit of cast iron cooking applies most significantly when you’re cooking acidic foods in the skillet — tomato-based sauces, citrus, anything with vinegar. The shakshuka recipe below, with its 28-ounce can of crushed tomatoes simmering directly in the pan, is where you’ll see the most iron transfer. Fried eggs on their own? Less so.
The things that matter on every single cook:
- 5–8 minutes preheat over medium — edges lag behind the center, so longer than you think
- Fat goes in after the pan is hot; let it shimmer or foam before the egg hits it
- The edges of the white should sizzle and go opaque immediately — if they don’t, stop and wait
- Pull everything slightly earlier than it looks done. Cast iron keeps cooking after it leaves the heat.
Essential Tools for Cast Iron Egg Cookery
Here’s the honest answer: not much.
A 10-inch skillet handles most of what’s below. The frittata, Spanish tortilla, and hash benefit from 12 inches — more surface area means the eggs and fillings don’t end up stacked on each other. A thin metal spatula — not a thick silicone one, which is too clunky to get under a delicate egg white without tearing it. And a lid. Any lid that fits. The lid does more work in egg cookery than most people give it credit for.
| Tool | What it actually does |
|---|---|
| 10-inch cast iron skillet | Everything from single eggs to 4-serving recipes |
| 12-inch cast iron skillet | Frittatas, hash, tortilla — needs the room |
| Thin metal fish spatula | Gets under egg whites cleanly without tearing |
| Any lid that fits | Steam-sets the top without flipping |
| Thick oven mitt | Handle is always hot. Always. Don’t forget this. |
That’s the whole list. Anyone who says you need more is selling something.
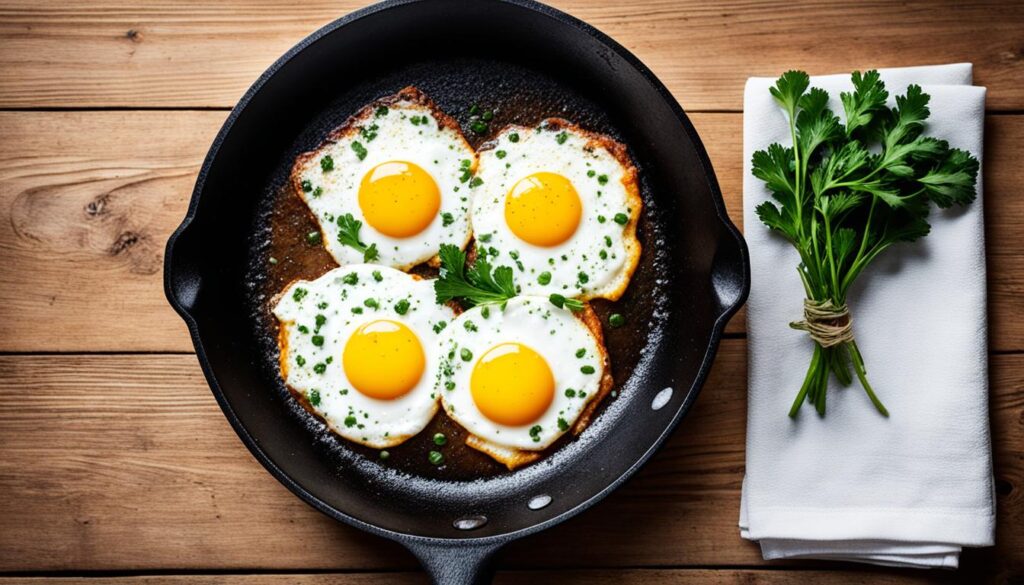
Classic Fried Eggs in Cast Iron
Four mornings a week, minimum. This is the one I come back to more than anything on this list, which feels almost embarrassing to admit given how simple it is — but the cast iron fried egg is genuinely better than any other version I’ve made, and I’ve made a lot of versions.
My two boys call them “the crispy ones” and request them by name now. My older one refuses fried eggs made any other way. Honestly, same.
Ingredients
- 4 large eggs
- 1 tbsp unsalted butter (or bacon fat, which is better and I’ll die on that hill)
- Salt and black pepper
- Flaky salt and fresh herbs if you want to feel fancy about it
Instructions
Set the skillet over medium heat. Three minutes minimum — set a timer if you don’t trust yourself to wait. While it heats, crack each egg into a separate small bowl. Do not crack them directly into a hot pan. If a shell goes in, you want to fish it out before it’s buried in sizzling butter.
Add the butter. It should foam immediately and start smelling nutty within about 15 seconds. If it just sits there melting slowly, the pan isn’t ready yet. Wait another minute and try again.
When the foam starts to subside — that little window between foaming and browning — slide the eggs in one at a time. They should sizzle the moment they make contact. The white edges go opaque almost instantly. If the white just spreads out slowly and sits there looking pale, the pan was too cool and you’ll need to be patient now.
Lid on for sunny-side up. Two minutes, maybe two and a half. The steam sets the white from the top without any contact with the yolk — when the white looks fully set and the yolk surface looks just barely filmed over with a thin, translucent skin, it’s done.
For over-easy, no lid, wait until the whites are fully set around the edges and just barely set in the center, then flip once with the thin spatula. Count to ten. Slide out.
Salt, pepper, done. Eat immediately — eggs cool fast and a warm cast iron egg is a different thing than a lukewarm one.
Nutritional Information (per serving, serves 4)
| Nutrient | Amount per Serving |
|---|---|
| Calories | 105 |
| Carbohydrates | 0.5g |
| Protein | 7g |
| Fat | 8g |
| Fiber | 0g |
| Sodium | 115mg |
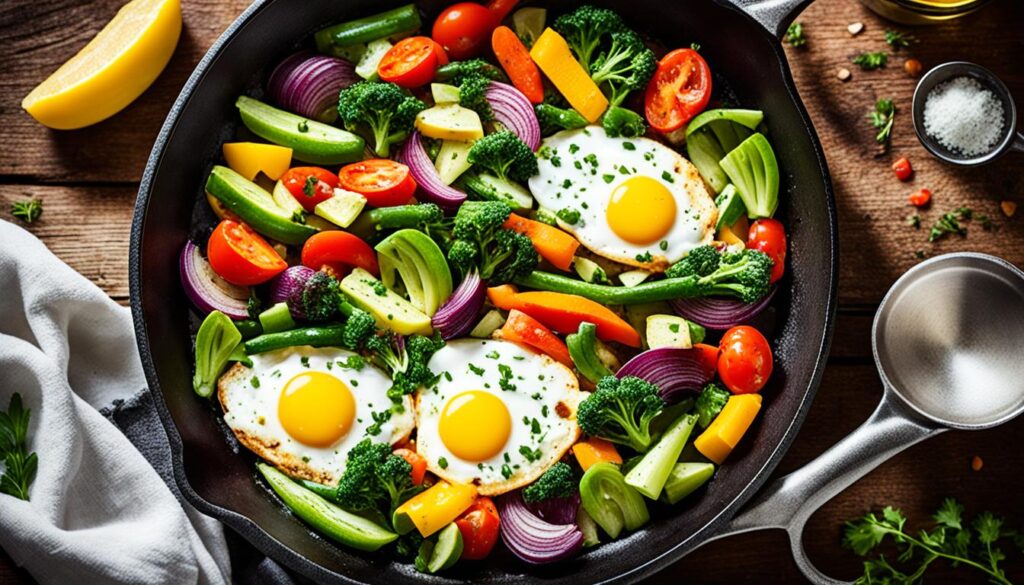
Savory Vegetable Frittata
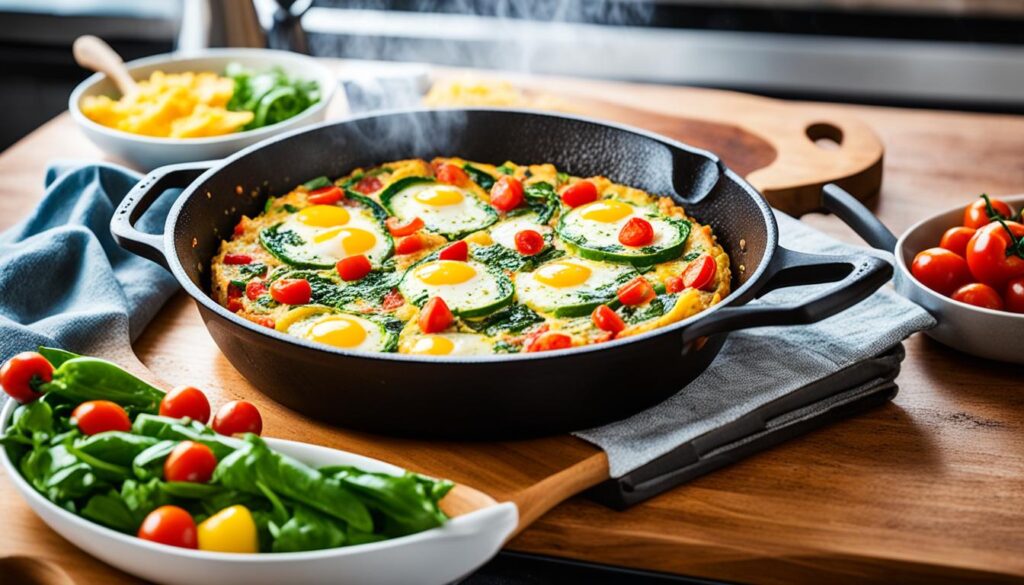
This is my Sunday-night-before-the-week-starts recipe. The vegetables in it are almost always whatever didn’t get used during the week — half a zucchini, a bell pepper that’s starting to wrinkle, some mushrooms I bought with good intentions. It works with basically anything, which is the whole point.
- It pairs well with a healthy beef and broccoli stir-fry if you want a full dinner that makes use of whatever else is going soft in the fridge.
A 2024 systematic review in PubMed identified eggs as a meaningful source of several nutrients widely under-consumed in modern diets — specifically folate, iodine, choline, and vitamin D. A vegetable frittata stacks all of that with fiber and additional micronutrients from the produce. It’s not the flashiest meal. It does a lot of quiet work.
Ingredients
- 8 large eggs
- 1/4 cup whole milk
- 1 cup diced zucchini
- 1 cup diced red bell pepper
- 1/2 cup diced yellow onion
- 2 cloves garlic, minced
- 1/2 cup crumbled feta or shredded mozzarella
- 2 tbsp olive oil
- 1/2 tsp salt
- 1/4 tsp black pepper
- Fresh parsley or basil to finish
Instructions
Oven to 375°F first. Then deal with everything else.
Whisk the eggs with the milk, salt, and pepper until fully combined — hold the bowl up to the light and make sure there are no streaks of unmixed yolk running through. Set the bowl aside.
Heat olive oil in the 12-inch skillet over medium. Onion goes in first — cook it 5 minutes, stirring now and then, until it looks soft and just starting to turn translucent at the edges. Garlic for 30 seconds, stirring constantly so it doesn’t burn. Then zucchini and bell pepper, another 4–5 minutes. You want them softened but not collapsed — they should still hold their shape when you press one with a spoon.
Spread everything into an even layer. Pour the egg mixture over the top slowly — it’ll start setting immediately at the edges where it touches the hot pan, which is exactly right. Scatter the cheese over the surface.
Straight into the oven. Bake 18–20 minutes. To check: shake the pan slightly. The edges should be fully set and the center should have just the faintest tremble — not liquid, but not rock-solid either. Pull it there. It’ll finish on residual heat.
Five minutes before cutting. It slices much more cleanly when it’s had time to firm up, and burning your mouth on frittata isn’t worth it.
Nutritional Information (per serving, serves 4)
| Nutrient | Amount per Serving |
|---|---|
| Calories | 265 |
| Carbohydrates | 7g |
| Protein | 17g |
| Fat | 19g |
| Fiber | 1.5g |
| Sodium | 490mg |
Huevos Rancheros Skillet
My college roommate made a version of this in a beat-up cast iron skillet we found at a thrift store for two dollars. We ate it for breakfast and sometimes dinner for about three semesters. It’s loud food — bright red, heavy on the cumin, unapologetically messy to eat. I’ve refined the recipe considerably since then but the spirit of it is identical: one pan, everything in it, ready before anyone’s fully awake.
Ingredients
- 4 large eggs
- 1-1/2 cups jarred or homemade salsa
- 1 can (15 oz) black beans, drained and rinsed
- 4 small corn tortillas, warmed
- 1/2 cup shredded Monterey Jack or cheddar
- 1/4 cup sour cream
- 1/4 cup fresh cilantro, roughly chopped
- 1/2 tsp cumin
- 1 tbsp olive oil
- Salt to taste
- Lime wedges for serving
Instructions
Heat olive oil in a 10-inch cast iron skillet over medium. Add the drained black beans and the cumin. Stir them around for about 2 minutes — you want the cumin to bloom in the oil, which means it’ll smell toasty and slightly smoky rather than raw and powdery.
Pour the salsa over the beans. Stir it together and let it come to a steady simmer — bubbling around the edges, steaming across the surface. This usually takes 3 minutes. Don’t rush to the eggs while the base is still cool; the eggs need heat from underneath to cook properly.
Make 4 small wells with the back of a spoon. Crack an egg into each one. Lid on. Start checking at 3 minutes — not 4, not 5. In a cast iron skillet with a lid, eggs poaching in simmering liquid cook faster than most people expect, and the carryover heat from the pan will keep cooking them even after you move the skillet off the burner. The whites should be fully set and opaque; the yolks should still feel soft and slightly liquid when you press them very gently with a fingertip. The moment the whites look set, pull the skillet off the heat entirely — the residual heat in the cast iron will finish any translucent spots in the whites without pushing the yolks to firm.
Cheese goes on while the skillet is still hot so it melts. Serve each portion on a warm tortilla with sour cream, cilantro, and lime.
Nutritional Information (per serving, serves 4)
| Nutrient | Amount per Serving |
|---|---|
| Calories | 340 |
| Carbohydrates | 35g |
| Protein | 18g |
| Fat | 14g |
| Fiber | 7g |
| Sodium | 620mg |
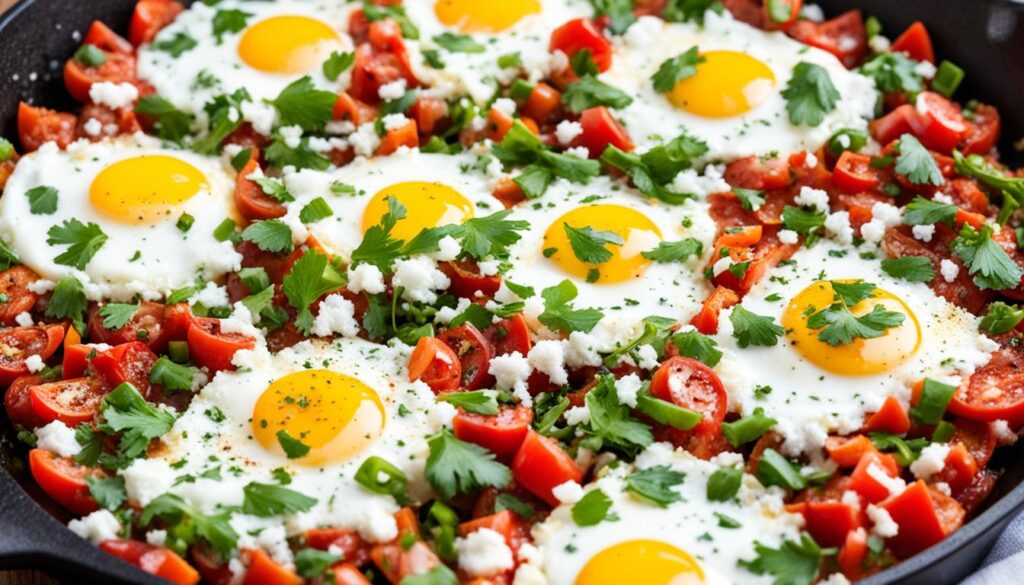
Shakshuka: Middle Eastern Egg Delight

A near-empty fridge on a Sunday afternoon about five years ago: one can of crushed tomatoes, half a bag of spinach that was one day from being compost, some cumin, some garlic. I’d read about shakshuka somewhere and thought it might work. It worked extremely well. I’ve made it on purpose probably 40 times since then, which is not something I expected to say about a recipe that started as a last resort.

It’s eggs poached directly in spiced tomato sauce, finished with feta. The whole thing takes about 25 minutes. It looks spectacular and people always ask what’s in it, which is funny because the answer is just canned tomatoes and spices.
Eggs are one of the only foods that contain naturally occurring vitamin D — and a 2024 review in Food & Nutrition Research noted that eggs are particularly valuable for closing the gap on vitamin D intake, which remains low in a significant portion of the population. The tomato base in shakshuka adds lycopene. So, nutritionally speaking, this is a fairly serious meal disguised as a simple one.
Ingredients
- 6 large eggs
- 1 can (28 oz) crushed tomatoes
- 1 medium yellow onion, diced
- 1 red bell pepper, diced
- 4 cloves garlic, minced
- 2 tbsp olive oil
- 1 tsp cumin
- 1 tsp smoked paprika
- 1/2 tsp chili flakes
- 1/2 tsp salt
- 1/4 tsp black pepper
- 1/2 cup crumbled feta
- Fresh parsley and crusty bread for serving
Instructions
Olive oil in the 12-inch skillet over medium. Onion and bell pepper go in together — cook 6 to 8 minutes, stirring occasionally. You’re waiting for the onion to go soft and take on some color at the edges. Not browned, not caramelized, just — cooked through and starting to look golden in places.
Add the garlic and all the spices at once. Stir constantly for about 1 minute. The spices will become very fragrant — cumin especially. If they start to smell sharp rather than toasty, the heat is too high.
Crushed tomatoes in. Stir everything together. Simmer over medium-low for 10 minutes, stirring occasionally. The sauce will thicken slightly and the color will deepen. Taste it here — adjust salt and heat now, before the eggs go in, because you can’t really stir anything once the eggs are poaching.
Six wells in the sauce, spaced out so the eggs have room. Crack one egg into each well. Lid on. Start checking at 3 minutes. Steam plus simmering liquid in a cast iron skillet creates a very fast cooking environment — eggs that look underdone at 3 minutes can be hard-yolked by 5. Cast iron also holds so much residual heat that the poaching continues even after you move the pan off the burner. Check the whites at 3 minutes; if they look nearly set, pull the skillet off the heat and let the carryover finish them. The yolks should be glossy and completely liquid when pressed. Firm yolks in shakshuka are the main thing that ruins shakshuka, and they happen faster than you’d think.
Feta crumbled over the top. Parsley scattered. Serve with bread for scooping directly from the skillet.
Nutritional Information (per serving, serves 4)
| Nutrient | Amount per Serving |
|---|---|
| Calories | 280 |
| Carbohydrates | 18g |
| Protein | 15g |
| Fat | 16g |
| Fiber | 4g |
| Sodium | 580mg |
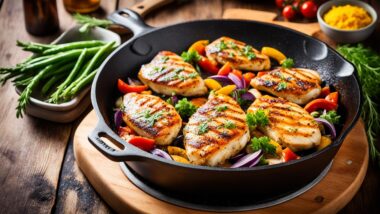
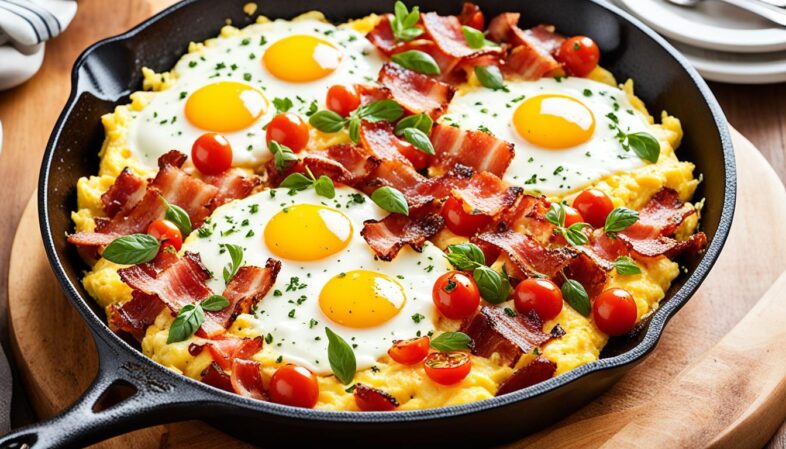
Bacon and Egg Breakfast Pizza
My brother stayed with me for a long weekend in March and asked for “something good” for breakfast without being more specific than that. I made this. He sent me a text about it three days later when he was back home. That’s the only review that matters to me for this recipe.
It sounds more involved than it is. Refrigerated pizza dough, pressed into a cast iron skillet, topped with ricotta and mozzarella and bacon, cracked eggs on top partway through baking. Thirty minutes start to finish. Looks like you planned it.
Ingredients
- 4 large eggs
- 1 can (13.8 oz) refrigerated pizza dough
- 4 strips bacon, cooked and crumbled
- 1/2 cup shredded mozzarella
- 1/4 cup ricotta
- 2 tbsp olive oil
- 1/2 tsp garlic powder
- 1/4 tsp black pepper
- Fresh chives or parsley to finish
Instructions
Oven to 425°F. Coat the inside of a 12-inch cast iron skillet with olive oil — bottom and about an inch up the sides.
Press the pizza dough into the skillet. It’ll spring back toward the center repeatedly, which is normal and annoying. Press it out, let it rest 5 minutes, press it out again. The second time it’ll mostly stay. You want it covering the bottom evenly with a slight lip up the sides.
Spread the ricotta in small dollops across the dough — don’t smooth it into a uniform layer; the pockets of ricotta are what makes this interesting to eat. Scatter the mozzarella and crumbled bacon over everything. Garlic powder and black pepper across the top.
Bake 10 minutes. The dough should be starting to set and look pale gold at the edges, and the cheese should be melted and just beginning to bubble. Pull the skillet out. Crack the 4 eggs across the top of the pizza, spacing them toward the four quadrants so each slice gets one. Back in the oven for 8–10 more minutes.
Whites should be fully set. Yolks can be wherever you want them — I pull it at 8 minutes for runny, 10 for firm. Finish with herbs and serve from the skillet.
Nutritional Information (per serving, serves 4)
| Nutrient | Amount per Serving |
|---|---|
| Calories | 480 |
| Carbohydrates | 42g |
| Protein | 22g |
| Fat | 24g |
| Fiber | 1g |
| Sodium | 840mg |
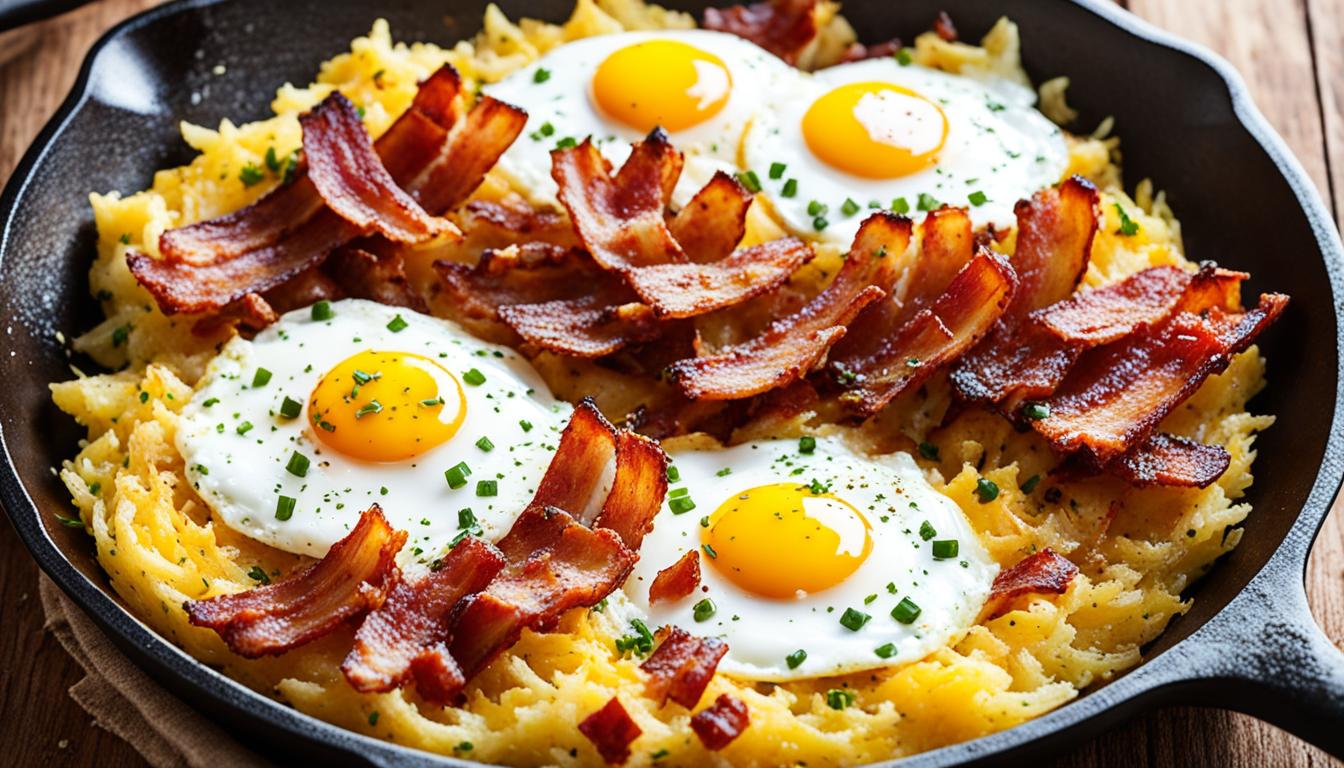
Skillet Egg and Potato Hash
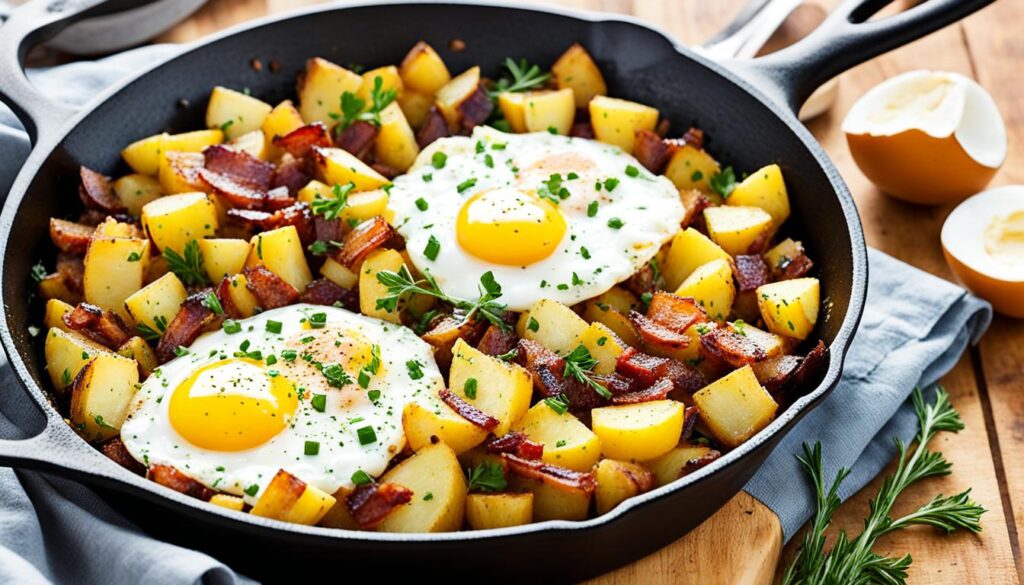
Saturday morning. Always Saturday morning. I’ve been making some version of a potato hash since I was in my early twenties, and the cast iron version is the first one that actually produces the crispy potato cubes it promises rather than soft, slightly steamed ones. The difference is leaving the potatoes alone. Just — leaving them in contact with the hot surface and not touching them until they’ve developed a real crust. Most people stir hash too early and then wonder why the potatoes are mushy.
Ingredients
- 4 large eggs
- 3 medium Yukon Gold potatoes, diced into 1/2-inch cubes
- 1/2 medium yellow onion, diced
- 1 red bell pepper, diced
- 2 cloves garlic, minced
- 3 tbsp olive oil or bacon fat
- 1/2 tsp smoked paprika
- 1/2 tsp garlic powder
- Salt and black pepper
- Fresh parsley or chives to finish
Instructions
Dice the potatoes and spread them on a paper towel. Pat them dry. Wet potato pieces steam rather than brown — the surface moisture has to cook off before any Maillard browning can happen, and by the time it does, the potatoes are overcooked. Dry them. It takes 30 seconds and it matters.
Heat the oil in a 12-inch skillet over medium-high until shimmering. Add the potato cubes in a single layer — if they don’t fit without overlapping, work in two batches. Season with salt, paprika, and garlic powder. Don’t touch them for 4–5 minutes. This is the hardest part. The urge to stir is real. Resist it.
Flip. Another 4–5 minutes without touching. By now the potatoes should be deeply golden on at least two sides and a fork should go through the center without resistance.
Add onion and bell pepper. Stir everything together and cook 3–4 minutes until the vegetables soften. Add garlic and stir for 30 seconds.
Four wells in the hash. One egg in each. Lid on, 4–5 minutes for runny yolks. Season and finish with herbs.
Nutritional Information (per serving, serves 4)
| Nutrient | Amount per Serving |
|---|---|
| Calories | 310 |
| Carbohydrates | 32g |
| Protein | 11g |
| Fat | 15g |
| Fiber | 3.5g |
| Sodium | 310mg |
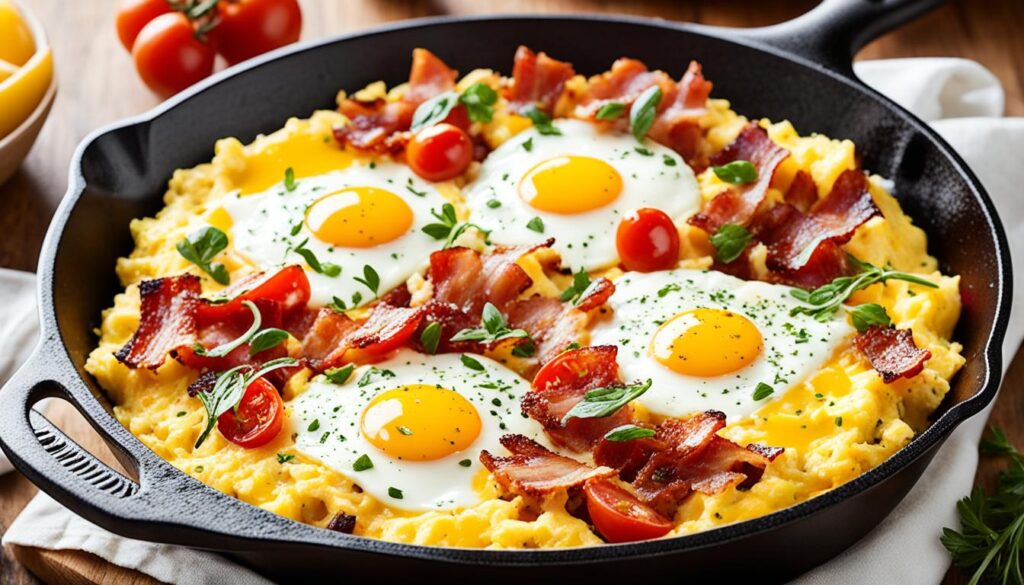
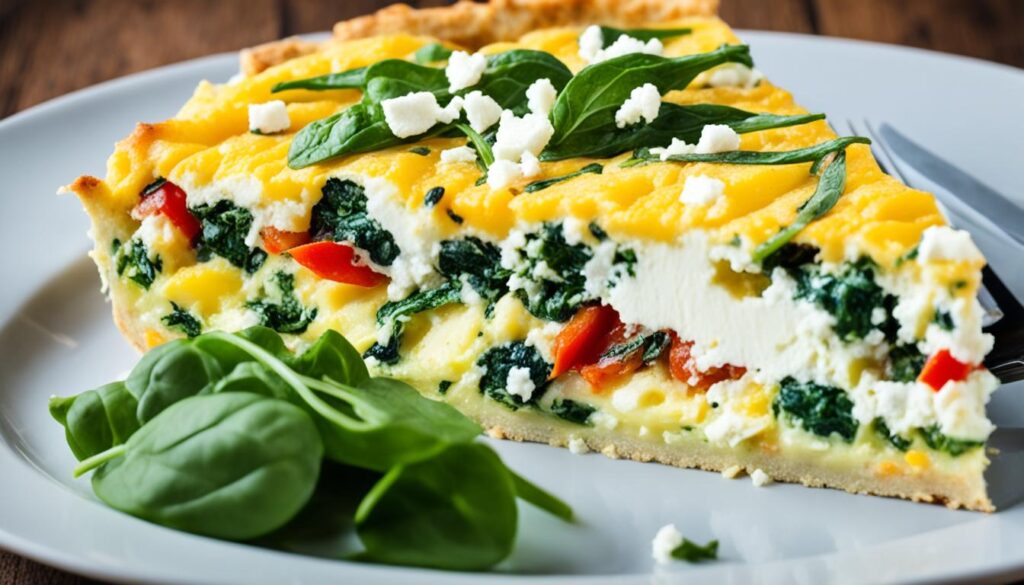
Crustless Quiche Lorraine
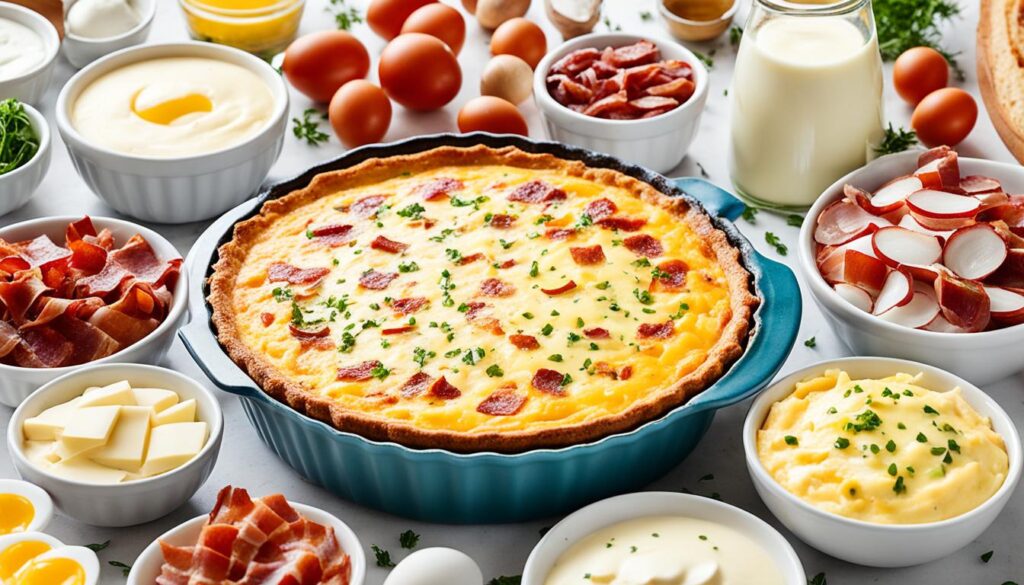
I dropped the crust from quiche about four years ago and have never once missed it. The crust is the least interesting part of the whole thing — the custard is what you’re actually there for. A properly made egg custard with Gruyère, bacon, and caramelized onion, baked until it’s just barely set in the center? It doesn’t need pastry. The cast iron gives you slightly crispy edges anyway, which covers most of what the crust was doing.
The one thing I won’t compromise on: caramelizing the onions properly. Twenty minutes minimum over medium-low heat. They should be deeply golden and sweet and almost jammy. People rush this step. Don’t.
Research published in PubMed found that consuming more than one egg per week was associated with a 47% lower risk of Alzheimer’s dementia in older adults, with dietary choline identified as a key driver — accounting for roughly 39% of that protective effect. Six eggs and real bacon in one skillet. That’s a substantial amount of choline in a single meal.
Ingredients
- 6 large eggs
- 1 cup heavy cream
- 1/2 cup whole milk
- 6 strips bacon, cooked and crumbled
- 1 cup shredded Gruyère (Swiss is fine in a pinch)
- 1/2 medium yellow onion, thinly sliced and caramelized
- 1/4 tsp nutmeg
- 1/2 tsp salt
- 1/4 tsp white pepper
- 1 tbsp butter (for the skillet)
Instructions
Oven to 325°F. Butter the inside of a 10-inch cast iron skillet thoroughly — bottom and all the way up the sides.
If you haven’t already caramelized the onion, do that now. Thin slices, medium-low heat, 20 minutes minimum with occasional stirring. They should look deeply golden and collapsed, not brown and crispy. This step cannot be rushed without ruining it.
Whisk eggs, heavy cream, milk, nutmeg, salt, and white pepper together until the mixture looks slightly frothy and fully homogeneous. No streaks.
Scatter the caramelized onion and crumbled bacon across the bottom of the buttered skillet. Add 3/4 of the Gruyère. Pour the custard over slowly so it settles in evenly. Scatter the remaining cheese over the top.
Bake 35–40 minutes. The edges should be fully set; the center should have a slight wobble — like a just-set pudding, not like liquid. It will firm up significantly as it cools, so pull it while it still looks a little soft in the middle.
Fifteen minutes before cutting. Minimum. The custard needs to finish setting and it slices much more cleanly when it’s had time.
Nutritional Information (per serving, serves 4)
| Nutrient | Amount per Serving |
|---|---|
| Calories | 530 |
| Carbohydrates | 5g |
| Protein | 26g |
| Fat | 45g |
| Fiber | 0.5g |
| Sodium | 680mg |
Spanish Tortilla with Caramelized Onions
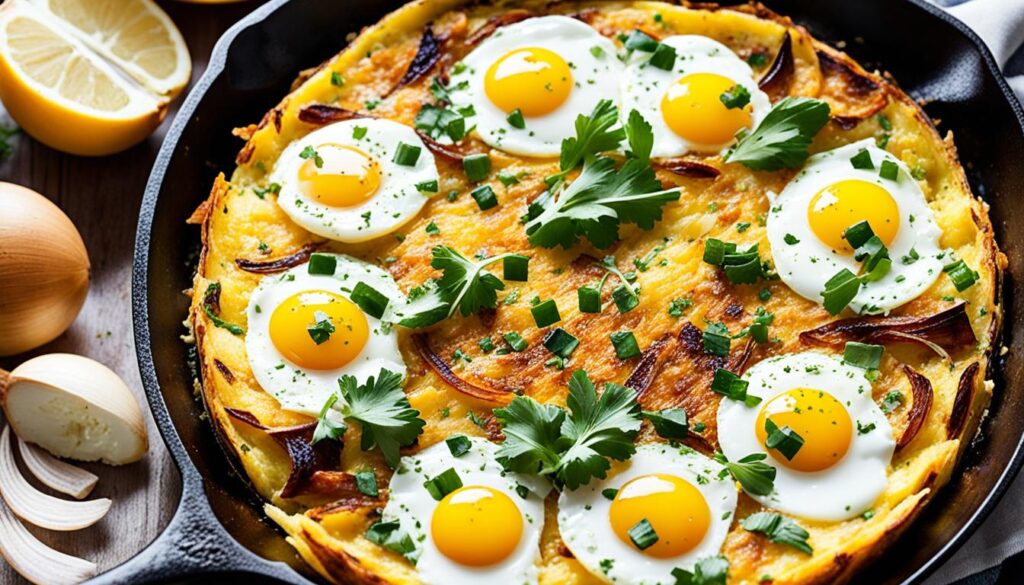
This is a weekend project and I want to say that clearly before you read the ingredient list and think it’s a weekday thing. The potatoes and onion cook slowly in olive oil for 25 to 30 minutes before the eggs even come near the pan. It’s patient cooking. The result — a thick, dense, golden egg-and-potato cake that slices like a pie and tastes like absolutely nothing else — is worth every minute.
I had a version of this at a small bar in San Sebastián about eight years ago, served at room temperature on a small plate with a glass of wine at 11 in the morning, which is apparently normal and correct. I’ve been chasing that exact result since.
Ingredients
- 6 large eggs
- 3 medium Yukon Gold potatoes, peeled and sliced very thin (1/8-inch)
- 1 large yellow onion, thinly sliced
- 1/2 cup olive oil
- 1 tsp salt
- 1/4 tsp black pepper
Instructions
Heat the olive oil in a 10-inch cast iron skillet over medium-low. Add the potato slices and onion together and stir to coat everything in oil. Now — slow cook. Stir every few minutes for 25 to 30 minutes. The potatoes should become completely tender and the onion deeply golden and sweet. Not crispy. Not browned. Just — thoroughly, gently, patiently cooked through. This is the part that determines whether the tortilla is extraordinary or just okay.
While the potatoes cook, whisk the eggs with salt and pepper in a large bowl.
Remove the potato-onion mixture with a slotted spoon, leaving the oil in the pan, and fold the mixture gently into the eggs. Let this sit for 5 minutes. The eggs will start to look slightly thickened and custardy where they contact the hot potatoes.
Pour most of the oil out of the skillet, leaving just a thin film. Heat over medium. Pour the egg-potato mixture in. Cook undisturbed for 5 to 6 minutes — peek under the edge with a spatula to check for golden color on the bottom.
The flip is the part people worry about — and honestly, the worry is justified. A 10-inch cast iron skillet weighs 5 to 6 pounds on its own. Add the potato-egg mixture and you’re maneuvering roughly 7 pounds of scorching hot, heavy skillet in an inverted position over a plate. This is a two-person job if you have any hesitation, or if your grip strength isn’t what it used to be. Have a second person hold the plate steady while you flip, and use oven mitts on both hands without exception.
If the flip sounds like more than you want to deal with — and there’s no shame in that — use the oven method instead: after the bottom is set and golden, slide the whole skillet into a 375°F oven for 8 to 10 minutes until the top is just set. You won’t get quite the same uniform texture throughout, but you’ll get a very good result without the risk. Traditionally? You flip it. Practically? Either method works.
Slide the tortilla onto a large flat plate. Place the skillet upside-down over the plate and flip both together in one confident motion. Slide the tortilla back into the skillet, uncooked side down. Cook 3 to 4 more minutes.
Serve warm or at room temperature. Both are correct. Room temperature is actually how it’s traditionally served, and it’s surprisingly good that way.
Nutritional Information (per serving, serves 4)
| Nutrient | Amount per Serving |
|---|---|
| Calories | 420 |
| Carbohydrates | 28g |
| Protein | 14g |
| Fat | 29g |
| Fiber | 2.5g |
| Sodium | 380mg |
Breakfast Skillet with Sausage and Eggs
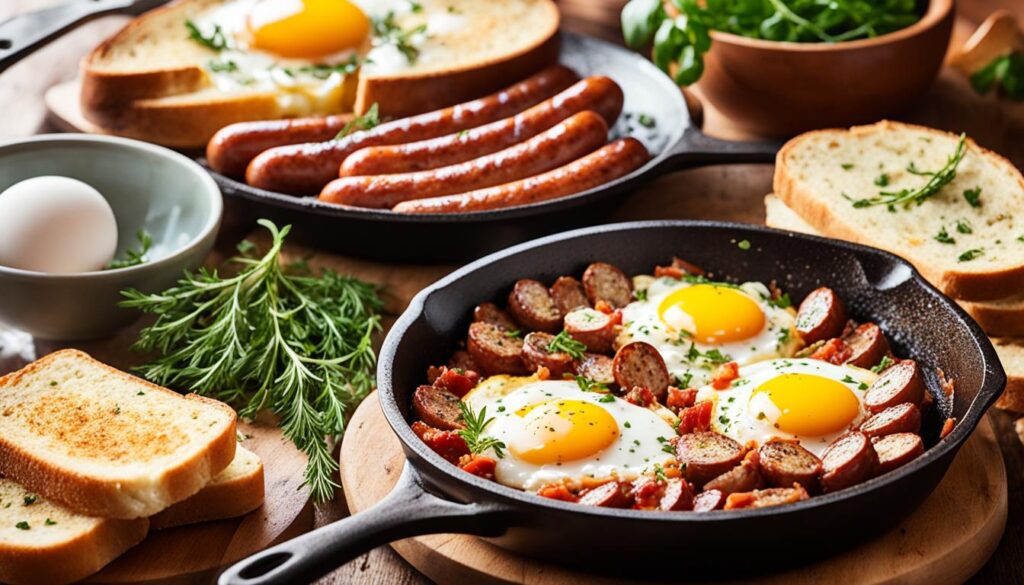
My dad calls this “a proper breakfast.” He grew up in a house where breakfast meant something hot, filling, and substantial enough to carry you through a morning of actual physical work. This delivers on all of that — sausage, potatoes, eggs, and cheese in one skillet — and it’s genuinely filling enough that you won’t want lunch until well past noon.
Data from PMC (NIH) showed that choline intake in the range of 187–399 mg per day was associated with approximately 40% lower risk of cognitive impairment across measures of learning, processing speed, and working memory in older adults. A breakfast with two eggs plus sausage puts you close to that range before 9 AM, which seems like a reasonable way to start.
Ingredients
- 4 large eggs
- 1/2 lb breakfast sausage, casings removed
- 2 medium Yukon Gold potatoes, small dice
- 1/2 cup diced yellow onion
- 1/2 cup diced red bell pepper
- 1/2 cup shredded cheddar
- 1 tbsp olive oil
- 1/2 tsp smoked paprika
- Salt and black pepper
- Hot sauce and fresh parsley for serving
Instructions
Heat olive oil in a 12-inch cast iron skillet over medium-high. Before the sausage goes in, pat the crumbled meat dry with a paper towel — the same logic as drying the potatoes in the hash recipe. Surface moisture turns to steam in the pan and prevents browning. Dry meat makes direct contact with the hot surface and the Maillard reaction — the chemical browning that creates flavor compounds — happens properly. Add the sausage and break it apart with a wooden spoon. Cook until deeply browned all over — 5 to 6 minutes. It should look crumbled and golden. Gray sausage means the protein has denatured but the browning hasn’t happened yet, which means most of the flavor development hasn’t happened yet. Brown it properly. Remove to a plate and leave the fat behind.
Potato cubes into the fat. Season with paprika, salt, and pepper. Don’t move them for 4 minutes — let the bottoms crust. Flip. Another 3 to 4 minutes. Then add onion and bell pepper, stir everything together, and cook 3 more minutes until the vegetables have softened and the whole skillet smells like a diner.
Sausage back in. Stir. Four wells for the eggs. Lid on — 4 to 5 minutes for runny yolks, 6 to 7 for firm. Scatter cheese over the top, lid back on for 30 seconds to melt it.
Serve from the skillet.
Nutritional Information (per serving, serves 4)
| Nutrient | Amount per Serving |
|---|---|
| Calories | 450 |
| Carbohydrates | 22g |
| Protein | 27g |
| Fat | 28g |
| Fiber | 2.5g |
| Sodium | 710mg |
Egg White Frittata for Health-Conscious Eaters
I was skeptical. Egg white frittatas have a well-earned reputation for being rubbery and flavorless, which is mostly what happens when they’re made in a nonstick pan over low heat with nothing interesting in them. Cast iron changes the equation — the hot surface gives the whites a slight caramelization at the edges that adds flavor without adding fat, and good fillings do the rest.
I add one whole egg for every four whites. The single yolk improves the color and the texture noticeably, and if you’re eating this for health reasons, one yolk isn’t going to undermine anything.
Ingredients
- 8 large egg whites
- 1 large whole egg
- 1 cup baby spinach, roughly chopped
- 1/2 cup diced cherry tomatoes
- 1/4 cup diced red onion
- 1/3 cup crumbled goat cheese or feta
- 2 tbsp olive oil
- 1/4 tsp garlic powder
- Salt and black pepper
- Fresh basil for finishing
Instructions
Oven to 375°F.
Whisk the egg whites and whole egg together with garlic powder, salt, and pepper until lightly frothy. There should be small bubbles across the surface when you lift the whisk. Set aside.
Heat olive oil in a 10-inch cast iron skillet over medium. Add red onion and cook 2 to 3 minutes until it goes soft and translucent. Spinach in — stir until wilted, which takes about 1 minute. It’ll look like a lot of spinach going in and very little coming out. That’s fine. Scatter the cherry tomatoes in and stir briefly.
Spread the vegetables into an even layer. Pour the egg white mixture over everything — the edges will start setting immediately. Drop the goat cheese in small crumbles across the surface.
Oven for 14 to 16 minutes. Done when it’s slightly puffed and the center doesn’t move when you shake the pan. The edges should look golden and starting to pull away from the sides.
Three or four minutes to cool, then slice and serve with basil scattered over the top.
Nutritional Information (per serving, serves 4)
| Nutrient | Amount per Serving |
|---|---|
| Calories | 165 |
| Carbohydrates | 4g |
| Protein | 14g |
| Fat | 10g |
| Fiber | 1g |
| Sodium | 330mg |
Sweet Skillet French Toast with Berries
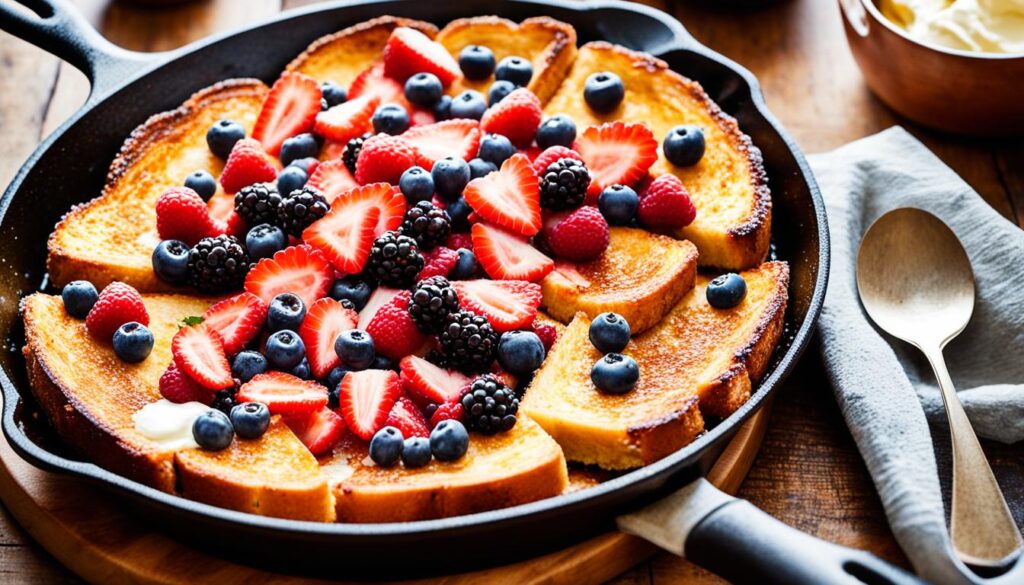
Every birthday in my house, this is what gets requested. Not cake — this. It looks like the kind of baked French toast you’d see at a bed-and-breakfast and assume required significant effort, but the whole thing takes about 35 minutes and most of that is oven time. Thick bread is the real secret. Thin sandwich bread turns into a wet, dense slab. Brioche or challah cubed up and soaked in the custard stays custardy in the center and gets a golden crust on top.
Ingredients
- 4 large eggs
- 3/4 cup whole milk
- 3 tbsp brown sugar
- 1 tsp vanilla extract
- 1/2 tsp cinnamon
- 1/4 tsp nutmeg
- 6 thick slices brioche or challah, cubed (about 5 cups)
- 2 tbsp unsalted butter
- 1 cup mixed berries — strawberries, blueberries, raspberries
- Powdered sugar and maple syrup for serving
Instructions
Oven to 375°F.
Whisk eggs, milk, brown sugar, vanilla, cinnamon, and nutmeg together until fully combined with no streaks. Add the bread cubes and press them down gently so they’re submerged in the custard. Walk away for 10 minutes. The bread should look saturated and heavy, significantly darker than it started, when it’s ready. If it still looks pale and dry in the center, press it down again and give it another 5 minutes.
Melt butter in a 10-inch cast iron skillet over medium. Swirl to coat the bottom and sides thoroughly. Pour the soaked bread in and press it gently into an even layer — don’t pack it too hard, you want some variation in height. Scatter the berries across the top.
Bake 22 to 25 minutes until the top is golden and the custard feels just set when you press the center firmly. Some of the berries will have burst and turned jammy and dark. Those are the best bites.
Powdered sugar and maple syrup to serve.
Nutritional Information (per serving, serves 4)
| Nutrient | Amount per Serving |
|---|---|
| Calories | 390 |
| Carbohydrates | 52g |
| Protein | 13g |
| Fat | 14g |
| Fiber | 2.5g |
| Sodium | 340mg |
Caprese Breakfast Skillet
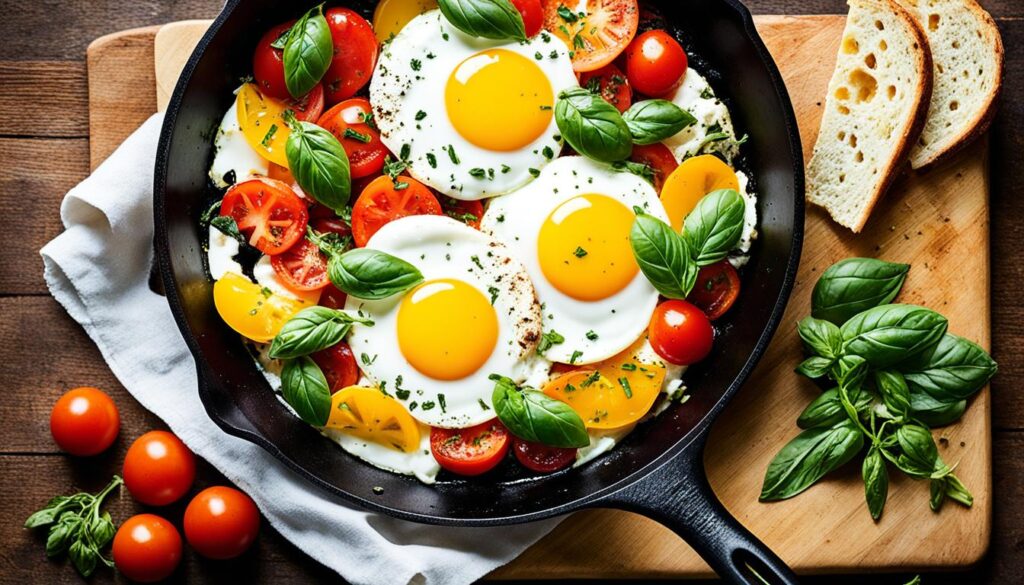
This is the August recipe. Good tomatoes — the kind that actually smell like tomatoes — fresh mozzarella, basil, and eggs. Under 15 minutes from skillet to table. It tastes like significantly more effort than it involves, which is my favorite kind of cooking.
The combination of a runny egg yolk breaking over warm fresh mozzarella and blistered tomatoes is one of those genuinely good food moments that’s hard to articulate without sounding excessive. But it’s there. Worth making just to find out if you agree.
Ingredients
- 4 large eggs
- 2 medium heirloom or beefsteak tomatoes, sliced 1/2-inch thick
- 4 oz fresh mozzarella, sliced
- 1/4 cup fresh basil leaves
- 2 tbsp olive oil
- 1 tbsp balsamic glaze
- Flaky sea salt and black pepper
- Red pepper flakes (optional, but recommended)
Instructions
Olive oil in a 10-inch cast iron skillet over medium. Add the tomato slices in a single layer — they should sizzle gently when they make contact with the oil. Two to three minutes without moving them. The undersides should blister slightly and the tomatoes will soften and start to slump. They’ll look glossy and a bit defeated. That’s right.
Lay mozzarella slices over and between the tomatoes. Make 4 small gaps between things and crack an egg into each gap. The eggs will partly sit on top of the tomatoes and mozzarella — that’s fine, they cook from the heat radiating off the surface below.
Lid on. Three to four minutes. Press a yolk gently with a fingertip — it should feel completely liquid and yielding. The whites should be fully set.
Off the heat. Basil leaves over everything. Balsamic glaze drizzled across the top. Flaky salt, black pepper, red pepper flakes if you want the heat. Serve from the skillet with bread for scooping.
Nutritional Information (per serving, serves 4)
| Nutrient | Amount per Serving |
|---|---|
| Calories | 240 |
| Carbohydrates | 6g |
| Protein | 14g |
| Fat | 18g |
| Fiber | 1g |
| Sodium | 310mg |
Tips for Perfect Cast Iron Skillet Eggs Every Time
Seasoning is important — but it’s the safety net, not the foundation. If eggs are sticking, check your temperature and fat usage first. You can fry a perfect, slidey egg on a minimally seasoned skillet with correct temperature and enough fat. You can also stick an egg to a beautifully seasoned heirloom pan if the temperature is wrong. Temperature is king. Seasoning is backup. In that order.
Beyond that, a few things I’ve learned by getting them wrong first:
Temperature is the most important variable and the one most people misjudge. Medium heat. Preheated 5 to 8 minutes — longer than you’d think, because cast iron edges lag behind the center for several minutes on a burner. High heat turns egg proteins rubbery before the outside even looks overdone, and produces those browned, lacy whites that taste slightly of rubber and regret. Medium is hotter than it sounds in a properly preheated cast iron skillet.
Use enough fat. A thin film isn’t enough for eggs. The fat should coat the entire cooking surface and come slightly up the sides of the white when the egg hits the pan. Butter, olive oil, bacon fat — all work. All need to be used in a real quantity, not a suggestion.
Don’t move them. Fried eggs, shakshuka eggs, hash eggs — leave them alone until they’re ready to move. Disturbing the white before it’s set tears it and compromises the yolk containment. The heat does the work. Let it.
The lid works — but only if it fits well. A tight-fitting lid traps enough steam to set the top of a fried egg in 2 minutes without any flipping. A loose, ill-fitting lid lets the steam escape and the result is uneven. Use the closest-fitting lid you have. I use the lid method probably 80% of the time now.
The pan stays hot. This catches people when cooking in batches. What works for the first two eggs overcooks the third because the skillet temperature keeps climbing. Pull the pan off the heat briefly between batches, or dial the burner back. Cast iron’s heat retention is the whole point — it’s also the thing that burns the second round if you forget about it.
Last thing. Eggs are more forgiving than people treat them. A slightly overdone yolk is still an egg. Don’t make yourself anxious about it at 7 AM.