Seniors with arthritis can stir-fry safely and comfortably by doing three things: swap the traditional wrist-flicking toss for a stirring-and-folding motion with a spatula, grab a lightweight skillet or wok under 2 to 3 lbs with a wide grippy handle, and pre-cut everything before the heat even goes on. That’s the whole formula, really. Traditional stir-fry technique relies on rapid, repeated wrist rotation — which happens to be exactly the motion arthritis makes hardest. So you change the motion. Not the dish.
Here’s the swap, laid out plain:
| Traditional Demand | Arthritis-Friendly Swap | Why It Works |
|---|---|---|
| Tossing/flicking the pan | Stir and fold with a spatula | No more repetitive wrist rotation |
| Heavy carbon steel wok | Lightweight nonstick skillet (1.3–2 lbs) | Less weight to wrestle around |
| Rushed last-minute chopping | Pre-cut everything first | No forceful knife work under time pressure |
| Constant high-heat monitoring | Smaller batches, calmer pace | Less standing, less reactive stress |
Table of Contents
- 1 Why Traditional Stir-Fry Technique Is Genuinely Hard on Arthritic Hands
- 2 The Core Technique Swaps That Make This Work
- 3 Choosing the Right Lightweight Skillet for Stir-Fry
- 4 The Best Lightweight Skillets for Stir-Fry Cooking
- 5 Two Healthy Stir-Fry Recipes, Adapted for Arthritic Hands
- 6 A Few More Things That Help While You’re Cooking
Why Traditional Stir-Fry Technique Is Genuinely Hard on Arthritic Hands
Real stir-fry — the kind you’d see in a restaurant kitchen — demands rapid, repeated tossing of a pan that’s usually heavy to begin with, all while gripping one handle with one hand over very high heat. That’s not one tough motion. That’s sustained grip strength, repetitive wrist flexion, and a lifting-jerking combo, all happening at once, over and over, for the entire cook time.
Honestly? It might be one of the more physically demanding standard home cooking techniques out there. Period.
And traditional woks don’t help. Carbon steel, cast iron — they’re heavy by design, built to hold and spread extreme heat. Which is exactly the opposite of what you want if you’re trying to take wrist load off the table. Add in the time pressure (everything’s moving fast, nothing waits for you) and you end up rushing your knife work too. Not great. Rushed chopping plus arthritic hands is a combination nobody needs.
But Stir-Fry Itself Isn’t the Problem
Here’s the thing — you don’t have to give up the dish. You adapt the technique.
Stir-fry has real appeal for this exact situation when you modify it right: it’s fast, it’s one pan, and it naturally piles on vegetables and lean protein without much effort. The dish is good. The traditional execution is what needs fixing. So that’s what the rest of this guide does — pan choice, motion substitution, prep strategy. All of it.
Quick, Honest Word on “Healthy” Here
Let’s be straight about what “healthy” actually means in this context. Stir-frying is a quick-cook method — and quick cooking tends to preserve more vitamins and texture in vegetables than boiling does. That’s just cooking science. It’s also a method that gives you full control over how much oil and sodium go in, since you’re not relying on a jarred sauce or a fryer.
What it does not mean: stir-fried meals don’t treat arthritis. No recipe here reduces flare-ups. If you’re making dietary changes specifically because of your arthritis, that’s a conversation for your doctor or a registered dietitian — not a cooking blog.
The Core Technique Swaps That Make This Work
Swap 1: Stir and Fold Instead of Toss
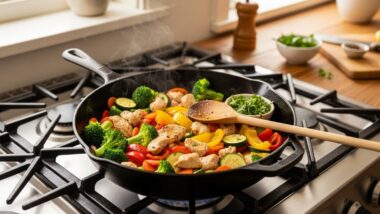
This is the big one. Instead of lifting and flicking the whole pan to keep food moving, you use a wide spatula or wooden spoon to push and fold ingredients from the outer edge toward the center.
Why does this matter so much? Because it shifts the work into your shoulder and forearm instead of your wrist. Same leverage principle behind those long-handled cleaning brushes — bigger muscles doing the job, smaller joints catching a break.

Here’s how it actually looks in practice: spatula goes in at the back of the pan, scoops under the food, folds it forward toward you, and you repeat that motion in a steady rotation around the pan. Not rapid back-and-forth flicking. Just a calm, deliberate fold-fold-fold.
And look — going slightly slower doesn’t ruin the dish. Most home stir-fry never needed restaurant-speed tossing in the first place. That speed is for show, mostly. And for huge commercial burners putting out way more heat than your stove ever will.
Swap 2: Get the Right Pan for This Specific Job
Pan weight matters more in stir-fry than almost any other cooking technique, because you’re actively manipulating the pan the whole time — not just letting it sit on the burner.
Here’s a fun little secret: a flat-bottomed lightweight skillet often works better than a traditional round-bottomed wok on a standard home stove anyway. Doesn’t matter if you have arthritis or not — round-bottomed woks are built for the intense, focused flame of a commercial wok burner, and most home stoves just can’t replicate that. So this isn’t really a compromise. It’s just… the better tool for your actual kitchen. Bonus: it’s also lighter.
Swap 3: Pre-Cut Everything Before the Pan Gets Hot
Traditional stir-fry’s whole vibe is “everything happens fast and you’d better be ready.” That’s a terrible environment for careful, controlled knife work. You end up rushing. Rushing plus arthritic hands plus a sharp knife is not where you want to be.
So don’t put yourself there. Do all your chopping, slicing, and portioning before the pan ever touches heat. At your own pace. No pressure, no clock running.
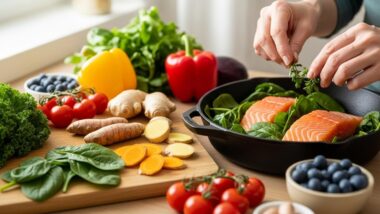
Lean on shortcuts without guilt: pre-cut stir-fry vegetable blends (fresh or frozen, both work fine), pre-sliced chicken or beef strips, jarred minced garlic and ginger. And organize everything into small bowls in the order you’ll use them — what cooking folks call mise en place. It sounds fancy. It’s really just “get your stuff ready first so you’re not reaching and fumbling once the pan’s hot.”
Swap 4: Smaller Batches, Slightly Lower Heat
Traditional stir-fry uses screaming-hot heat because everything’s cooking at once in a tiny window — which demands constant, fast motion to keep things from burning. That’s the whole reason the tossing is so frantic.
Cook smaller batches instead. Two rounds instead of one giant one. Moderately high heat instead of maximum. Yes, it takes a few extra minutes total. But the physical intensity per batch drops noticeably — less urgency, less frantic stirring, more breathing room. Worth the trade. Every time.
Swap 5: Use the Lid as a Strategic Shortcut
Here’s a move that isn’t “real” stir-fry technique but works great anyway: cover the pan partway through cooking — after an initial sear or quick stir — and let the lid do some of the work. Vegetables steam and soften with way less active stirring required from you.
Denser vegetables like broccoli or carrots benefit most from this. Quick-cooking stuff like snap peas or bean sprouts barely need it at all. Use your judgment based on what’s in the pan.
Choosing the Right Lightweight Skillet for Stir-Fry

Even the best technique modifications fall flat if the pan itself is heavy, badly balanced, or has a handle you can’t grip with confidence. The pan is the foundation here. Get it wrong, and none of the technique advice above matters much.
Look for a wide, flat cooking surface rather than a deep, narrow one — it gives your spatula room to actually work the fold motion without forcing weird wrist angles. And a good nonstick or well-seasoned surface cuts down the force needed to move food around, which directly supports that lower-effort stirring you’re aiming for.
What to Actually Look For
- Weight: under 2–3 lbs for a 12-inch pan is a fair target — same range you’d want for any arthritis-friendly skillet
- Handle: wide, contoured, silicone-wrapped, single-handle is fine here. A helper handle’s less useful for stir-fry since you’ve got a spatula in your other hand anyway
- Shape: a flat-bottomed skillet with gently flared sides beats a traditional round-bottomed wok on a home stove — supports the fold motion better, sits stable on your burner
- Surface: nonstick or hard-anodized aluminum cuts the force needed to move food; lightweight carbon steel works too if you don’t mind the seasoning upkeep
The Best Lightweight Skillets for Stir-Fry Cooking
GreenPan Valencia Pro Ceramic Nonstick Skillet
A hard-anodized aluminum skillet with a ceramic coating — wide and flat enough to support a real stir-and-fold motion without any awkward reaching.
- Weight: ~1.7 lbs (12″)
- Price: $50–$65
- Diamond-infused ceramic coating, PFAS-free and PTFE-free
- Wide, flat surface with gently flared sides
- Riveted, contoured stainless handle, oven-safe to 600°F
Pros: Excellent food release means less force needed during stirring. Wide surface gives your spatula full access, no cramped corners. PFAS-free coating, which matters to a lot of buyers.
Cons: Ceramic wears faster than PTFE — figure 2 to 3 years with frequent stir-fry use. Single handle only, though that’s genuinely fine for this technique.
Best for: Anyone who wants a versatile, health-conscious pan that handles stir-fry and basically everything else too.
Anolon Advanced Home Hard-Anodized Skillet
Slightly flared sides, built specifically with stirring and folding in mind.
- Weight: ~2 lbs (12″)
- Price: $35–$50
- Hard-anodized aluminum, durable nonstick interior
- Flared sides give food room to move without spilling over
- Silicone-wrapped riveted handle, dishwasher-safe
Pros: Those flared sides genuinely support the fold motion — ingredients have room to move without escaping the pan. Durable coating holds up to frequent stirring. Fair price for what you get.
Cons: A touch heavier than some others on this list, though still comfortably in range. No helper handle — not really an issue for one-handed stir-fry work, though.
Best for: Frequent stir-fry cooks who want something durable and built around the flared-side advantage specifically.
Carote Nonstick Wok-Style Skillet
Flat-bottomed but wok-shaped — mimics traditional wok cooking while staying light and compatible with your normal stove.
- Weight: ~1.8 lbs (12.5″)
- Price: $30–$45
- Wok-inspired shape, flat base, gently sloped sides
- Granite-derived nonstick coating, PFOA-free
- Wide handle, optional helper handle on larger sizes, induction compatible

Pros: Gives you that more traditional stir-fry feel while staying lightweight and stable on a flat-bottom stove. Way lighter than a real carbon steel or cast iron wok. Optional helper handle if you ever need the extra support moving a fuller pan.
Cons: Sloped sides need a slightly more careful spatula technique than a fully flat skillet. Coating may show wear patterns with frequent high-heat use over time.
Best for: Anyone who misses the traditional wok shape and wants a lighter, friendlier version of it.
T-fal Ultimate Hard Anodized Nonstick Skillet
Reliable, widely available, and it tells you when it’s actually ready to cook on — which matters more for stir-fry than you’d think.
- Weight: ~1.7 lbs (12″)
- Price: $35–$50
- Hard-anodized aluminum, Thermo-Spot heat indicator
- Silicone-wrapped handle, oven-safe to 400°F, dishwasher-safe
Pros: That Thermo-Spot indicator helps you avoid the classic stir-fry mistake — adding food before the pan’s hot enough, which makes everything steam instead of sear and forces you into more aggressive stirring to compensate. Silicone handle gives a secure grip during active stirring. Easy to find, easy to replace.
Cons: Standard PTFE coating, not ideal if you’re specifically chasing a PFAS-free option. Flatter sides than the Anolon or Carote — some people find that slightly less accommodating for bigger batches.
Best for: Anyone who wants clear confirmation the pan’s actually ready, plus a secure grip during stirring.
Made In Blue Carbon Steel Wok
For seniors who want the real deal — a genuine wok surface — and don’t mind a bit of extra upkeep to get there.
- Weight: ~2.5 lbs (12.5″, flat-bottomed version)
- Price: $90–$120
- Flat-bottomed carbon steel, compatible with home stoves
- Pre-seasoned, builds a natural patina over time
- Long riveted handle plus a small helper handle, oven-safe to 1,200°F
Pros: Authentic high-heat performance that traditional woks are actually known for. Noticeably lighter than a comparable cast iron wok. Gets better food release the more you cook on it.
Cons: Heaviest pick on this list, even though it’s still far lighter than cast iron. Needs seasoning maintenance and hand-washing — a small but real ongoing task. Reactive to acidic sauces until it’s properly broken in.

Best for: Seniors with mild to moderate symptoms who specifically want authentic wok performance and are willing to handle the seasoning routine for it.
Two Healthy Stir-Fry Recipes, Adapted for Arthritic Hands
One-Pan Chicken and Vegetable Stir-Fry
A familiar stir-fry, modified top to bottom: pre-cut ingredients, stir-and-fold motion, moderate heat instead of blazing.
- Cost: $10–$14 for 4 servings
- Time: 25 minutes
Ingredients:
- 1 lb pre-sliced chicken breast or thigh strips
- 2 tbsp vegetable or avocado oil
- 1 (16 oz) bag pre-cut stir-fry vegetable blend (fresh or frozen)
- 2 tsp jarred minced garlic
- 1 tsp jarred minced ginger
- 3 tbsp low-sodium soy sauce
- 1 tbsp rice vinegar
- 1 tsp cornstarch mixed with 1 tbsp water (optional, for a thicker glaze)
Instructions:
- Heat oil in a lightweight 12-inch nonstick skillet over medium-high — not maximum — heat.
- Add chicken strips in a single layer. Let it sear undisturbed for 2 minutes, then fold and turn with a spatula. No tossing.
- Cook 4–5 minutes, folding occasionally, until cooked through. Remove to a plate.
- Add the vegetable blend to the same skillet. Fold and stir gently for 3–4 minutes.
- Cover the skillet for 2 minutes — let the denser vegetables soften with minimal stirring from you.
- Add garlic, ginger, soy sauce, and rice vinegar. Stir once to combine.
- Return the chicken to the skillet. Add the cornstarch slurry if you want a thicker glaze. Fold gently for 1–2 minutes until everything’s heated through.
- Serve right from the skillet.
Pros: Almost no knife work if you’re using pre-cut ingredients. The cover-and-steam step cuts down stirring. Moderate heat means no urgency, no panic.
Cons: Takes a few minutes longer than the high-heat restaurant version. Folding still asks a little wrist engagement — just way, way less than tossing ever would.
Best for: Anyone who wants a familiar, complete stir-fry dinner using fully adapted, lower-strain technique.
One-Pan Shrimp and Snap Pea Stir-Fry
Fast. Light. Minimal stirring from start to finish.
- Cost: $12–$16 for 4 servings
- Time: 15 minutes
Ingredients:
- 1 lb frozen, pre-peeled and deveined shrimp, thawed
- 2 tbsp sesame or vegetable oil
- 2 cups fresh or frozen snap peas
- 1 cup pre-sliced bell pepper strips
- 2 tsp jarred minced garlic
- 2 tbsp low-sodium soy sauce
- 1 tsp honey
Instructions:
- Heat oil in a lightweight skillet over medium-high heat.
- Add snap peas and bell pepper. Fold and stir gently for 2–3 minutes.
- Push the vegetables to one side of the pan. Add shrimp to the open space.
- Cook the shrimp 2–3 minutes per side, until pink and opaque, folding occasionally rather than tossing.
- Add garlic, soy sauce, and honey. Fold everything together gently for 1 minute to combine and heat through.
- Serve immediately from the skillet.
Pros: One of the lowest-effort recipes you’ll find — minimal stirring the whole way through. No raw meat timing stress, since shrimp cooks fast and tells you when it’s done.
Cons: Shrimp moves quick and needs a little attentiveness so it doesn’t overcook.
Best for: Anyone who wants the fastest, lowest-wrist-engagement stir-fry option, period.
A Few More Things That Help While You’re Cooking
Setting Up Your Stovetop Right
Use a front burner at a comfortable reach — skip the back ones that make you lean or stretch. Keep your spatula and sauces within easy reach before you even start, so you’re not twisting or reaching mid-cook. And if standing the whole time bothers your hips or knees, an anti-fatigue mat or a stool nearby genuinely helps more than people expect.
Switch Hands, Take Breaks
Swap which hand holds the spatula every so often during longer sessions — spreads the fatigue instead of dumping it all on one side. And for bigger batches, lean on that two-round approach from earlier. It naturally builds in a little breathing room between rounds.
Asking for Help Isn’t Giving Up
For big batches or larger gatherings, prep solo at your own pace, then bring someone in for the active stirring part — especially on days when your joints just aren’t cooperating. That’s not a failure. That’s just a smart way to keep enjoying a meal you actually like making, without burning yourself out doing it the hard way every single time.