Adaptive cooking tools let seniors with arthritis continue using their beloved skillets by adding ergonomic grips, reducing weight strain, and providing stability aids that compensate for reduced hand strength and joint mobility.
Look. You don’t need to abandon that cast iron skillet your grandmother gave you. Or the copper pan you’ve been using for 30 years. What you need are the right tools to keep using them.
Understanding Adaptive Cooking Tools for Seniors with Arthritis
Adaptive cooking tools are specialized devices and modifications designed to reduce joint strain, improve grip, and make kitchen tasks manageable for people with arthritis—letting them continue cooking with the skillets they’ve always used.
What Are Adaptive Cooking Tools and Why They Matter for Skillet Use
Simple answer: they’re problem solvers.
Your hands don’t work like they used to. Gripping that skillet handle hurts. Lifting it from the cabinet makes your shoulders scream. Stirring for five minutes leaves your wrist throbbing. Adaptive tools fix these specific problems without requiring you to throw out your favorite cookware.
Here’s the thing—most people think arthritis means stopping activities you love. Wrong. It means adapting HOW you do those activities.
A silicone grip cover turns your too-thin pan handle into something your weakened hands can actually hold. A pan lifter lets you move that 8-pound cast iron skillet using two hands and proper body mechanics instead of one screaming wrist. A long-handled spatula means you’re not constantly bending over the stove aggravating your back and neck.
These tools bridge the gap between what your body can do now and what the cooking task requires.
How Arthritis Affects the Ability to Use Traditional Skillets
The problems stack up fast.
Grip strength drops. What used to be an easy handle-grab now requires conscious effort and concentration. Smooth metal handles slip. Thin handles dig into swollen knuckles. You’re fighting just to hold the pan, never mind actually cooking with it.
Wrist rotation becomes painful. Flipping eggs? Tossing vegetables? Those quick wrist flicks that made cooking easy are now sharp reminders that your joints are inflamed. Each twist sends pain shooting up your forearm.
Weight feels multiplied. A 3-pound skillet feels like 10 when you’re lifting it from a low cabinet. Your shoulders, elbows, and wrists all protest the load. And that’s before you add food to it.
Prolonged standing makes everything worse—your knees hurt, your hips ache, and fatigue sets in faster than it used to. Traditional cooking methods don’t account for these limitations.
The Connection Between Adaptive Tools and Independent Cooking
Independence matters. A lot.
Being able to make your own meals, use your own cookware, cook your favorite recipes—these aren’t small things. They’re dignity. They’re autonomy. They’re what keeps you feeling capable and confident.
Adaptive tools don’t solve arthritis. But they solve the cooking problems arthritis creates. That distinction matters because you’re not giving up or giving in—you’re adapting intelligently to maintain the activities that matter to you.
When you can still cook Sunday breakfast in your favorite skillet (with some grip aids and a helper handle), you’re not a person who can’t cook anymore. You’re a person who cooks smarter.
Essential Adaptive Tools for Lifting and Maneuvering Heavy Skillets
Pan handle grips, two-handed lifters, and clip-on helper handles are the three essential adaptive tools that make it possible to safely lift, carry, and maneuver heavy skillets despite reduced grip strength and joint pain.
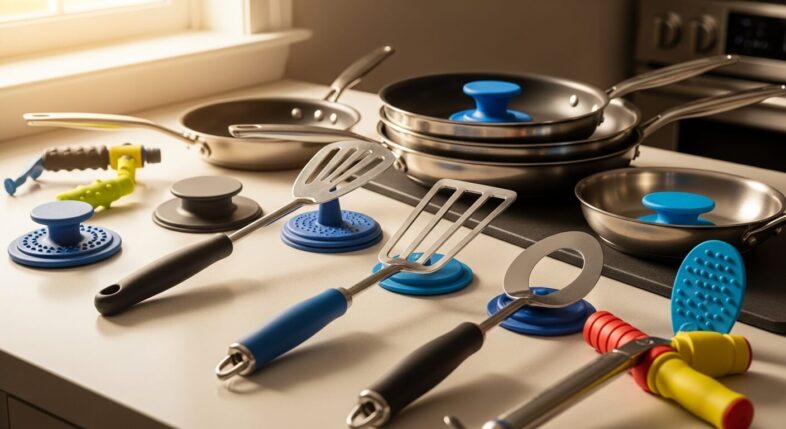
Pan Handle Grips and Cushioned Covers for Arthritic Hands
These are your first line of defense. Cheap, easy to install, immediately effective.
Silicone Pan Handle Grips
Slide-on silicone covers that turn skinny metal handles into fat, cushioned grips your hands can actually hold onto without pain.
The silicone is heat-resistant (usually up to 450°F), textured for better grip, and thick enough that your fingers aren’t wrapping into a tight fist (which aggravates knuckle joints). Instead of gripping hard, you’re just resting your hand around a cushioned surface.
What to look for:
1.5-2 inches in diameter when installed
Textured surface (ridges or dimples, not smooth)
Can withstand 400°F minimum
Easy slide-on installation (some require removing the pan handle—skip those)
Cost: $8-15 per grip. Worth every penny.
Some models have built-in hanging loops. Bonus feature if you’ve got wall storage—easier to grab pans from hooks when there’s a big silicone loop instead of trying to grasp a thin metal handle.
Heat-Resistant Padded Handle Covers
Thicker than basic silicone grips. These have actual padding inside—quilted fabric or silicone foam layers that cushion your palm while you’re holding hot pans.
They’re removable (usually Velcro or snap closures), which means you can wash them separately. Nice feature because handles get greasy, and washable covers beat permanent grips that trap grime.
Trade-offs:
Better cushioning = thicker = slightly harder to store in tight spaces
Fabric covers aren’t as heat-resistant (max 350-400°F typically)
Need regular washing
Can slip if not secured tightly
But for someone with severe hand arthritis? The extra padding is worth the minor inconveniences.
Universal Fit vs. Custom-Sized Handle Grips
Universal grips stretch to fit handles ranging from 0.75 to 1.5 inches in diameter. Sounds convenient. Sometimes is, sometimes isn’t.
Problems with universal fit:
Can rotate on the handle while you’re cooking (annoying and potentially dangerous)
Might be too loose on thin handles or too tight on thick ones
Custom-sized grips are better if you’re using the same 2-3 skillets regularly. Measure your handle diameter, buy grips specifically sized for that measurement. Tighter fit = better control = safer cooking.
Two-Handed Pan Lifters for Heavy Cast Iron Skillets
These change everything for people who love cast iron but can barely lift it anymore.
A two-handed lifter is essentially a wide gripper tool that clamps onto your skillet’s edges, giving you two handle points (one for each hand). Weight distribution improves dramatically—instead of one wrist taking all 8-10 pounds, you’re splitting it between both hands and using your core and legs to lift.
How Two-Handled Lifting Tools Distribute Weight
Basic physics. One handle = all weight goes through one arm, one wrist, one set of joints. Two handles = weight splits in half.
But it’s better than just halving the load. Two-handed lifting lets you position your body properly. You’re facing the pan straight on, bending at the knees (not the waist), using leg muscles to lift instead of arm and back muscles. Proper body mechanics reduce strain on every joint involved.
Your wrists stay neutral (not bent or twisted). Your shoulders stay in a natural position. Your back isn’t torqued sideways. All because you’ve got two contact points instead of one.
Best for:
Cast iron skillets 10 inches or larger
Moving pans from oven to stovetop
Transferring full skillets to sink for cleaning
Anyone with wrist, elbow, or shoulder arthritis
Adjustable Pan Lifters for Different Skillet Sizes
Get one that adjusts. Don’t buy fixed-size lifters for each pan you own—you’ll spend $100 and clutter up your drawers.
Adjustable lifters expand from about 8 inches to 14 inches, covering everything from a small omelet pan to your largest skillet. Spring-loaded or ratcheting mechanisms let you set the width, then lock it in place before lifting.
The gripping surfaces should be silicone or rubberized—something that won’t slip against the pan and won’t scratch your cookware. Metal-on-metal contact can damage non-stick coatings and leave marks on bare cast iron.
Cost runs $20-40 for decent adjustable lifters. High-end models ($50-70) include ergonomic handles with cushioned grips, which matters if your hands hurt while gripping the lifter itself.
Pan Helper Handles: Adding a Second Grip Point
Your 12-inch skillet has one long handle. Great for maneuverability, terrible for arthritis. What you need is that second handle most larger pans have—the little loop handle opposite the main one.
If your favorite skillet doesn’t have a helper handle? Add one.
Clip-On Helper Handles for Existing Skillets
These clip or clamp onto the rim of your skillet, creating an instant second handle. No permanent modifications, no drilling, no damage to your pan.
How they work:
Adjustable clamp or clip mechanism grabs the pan rim
The catch: they’re only as strong as the grip. If you’re lifting a fully-loaded pan and the clip slips, you’re dropping hot food and possibly burning yourself. Test the grip strength empty before trusting it with a full pan.
Position the helper handle directly opposite your main handle. This creates the best weight distribution and prevents twisting forces that might loosen the clip.
Magnetic Helper Handle Solutions
Newer tech. Rare but worth mentioning.
Magnetic helper handles use powerful rare-earth magnets to attach to metal pans (only works on magnetic metals—cast iron, carbon steel, some stainless). Way more secure than clips because there’s no mechanical failure point—either the magnet holds or it doesn’t, and quality magnetic handles hold strong.
Advantages:
Extremely secure attachment
Quick on/off (snap it on when you need it, remove for storage)
Won’t scratch or damage pan surfaces
Works on flat or curved surfaces
Limitations:
Only magnetic cookware (aluminum and copper are out)
Expensive ($40-80 per handle)
Handle heats up through magnetic contact (use pot holders)
Not for everyone, but if you’ve got cast iron skillets and the budget, magnetic helpers are sneaky good.
Adaptive Tools for Gripping and Holding Skillets Safely
Ergonomic spatulas with oversized handles, non-slip gripping gloves, and specialized tongs reduce the hand strength needed to manipulate food in skillets by 50-60% compared to traditional utensils.
Ergonomic Tongs and Spatulas Designed for Weak Grip Strength
Standard cooking utensils assume you’ve got normal hand strength and dexterity. You don’t. So standard utensils don’t work.
Large-Handle Spatulas for Reduced Hand Strain
Spatula handles should be fat. Really fat. 1.5 to 2 inches in diameter beats the standard 0.75-inch handles found on most spatulas.
Why? Your hand doesn’t have to close as tightly to grip a large handle. Open hand, loose grip, less joint stress. The thicker handle also distributes pressure across your entire palm instead of concentrating it in your finger joints.
Length of 12-14 inches to keep hands away from heat
Hanging holes or loops for storage without drawer-digging
OXO Good Grips line nails this. Their handles are oversized, cushioned, and designed specifically for people with grip limitations. Not cheap ($12-18 per utensil) but they actually work.
Weighted Cooking Utensils for Better Control
Seems counterintuitive. Heavier utensils for people with weak hands? But hear this out.
Light utensils require active muscle control—you’re constantly gripping and adjusting to keep them steady. Weighted utensils (typically 4-6 ounces, about 2-3x normal weight) use momentum and gravity to stay stable. Less active control required = less hand fatigue.
This works especially well for stirring and mixing. The weighted spoon plows through thick foods without requiring you to press hard. Your hand is just guiding direction—the weight does the work.
Best applications:
Stirring thick sauces or batters
Mixing ground meat in a skillet
Scraping fond from pan bottoms
Not ideal for delicate tasks like flipping eggs or moving small pieces of food. Too heavy, too clumsy.
Jar Openers Adapted for Pan Lid Removal
That rubber disc you use to open stubborn jar lids? Works on pan lids too.
Tight-fitting lids create suction as contents cool. Your arthritic fingers can’t generate enough friction or force to break the seal. A jar opener—circular rubber pad with textured grip surface—gives you the friction you need without requiring death-grip strength.
Place the opener over the lid knob or handle, press down, twist. The rubber grabs where your skin would slip. Works on glass lids, metal lids, any lid with a handle your hand can’t grip properly.
Cost: $5-10. Keep one in your utensil drawer specifically for this purpose.
Non-Slip Gripping Aids for Smooth Pan Handles
Grip-Enhancing Gloves and Mitts
Not oven mitts. These are thin, flexible gloves with rubberized palms and fingers—think gardening gloves but designed for kitchen use.
The textured rubber coating gives you aggressive grip on smooth metal handles. What would normally slip out of your weak grasp suddenly stays put because friction’s doing the work instead of muscle strength.
Choose gloves that:
Fit snugly (loose gloves bunch up and reduce dexterity)
Have rubberized coating only on palm and inner fingers (backs can be fabric for breathability)
Are heat-resistant to at least 350°F
Are machine washable
Wear them any time you’re handling pans. The constant stable grip reduces anxiety about dropping things, which means you’re cooking more relaxed instead of tensed up (which aggravates arthritis symptoms).
Rubberized Shelf Liner as an Adaptive Tool
That grippy mesh stuff you put in cabinets to keep dishes from sliding? Cut a small square, keep it by the stove.
When you need to grip a slippery handle, wrap the liner around it. Instant friction. It’s heat-resistant (to a point—don’t let it touch the pan body near the stove), washable, and costs maybe $8 for a 10-foot roll that’ll last years.
Not elegant. Very effective.
Adaptive Cooking Tools That Reduce Reaching and Bending
Long-handled grabber tools and pull-out shelf retrofits eliminate 90% of the painful bending and reaching required to access skillets stored in lower cabinets.
Pan Retrieval Tools for Lower Cabinet Access
Squatting to dig through a lower cabinet? That’s not happening anymore. Not without significant pain.
Long-Handled Grabber Tools for Kitchen Use
Reacher-grabbers aren’t just for picking up dropped items. They’re for extracting pans from cabinets without bending.
A 32-inch reacher lets you stand upright while reaching into a base cabinet. The pincer end grabs the pan handle (or a helper handle if you’ve added one), and you pull it toward you. No squatting, no kneeling, no back strain.
Kitchen-specific features to look for:
Rubberized or silicone gripper tips (better hold on smooth metal)
Locking mechanism to maintain grip while lifting
Magnetic tip option (grabs cast iron pans securely)
Weight capacity of at least 5 pounds
Restaurant supply stores sell heavy-duty reachers designed for kitchen environments. They’re built tougher than medical reachers (which are meant for picking up lightweight objects, not heavy cookware).
Cost: $15-30 for basic models, $40-60 for heavy-duty versions.
Pull-Out Shelf Retrofit Kits as Adaptive Solutions
If you’re serious about keeping your favorite skillets accessible, retrofit your base cabinets with pull-out shelves. This is a one-time investment that pays off every single day.
Pull-out shelves bring the back of the cabinet to you. No reaching, no digging, no forgetting what you own because it’s buried in a dark corner. Pull the shelf, grab the pan, done.
Installation options:
DIY kits with pre-assembled slides ($50-100 per cabinet)
Custom-built pull-outs from a carpenter ($150-300 per cabinet)
Pre-made drawer systems that fit standard cabinet sizes ($80-150)
Get full-extension slides rated for 75-100 pounds. Your pans are heavy—cheap slides will fail.
Countertop Pan Organizers at Accessible Heights
Why store pans in cabinets at all? If you’re using them daily, keep them on the counter where you can grab them without any bending or reaching.
Tiered Pan Stands for Counter Storage
Vertical organizers that hold 3-5 pans standing on edge, each in its own slot. They sit on your counter taking up maybe 18 inches of space but saving you dozens of painful cabinet-access moments every week.
The tiers are angled—front slots lower, back slots higher. You can see every pan at a glance and pull out what you need without moving others.
Sizing considerations:
Measure your most-used pans before buying
Allow extra width for handles (handles stick out sideways)
Check weight capacity—some decorative organizers aren’t built for cast iron
Bamboo organizers look nice but can be flimsy. Stainless steel or heavy plastic holds up better to daily use and actual weight.
Wall-Mounted Pan Racks Within Easy Reach
Mount a pot rack on the wall at 36-40 inches from the floor. This puts hanging pans at perfect grab-height—no reaching up, no bending down.
S-hooks hold the pans by their handles. Look for hooks with rubber coating or silicone tips so pans don’t slip off. Arrange your most-used skillets at the front for easiest access.
Wall studs required. Don’t trust drywall anchors alone—a rack full of cast iron weighs 30+ pounds. Find studs, use lag bolts, mount it properly.
Skillet Stabilization Tools for Seniors with Tremors or Weakness
Non-slip silicone mats and suction-base stabilizers keep skillets from sliding on counters or stovetops, compensating for hand tremors and reduced control that make cooking with traditional pans dangerous.
Non-Slip Pan Stabilizers and Grip Mats
Ever had a pan slide across your cooktop while you’re trying to stir? Terrifying when your hands are already shaky.
How Silicone Trivets Double as Stabilizers
Thick silicone trivets (the ones with raised nubs or ridges) serve double duty. They protect your counters from heat AND they keep hot pans from sliding when you set them down.
The silicone grips both the counter below and the pan bottom above. Creating a stable platform for pans that might otherwise shift when you’re stirring, pouring, or transferring food out.
Key features:
At least 0.5 inches thick (thinner ones slide)
Textured on both sides (top and bottom)
Heat-resistant to 500°F minimum
Large enough for your biggest skillet (12+ inches)
Keep one by the stove as a permanent landing pad. Every time you pick up that skillet, you’ve got a reliable spot to set it back down without worrying about slipping.
Dycem Non-Slip Mats for Stovetop Use
Dycem is medical-grade non-slip material. Originally designed to stabilize items for people with tremors and coordination issues. Works brilliantly in the kitchen.
It’s a thin rubber-like mat (about 1/8 inch thick) that creates unreal friction. Place it under your skillet on the counter and that pan is NOT moving. You can stir aggressively, press down hard while scraping—the skillet stays put.
Important limitations:
Not heat-resistant (don’t use directly on stovetops while cooking)
Use on counter for prep work or cooling finished dishes
Wash with soap and water when it gets greasy (grip diminishes with oil)
Small sheets (8×10 inches) cost $15-20. Cut them to size for different pans. They last years if you maintain them properly.
One-Handed Cooking Aids for Skillet Management
Some people only have one functional hand (stroke, injury, severe arthritis affecting one side more than the other). Traditional cooking assumes two working hands.
Pan Holders That Secure Skillets During Stirring
These clamp onto your counter edge, creating a stable bracket that holds your skillet in place. You set the pan in the bracket, tighten the clamp, and now you can stir, flip, or season using just one hand because the pan can’t move.
Adjustable arms accommodate different pan sizes. Silicone-lined grips prevent scratching. The whole apparatus swivels so you can angle the pan however you need it.
Best uses:
Scrambling eggs one-handed
Browning ground meat while seasoning
Stir-frying when you can’t hold the pan and stir simultaneously
Not cheap—$60-100 for quality models. But if you’re genuinely cooking one-handed, they’re worth it.
Suction-Base Cutting Boards and Their Application to Cooking
Suction-base cutting boards stick to your counter so you can chop vegetables one-handed. Same technology works for stabilizing mixing bowls while you’re stirring.
Some creative cooks use these with skillets. Place the pan on a large suction-base board positioned on the counter. The board’s suction holds it stable while you work. Not ideal for stovetop cooking (board isn’t heat-resistant) but works for prep tasks like seasoning meat in the skillet before cooking.
More of a workaround than a purpose-built solution, but when you’re adapting, you use what works.
Adaptive Tools for Pouring and Transferring from Skillets
Clip-on pouring spouts, extended-handle ladles, and silicone straining clips let you pour liquids and serve food from heavy skillets without the wrist-twisting and tipping motions that aggravate arthritis.
Batter Pouring Aids and Ladles with Extended Handles
Pouring pancake batter from a mixing bowl into a hot skillet requires wrist control and steadiness. Extended-handle ladles give you leverage—less wrist rotation required, better control even with shaky hands.
Look for ladles with 12-15 inch handles (standard is 8-10 inches). The extra length means you’re not leaning over the hot pan, and the extended leverage multiplies your limited wrist strength.
Angled ladle bowls help too. A 45-degree angle between handle and bowl means your wrist stays straighter while pouring. Less bending = less pain.
Pan Pouring Spouts and Straining Attachments
Your skillet doesn’t have a pouring spout. Most don’t. Which means pouring off grease or liquids requires tipping the whole pan at an awkward angle.
Clip-On Spouts for Skillets Without Pouring Lips
Small silicone spouts that clip onto your pan rim. They create a defined pouring channel so liquids flow in a controlled stream instead of dribbling down the outside of the pan.
How they work:
Flexible silicone body conforms to pan rim
Clip or spring mechanism holds it in place
Spouted end extends 2-3 inches beyond rim
Heat-resistant to 450°F
Set it up before you start cooking. When you need to pour off excess grease from sautéed meat or drain liquid from vegetables, the spout’s already in position. No awkward maneuvering with a hot, heavy pan.
Cost: $8-12. Get two so you always have a clean one ready.
Silicone Straining Clips for One-Handed Draining
These clip onto your pan rim and function like a colander. The silicone body has perforations—you tip the pan, the liquid drains through the holes, the solid food stays inside.
Perfect for draining canned vegetables you’ve heated in a skillet, removing excess liquid from sautéed mushrooms, or pouring off fat from cooked ground beef. All without transferring to a separate colander (which means one less heavy item to lift and one less dish to wash).
One-handed operation is the key benefit. Set the clip, hold the pan with your stronger hand, tip carefully over the sink. Done.
Lightweight Serving Utensils for Transferring Food from Skillets
Standard serving spoons are heavier than you think. When you’re making multiple portions, that weight adds up and your hand fatigues.
Aluminum or titanium serving utensils weigh 60-70% less than stainless steel. They’re sturdy enough for regular use but light enough that you can serve an entire meal without your hand cramping.
Look for models with oversized, cushioned handles (same principle as the spatulas mentioned earlier). Light weight + comfortable grip = you can actually finish serving without needing to rest halfway through.
Heat-Resistant Adaptive Tools for Safe Skillet Handling
Extended-cuff silicone oven mitts rated to 500°F and long-handled trivets prevent burns while providing the grip security and heat protection that seniors with reduced sensation or slower reaction times need when handling hot skillets.
Long-Handled Oven Mitts and Pot Holders
Standard oven mitts protect your hands. That’s it. Your wrists and forearms are exposed. When you’re lifting a heavy skillet at an awkward angle, hot metal can contact your wrists or arms.
Oven Mitts with Extended Cuff Protection
Get mitts with cuffs that extend 5-7 inches past your wrist. This covers your forearms up to mid-arm, protecting against accidental contact with hot pan sides or handles.
Other critical features:
Silicone exterior (better heat resistance than fabric, easier to clean)
Textured grip surface (prevents slipping)
Individual finger sections vs. mitten style (better dexterity)
Machine washable
Heat resistance to 500°F minimum
Thick padding matters. Thin mitts don’t provide enough insulation—you feel the heat through them, your hand starts hurting, you rush and make mistakes. Get mitts with at least 0.5 inches of padding.
Silicone Oven Mitts vs. Traditional Fabric Options
Silicone wins for arthritis. Here’s why.
Silicone advantages:
Waterproof (wet fabric conducts heat—dangerous)
Better grip on slippery metal handles
Easier to clean (wipe down or dishwasher)
Longer heat protection (doesn’t degrade like fabric)
Fabric advantages:
More flexible (easier to bend fingers)
Lighter weight
Better breathability (hands don’t sweat as much)
If your arthritis is severe and dexterity is really compromised, the flexibility of fabric mitts might matter more than silicone’s superior grip and heat protection. Try both if you can.
Heat-Resistant Trivets and Landing Pads
You need safe places to set hot pans. Multiple places. Positioned strategically around your cooking area so you’re never holding a hot skillet while hunting for somewhere to put it down.
Magnetic Trivets That Attach to Pan Bottoms
These are wild. Small magnetic discs (2-3 inches diameter) that stick to the bottom of your cast iron skillet. When you set the pan down on your counter, the magnetic disc is between the hot metal and your counter surface. Built-in trivet that’s always there when you need it.
Benefits: never searching for a trivet, never accidentally setting a hot pan on bare counter, no cluttering up your workspace with separate trivets you have to move around.
Downside: only works on magnetic cookware, adds slight height to pan (can affect storage), and costs more than regular trivets ($20-30 per set).
Expandable Trivets for Various Skillet Sizes
Adjustable trivets that expand from 6 inches to 12+ inches. Accordion-style folding or sliding panel design that contracts for small pans and expands for large ones.
Means you only need one or two trivets instead of a collection sized for different pans. Less stuff cluttering your drawers and counter.
Silicone or coated metal construction. Silicone is lighter and grips the counter better (won’t slide). Metal is more durable and handles higher temperatures. Pick based on your priority.
Adaptive Utensils Specifically for Skillet Cooking
Vertical-grip utensils and angled spatulas reduce wrist deviation by up to 70%, letting seniors with severe hand arthritis continue cooking in skillets with dramatically less joint pain during stirring, flipping, and serving.
Angled Spatulas for Reduced Wrist Rotation
Standard spatulas have handles in line with the blade. This means your wrist bends up (dorsiflexion) when you’re sliding the spatula under food. That upward bend is painful with arthritis.
Angled spatulas have handles offset 30-45 degrees from the blade. Your wrist stays neutral (straight) while the blade does its job. Less bend = less pain.
Best for:
Flipping eggs, pancakes, burgers
Scraping fond from pan bottoms
Transferring delicate fish fillets
The angle takes some getting used to. Your brain expects the traditional motion. Give it a few cooking sessions—the reduced wrist pain is worth the adjustment period.
Vertical-Grip Cooking Utensils
These turn the entire utensil concept sideways. Instead of a handle you grip horizontally (like holding a pencil), vertical-grip utensils have handles you grip like a stamp or a cane.
How Vertical Handles Reduce Joint Strain
Your hand stays in a natural, relaxed position—similar to how it hangs at your side. No gripping, no finger curling, minimal joint flexion.
The utensil extends downward from your fist. Stirring motions come from shoulder and elbow movement instead of wrist and finger movement. This shifts the work from small, arthritic joints to larger joints that can handle it better.
Adaptive Stirring Spoons with Ergonomic Designs
Ball-handle spoons are common in adaptive utensil lines. The handle ends in a spherical grip (like a doorknob). Your entire palm wraps around it—way more comfortable than gripping a thin cylindrical handle.
Some models have D-shaped handles (like the letter D). Your four fingers go through the loop, thumb rests on top. Again, shifting the grip work from fingers to palm and thumb.
Where to find these:
Occupational therapy supply catalogs
Adaptive equipment retailers (Sammons Preston, North Coast Medical)
Sometimes in pharmacy sections of major retailers
They’re not always labeled as “skillet utensils”—look for “adaptive dining utensils” or “arthritis kitchen tools.”
Extended-Handle Utensils for Safer Reach
Longer handles keep your hands farther from heat. Standard utensils are 10-12 inches. Extended versions run 14-16 inches.
The extra 4 inches matters when you’ve got slower reaction time or reduced sensation. If your hand drifts toward the hot pan or steam, you’ve got more margin for error before you get burned.
Also useful if you’re cooking seated (standing is too painful). The extra reach compensates for the different angle and distance to the cooktop.
Tools That Make Cleaning Skillets Easier with Arthritis
Electric scrubbing brushes and long-handled dish wands eliminate the repetitive circular scrubbing motions that make cleaning cast iron skillets agonizing for arthritic hands—reducing cleaning time and effort by 75%.
Long-Handled Dish Brushes and Scrubbers
Standard dish sponges require you to lean over the sink with your hand in hot water, scrubbing in circles. Every motion hurts.
Dish Wands with Built-In Soap Dispensers
These are simple brilliance. A handled brush with a hollow reservoir that holds dish soap. Press a button, soap dispenses through the bristles directly onto your pan. No juggling soap bottle and sponge.
The 12-14 inch handle keeps your hand out of the water and away from steam. You’re standing more upright (better for your back) and your hand stays dry (better for your skin—arthritis and skin problems often go together).
Replaceable brush heads mean you’re not throwing away the whole unit when bristles wear out. $10-15 initial cost, $5-7 for replacement heads.
Electric Scrubbing Brushes for Effortless Cleaning
Battery-powered rotary brushes do the circular scrubbing motion for you. Hold the brush against the pan surface, trigger it, guide it around. The motor does the work your hand can’t.
Key features to look for:
Waterproof design (obviously)
Multiple brush head options (soft for non-stick, firm for cast iron, abrasive for baked-on crud)
Ergonomic handle with cushioned grip
Rechargeable battery (buying batteries constantly is annoying)
Cost: $20-40 for basic models, $60-80 for premium versions with better motors and more accessories.
These aren’t toys. They generate real scrubbing power—enough to clean seasoned cast iron without harsh chemicals or extensive elbow grease you don’t have.
Pan Cleaning Tools That Eliminate Grip Requirements
Push-Style Pan Scrapers
Flat plastic or silicone scrapers with a handle perpendicular to the blade. Instead of gripping and pulling, you push down and forward. Uses palm pressure instead of finger grip.
Great for scraping stuck-on bits from skillet bottoms. The pushing motion lets you use your body weight—lean into it slightly and let gravity help instead of relying purely on hand strength.
Curved blade options match pan curvature, making it easier to get in the rounded corners where food tends to stick.
Chainmail Scrubbers with Handle Attachments
Chainmail scrubbers are fantastic for cast iron—they remove stuck food without damaging seasoning. But holding a small square of chainmail and scrubbing requires serious grip strength.
Solution: chainmail scrubbers with handle attachments. The mail is sewn into a holder with a loop handle. Hook your fingers through the loop (no tight gripping required) and scrub. Or get models with a 6-inch wooden handle—even easier.
Adaptive Drying Tools and Drain Racks
Drying heavy skillets requires lifting them from sink to dish rack or drying them by hand. Both are problematic.
Air-drying racks that mount directly over your sink give you a place to set clean pans without lifting them very far. Wash in the sink, lift 6 inches, set on rack. Way better than lifting all the way to a counter-height dish rack.
If you’re hand-drying (required for cast iron to prevent rust), use a large, highly absorbent towel and a patting motion instead of rubbing. Patting uses less wrist rotation and grip strength.
Modifications to Favorite Skillets: Making Them More Arthritis-Friendly
Adding silicone handle covers and permanent helper handles to your existing skillets costs $15-40 per pan but can extend your ability to use beloved cookware for years despite progressing arthritis.
Adding Aftermarket Handles to Beloved Cast Iron Skillets
That 50-year-old cast iron skillet doesn’t need to retire. It needs better handles.
Detachable Silicone Handle Covers
Slide-on covers we discussed earlier. But let’s talk about making them semi-permanent.
If you’ve found grips that work perfectly for you, consider securing them more permanently. A small amount of food-safe silicone adhesive at the handle base prevents the grip from sliding or rotating. You can still remove them if needed (adhesive peels off with effort), but they won’t shift during normal use.
Test fit before adhering. Make sure the grip is positioned exactly where you want it and that it doesn’t interfere with helper handles or hanging holes.
Permanent Handle Replacement Options
For seriously dedicated cast iron users: handle replacement is possible. Not easy, not cheap, but possible.
Metalworking shops can remove your existing handle and weld on a new one. You could add a loop-style helper handle to a skillet that never had one. Or replace a straight handle with a curved one that provides better grip.
Costs and considerations:
Professional welding: $75-150 depending on complexity
Will affect pan’s value if it’s vintage or collectible
Welding can affect seasoning near the handle area (requires re-seasoning)
Make sure the shop has experience with cast iron (wrong heat can crack the pan)
Only worth it for truly irreplaceable pans with sentimental or functional value you can’t get elsewhere.
Reducing Skillet Weight Through Material Substitutions
You can’t make cast iron lighter. Physics doesn’t bend for arthritis. But you can replace cast iron with lighter alternatives that cook similarly.
Weight comparisons (12-inch skillets):
Cast iron: 8-9 pounds
Carbon steel: 5-6 pounds
Hard-anodized aluminum: 2.5-3 pounds
Ceramic-coated: 2-3 pounds
Carbon steel develops a natural non-stick patina like cast iron, requires similar maintenance, and weighs 40% less. If you’re willing to learn slightly different cooking techniques, carbon steel can replace cast iron for most applications.
Hard-anodized aluminum is the lightest option that still provides decent heat distribution and durability. Won’t last as long as cast iron (nothing does), but it’ll give you years of use and your wrists won’t hate you.
Custom Handle Extensions and Modifications
Sometimes the problem isn’t the handle material or thickness—it’s the length. Short handles don’t give you leverage. Long handles provide better mechanical advantage.
Wooden or polymer extensions can be attached to existing handles using set screws or clamps. These extend the handle by 3-5 inches, improving leverage significantly.
DIY option: Wood handle extensions from hardware stores. Get a short section of wooden dowel (1.5-2 inches diameter), drill a hole lengthwise through it, slide it over your existing handle, secure with a set screw through the side. Total cost: $10-15. Total time: 30 minutes if you have basic tools.
Professional option: Machine shops can fabricate custom handle extensions from stainless steel or titanium. Beautiful, durable, and expensive ($100+).
Adaptive Storage Solutions That Complement Cooking Tools
Lazy Susan corner cabinet organizers and pull-down shelving systems bring stored skillets within reach without requiring the bending, twisting, or overhead reaching that makes traditional storage inaccessible for people with arthritis.
Vertical Pan Organizers with Easy-Grip Handles
Vertical file-style organizers keep skillets standing on edge. We’ve mentioned these before for counter storage—they work in cabinets too.
The difference: cabinet versions often have a handle at the top. Pull the whole organizer forward (like a drawer), then select your pan. No reaching to the back of the cabinet.
Some models have individual pullout sections—each pan slot pulls out independently. Even better control and accessibility, but more expensive and requires more cabinet height.
Lazy Susan Systems for Corner Cabinet Access
Corner cabinets are terrible. Deep, dark, and requiring you to twist and reach simultaneously to access anything past the front 6 inches.
Lazy Susans solve this. Everything rotates to you. No reaching, no twisting, no excavating past items you don’t need.
Two-tier systems work best for skillets:
Bottom tier: largest, heaviest pans (they’re most stable at the bottom and you’re not lifting them as high)
Top tier: lighter pans and lids
Full-rotation bearings matter. Cheap lazy Susans with plastic bearings bind up when weighted with heavy cookware. Ball-bearing systems handle the weight smoothly.
Pull-Down Cabinet Shelving Systems
Upper cabinets require reaching overhead. Pull-down systems bring the shelf down to counter height at the press of a button or pull of a handle.
These are premium solutions ($300-600 per cabinet) but they’re legitimate accessibility aids if overhead reaching is impossible. Originally designed for wheelchair users, they work for anyone who can’t reach standard upper cabinets.
Motorized versions are easiest—press a button, shelf descends. Spring-assisted manual versions cost less but require some arm strength to operate.
Electric and Powered Adaptive Cooking Tools for Skillet Use
Induction cooktops with auto-shutoff sensors and temperature monitoring systems eliminate the constant manual adjustment and safety vigilance required with traditional stoves—critical features when arthritis causes fatigue or medications affect cognitive sharpness.
Electric Cooktops with Auto-Shutoff Features
Forgetting you’ve got a skillet on the stove becomes more common as you age—especially when pain and fatigue dominate your attention.
Auto-shutoff electric cooktops detect inactivity. No motion near the stove for 5 minutes? Burner shuts off automatically. Prevents fires, prevents ruined pans, prevents disasters.
Some models use motion sensors. Others use weight sensors (they detect when a pan is removed and shut off after a set time). The best use both.
Cost considerations:
Budget electric cooktops with auto-shutoff: $500-800
Mid-range with multiple safety features: $1000-1500
High-end with smartphone alerts: $2000+
Worth it? If you’ve ever left a burner on, yes. Absolutely yes.
Induction Burner Benefits for Seniors Using Adaptive Tools
Induction cooktops only heat the pan, not the burner surface. This matters for several reasons.
Safety advantages:
Touch the burner next to an active pan—it’s barely warm
Pan removed = burner shuts off within seconds
No open flames or glowing coils to confuse medication-affected perception
Spills don’t bake onto the surface (easier cleanup with arthritic hands)
Usability advantages:
Precise temperature control (matters for technique-dependent cooking)
Rapid heat response (compensates for slower reaction time)
Lightweight portable single-burner units available ($60-120)
The catch: your skillets must be magnetic. Cast iron works. Stainless steel works if it’s magnetic grade. Aluminum and copper don’t work unless they have magnetic bases.
Smart Temperature Monitors and Timers
Stick-on temperature monitors (small discs that adhere to your pan bottom) connect to smartphone apps. They alert you when temperature gets too high or too low.
Useful if your arthritis medications affect your attention span or if fatigue makes you forget what you’re doing. The timer reminds you. The temperature monitor catches problems before they become emergencies.
Features worth paying for:
Multiple temperature alerts (different foods need different temps)
Audible alarms (not just phone notifications—you might not have phone nearby)
Battery life of 6+ months
Water-resistant for cleanup
Cost: $30-60 per monitor. Buy 2-3 so you can monitor multiple pans if you’re cooking a complex meal.
Multi-Functional Adaptive Tools for Skillet Cooking
Combination tong-and-spatula tools reduce the number of utensils you need to grab, handle, and wash—cutting kitchen tasks by 30-40% when every motion matters because of arthritis pain.
All-in-One Utensil Sets with Interchangeable Heads
Modular systems where one handle works with multiple heads (spatula, spoon, tongs, whisk). Snap the head you need onto the handle, cook, remove it, snap on the next head.
Benefits: you only need to grip one handle style (find the perfect ergonomic handle and use it for everything). You’re storing and washing fewer separate pieces.
Drawbacks: the connection points can loosen over time, and if the handle breaks, all your utensils are useless until you replace it.
These exist. A spatula blade with spring-loaded tongs integrated into the design. Flip with the spatula, grip with the tongs. One utensil, two functions.
Perfect for tasks like flipping and transferring burgers, handling sausages, managing delicate fish fillets. Anything where you’d normally be switching between two utensils every 30 seconds.
The build quality matters. Cheap versions have weak springs or the two functions interfere with each other. Spend $20-30 for a good one instead of $8 for garbage.
Adjustable Cooking Utensils That Serve Multiple Purposes
Adjustable-angle spatulas that lock at different positions. One position for flipping eggs, another for scraping pan bottoms, a third for serving.
Variable-width tongs that adjust from 2 inches (picking up green beans) to 6 inches (grabbing a whole steak). One tool replacing three or four fixed-width options.
These save drawer space and reduce the number of tools you’re managing. Fewer tools = less decision fatigue when cooking = less stress on your already-taxed cognitive resources.
Adaptive Cutting and Prep Tools for Skillet Cooking
Rocker knives and one-handed choppers eliminate the repetitive up-down chopping motion that aggravates finger and wrist joints, letting you prep vegetables and meat for skillet cooking with 60% less joint strain.
Rocker Knives for One-Handed Chopping
Curved blade that rocks back and forth instead of requiring lifting and downward force. You press down on the handle (using your palm or whole forearm), rock forward, press, rock back. Repetitive but low-impact motion.
Best for:
Chopping vegetables for stir-fries
Mincing garlic and herbs
Cutting cooked meat into smaller pieces
Single-handle rockers work for most people. Double-handle versions (one handle on each end of the curved blade) provide even better leverage for people with severe hand weakness.
Food Choppers and Slicers That Reduce Hand Strain
Push-down choppers with spring-loaded mechanisms. Put your vegetables in the container, press the plunger, blades chop on the way down. Spring resets the mechanism. Press again. Repeat until food is chopped to desired size.
No knife skills required. No gripping. Just downward pressure from your palm—you can use your forearm or even lean your bodyweight on it if grip is severely limited.
Limitations:
Food comes out roughly chopped (not precision cuts)
Cleaning is tedious (blades have multiple parts)
Takes up counter and storage space
But if chopping vegetables is the barrier between you and cooking, these are worth the trade-offs.
Adaptive Cutting Boards with Corner Guards and Stabilizers
Boards with raised edges on two or three sides. Push your food against the edge while cutting—it can’t slide away. Compensates for reduced coordination or one-handed cutting.
Built-in stabilizers (rubber feet or suction cups) keep the board from sliding on the counter. Standard boards slide when you press down with a knife. Adaptive boards stay put.
Some models have stainless steel nails or spikes in one corner. Skewer your onion or potato on the spikes, then slice—the food stays secured. Genius for one-handed cooking.
Specialized Adaptive Tools for Different Types of Skillets
Cast iron requires different handling tools than non-stick or stainless steel—specialized handle covers, lifters, and cleaning tools designed for each cookware type prevent damage while accommodating arthritic limitations.
Tools Specifically for Cast Iron Skillet Management
Cast iron is heavy and requires specific care. Regular adaptive tools might not cut it.
Cast Iron Handle Covers and Helpers
Extra-thick silicone covers designed to handle the weight and heat of cast iron. Standard covers are 0.25-0.5 inches thick. Cast iron covers are 0.75-1 inch thick with reinforced stitching or molding.
They’re also longer—covering 8-10 inches of handle instead of 4-6. Distributes weight across more of your hand and wrist.
Helper handles for cast iron need to be rated for higher weight. Look for 15-20 pound capacity minimum (your 12-inch skillet is 8 pounds empty, 15-18 pounds when loaded with food).
Cast Iron Lifting Hooks
Heavy-duty hooks that slide under the skillet’s pouring spouts (those little corners on either side of the rim). Hook engages, you lift with two hands holding the hook handle.
Removes all stress from your wrists—the hook takes the weight, your hands just guide direction. Sort of like using pot holders but with mechanical advantage built in.
These are specialized tools ($30-50) but if cast iron is your primary cookware and you’re determined to keep using it, they’re worth investigating.
Adaptive Tools for Non-Stick Skillet Care
Non-stick coatings scratch easily. Metal tools damage them. So you need soft adaptive tools.
Silicone utensils exclusively. No metal, no sharp edges. This limits your options—fewer adaptive silicone tools exist compared to metal ones.
Look for silicone utensils with the same ergonomic handle features (large diameter, cushioned grip) as metal adaptive tools. They exist but you’ll pay more (silicone manufacturing with premium handles is more expensive).
Soft-bristle brushes for cleaning. The electric scrubbing brushes mentioned earlier need soft brush heads when used on non-stick. Hard bristles will scratch the coating.
Stainless Steel Skillet Accessories for Easier Handling
Stainless steel handles get hot. Really hot. Metal conducts heat better than other materials, so even handles that are supposedly “stay-cool” get warm during extended cooking.
Double up on handle protection. Silicone grip cover PLUS an oven mitt. Overkill for other skillets, necessary for stainless steel.
Stainless steel skillets often have helper handles built in (on quality models). If yours doesn’t, the clip-on helper handles work perfectly—stainless rims provide secure attachment points for clamps.
Wearable Adaptive Aids That Improve Skillet Handling
Compression gloves worn during cooking reduce hand swelling and joint pain by 30-50%, improving grip strength and dexterity enough to safely handle skillets for the duration of meal preparation.
Compression Gloves for Arthritis Relief While Cooking
Light compression increases blood flow, reduces swelling, and provides proprioceptive feedback (helps your brain know where your joints are—important for coordination).
Kitchen-specific considerations:
Get fingerless gloves (full-finger styles overheat)
Washable material (they’ll get food on them)
Non-slip palms and fingers if available
Copper-infused fabric if you’re willing to pay more (some people swear by copper’s anti-inflammatory properties)
Wear them while cooking. The compression supports your joints while you’re gripping handles, stirring, and maneuvering pans. Take them off when done—constant compression isn’t recommended.
Cost: $15-30 per pair. Buy two pairs so you can wear one while the other’s in the wash.
Wrist Braces and Supports for Kitchen Use
Standard wrist braces are too bulky for cooking. You need low-profile supports that fit under oven mitts and don’t interfere with utensil grip.
Elastic sleeves with minimal rigid components work best. They provide wrist stability without the bulk of traditional braces with metal stays and thick padding.
When to wear them:
If you’re having a bad arthritis day and need extra wrist support
When lifting heavy skillets or pots
During extended cooking sessions (2+ hours)
Don’t wear them constantly. Your wrist muscles need to work to stay functional. Braces are for support during high-stress tasks, not 24/7 use.
Finger Splints That Allow Continued Cooking
Ring splints stabilize individual finger joints (usually the middle or end joints that tend to hyperextend in arthritis). They keep joints aligned while still allowing enough movement to grip handles and utensils.
Custom-fitted splints work best but cost $150-300 per finger. Over-the-counter options run $20-40 and work adequately for many people.
You can cook wearing these. They’re low-profile enough that they don’t interfere with most tasks. Some people find they actually improve grip by preventing painful joint deviation.
Budget-Friendly Adaptive Cooking Tools and DIY Solutions
Household items like pool noodle handle covers (cut sections and slide over pan handles) and rubber jar grippers cost under $10 and provide 70-80% of the benefit of expensive adaptive equipment.
Household Items That Function as Adaptive Tools
You don’t need to buy everything. Some solutions are sitting in your garage or utility closet already.
Pool Noodles as Pan Handle Covers
Cut a 6-inch section of foam pool noodle. Slit it lengthwise. Slide it over your skillet handle. Instant cushioned grip for under $2.
It’s not heat-resistant (melts around 200°F), so don’t leave it on while cooking. But for grabbing pans from cabinets or moving cold skillets, it works perfectly.
Color-code your pans if you’ve got multiple sizes. Blue noodle on the 8-inch skillet, green on the 10-inch, yellow on the 12-inch. Silly but effective for quick identification.
Rubber Bands for Enhanced Grip
Wrap 5-6 thick rubber bands around a smooth pan handle. Creates a textured, grippy surface. Ugly but functional.
Replace them monthly (they degrade with heat exposure and washing). Costs essentially nothing—you probably have rubber bands in a drawer somewhere.
Better than nothing. Not as good as proper silicone grips. But free and immediate beats perfect and expensive when you’re cooking tonight and your handle’s slippery.
Low-Cost Commercial Adaptive Tools Under $20
Tool
Cost
Function
Where to Buy
Silicone pan handle grip
$8-12
Cushioned grip
Amazon, kitchen stores
Jar opener (multi-size)
$6-10
Lid removal
Grocery stores, pharmacies
Long-handled dish brush
$10-15
Easier pan cleaning
Hardware stores, kitchen stores
Non-slip drawer liner
$8-12 per 10ft roll
Stabilizing pans
Home improvement stores
Reacher-grabber (basic)
$12-18
Accessing lower cabinets
Pharmacies, medical supply stores
Start with these. They’ll solve 80% of your problems. Only invest in expensive tools if these basics aren’t enough.
When to Invest in Premium Adaptive Equipment
Premium tools make sense when:
Budget options have failed or broken
You’re cooking daily (frequent use justifies higher cost)
Your arthritis is severe (basic aids don’t provide enough assistance)
The tool addresses your specific primary limitation
Don’t buy a $60 electric scrubbing brush if you rarely cook foods that stick. Do buy it if you make cast iron cornbread twice a week and scrubbing is preventing you from doing so.
Priority spending: Tools you use every single cooking session (handle grips, primary utensils, pan lifters). Economy spending: Specialty tools for occasional tasks.
Choosing the Right Adaptive Cooking Tools for Your Specific Needs
Match adaptive tools to your primary arthritis symptoms—if grip is your main issue, prioritize handle modifications; if lifting is hardest, invest in pan lifters and lightweight alternatives; if standing causes the most pain, focus on seated cooking adaptations and organization solutions.
Assessing Your Arthritis Symptoms and Limitations
Be honest about what hurts most and what’s actually stopping you from cooking.
Primary limitation categories:
Grip strength: Can’t hold handles securely
Pain on pressure: Gripping hurts even if you can physically do it
Range of motion: Can’t reach cabinets, can’t rotate wrists
Endurance: Can cook for 10 minutes then must rest
Coordination: Shaky hands, dropping things
Identify your #1 limitation. Buy tools that address that first. Don’t scatter your budget across everything—focused solutions work better than trying to fix every problem at once.
Matching Adaptive Tools to Your Favorite Skillet Types
Cast iron requires different tools than non-stick. Don’t buy generic solutions.
Electric cleaning brushes (scrubbing cast iron is brutal for arthritic hands)
For non-stick pan users:
Soft-tip utensils exclusively
Gentle cleaning tools
Possibly lighter replacement pans (non-stick tends to be lighter anyway)
For stainless steel:
Extra heat protection for handles
Strong scrubbing tools (stainless steel can take aggressive cleaning)
Spouts and straining clips (stainless pans benefit from these more than other types)
Testing Tools Before Committing to Purchase
Many medical supply stores and occupational therapy offices have demo adaptive tools you can try before buying.
Ask to test:
Handle grip (does it actually feel better or just different?)
Weight distribution (does the tool legitimately reduce strain or is it marketing?)
Ease of cleaning (will you actually maintain this or will it sit unused because cleaning it is annoying?)
Amazon and similar retailers have good return policies. Order, test for a week, return if it doesn’t work. Yes, it’s technically abusing the system. But you need tools that work, not pretty things that sit in drawers.
Where to Purchase Adaptive Cooking Tools for Seniors with Arthritis
Medical supply retailers like Patterson Medical and Performance Health carry the widest selection of occupational therapy-approved adaptive kitchen tools, while Amazon and kitchen specialty stores offer budget-friendly options and quicker shipping for less specialized items.
Online Retailers Specializing in Adaptive Equipment
Patterson Medical / Sammons Preston: Industry standard for OT-approved tools. Professional-grade quality, higher prices, but everything’s been tested for actual use by people with disabilities. Not cheap thrills.
North Coast Medical: Similar to Patterson. Excellent selection, detailed product descriptions that actually explain who each tool helps and why.
MaxiAids: Broader disability aids but good kitchen section. Often has sales that make premium tools more affordable.
Amazon: Hit or miss quality, but huge selection and reviews help sort good from garbage. Buy tools with 100+ reviews and 4+ stars. Read the negative reviews to spot common problems.
Medical Supply Stores with Kitchen Aid Sections
Local medical supply stores let you handle tools before buying. Critical for something you’ll use daily.
Call ahead. Not all medical supply stores stock kitchen aids—some focus on mobility equipment and incontinence products. Ask specifically about adaptive kitchen tools and occupational therapy supplies.
Bring your most-used skillet when you visit (if you can carry it). Test handle grips on your actual cookware. Demo the tools with the pan you’ll actually be using them with.
Occupational Therapy Catalogs and Resources
If you’re seeing an OT for your arthritis, ask for catalog access. OTs have professional accounts with equipment suppliers and can sometimes order for you at discounted prices.
Therapy catalogs include detailed usage instructions and often list specific conditions each tool addresses. More educational than commercial catalogs (which just want to sell you stuff).
Occupational Therapy Recommendations for Adaptive Skillet Tools
Occupational therapists assess your specific arthritis limitations, cooking habits, and kitchen setup to recommend the 3-5 adaptive tools that will provide maximum benefit—typically handle modifications, one lifting aid, and one stabilization tool customized to your individual needs.
Working with an OT to Select Appropriate Tools
OTs don’t guess. They assess.
They’ll watch you cook (or simulate cooking tasks in their office), identify exactly where your mechanics break down, and prescribe specific tools to address those specific failures. Not general “these are good for arthritis” recommendations—precise “you hyperextend your third knuckle when gripping smooth handles, so you need XYZ grip modification” prescriptions.
What to bring to an OT eval:
Your favorite skillet (so they can assess with actual equipment)
List of meals you cook regularly
Description of your kitchen layout
Budget limitations (be honest)
Insurance sometimes covers OT consultations for arthritis. Check your benefits. Even one session can guide thousands of dollars of potential equipment purchases.
Joint Protection Techniques When Using Skillets
Tools help. Technique helps more.
Core principles:
Use larger joints instead of smaller ones (palm push instead of finger pull)
Two hands beat one hand (even if it’s slower)
Avoid sustained gripping (release and re-grip every 30 seconds)
Keep wrists neutral (no bending up, down, or sideways)
Let gravity help (slide don’t lift when possible)
Your OT will teach specific techniques for common tasks. Like using your hip to close a drawer instead of pulling with your hand. Or sliding a skillet onto a silicone mat instead of lifting and placing it.
Exercises to Maintain Cooking Ability Alongside Adaptive Tools
Adaptive tools let you cook now. Exercises help you keep cooking later.
Grip strengthening:
Stress ball squeezes (2 sets of 10, daily)
Clothespin squeezes with each finger
Therapy putty exercises
Range of motion:
Wrist circles (10 each direction, 3x daily)
Finger flexion/extension stretches
Forearm pronation/supination (palm up/palm down rotation)
Five minutes a day. Not intense workouts—gentle maintenance. The goal is preventing further loss of function, not building muscle.
Your OT can design a specific program based on which joints are most affected.
Combining Adaptive Tools with Technique Modifications
Adaptive tools work best when paired with cooking technique changes—using two hands for lifting, cooking in smaller batches, and choosing one-pan recipes reduces the cumulative strain that causes pain even with proper equipment.
Energy Conservation Methods for Skillet Cooking
You have limited energy. Arthritis is exhausting. Cooking with pain drains you faster. Conserve energy strategically.
Batch cooking: Make large quantities once instead of cooking daily. Freeze portions. Reheat as needed. One big cooking session (when you’re having a good day) beats seven small ones.
Sit while prepping: Cut vegetables, mix ingredients, organize your mise en place while seated. Stand only for the actual cooking that requires it.
Assemble ingredients first: Don’t cook while gathering supplies. Get everything ready, then start cooking. Fewer trips back and forth = less total standing and moving.
One-Pot Cooking Strategies That Reduce Tool Requirements
Fewer pans = less lifting, less cleaning, less tool management.
One-skillet meals: Sauté protein, remove it. Cook vegetables in the same skillet. Return protein. Add sauce. Serve. One pan, one spatula, done.
Sheet pan + cast iron combo: Roast vegetables on a sheet pan in the oven (no stirring required), sear meat in your skillet on the stovetop. Two pans, minimal handling of each.
Seated Cooking Techniques Using Adaptive Equipment
If standing is the primary barrier, cook seated.
Counter-height stool or chair positioned at your cooktop. Portable induction burner on a lower counter or table where you can comfortably reach while seated. Use long-handled utensils to compensate for different angle.
Your skillet work surface should be at elbow height when seated. Too high and you’re reaching up (shoulder strain). Too low and you’re hunching over (back and neck strain).
Maintaining and Caring for Adaptive Cooking Tools
Silicone grips and rubber stabilizers need weekly washing with hot soapy water to maintain friction—oil buildup reduces effectiveness by 60-70%, and most adaptive tool failures come from poor maintenance rather than actual wear.
Cleaning and Storage of Silicone and Rubber Grip Aids
Silicone and rubber attract oil and grime. When they’re greasy, they don’t grip. Basic maintenance keeps them functional.
Weekly cleaning:
Remove from handles
Wash in hot soapy water (dish soap works)
Scrub with brush to remove oils
Rinse thoroughly
Air dry completely before reinstalling
Monthly deep clean with baking soda paste (gets into textured surfaces). Quarterly inspection for cracks or tears—damaged grips are safety hazards.
Store grips on the handles. Taking them on and off repeatedly degrades them faster. If you must remove for storage, keep them in a drawer (not hanging where they stretch under their own weight).
When to Replace Worn Adaptive Equipment
Signs it’s time for new equipment:
Grips slide on handles during use
Rubber has become hard or cracked
Locking mechanisms on lifters don’t hold reliably
Cushioning has compressed flat
You’re compensating for tool failures instead of tool helping you
Don’t wait for catastrophic failure. Replace before something breaks while you’re holding a hot pan.
Budget for annual replacement of frequently-used items. Silicone grips: 12-18 months. Rubber stabilizers: 18-24 months. Mechanical lifters and grabbers: 2-3 years with normal use.
Preventing Cross-Contamination with Shared Adaptive Tools
If you’re using the same reacher-grabber to pull pans from cabinets and retrieve items from your pantry, you risk food cross-contamination.
Designate tools: cookware-only grabbers, food-only utensils, cleaning-only brushes. Color-coding works (red for meat, green for vegetables, etc.).
Wash tools after every cooking session that involves raw meat. Not just the utensils that touched food—also the handle grips and stabilizers. Bacteria transfer through handling.
Safety Considerations When Using Adaptive Cooking Tools with Skillets
Check adaptive tool heat ratings before using them near stovetops—most silicone grips withstand 400-450°F, but cheaper rubber and plastic options melt at 200°F, creating burn hazards and toxic fumes.
Ensuring Adaptive Tools Are Heat-Safe
Read temperature ratings. Always. Don’t assume.
Silicone typically handles 400-450°F. Rubber varies wildly (some 300°F, some 180°F). Plastic and foam (like pool noodles) melt at low temperatures—never use these on active cookware.
Test new tools with an empty pan on medium heat. Watch for 60 seconds. If the tool softens, deforms, or emits odor, it’s not heat-safe for cooking use.
Keep receipts and packaging with temperature specs. When memory fails (arthritis medications can affect cognition), refer back to documentation.
Weight Capacity Limits of Assistive Devices
Lifters, grabbers, and handles all have maximum weight ratings. Exceed them and they fail—usually at the worst possible moment.
Cast iron skillets when full can hit 15-20 pounds. Make sure your adaptive tools are rated for at least 20 pounds (build in safety margin).
Test tools with water weight before using with hot food. Fill your skillet with water to cooking weight, practice lifting with your adaptive tool. If it struggles or the mechanism strains, don’t use it for real cooking.
Proper Use of Adaptive Tools to Prevent Accidents
Tools aren’t magical. They require proper technique.
Two-handed lifters: Center the tool on the pan before lifting. Uneven weight distribution causes tilting and spilling.
Stabilizers: Place pan fully on the stabilizer before releasing. Setting pan partially on/off causes tipping.
Clip-on helpers: Check grip tightness before lifting. Give a gentle tug test (without food in the pan) before trusting it with a full load.
Adaptive Tools for Specific Skillet Cooking Tasks
Specialty tools like offset turners for flipping, push-style mashers for ground meat, and one-handed basting bulbs address specific cooking motions that standard adaptive utensils don’t accommodate.
Tools for Flipping Foods in Skillets
Flipping requires wrist rotation and quick movements—both problematic for arthritis.
Offset turners (fish spatulas) have the blade angled below the handle. Less wrist rotation required. The thin, flexible blade slides under delicate foods without breaking them.
Some people use two spatulas instead of one spatula and a flipping motion. Lift with one spatula, support with the second, rotate the food, set it back down. Slower but more controlled and way less painful.
Adaptive Aids for Stirring and Sautéing
Constant stirring motion kills arthritic wrists. Extended-handle spoons with vertical grips reduce this significantly (discussed earlier).
Electric stirring wands exist. Battery-powered devices with paddle or whisk attachments that stir for you. Originally designed for commercial kitchens and catering, but available for home use ($30-60).
Set them in the skillet, turn them on, and they stir continuously. You’re free to do other tasks or just stand there without actively moving your arms. Perfect for thick sauces that need constant stirring.
Specialized Tools for Deglazing and Sauce-Making
Deglazing requires scraping stuck bits from pan bottoms while liquids bubble—hot, splashy, and requiring downward pressure and scraping motion.
Long-handled, flat-bottomed wooden spatulas specifically for this. The flat blade covers more surface area (fewer scraping motions required), and the extended handle keeps your hands away from steam and splatters.
Alternatively, use your electric scrubbing brush (switched off) as a manual scraper. The rigid bristle head is perfect for deglazing—tougher than a regular spatula, safer than metal utensils on most surfaces.