Heart-healthy skillet cooking for seniors with arthritis using minimal oil comes down to three things working together: a quality nonstick or well-seasoned lightweight skillet that doesn’t demand a ton of oil for food release, a few simple techniques (broth-based sautéing, oil misting, that kind of thing) that cut added fat without torching the flavor, and the same low-effort, one-pan cooking principles already proven easier on arthritic hands. That’s the whole package.
Quick disclaimer before we go further, because it matters: reducing saturated fat and excess oil is genuinely recommended by mainstream health groups like the American Heart Association for cardiovascular health. That part’s solid. But individual heart-health needs vary a lot — especially if you’re on blood thinners, managing specific cholesterol numbers, or dealing with any heart condition your doctor’s already tracking. Talk to your doctor or a registered dietitian about what’s right for you specifically. This article gives you the general playbook. It’s not a substitute for that conversation.
Why Minimal-Oil Skillet Cooking Actually Matters for Your Heart
What the Real Guidance Says About Dietary Fat
Mainstream health guidance — the American Heart Association included — recommends limiting saturated fat and swapping it for unsaturated fat where you can. Olive oil instead of butter. That sort of thing. Nothing radical here.
And here’s an important distinction: this isn’t about cutting fat out entirely. It’s about portion control and smarter choices. Your body actually needs some fat — for nutrient absorption, for flavor, for satisfaction at the table. Nobody’s asking you to cook with water and hope for the best. The goal is using less, and using better fat when you do.
One more time, because it’s worth repeating: your specific situation matters here. If you’ve got a heart condition already being managed, or you’re on medication that affects fat metabolism, get personalized guidance from your doctor or a dietitian. This article’s giving you the general approach. Not your specific prescription.
Why Skillet Cooking Is Already a Step in the Right Direction
Think about it this way — pan cooking is already lower-fat than deep frying or drowning everything in a heavy sauce. That’s just baseline. The right equipment lets you push that further without sacrificing how the food actually turns out.
Here’s the real lever, though: most home cooks add way more oil than they need specifically to stop food from sticking. Not for flavor. For sticking. Which means a genuinely good nonstick or well-seasoned pan — like the kind covered in this breakdown of the best lightweight skillets built for seniors with arthritis — directly translates into less oil used, every single time you cook.
How This Connects to (and Stays Totally Separate From) Arthritis-Friendly Cooking
Let’s be clear about something. Heart-healthy, minimal-oil technique and arthritis-friendly ergonomics are two different goals. Related, sure — but different. Don’t mix them up.
Here’s where they overlap in practice, though: a lightweight nonstick skillet happens to serve both goals at once. Less oil needed for food release on one hand. Less physical effort to lift, tilt, and clean on the other. Two wins from one good pan purchase.
But say it plainly — minimal-oil cooking doesn’t treat or improve arthritis symptoms. It’s a heart-health habit. It just happens to pair naturally with the same ergonomic equipment this whole content series already points you toward, including the kind of low-strain stir-fry adjustments built specifically for arthritic hands, which use a lot of these same oil-saving habits without you even realizing it.
Here’s the thing nobody tells you: a properly preheated nonstick or well-seasoned pan needs way less oil than you think to prevent sticking. Most people just don’t trust the preheat.
Heat the empty pan first. Then add a measured amount — a teaspoon, not a free-pour — and tilt the pan to spread it thin across the surface. That’s it. That one habit change probably has the single biggest impact on how much oil you use across an entire week of cooking. Bigger than any fancy ingredient swap.
Technique 2: Ditch the Free-Pour, Use a Mister or Measured Spoon
Free-pouring oil straight from the bottle? That’s where most unintentional overuse happens. It’s genuinely hard to eyeball a small amount accurately. You think you’re using a teaspoon. You’re using three.
Get an oil mister — the manual pump kind, not an aerosol spray can — and you’ll lay down a thin, even layer using a fraction of the oil. And here’s a nice bonus for this specific audience: pump-style misters generally take less grip force than squeezing a bottle or wrestling a cap open and shut, over and over, meal after meal.
Technique 3: Build Flavor with Broth or Citrus, Not More Oil
Sear with your small amount of oil first. Then switch — finish the dish in broth, a splash of wine, or some citrus juice instead of reaching for more oil or butter.
This works especially well with the staged, sear-then-simmer cooking already recommended elsewhere in this series for arthritis-friendly technique — you can read more about that approach in this guide to one-pan skillet dinners built around minimizing physical strain. Same staging. Same low-effort structure. You’re just swapping what goes in the pan after the sear.
Technique 4: Trim the Fat Before It Hits the Pan, Not After
Trimming visible fat off meat before cooking cuts the saturated fat content way more effectively than trying to drain it out afterward. By then it’s already partly rendered into everything else in the pan.
Worth being honest here — trimming does require some knife work, and that’s a real, if brief, demand on arthritic hands. Do it during a calm moment, not rushed right before dinner. Or better yet, grab pre-trimmed cuts at the store. They’re more available than ever, and they skip this step almost entirely.
Technique 5: Pick Cooking Methods That Need Less Oil to Begin With
Not all skillet techniques are equal here. Searing and sautéing need the least oil. Pan-frying with breading needs more. Shallow frying needs the most, by a wide margin.
So favor searing, sautéing, and the steam-finish move — covering the pan partway through cooking — as your go-tos. They line up with minimal-oil goals and the lower-stirring, staged cooking that’s already easier on your joints. Two birds, one cooking method.
Choosing the Right Skillet for This Whole Approach
Why Pan Quality Decides How Little Oil You Can Actually Get Away With
Here’s a blunt truth: a worn-out, scratched-up nonstick surface forces you to use more oil no matter how good your technique is. Doesn’t matter how careful you are with the mister if the coating’s shot. The pan undermines the whole plan.
A well-seasoned carbon steel or cast iron surface can also support minimal-oil cooking really well — though the weight trade-off matters for this audience specifically, and it’s worth weighing against the lighter options. And a quick honest note on ceramic and ceramic-titanium coatings: a lot of them get marketed around “oil-free” cooking claims. Take that with a grain of salt. You’ll still usually want a touch of oil for the best results, despite what the packaging implies.
What to Actually Look For
A genuinely strong, current nonstick surface — this is the single biggest factor. An aging or scratched coating undoes everything else on this list
Lightweight construction — same ergonomic logic as the rest of this series; a heavy pan defeats the purpose even if the surface itself performs beautifully
Wide, flat cooking surface — better heat distribution means less temptation to add extra oil just to fight off hot spots
A comfortable, secure handle — you need confident control for tilting and swirling, the small motion that spreads a thin oil layer evenly across the pan
The Best Skillets for Heart-Healthy, Minimal-Oil Cooking
GreenPan Valencia Pro Ceramic Nonstick Skillet
Hard-anodized aluminum with a ceramic coating, and the food release is genuinely strong enough to back up the reduced-oil marketing this brand leans on.
Weight: ~1.7 lbs (12″)
Price: $50–$65
Diamond-infused ceramic coating, PFAS-free and PTFE-free
Strong enough food release that very small amounts of oil actually work
Riveted, contoured stainless handle, oven-safe to 600°F
Pros: Excellent food release means less oil needed for searing and sautéing. Lightweight build hits both the minimal-oil and the arthritis-friendly goals at once. PFAS-free coating, for what that’s worth to you.
Cons: Like all ceramic coatings, it’ll need more oil to perform well as it ages — figure 2 to 3 years before you notice the drop-off. Pricier than the basics.
Best for: Anyone who wants a pan where the minimal-oil performance is real, not just a claim on the box.
Anolon Advanced Home Hard-Anodized Skillet
A durable nonstick interior built for exactly the searing and sautéing techniques that need the least oil to begin with.
Weight: ~2 lbs (12″)
Price: $35–$50
Hard-anodized aluminum, durable nonstick interior
Flared sides that make the tilt-and-swirl oil technique easier
Silicone-wrapped handle, dishwasher-safe
Pros: The durable coating holds onto strong food release for a long time, which keeps your minimal-oil results consistent. Flared sides genuinely help with spreading oil evenly. Fair price for the build quality.
Cons: A touch heavier than some other picks here. It’s a standard coating, not a specialty health-marketed one — though the actual performance is comparable.
Best for: Anyone who wants a dependable, mid-priced pan that just keeps performing for searing and sautéing, batch after batch.
T-fal Ultimate Hard Anodized Nonstick Skillet
Reliable, everywhere, and it tells you exactly when it’s ready — which matters more for minimal-oil cooking than people realize.
Silicone-wrapped handle, oven-safe to 400°F, dishwasher-safe
Pros: That Thermo-Spot indicator confirms the pan’s actually hot enough before you add oil — which is exactly when a small amount of oil does its best work. Silicone handle gives a secure grip while you’re tilting and swirling. Easy to find, easy to replace.
Cons: Standard PTFE, not a PFAS-free option if that’s what you’re after. Will need more oil over time as the coating ages, same as any nonstick eventually does.
Best for: Anyone who wants clear, visual confirmation of proper temperature — which directly supports actually pulling off the less-oil approach successfully.
Caraway Nonstick Ceramic Skillet
The premium pick. Looks good, performs well, costs more.
Weight: ~1.9 lbs (10.5″)
Price: $90–$145 (often part of a set)
Mineral-based ceramic coating, free of PTFE, PFOA, and PFAS
Aluminum core for even heat, which cuts down on hot-spot-driven oil overuse
Wide, easy-grip stainless handle, oven-safe to 550°F
Pros: Even heat distribution means consistent minimal-oil results across the whole pan, not just the center. Health-conscious coating appeals if that’s a priority alongside your heart-health goals. Wide handle spreads grip pressure nicely for tilting and swirling.
Cons: Noticeably more expensive than everything else on this list. Same as other ceramics — oil efficiency drops off somewhat as it ages.
Best for: Anyone who wants a premium, good-looking pan and doesn’t mind paying for the health-conscious coating formulation.
Lodge Carbon Steel Skillet
The non-coated alternative, for anyone who’d rather build a seasoning patina than rely on synthetic nonstick.
Weight: ~2 lbs (10″)
Price: $35–$50
Pre-seasoned carbon steel, oven-safe to 1,200°F
Builds a natural food-release patina over time with regular use
Long riveted steel handle
Pros: Once it’s well-seasoned, this needs very little oil for excellent food release — often less than synthetic nonstick over the long haul. Nothing to wear out or degrade the way PTFE or ceramic eventually do. Significantly lighter than a comparable cast iron pan.
Cons: Needs a seasoning routine and hand-washing, which is a small but real ongoing task. Performance is inconsistent until it’s properly broken in, and that takes a while.
Best for: Seniors with mild to moderate symptoms who are fine with a seasoning routine and want a long-term, coating-free approach to using less oil.
Two Heart-Healthy, Minimal-Oil Skillet Recipes
Minimal-Oil Seared Chicken with Broth-Braised Vegetables
Heat a lightweight nonstick skillet over medium-high heat until properly preheated (a water droplet should sizzle and evaporate fast).
Add the teaspoon of oil, tilting the pan to spread it thin across the surface.
Add chicken. Sear 4–5 minutes per side until browned. Remove to a plate.
Add vegetables to the same skillet. Stir once.
Add broth, garlic, and herbs. Stir once to combine.
Return chicken to the skillet. Cover and reduce heat to medium-low. Simmer 12–15 minutes, until chicken hits 165°F internally and vegetables are tender.
Serve directly from the skillet.
Pros: Uses a fraction of the oil a normal sauté would call for. Broth-based finishing keeps everything moist without extra fat. Staged cooking keeps the physical effort low.
Cons: You need an accurate preheat to get the full benefit from that small amount of oil. Chicken needs occasional turning with tongs.
Best for: Anyone who wants a complete, satisfying dinner that meaningfully cuts added fat without losing flavor or moisture.
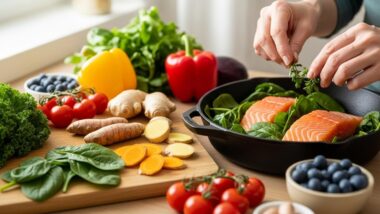
Minimal-Oil Skillet Salmon with Lemon and Asparagus
A measured mist of oil instead of a pour, finished with citrus instead of butter.
Heat a lightweight nonstick skillet over medium heat.
Mist or lightly brush the pan with oil — just enough for a faint sheen.
Season salmon with salt and pepper. Place in the skillet, top-side down.
Cook 4–5 minutes, then flip gently. Cook another 3–4 minutes until done. Remove to a plate.
Add asparagus to the same skillet. Cover and cook 4–5 minutes, stirring once, until tender.
Drizzle lemon juice over the asparagus. Return salmon to the skillet and serve straight from the pan.
Pros: The misting technique genuinely minimizes oil. Salmon’s natural fat content covers a lot of the richness you’d otherwise add with oil. Fast, start to finish.
Cons: You need a working oil mister or careful measuring without one. Flipping salmon takes a gentle, careful spatula hand. If fish recipes like this one are becoming a regular thing, it’s worth seeing how a few of these dishes pair with broader anti-inflammatory ingredient choices too, since salmon shows up there for similar nutritional reasons.
Best for: Anyone who wants a fast, minimal-oil dinner that leans on the fish’s own natural fat instead of added oil for richness.
Making This a Routine, Not a One-Time Effort
Small Changes That Actually Stick
Start with one technique. Just one — switching to measured pours, say — instead of overhauling every single recipe you make this week. Gradual changes stick. Dramatic overhauls usually don’t, not for long anyway.
And lean on a small, reliable rotation of minimal-oil recipes rather than constantly reinventing the wheel. That’s the same consistency strategy that works for building a manageable rotation of one-pan dinners in general — fewer decisions, more consistency, less mental load every single night.
Keep the Right Tools Within Reach
Keep your oil mister filled and sitting right by the stove, not buried in some cabinet you never open. Convenience is what makes a habit actually happen. Same goes for measuring spoons — keep them near the stove instead of in a drawer across the kitchen, so measuring oil accurately doesn’t feel like extra work every time.
And keep a reliable, well-maintained nonstick or seasoned pan as your default for daily cooking. Save the heavier or less oil-efficient cookware for the occasional special dish. If you’re cooking mostly solo or for just one or two people most nights, it’s also worth checking out smaller skillets sized for exactly that kind of low-effort, small-batch cooking — no reason to wrestle a 12-inch pan for a single chicken breast and a handful of asparagus.
One Last, Important Word on Heart Health and Your Own Situation
Minimal-oil skillet cooking is a widely recommended, genuinely practical way to support cardiovascular health — that part lines up with mainstream dietary guidance, full stop. But your cardiovascular needs are yours. Specific conditions, specific medications, specific cholesterol numbers — all of that means a conversation with your doctor or a registered dietitian beats anything a blog post can tell you.
And one more time, just to keep things honest: everything in this guide reduces physical strain during cooking and supports heart-healthy habits. None of it treats arthritis symptoms. Two different goals, addressed honestly, in the same kitchen.