Your cast iron seasoning feels sticky because you used too much oil during the seasoning process, and the excess didn’t fully polymerize into a hard coating—instead, it created a tacky, gummy layer that never properly hardened.
This is the #1 seasoning mistake. Everyone does it at least once.
You think more oil equals better seasoning. Wrong. More oil equals sticky, gross mess that attracts dust and makes cooking unpleasant.
What Causes Sticky Seasoning on Cast Iron
Too much oil, period. That’s the main culprit like 95% of the time.
When you apply oil for seasoning, you need an ultra-thin layer—so thin it barely looks like there’s any oil at all. Most people slap on way too much, thinking they’re doing their pan a favor.
What happens? The oil on the surface polymerizes and hardens. But underneath? There’s still liquid or semi-liquid oil that never fully converts. You get a hard shell over gooey stuff. Feels sticky. Acts sticky. Is sticky.
Other causes:
Not heating to a high enough temperature (oil doesn’t polymerize completely)
Taking the pan out too soon (didn’t finish the chemical process)
Using oils that don’t polymerize well (some oils just suck for seasoning)
Seasoning over a dirty surface (oil bonds to gunk instead of iron)
Too low an oven temperature (needs 450°F+ for proper polymerization)
But really, it’s usually the oil thing.
The Science Behind Sticky vs. Proper Seasoning
Proper seasoning is polymerized oil—the fat molecules have broken down and reorganized into a hard, plastic-like coating that’s bonded to the iron.
This happens through heat. When you heat oil past its smoke point in the presence of iron, the molecules transform from liquid fat into solid polymer chains. Chemistry happening right in your oven.
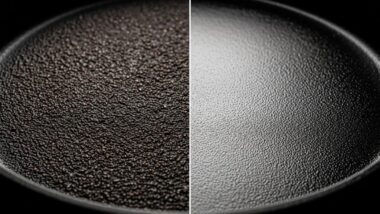
Good seasoning: Thin layer, high heat, complete polymerization. Result: hard, smooth, dry to the touch.
Sticky seasoning: Thick layer, incomplete polymerization. The top hardens but the bottom stays gummy. Result: tacky surface that never fully dries.
Think of it like paint. Thin coat? Dries hard and smooth. Thick coat? Crusty on top, wet underneath. Same principle.
How to Tell If Your Seasoning Is Actually Sticky or Just Needs More Time
Touch it. Seriously, just touch the cooking surface with your finger.
Actually sticky: Feels tacky, slightly gummy, like touching tape residue. Might leave a slight film on your finger. Definitely has resistance when you drag your finger across.
Just needs time: Feels smooth but maybe not as hard as expected. No tackiness, no gummy feel. This is fine—it’ll harden fully as it cools completely and with use.
Looks dry but feels sticky: Classic thick-oil problem. Visual check fails you here. Trust your fingers.
If you’re not sure, wait 24 hours. Sometimes seasoning that seems slightly soft will harden up fully after a day or two at room temperature. But genuine stickiness? That’s not going away on its own.
The 3 Easy Steps to Fix Sticky Cast Iron Seasoning
To fix sticky cast iron seasoning, wipe away excess oil with paper towels, re-bake the skillet at 450-500°F for one hour, and if it’s still sticky after cooling, strip the bad seasoning and start over with ultra-thin oil coats.
Three steps. That’s it. Most of the time, step one or two fixes it.
Step 1: Wipe down the sticky surface, try heating it to harden the coating.
Step 2: Re-bake at higher temp for longer if wiping didn’t work.
Step 3: Strip and re-season if it’s still sticky (nuclear option for bad cases).
Most sticky seasoning gets fixed at step one or two. Step three is for when you really screwed up—like poured oil on the pan instead of wiping it.
What You’ll Need to Fix Sticky Skillet Seasoning
Basic supplies:
Paper towels or clean rags
Cooking oil (if you need to re-season)
Oven access
Patience
For stripping (if needed):
Oven cleaner (Easy-Off yellow cap)
Garbage bags
Steel wool or coarse salt
Dish soap
Most jobs need just paper towels and an oven. Maybe five bucks in materials.
Step 1: Remove Excess Oil from Your Sticky Cast Iron
The first fix for sticky seasoning is wiping away excess oil with paper towels, then heating the pan on the stovetop or in the oven to see if the remaining coating will harden properly.
Start here. Simplest solution.
How to Wipe Down Sticky Seasoning Properly
Take a wad of paper towels and buff the sticky surface hard—like you’re trying to remove all the stickiness completely.
Apply real pressure. Wipe in circles, then straight lines, then circles again. You’re removing the gummy top layer and any excess oil that’s sitting on the surface.
The towels will come away with brown or black residue. Good. That’s the sticky stuff leaving.
Keep wiping until:
The surface feels less tacky
Paper towels stop picking up much residue
You’ve buffed the whole cooking surface thoroughly
This alone sometimes fixes light stickiness. The thicker gummy layer comes off, leaving behind thinner (hopefully hardened) seasoning underneath.
Using Paper Towels to Buff Away Tacky Coating
Use several paper towels—don’t try to do this with one sheet. You need clean surfaces to keep absorbing the sticky residue.
Fold them into pads for better grip and pressure. Unfold and refold as sections get saturated with sticky oil.
Pro move: Slightly dampen the paper towel with water. Sometimes moisture helps break up the gummy oil. But not soaking wet—just barely damp.
If you’re using cloth rags, be aware they’ll probably get ruined. That sticky oil doesn’t always wash out easily.
When to Use Salt Scrubbing for Sticky Spots
If buffing with paper towels isn’t cutting it, add coarse salt.
Sprinkle 2-3 tablespoons of kosher salt on the sticky area. Add a tiny bit of fresh oil (yeah, more oil to remove oil—works though). Scrub with paper towels or a cloth using the salt as an abrasive.
The salt mechanically removes the gummy layer better than towels alone. It’s like using super-fine sandpaper.
Scrub for 1-2 minutes, then dump out the dirty salt and wipe clean with fresh towels.
Heating the Pan to Test If Sticky Seasoning Will Harden
After wiping, sometimes the remaining coating just needs more heat to finish polymerizing.
Stovetop Method for Hardening Tacky Seasoning
Put the wiped-down pan on a burner over medium heat. Let it heat for 5-10 minutes.
You might see a bit of smoke—that’s residual oil finishing its polymerization. Good sign.
After 10 minutes, turn off the heat and let the pan cool completely on the stove (takes 30-60 minutes).
Once cool, touch it. Still sticky? Move to step two. Feels dry and smooth? You’re done. Problem solved.
This works for light stickiness where you just used slightly too much oil.
Oven Re-Bake Method for Sticky Skillets
For more significant stickiness, the oven’s better than stovetop.
After wiping down the pan thoroughly, stick it in a 450°F oven upside down for 30-60 minutes.
The sustained high heat gives any remaining oil another chance to polymerize fully. Plus being upside down prevents any excess oil from pooling.
Cool in the oven completely (turn oven off, leave door closed, wait 1-2 hours).
Check when cool. Fixed? Great. Still sticky? Time for step two or three.
Signs Your Sticky Seasoning Can Be Saved vs. Must Be Stripped
Can probably be saved:
Light tackiness only
Sticky spots in patches, not everywhere
Feels sticky immediately after seasoning but you used reasonable oil amounts
Gets less sticky after wiping and heating
Needs stripping:
Extremely gummy, like touching glue
Thick, obviously goopy coating
Still sticky after wiping and re-baking
Has been sticky for weeks/months
You can see thick, uneven oil puddles that hardened into lumps
When in doubt, try the wipe-and-heat method first. Stripping’s a bigger project—only go there if simpler fixes fail.
Step 2: Re-Bake Your Skillet at Higher Temperature
To fix persistent sticky seasoning, thoroughly wipe the pan to remove excess oil, then bake it upside down at 475-500°F for a full hour and let it cool completely in the turned-off oven.
This is the “serious but not nuclear” fix.
Why Higher Heat Fixes Sticky Cast Iron Seasoning
Higher temperatures push the polymerization process further and faster.
Oil that partially polymerized at 350°F (too low) will finish polymerizing at 500°F. The extra heat provides the energy needed to complete the chemical transformation from liquid oil to solid polymer.
Think of it like cooking a cake. Pull it out at 15 minutes? Gooey center. Full 30 minutes? Cooked through. Same concept—the reaction needs enough heat for enough time.
Also, higher heat burns off some of the excess oil that’s causing stickiness. It smokes away, leaving behind a thinner, properly hardened layer.
The Correct Temperature for Hardening Sticky Seasoning
Heating to 450-500°F for Full Polymerization
Sweet spot: 475-500°F. This is hot enough to fully polymerize most oils without risking damage to your oven or pan.
Don’t go higher than 500°F. You’re not trying to melt the pan, just finish the seasoning chemistry.
Most oils have smoke points around 400-450°F. You want to go above the smoke point to ensure complete polymerization—that’s when the transformation happens.
If your sticky seasoning was done at 350°F (common mistake), bumping it to 475°F gives it the heat it needs to actually finish hardening.
How Long to Bake Sticky Seasoning
Minimum: 45 minutes at 475-500°F.
Recommended: Full hour. Give it time to completely finish the process.
Maximum useful: 90 minutes if it’s really sticky, but beyond that you’re not gaining anything.
Set a timer. Don’t peek. Don’t open the oven door to check. Just let it bake.
The pan will smoke during the first 10-20 minutes. Open windows, turn on fans. Normal part of finishing the polymerization.
Proper Oven Placement and Cooling Technique
Upside Down Positioning to Prevent Pooling
Always put the skillet upside down on the oven rack—cooking surface facing down, bottom of the pan facing up.
Why? Gravity. Any excess oil that’s still liquid will drip out instead of pooling in the pan where it’ll stay gummy.
Put aluminum foil or a baking sheet on the rack below to catch drips. Shouldn’t be much if you wiped properly, but better safe than sorry.
Why You Must Cool in the Oven Completely
After the hour’s up, turn off the oven. Don’t open the door. Don’t take the pan out.
Let it cool completely inside the closed oven. Takes 1-2 hours minimum.
Why this matters: Slow, gradual cooling lets the seasoning finish curing and hardening. Quick cooling (taking it out into room-temp air) can leave it slightly soft.
Plus, grabbing a 500°F pan and moving it around is a good way to burn yourself or drop it. Just leave it alone.
When the oven’s completely cool and the pan’s room temperature, check it. Run your finger across the surface.
What to Do If Seasoning Is Still Sticky After Re-Baking
Still sticky after a full re-bake at proper temperature? You’ve got thick, badly applied seasoning that’s not going to fix itself.
Time for step three. Strip it.
Or you can try one more round of wiping and re-baking—sometimes really thick stuff needs two cycles. But honestly? If it didn’t fix after one proper high-heat bake, it probably won’t fix at all.
Step 3: Strip and Re-Season If Necessary
If sticky seasoning persists after wiping and re-baking, you’ll need to strip the bad seasoning completely using oven cleaner or a lye bath, then re-season the bare pan with ultra-thin oil layers and proper technique.
The nuclear option. But sometimes necessary.
When to Give Up and Start Over with Your Seasoning
Strip and start over when:
Pan’s still sticky after proper wiping and high-temp re-bake
The coating is extremely thick and gummy
There are visible globs or puddles of hardened oil
You’ve had sticky seasoning for weeks and it’s not improving
The stickiness is everywhere, not just spots
Keep trying to fix when:
It’s only mildly tacky
You haven’t tried a full high-temp re-bake yet
The stickiness is recent (like within the last few days)
Only certain spots are sticky
Stripping means starting from zero. All that seasoning you built up? Gone. But if it’s sticky and gross, it wasn’t good seasoning anyway.
How to Strip Sticky Seasoning from Cast Iron
Three main methods. Pick based on what you have available.
Using Oven Cleaner to Remove Bad Seasoning
Easiest method for most people.
Get yellow-cap Easy-Off (the lye-based formula, not the “fume free” version). Spray the entire pan—inside, outside, handle, everything.
Put the sprayed pan in a garbage bag, seal it up, leave it outside or in the garage for 24 hours.
After 24 hours, open the bag (outside—it smells), pull out the pan, scrub with steel wool or a stiff brush under running water. The seasoning should come off in gooey black chunks.
If any sticky seasoning remains, spray and bag again for another 24 hours.
Once all seasoning’s off and you’ve got bare gray iron, wash with dish soap and hot water, dry thoroughly, and you’re ready to re-season.
The Self-Cleaning Oven Method
If your pan fits in your oven and the oven has a self-clean cycle, this works great.
Remove the pan’s handle if it’s detachable. Place pan in oven. Run the self-clean cycle (usually 2-4 hours at 800-900°F).
This burns off ALL organic material, including all seasoning. You’ll be left with bare iron—gray, possibly with some ash residue.
After the cycle completes and oven cools, remove the pan, wash it, dry it completely. Ready for fresh seasoning.
Warning: Some people say this can warp or crack pans. It’s rare with quality cast iron, but possible. Use at your own risk.
Lye Bath for Complete Seasoning Removal
For multiple pans or serious restoration projects, a lye bath is most efficient.
Mix 1 pound of lye (drain cleaner like Red Devil) per 5 gallons of water in a plastic container. Submerge the pan completely. Wait 2-7 days.
The lye dissolves the polymerized oil. Pull the pan out (wear gloves—lye is caustic), scrub with steel wool, rinse thoroughly, neutralize with vinegar rinse, wash with soap, dry.
Bare iron achieved.
Re-Seasoning Your Skillet the Right Way After Stripping
Now that you’ve got bare iron, don’t make the same mistakes that caused stickiness in the first place.
Applying Ultra-Thin Oil Layers
Put maybe ¼ teaspoon of oil on the cooking surface. Seriously, that little.
Spread it over the entire pan with a paper towel or cloth—inside, outside, everywhere.
The whole pan should have a light sheen. That’s it. Not dripping, not puddling, just barely there.
The Wipe-Until-Dry Technique
Here’s the key that prevents stickiness:
After applying oil, take a fresh, clean paper towel and wipe the pan like you’re trying to remove ALL the oil.
Buff hard. Wipe every surface again. And again. The pan should look almost dry—barely any sheen visible.
This is the secret. If you can see oil shining on the surface, you’ve used too much. Wipe more.
It should feel like there’s not enough oil. That feeling? That’s the right amount.
Multiple Thin Coats vs. One Thick Coat
Always multiple thin coats. Always.
One thick coat = sticky disaster (which is how you got here in the first place).
Five ultra-thin coats = beautiful, hard, non-sticky seasoning.
Each thin coat bakes for one hour at 450-475°F. Cool completely. Repeat.
Start with 4-5 coats minimum after stripping. Build from there through cooking.
Common Mistakes That Cause Sticky Cast Iron Seasoning
People mess up seasoning in predictable ways—here’s how to avoid creating sticky seasoning in the first place.
Using Too Much Oil When Seasoning
This is the mistake. The big one. The reason you’re reading this article.
How Much Oil You Should Actually Use
For a 10-12 inch skillet: ¼ to ½ teaspoon total. That’s it.
For smaller pans: Even less. A few drops.
You’re not coating the pan in oil. You’re creating an invisible film that will polymerize into seasoning.
Most people use 10-20x too much oil. They pour a tablespoon or more, spread it around, think “that looks good.” Nope. That’s going to be sticky.
The Buffing Technique That Prevents Stickiness
After applying oil (however little you think you used), wipe it off.
No really. Wipe it like you’re removing it. Take a clean towel and buff the entire surface. Then buff again with a fresh section of towel.
When you think you’ve wiped enough? Wipe more.
The pan should look dry or nearly dry. That’s how you prevent stickiness—by removing almost all the oil before baking.
Choosing the Wrong Oil for Seasoning Cast Iron
Oils That Are More Likely to Stay Sticky
Problem oils:
Olive oil — Low smoke point, doesn’t polymerize well, often stays sticky
Coconut oil — High in saturated fats, which don’t polymerize as readily
Butter — Milk solids cause problems, too low smoke point
Flaxseed oil — Can work but tends to get sticky if applied too thick, then flakes later
These either don’t polymerize properly or require perfect application (which most people don’t do).
Best Oils for Non-Sticky Seasoning
Reliable choices:
Oil
Why It Works
Stickiness Risk
Grapeseed
High smoke point, polymerizes hard
Low if wiped properly
Canola
Inexpensive, reliable, widely available
Very low
Vegetable oil
Works well, cheap, easy to find
Low
Crisco/shortening
Old-school favorite, very durable
Low
These oils have high polyunsaturated fat content and appropriate smoke points. They polymerize into hard finishes when applied thin and heated properly.
Not Heating to a High Enough Temperature
Why Low Temperatures Leave Seasoning Tacky
If you season at 300°F or 350°F, the oil doesn’t get hot enough to fully polymerize.
It might thicken and darken (looks like it’s working), but the chemical transformation isn’t complete. You get a partially polymerized coating that’s soft and sticky instead of hard and dry.
Most oils need 400°F+ to polymerize properly. Ideally 450-500°F.
The Relationship Between Smoke Point and Polymerization
The smoke point is where oil starts to break down and polymerize. You want to exceed the smoke point during seasoning—that’s when the magic happens.
Oil with 400°F smoke point? Heat your oven to 450-475°F to ensure you’re well past that point.
This is why your kitchen smokes during seasoning. That smoke is the oil polymerizing. Good sign, not a problem (though open your windows).
Taking the Pan Out of the Oven Too Soon
Why Cooling Time Matters for Proper Seasoning
Polymerization continues during the cooling process. Pull the pan out after 30 minutes of baking? The reaction isn’t finished.
It needs the full hour of high heat, PLUS the slow cool-down period to fully cure.
Quick cooling (taking a hot pan into cool air) can leave the seasoning slightly soft or sticky.
The Mistake of Opening the Oven Door Early
Every time you open the oven door to check on your pan, you drop the temperature by 50-100°F.
Temperature drops interrupt the polymerization process. The oil cools down, stops reacting, then has to heat back up when you close the door.
Set your timer for one hour. Don’t open the door. Don’t peek. Trust the process.
When the timer goes off, turn off the oven but leave the pan inside until everything’s completely cool.
Seasoning Over Dirty or Wet Cast Iron
Why Surface Preparation Prevents Sticky Seasoning
Oil bonds to whatever’s on the surface. If there’s food residue, old sticky oil, or moisture, the new seasoning bonds to that instead of the iron.
Wash the pan with hot water (soap’s fine if it’s already bare or mostly bare). Scrub off any residue. Rinse thoroughly.
Dry with a towel immediately. Then put it on the stovetop over medium heat for 2-3 minutes to evaporate any remaining moisture.
The pan should be bone dry and slightly warm when you apply seasoning oil. Any moisture = bad seasoning = potential stickiness.
Different Types of Sticky Seasoning Problems
Not all stickiness is the same. Different patterns tell you different things about what went wrong.
Completely Sticky All Over the Pan
Cause: Way too much oil applied everywhere during seasoning.
Fix: Wipe thoroughly with paper towels and re-bake at high temp. If that doesn’t work, strip and start over.
This is the classic “poured oil on the pan and didn’t wipe enough” problem.
Sticky Spots or Patches on Otherwise Good Seasoning
Cause: Oil pooled in certain areas (usually the center or near the sides), or uneven oil application.
Fix: Scrub the sticky spots with salt and a bit of oil to remove the gummy coating. Re-season just those areas with a thin coat.
No need to strip the whole pan if most of the seasoning is good.
Gummy or Gluey Feeling Seasoning
Cause: Extremely thick oil application that never polymerized—just partially hardened into a gel-like substance.
Fix: Strip it. This level of gumminess won’t fix with heat or wiping. You need to remove it completely and start over.
This happens when people glob on oil thinking more is better.
Seasoning That Looks Dry But Feels Tacky
Cause: Oil that polymerized on the surface but left gummy stuff underneath, or seasoning that’s almost polymerized but not quite.
Fix: Try the re-bake method at high temp first. Sometimes this’ll finish the polymerization. If not, strip and re-season.
This is often from insufficient heat or not enough baking time.
Preventing Sticky Seasoning in Future Seasoning Jobs
Once you’ve fixed your sticky seasoning, don’t make the same mistakes again.
The Proper Seasoning Process Step-by-Step
Here’s the right way to season cast iron so it never gets sticky.
Surface Preparation Before Applying Oil
Start with clean, dry cast iron. Wash if needed, dry thoroughly, heat briefly on the stove to ensure zero moisture.
The surface should be:
Free of food residue
Free of rust
Completely dry
Slightly warm (optional but helpful)
Oil Application and Removal Technique
Apply a tiny amount of oil (¼ teaspoon for a large skillet). Spread it everywhere with a paper towel.
Then—this is critical—wipe it off with clean paper towels. Buff the entire surface like you’re removing the oil. Wipe until the pan looks nearly dry.
Check for any shiny spots or oil accumulation. Wipe those areas more.
Temperature and Timing Guidelines
Preheat oven to 450-475°F.
Place oiled (and wiped-nearly-dry) pan upside down on middle rack.
Bake for one full hour. Don’t open the door.
After one hour, turn off oven. Leave pan inside to cool completely (1-2 hours minimum).
Cooling and Layer Building
Once cool, the pan should feel dry and smooth—maybe slightly tacky to the touch initially, but that’ll harden fully in 24 hours.
For building layers, repeat the process: thin oil, wipe nearly dry, bake one hour, cool completely.
Do this 4-6 times for new or stripped pans. Each layer should feel dry and hard before adding the next.
How to Know When You’ve Wiped Away Enough Oil
Good signs:
Pan looks almost dry, just a faint sheen
Can’t see your reflection in the oil
No drips or runs anywhere
Surface feels barely damp to the touch
Bad signs:
Oil is visibly pooling
You can see your reflection in shiny oil
Drips forming on the sides
Surface feels wet or slick
When in doubt, wipe more. You can’t wipe too much—you can only wipe too little.
Visual Cues That Your Seasoning Will Turn Out Right
Before putting the pan in the oven, it should look like there’s barely any oil on it. Almost like you forgot to oil it.
During baking, you’ll see smoke for the first 10-15 minutes (that’s good—oil polymerizing).
After baking and cooling, the pan should be:
Darker than before (brown to dark brown or black)
Dry to the touch
Smooth, not sticky
Slightly matte or semi-gloss, not shiny-wet looking
Building Multiple Layers Without Stickiness
Each layer gets the same treatment: minimal oil, wipe thoroughly, high heat, complete cooling.
Wait until each layer is completely cool and hard before adding the next. Rushing this (adding oil while the pan’s still warm from the previous session) can cause stickiness.
After 4-5 properly applied layers, you’ll have a solid foundation that’s completely non-sticky.
Troubleshooting Other Seasoning Problems
Stickiness isn’t the only seasoning issue. Here’s how to handle other problems.
My Seasoning Is Flaking or Peeling
Causes:
Oil layer was too thick
Seasoned over dirty surface
Used flaxseed oil (notorious for flaking)
Didn’t heat long enough
Fix: Scrub off the flaking areas with salt or steel wool. Re-season those spots with thin coats of better oil (grapeseed or canola).
If it’s flaking everywhere, strip and re-season the whole pan.
The Seasoning Looks Blotchy or Uneven
Causes:
Uneven oil application
Some areas had more oil than others
Natural color variation in early seasoning layers
Fix: Keep cooking with it. The color evens out over time as you build more layers through use.
If it bothers you, add 1-2 more thin seasoning coats. That usually evens things out.
Seasoning Appears Dull Instead of Shiny
This is actually good. Proper seasoning is matte to semi-gloss, not shiny.
Shiny often means too much oil that hasn’t fully polymerized. Dull means properly thin, hard seasoning.
If you want more sheen, cook fatty foods (bacon, fried chicken). That’ll add natural luster through use.
Food Still Sticks Even After Fixing Sticky Seasoning
Possible issues:
Not enough seasoning layers yet (needs more building)
Not preheating the pan properly
Not using enough cooking fat
Heat too high (food burns before releasing)
Solutions:
Add 2-3 more seasoning layers
Preheat pan for 5 minutes before cooking
Use adequate butter or oil when cooking
Lower heat to medium
Even well-seasoned cast iron isn’t completely non-stick without proper technique.
Oil-Specific Solutions for Sticky Seasoning
Different oils create different sticky problems and need different solutions.
Fixing Sticky Flaxseed Oil Seasoning
Flaxseed creates beautiful initial seasoning but often stays slightly tacky or later flakes.
If sticky: Try re-baking at 500°F for an hour. Flaxseed sometimes just needs higher heat to finish polymerizing.
If still sticky after re-bake: Strip it. Flaxseed that won’t harden probably won’t ever harden.
Re-season with grapeseed or canola instead.
What to Do About Sticky Olive Oil Seasoning
Olive oil’s low smoke point (325-375°F) means it doesn’t polymerize well at typical seasoning temps.
Fix: Try re-baking at 450-475°F to see if higher heat helps. But honestly, olive oil seasoning is usually a lost cause.
Strip and re-season with proper high smoke point oil.
Coconut Oil Seasoning That Won’t Harden
Coconut oil is mostly saturated fat, which doesn’t polymerize as readily as polyunsaturated fats.
Fix: Re-bake at high temp (475-500°F). Sometimes the extra heat compensates for the oil’s lower reactivity.
If that doesn’t work, strip and use canola or grapeseed.
Vegetable Oil and Canola Oil Stickiness Issues
These oils rarely cause stickiness unless you used way too much.
Fix: Wipe thoroughly and re-bake. This almost always fixes it since these oils polymerize well.
If it’s still sticky, you probably have an inch-thick coating. Strip and re-season with proper amounts.
Quick Fixes vs. Complete Solutions for Sticky Skillets
Not every sticky pan needs the full nuclear option. Here’s how to decide.
When a Simple Re-Bake Will Fix Your Problem
Re-bake works for:
Light to moderate stickiness
Recently applied seasoning (within last week)
Pans where you used slightly too much oil but not a ridiculous amount
Stickiness that decreases when you wipe the pan
Process: Wipe thoroughly, bake at 475°F for one hour upside down, cool completely in oven.
Success rate: maybe 60-70% for moderate stickiness.
When You Need to Strip and Start Over
Strip for:
Severe stickiness that feels gummy or gluey
Stickiness that persists after proper re-bake attempt
Very thick, uneven coating with visible oil puddles
Sticky seasoning that’s been there for months
Process: Use oven cleaner, lye bath, or self-clean cycle to remove all seasoning. Start fresh with proper thin coats.
More work, but gives you clean slate and guaranteed results.
Partial Stripping for Localized Sticky Spots
If only certain areas are sticky, you don’t need to strip the whole pan.
Process:
Scrub sticky spots with steel wool or salt to remove the gummy coating
Leave good seasoning alone
Re-season just the stripped spots with thin oil coats
Bake the whole pan to even everything out
Works great for pans that are mostly fine with a few problem areas.
Cost-Benefit of Quick Fixes vs. Full Re-Seasoning
Quick fix (wipe and re-bake):
Time: 2-3 hours (mostly passive oven time)
Cost: $0 (just paper towels)
Success: Works for light to moderate stickiness
Full strip and re-season:
Time: 1-2 days (stripping time) plus 6-8 hours (seasoning multiple layers)
Cost: $5-10 (oven cleaner or lye)
Success: Always works if done properly
Try the quick fix first. If it doesn’t work, then commit to stripping.
Maintaining Properly Seasoned Cast Iron After Fixing Stickiness
Once you’ve got good, non-sticky seasoning, keep it that way.
Cleaning Methods That Protect Your Fixed Seasoning
After each use:
Wipe out warm pan with paper towel
For stuck food, use hot water and soft brush or salt scrub
Dry immediately and completely on stovetop
Apply thin oil layer before storing
Don’t:
Soak in water (causes rust)
Use harsh detergents (strips seasoning)
Put in dishwasher (ruins everything)
Scrub with steel wool unless removing damaged seasoning
Gentle care keeps your hard-won seasoning intact.
Building Seasoning Through Cooking
Every time you cook fatty foods, you’re adding natural seasoning layers.
Best foods for building seasoning:
Bacon
Fried chicken
Cornbread
Sausages
Anything with significant oil or butter
Foods to avoid initially:
Tomato sauce (acidic, can strip seasoning)
Wine-based dishes
Lots of vinegar
After 3-6 months of use, the seasoning’s thick enough to handle acidic foods occasionally.
When to Add Maintenance Seasoning Layers
Add a full oven seasoning layer when:
Pan looks dull or gray instead of dark brown/black
Food starts sticking more than usual
You see bare spots or patches
Every 3-6 months with heavy use
Don’t re-season when:
Pan’s still dark and smooth
Food releases fine
Just because you think you should
Over-seasoning is a thing. If it’s working, leave it alone.
Avoiding Future Sticky Seasoning Problems
Remember:
Use minimal oil (less than you think)
Wipe until nearly dry
Heat to 450°F minimum
Cool completely before handling
Build thin layers, not thick ones
Stick to these principles and you’ll never have sticky seasoning again.
Special Cases: Sticky Seasoning on Different Cookware
Cast iron isn’t the only thing that gets sticky seasoning. Other cookware has similar issues.
Fixing Sticky Seasoning on Carbon Steel Pans
Carbon steel seasons the same way as cast iron—same oils, same temps, same problems.
Fix sticky carbon steel the same way:
Wipe thoroughly
Re-bake at high temp
Strip if needed
Carbon steel is thinner than cast iron, so it heats and cools faster. But the chemistry’s identical.
Dealing with Sticky Dutch Oven Seasoning
Dutch ovens have more surface area and often have lids that also need seasoning.
Fix:
Treat the pot and lid separately
Both need wiping and re-baking
Interior bottom often gets stickiest (where oil pools)
Same principles apply, just more area to cover.
Griddles and Other Large Surface Cast Iron
Flat griddles and large skillets need more oil to cover the surface—which means more risk of using too much.
Prevention:
Use a thin cloth instead of paper towels for more even distribution
Work in sections to ensure thorough wiping
Check for pooling in the center
Fix:
Same methods as regular skillets
May need more wiping time due to larger area
Vintage Cast Iron with Sticky Seasoning Issues
Old cast iron has smooth surfaces that show stickiness more obviously than rough modern iron.
Advantages: Smooth iron’s easier to wipe clean when fixing stickiness.
Disadvantages: Stickiness is more noticeable since there’s no texture to hide it.
Fix it the same way—wipe, re-bake, or strip. Vintage iron takes new seasoning beautifully once cleaned properly.