Table of Contents
- 1 The Direct Answer: Should You Strip Factory Seasoning on New Lodge Cast Iron?
- 2 Understanding Lodge’s Pre-Seasoning Process
- 3 The Case for Keeping Lodge’s Factory Seasoning
- 4 The Case for Stripping New Lodge Skillets
- 5 Inspecting Your New Lodge Before Deciding
- 6 How to Properly Use a New Lodge Without Stripping
- 7 Step-by-Step: Stripping a New Lodge Skillet (If You Choose To)
- 8 Re-Seasoning Your Lodge After Stripping
- 9 The Texture Issue: Lodge’s Pebbly Surface
- 10 Addressing Common Factory Seasoning Problems
- 11 Building Superior Seasoning on Factory Base
- 12 The Economics: Time vs. Results
- 13 Comparing New Lodge to Vintage Cast Iron
- 14 What Professional Cooks Do With New Lodge
- 15 Special Considerations for Different Lodge Products
- 16 Troubleshooting New Lodge Performance Issues
- 17 The First Cook: What to Expect
- 18 Alternative to Stripping: Targeted Touch-Ups
- 19 Long-Term Results: Stripped vs. Unstripped Lodge
- 20 Expert Opinions: What Cast Iron Authorities Say
- 21 Making Your Decision: A Practical Framework
- 22 Quick-Start Guide: Using New Lodge Today
The Direct Answer: Should You Strip Factory Seasoning on New Lodge Cast Iron?
No, you should not strip the factory seasoning on a brand new Lodge skillet—Lodge’s pre-seasoning is functional, durable, and ready to cook on immediately, and stripping it wastes hours of work for minimal benefit since you can simply add more seasoning layers on top of the existing coating if you want additional protection.
Just don’t do it.
The internet is full of people telling you to strip your new Lodge and start from bare iron. They’re mostly wrong. Sure, there are edge cases where stripping makes sense (we’ll cover those), but 95% of new Lodge buyers should absolutely skip the stripping process and just start cooking.
Here’s why this question even exists: vintage cast iron collectors and enthusiasts sometimes strip everything to bare metal because they’re restoring crusty yard-sale finds or want complete control. That approach makes sense for a rusted 1940s Griswold. Makes zero sense for a brand-new $25 Lodge that’s already seasoned and ready to go.
What Lodge’s Factory Seasoning Actually Is
Lodge’s factory seasoning is a thin coating of soy-based vegetable oil that’s been spray-applied and baked onto the cast iron at high temperatures during manufacturing, creating a food-safe, polymerized layer that protects against rust and provides a basic non-stick surface right out of the box.
It’s real seasoning. Actual polymerized oil bonded to iron. Not some removable protective coating or wax (like what’s on some imported cast iron).
The process Lodge uses involves cleaning the raw casting, spraying a thin layer of soy oil, then baking it at around 450°F—basically the same process you’d do at home, just automated and scaled up. They typically apply one coat in the factory, sometimes two depending on the product line.
Why Most People Don’t Need to Strip New Lodge
Most people don’t need to strip new Lodge because the factory seasoning is already functional enough to cook on, adding your own layers on top of it works perfectly fine, and stripping requires 3-8 hours of work plus dealing with caustic chemicals or high heat to achieve results that aren’t meaningfully better for everyday cooking.
Reasons to keep factory seasoning:
- It’s already there (free seasoning you didn’t have to apply)
- Works as a base for additional layers
- Protects against rust immediately
- Lets you start cooking today instead of next week
- Saves you hours of stripping and re-seasoning work
- Factory application is actually quite good for what it is
The time investment alone should make you think twice. Strip a new Lodge and you’re looking at hours of work to get back to where you already are—seasoned cast iron ready to cook.
When Stripping Makes Sense (Rare Cases)

Stripping a new Lodge makes sense if the factory seasoning is visibly defective (flaking, sticky, or uneven), if you’re an experienced cast iron user who wants the smoothest possible finish and is willing to invest serious time, or if you’re planning to sand/polish the cooking surface and need bare metal to work with anyway.
Strip new Lodge only if:
- Factory coating is actually defective (sticky, flaking, weird texture)
- You’re sanding the surface smooth and need bare iron
- You’re a perfectionist willing to spend 8+ hours for marginal gains
- You specifically want a particular oil (not soy) for dietary or performance reasons
- You can’t get the factory coating to work after multiple attempts
Notice these are all edge cases. Not normal use situations.
The Risk vs. Reward of Stripping Factory Coating
Stripping factory seasoning risks damaging your pan with improper techniques (over-etching with vinegar, warping with extreme heat), wastes significant time that could be spent cooking and naturally building seasoning, and the reward is minimal—slightly more control over your base layers that makes essentially zero difference in cooking performance for 99% of home cooks.
Risk: damage, time waste, chemical exposure, no meaningful benefit
Reward: control, smooth feeling of “I did it myself,” potentially slightly better initial appearance
The math doesn’t add up for most people.
Understanding Lodge’s Pre-Seasoning Process
Lodge’s pre-seasoning process involves machine-spraying a thin layer of vegetable oil onto cleaned castings and baking them in industrial ovens at seasoning temperatures, creating a basic protective coating that’s been standard on all new Lodge cast iron since 2002.
Factory automation. That’s what you’re getting.
How Lodge Factory-Seasons Their Cast Iron
Lodge cleans the raw cast iron to remove foundry sand and manufacturing residue, applies a thin mist of vegetable oil using automated spray equipment, then runs the pieces through a conveyor oven at approximately 450-500°F for the time needed to polymerize the oil into bonded seasoning.

It’s basically oven seasoning at scale. The same chemistry you’d use at home—heat plus oil equals polymerized coating—just done in a factory setting with automated equipment instead of you standing in your kitchen with a bottle of Crisco.
The process is consistent. That’s the advantage of automation. Every Lodge skillet gets roughly the same treatment, so quality is predictable (unlike your first attempt at home seasoning which might be a disaster).
The Soy-Based Oil Used by Lodge
Lodge uses soy-based vegetable oil for their factory seasoning—it’s food-safe, has an appropriate smoke point for seasoning, polymerizes reliably, and is cost-effective at manufacturing scale, though some people prefer to add layers of different oils on top for various reasons.
Why soy? Economics and performance. Soy oil is cheap, widely available, and works well for seasoning. It’s not the “best” oil (that’s debatable anyway), but it’s perfectly good.
Some people object to soy for dietary reasons (allergies, preferences). If that’s you, you can add layers of different oil on top—the soy is sealed under your new layers and won’t contact food. Or strip and start with your preferred oil if you’re really particular.
How Many Layers Come From the Factory
Lodge typically applies one thin layer of seasoning at the factory, occasionally two on certain product lines—this is enough for rust protection and basic cooking performance but not as thick or developed as cast iron that’s been seasoned 5-7 times and used regularly for months.
One coat. Maybe two. That’s it.
Compare that to the 5+ coats serious home seasoners apply. Factory seasoning is a starting point, not a finished product. It’s meant to protect the iron during shipping and give you something functional to cook on while you build up real seasoning through use.
This is why some people think factory seasoning is “bad”—they’re comparing one factory coat to their expertly-applied five-coat custom seasoning. Not a fair comparison.
Quality and Durability of Factory Seasoning
Lodge’s factory seasoning is reasonably durable for light use but not as robust as 5+ home-applied coats—it’ll handle eggs and bacon fine but might show wear in high-traffic areas after a few weeks of cooking, which is normal and expected since you’re meant to build on it through use.

It’s serviceable. Not spectacular.
Expect it to work adequately right away. Expect it to improve significantly as you cook and add natural layers. Don’t expect it to perform like a perfectly-seasoned vintage skillet on day one.
The Case for Keeping Lodge’s Factory Seasoning
The strongest argument for keeping Lodge’s factory seasoning is simple economics—it works well enough to cook on immediately, saves you hours of stripping and re-seasoning labor, and you can enhance it by adding supplemental layers on top without the hassle of starting from bare iron.
Work smarter. Not harder.
Why Factory Seasoning Is Better Than You Think
Modern Lodge factory seasoning is significantly better than it was 15-20 years ago when the pre-seasoning process was newer and less refined—today’s automated application creates fairly even, functional coats that many people cook on successfully for years without ever adding additional seasoning.
It’s gotten better. Lodge has refined their process over two decades of doing this.
Early factory-seasoned Lodge (early 2000s) had more quality control issues. Today’s factory seasoning is predictable and consistent. Not perfect. But pretty damn functional for what it is.
Time and Effort Saved by Not Stripping
Stripping and re-seasoning a Lodge skillet requires 6-8 hours minimum (including drying time, multiple seasoning coats, cooling periods), while simply washing your new Lodge, maybe adding 1-2 supplemental coats, and starting to cook takes maybe 2-3 hours total and gets you to a usable pan faster.
| Approach | Time Required | Skill Needed | Result |
|---|---|---|---|
| Strip & re-season | 6-8+ hours | Moderate-High | Bare iron plus your seasoning |
| Use factory + add coats | 2-3 hours | Low | Factory seasoning plus your layers |
| Use factory as-is | 15 minutes | None | Ready to cook immediately |
Six hours you’ll never get back. For results that aren’t meaningfully better.
Modern Lodge Pre-Seasoning vs. Old Methods
Before 2002, Lodge sold bare iron that required immediate seasoning to prevent rust, meaning you had to season before first use—the modern pre-seasoning means you can literally start cooking the day you buy it, which is a massive convenience improvement even if the factory coating isn’t perfect.

Used to be: buy Lodge, spend an evening seasoning it, maybe cook tomorrow
Now: buy Lodge, wash it, cook tonight
That convenience is worth something.
Success Stories: Cooking on Unstripped Lodge
Millions of people cook successfully on unstripped Lodge—restaurant kitchens, home cooks, camping enthusiasts—using the factory seasoning as their base and building on it through normal cooking without ever stripping or applying formal oven seasoning beyond maybe an occasional maintenance coat.
It works. For a lot of people. In real conditions.
The cast iron forums are full of perfectionists who strip everything, but the actual cooking world (restaurants, grandmothers, camp cooks) just use the damn pans and they work fine.
The Case for Stripping New Lodge Skillets
The argument for stripping new Lodge centers on control—you get to choose your exact seasoning oil, apply it in multiple thin coats using optimal technique, and create a custom base that might (emphasis on might) perform slightly better than factory seasoning, especially if you’re experienced enough to do it right.
Some people want total control. Fair enough.
Arguments for Starting Fresh
Starting from bare iron lets you use your preferred oil (flax, grapeseed, lard, whatever), apply 5-7 thin coats using proper technique, and ensure every layer is exactly how you want it without wondering about the quality of what’s underneath—this matters more to enthusiasts than practical cooks.
Why people strip:
- Complete control over the seasoning process
- Choice of specific oils they prefer
- Satisfaction of doing it themselves
- Potentially smoother initial feel (if they’re also sanding)
- Knowledge that every layer is optimal
These are valid reasons if you care about them. Most people don’t care enough for it to matter.
Texture and Smoothness Concerns
Some people strip new Lodge because they want to sand/polish the rough surface and believe they need bare iron to do this effectively—while you can technically sand over factory seasoning, many prefer starting with bare metal when they’re modifying the cooking surface texture.
If you’re sanding anyway, stripping makes more sense. The factory seasoning comes off during sanding anyway (mostly), so you might as well start clean.
But here’s the thing: the rough texture isn’t from factory seasoning. It’s from how Lodge casts their iron. Stripping the seasoning without sanding accomplishes nothing for smoothness.
Control Over Your Seasoning Build
By stripping and re-seasoning yourself, you control every variable—oil type, number of coats, baking temperature, wiping technique—which appeals to people who enjoy the process itself or who’ve had bad experiences with factory-seasoned cookware (from Lodge or other brands).
Total control. Some people want it.
They want to know exactly what’s on their pan. Want to use specific oils. Want to apply specific techniques they’ve researched.
This is a hobby approach more than a practical approach. Nothing wrong with it. Just recognize what you’re doing and why.
When Perfectionists Choose to Strip
Perfectionist cooks sometimes strip new Lodge because they can’t tolerate the uncertainty of factory seasoning quality—they’d rather invest the time to do it “right” (by their standards) than trust a factory process they don’t control, even if the factory process would work fine.
Control freaks, unite. I say that with affection.
If you’re the type who wants everything exactly so, you’ll probably strip. And you know what? Your pan will probably turn out great because you’ll put in the effort to do it right.
But you’ll still have rough Lodge texture unless you also sand it.
Inspecting Your New Lodge Before Deciding
Before deciding whether to strip, carefully inspect your new Lodge’s factory seasoning—check for even color, smooth feel (considering Lodge’s inherent texture), no sticky or tacky spots, and no visible flaking or peeling, which helps you determine if the factory coating is actually good enough to keep.
Look at what you’ve got. Make an informed decision.
What to Look for on Factory-Seasoned Surface
A good factory-seasoned Lodge should have uniform dark gray to black color across the cooking surface, feel dry and hard to the touch (not sticky or tacky), and show no signs of flaking, peeling, or heavy buildup in certain areas that indicates poor application.
Run your hand across it. Dry and smooth (for Lodge’s pebbly texture)? Good.
Sticky or tacky? Problem.
Flaking or peeling? Defect.
Uneven with thick globs in some areas? Poor application.
Identifying Good vs. Poor Factory Seasoning
Good factory seasoning looks uniform, feels dry, and has a slight sheen but not wet appearance—poor factory seasoning looks blotchy, feels sticky or tacky, may have visible thick spots or thin spots, and might show rust spots where coverage failed.
Good factory seasoning:
- Even dark color throughout
- Dry, hard feel
- Subtle sheen, not wet-looking
- No sticky or tacky areas
- Complete coverage with no rust
Poor factory seasoning:
- Blotchy with light and dark patches
- Sticky or tacky feel anywhere
- Visible thick buildup or thin bare spots
- Rust starting to show
- Flaking or peeling
Poor factory seasoning might warrant stripping. Good factory seasoning definitely doesn’t.
Signs of Manufacturing Issues That Require Stripping
Strip your new Lodge if you see significant rust already forming (indicates failed factory seasoning), extensive sticky or tacky areas that don’t improve after washing and heating, heavy flaking or peeling across large portions of the surface, or visible thick globs of unpolymerized oil that suggest the factory process failed.
Definite strip situations:
- Rust visible despite factory coating
- Sticky everywhere even after washing
- Flaking off in sheets
- Thick uneven globs that won’t smooth out
- Chemical smell that won’t dissipate
These are defects. Return it or strip and start over.
Testing the Factory Coating Before First Use
Test your Lodge’s factory seasoning by washing it with hot water and mild soap, drying thoroughly, then heating it empty on medium heat for 5 minutes—if it smokes excessively, smells weird, or develops sticky spots, the factory coating may have issues, but if it just gets hot and looks normal, it’s probably fine to use.
Simple test. Heat it up. See what happens.
Normal: gets hot, maybe slight smell, no drama
Problem: excessive smoke, chemical smell, stickiness developing, weird residue appearing
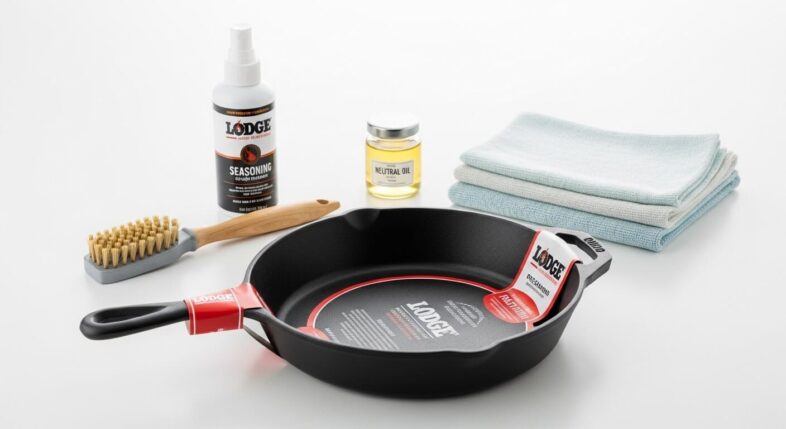
How to Properly Use a New Lodge Without Stripping
To use a new Lodge without stripping the factory seasoning, wash it thoroughly with hot soapy water to remove manufacturing residue and dust, dry it completely, add 1-2 supplemental seasoning coats if desired (not required), then start cooking with fatty foods that will naturally enhance the existing seasoning.
Just use it. Really.
Initial Cleaning of Factory-Seasoned Lodge
New Lodge needs washing before first use—not because the factory seasoning is bad but because there’s manufacturing dust, cardboard lint from packaging, and handling residue from the factory and store that you don’t want in your food.
Washing Away Manufacturing Residue
Wash your new Lodge with hot water and a drop of dish soap using a stiff brush or scrub pad—this removes dust and cardboard fibers without damaging the factory seasoning, despite what soap-phobic cast iron purists claim about never using soap.
Soap won’t hurt factory-seasoned Lodge. That’s a myth from old lye-based soaps. Modern dish soap is fine.
Scrub it. Rinse it well. You’re removing packaging residue, not stripping seasoning.
Drying Thoroughly
After washing, dry your Lodge immediately with towels, then place it on a warm burner for 5 minutes to evaporate any remaining moisture—this prevents flash rust from forming on any microscopic areas where factory seasoning might be thin.
Dry it completely. Heat-dry it to be sure.
Flash rust can appear quickly on new Lodge if you leave it wet. Factory seasoning is thin, so it’s not bulletproof against moisture.
Adding Supplemental Seasoning Layers
You can (but don’t have to) add 1-3 coats of your preferred oil on top of Lodge’s factory seasoning using standard oven seasoning technique—this builds up the coating faster than waiting for cooking alone to do it, though it’s optional and many people skip it entirely.
Optional but helpful. Especially if you want a head start.
Building on Top of Factory Coating
Apply seasoning on top of factory coating exactly like you would on bare iron—thin coat of oil, wipe thoroughly until nearly dry, bake upside-down at 450°F for an hour, cool completely, and repeat 1-3 times to build thickness.
The factory layer stays underneath. Your layers go on top. They bond together fine—it’s all polymerized oil, chemically similar.
How Many Additional Coats to Add
One or two supplemental coats gives you a noticeable improvement over factory-only seasoning, three coats puts you at good working seasoning comparable to a well-used pan, and more than three is probably overkill unless you’re a perfectionist or preparing for heavy use.
| Additional Coats | Total Seasoning | Performance Level |
|---|---|---|
| 0 (factory only) | 1-2 layers | Functional, will improve with cooking |
| 1-2 coats | 3-4 layers | Solid working seasoning |
| 3+ coats | 5+ layers | Excellent, durable seasoning |
Diminishing returns after three additional coats. Cook on it and let use add natural layers from there.
Breaking In Your Lodge Through Cooking
The best way to improve factory-seasoned Lodge is simply cooking on it regularly—each time you cook with fat, you’re adding microscopic seasoning layers naturally, and over 2-3 months of regular use, factory-seasoned Lodge develops seasoning that rivals or exceeds what strippers achieve with multiple oven coats.
Cooking builds better seasoning than oven seasoning. Eventually.
It just takes time and use. But the results are excellent and you didn’t spend hours standing in your kitchen applying coats.
Best First Foods for New Lodge
Start with fatty foods that naturally enhance seasoning—bacon, sausage, pan-fried chicken, cornbread, grilled cheese, or vegetables sautéed in generous oil—these deposit fat during cooking and build seasoning faster than lean proteins or dry cooking.
Great first foods:
- Bacon (classic for a reason—tons of fat)
- Sausage patties or links
- Pan-fried chicken thighs
- Cornbread baked in the skillet
- Grilled cheese sandwiches
- Sautéed vegetables with oil
- Hash browns cooked in butter or bacon fat
Fat plus heat equals more seasoning. Use this to your advantage early on.
Foods to Avoid Initially
Avoid acidic foods (tomato sauce, citrus, vinegar-heavy dishes) for the first month of use since they can strip weak factory seasoning before it’s been reinforced, and skip delicate proteins like fish or eggs until you’ve built up more non-stick properties through cooking fattier foods.
Skip these at first:
- Tomato-based sauces
- Anything with lots of vinegar
- Citrus-heavy dishes
- Delicate fish
- Eggs (until you’ve built up more seasoning)
Give it a month of fatty cooking. Then branch out into everything.
Step-by-Step: Stripping a New Lodge Skillet (If You Choose To)
If you decide to strip your new Lodge despite the factory seasoning being functional, the most common method is using lye-based oven cleaner which dissolves polymerized oil over 24-48 hours, though other methods like self-cleaning oven cycles or electrolysis also work for removing seasoning down to bare iron.
You’re committed. Here’s how to do it.
Why You Might Strip Despite Good Factory Seasoning
Even with functional factory seasoning, some people strip because they’re also planning to sand/polish the surface, they specifically want a certain oil for the base layers, they’re building a matched set and want identical seasoning on all pieces, or they simply enjoy the process and want complete control.
Control. Customization. The satisfaction of DIY.
These are psychological reasons more than practical ones. But they’re still valid if they matter to you.
Method 1: Oven Cleaner (Lye-Based Stripping)
Lye-based oven cleaner (like Easy-Off yellow cap) is the most common stripping method—spray the skillet heavily, seal it in a garbage bag, wait 24-48 hours, then scrub off the dissolved seasoning with water and a stiff brush, repeating if necessary until you reach bare gray iron.
Safety Precautions
Wear chemical-resistant gloves, eye protection, and work in a well-ventilated area or outdoors—lye (sodium hydroxide) is caustic and can burn skin and eyes, and the fumes are unpleasant though not typically dangerous in outdoor settings.
Don’t mess around with lye. It’s serious stuff.
Gloves. Goggles. Outside or in garage. Not in your kitchen.
Application Process
Spray the oven cleaner liberally over all surfaces of the skillet, place it in a heavy-duty garbage bag, seal the bag, and let it sit for 24-48 hours—the lye breaks down the polymerized oil bonds, turning hard seasoning into soft goop that scrubs off easily.
Spray everywhere. Bag it. Wait.
The waiting is the process working. Don’t rush it.
Neutralizing and Cleaning
After 24-48 hours, remove the skillet from the bag (wearing gloves), scrub it thoroughly with water and a stiff brush or steel wool to remove dissolved seasoning, then neutralize any remaining lye by washing with vinegar-water solution (50/50 mix) followed by thorough rinsing and immediate drying.
Scrub, neutralize, rinse, dry. Immediately.
Bare iron rusts fast. Don’t leave it wet for even a few minutes.
Method 2: Self-Cleaning Oven Cycle
The self-cleaning oven method involves placing your skillet in the oven and running a self-clean cycle (typically 3-4 hours at 800-900°F)—the extreme heat burns off all organic matter including seasoning, leaving ash that wipes away to reveal bare iron.
How This Method Works
Self-cleaning cycles superheat the oven to burn off food residue—this same heat incinerates polymerized seasoning, reducing it to ash, and while it’s effective at removing seasoning, the extreme temperatures can potentially warp or crack cast iron, especially thin pieces or those with flaws.
Works great. When it works.
Risks and Considerations
The extreme heat of self-cleaning can warp skillets (rare but possible), may crack pieces with casting flaws or stress points, and sometimes causes cookware manufacturers to recommend against this method, though millions of people have done it successfully with vintage and modern cast iron.
Risks:
- Potential warping from extreme heat
- Possible cracking at weak points in the casting
- Voids some manufacturer warranties
- Creates smoke and smell (normal for self-clean)
Many people do this with no problems. Some have problems. Your call.
Method 3: Electrolysis Tank
Electrolysis uses electrical current in a water bath to remove rust and seasoning—you create a tank with washing soda solution, connect a battery charger, and the current strips everything from the iron over 12-24 hours, though this method requires setup and equipment that most people don’t have.
When to Use This Method
Electrolysis makes sense if you’re regularly restoring cast iron and want a reusable setup, if you have multiple pieces to strip, or if you’re dealing with heavy rust combined with old seasoning—for one new Lodge, it’s overkill.
Serious restorers use this. One-time strippers shouldn’t bother.
The setup takes as long as just using oven cleaner. Not worth it for a single pan.
Basic Setup Requirements
You need a plastic tub large enough for your skillet, a battery charger (manual, not automatic), a sacrificial iron anode, washing soda, and water—the complexity and cost make this impractical for most people who just want to strip one factory-seasoned Lodge.
Too much work. Too much equipment. Skip it unless you’re doing this regularly.
Method 4: Vinegar Soak (Not Recommended for Full Stripping)
Vinegar soaks remove rust effectively but don’t strip polymerized seasoning well—they’re sometimes mentioned for stripping but they’re really a rust removal method, not a seasoning stripper, and prolonged exposure can actually etch and damage the iron surface.
Don’t use vinegar to strip seasoning. Wrong tool.
Vinegar is for rust. Lye is for seasoning. Different jobs.
Cleaning Bare Iron After Stripping
Once stripped to bare iron, immediately wash the skillet with soap and water to remove any stripping chemical residue, dry it thoroughly, then apply a thin coat of oil and heat it briefly (or start your seasoning process immediately) to prevent flash rust from forming on the exposed metal.
Bare iron rusts in minutes. Literally.
Strip it, clean it, protect it. Don’t walk away and make lunch first.
Re-Seasoning Your Lodge After Stripping
After stripping your Lodge to bare iron, you need to build new seasoning from scratch using 5-7 thin coats of oil baked at 450°F—this process takes 10-15 hours total (including cooling time) and creates custom seasoning that might perform slightly better than factory coating but takes serious time investment.
Now the real work starts. Hope you’ve got free time.
Starting with Bare Iron
Bare iron must be completely clean, dry, and ideally rust-free before you start seasoning—any rust, oil, or contamination will interfere with the first seasoning layer bonding properly, so start with a totally clean slate.
Clean. Dry. Ready to season.
If there’s surface rust from the stripping process, scrub it off with steel wool and a little oil, clean again, dry thoroughly.
Choosing Your Seasoning Oil
For re-seasoning stripped Lodge, choose a high smoke point oil like canola, vegetable, soybean, or Crisco—avoid flaxseed despite internet hype (it flakes), and skip low smoke point oils like butter or olive oil that don’t polymerize well at seasoning temperatures.
Canola works. Vegetable oil works. Crisco works.
Pick one. Don’t overthink it. They all perform similarly when properly applied.
The Complete Seasoning Process (5+ Coats)
Apply each coat using the upside-down oven method—thin layer of oil, aggressive wiping until nearly dry, bake upside-down at 450°F for one hour, cool completely in the oven, then repeat 4-6 more times to build durable seasoning comparable to what comes on factory Lodge.
Same process covered elsewhere in cast iron guides. Seven times.
Oil. Wipe. Bake. Cool. Repeat. Repeat. Repeat. Repeat. Repeat. Repeat. Repeat.
Time Investment Required
Expect to spend 10-15 hours total (mostly waiting) to properly season your stripped Lodge with 5-7 coats—each coat takes about 2.5 hours (application plus baking plus cooling), and while the process is mostly hands-off, it’s spread over several days unless you do marathon sessions.
Two days minimum if you’re doing it right. More realistically 3-4 days.
Each coat needs complete cooling before the next. Can’t rush chemistry.
Comparing Your Results to Factory Seasoning
After all that work, your DIY seasoning will probably look slightly more uniform than factory coating and might feel slightly smoother (though Lodge’s rough texture remains), but cooking performance will be essentially identical—you’ve invested hours to recreate what Lodge already gave you for free.
Be honest about what you gained. Probably not much.
Your seasoning might look prettier. Might be slightly thicker. But does it cook better? Questionably.
Was it worth the time? You decide.
The Texture Issue: Lodge’s Pebbly Surface
The rough, pebbly texture of new Lodge cast iron comes from the sand-casting manufacturing process, not from factory seasoning—stripping the seasoning reveals the same rough texture underneath, so if smoothness is your goal, you need to sand/polish the iron itself, not just strip the coating.
The texture IS the iron. Not the seasoning.
Why New Lodge Feels Rough
Modern Lodge uses sand casting without machining the cooking surface smooth—this leaves a pebbly, slightly rough texture that’s faster and cheaper to produce than vintage cast iron which was often ground smooth after casting, and this texture exists on the raw iron before any seasoning is applied.
Cost cutting. That’s why.
Vintage cast iron manufacturers (Griswold, Wagner, others) ground their cooking surfaces smooth. Lodge doesn’t. Saves time and money.
You’re feeling the iron itself. The seasoning just follows that texture.
Factory Seasoning Doesn’t Cause Roughness
Lodge’s factory seasoning is extremely thin (one coat) and cannot create the rough texture people feel—that roughness is the iron’s surface topography, and stripping the factory seasoning does absolutely nothing to make your skillet smoother.
Stripping won’t fix texture. Ever.
People strip expecting smoothness. They get bare rough iron. Then they’re confused and disappointed.
How Seasoning Smooths Out Over Time
Multiple seasoning coats (5-10+) combined with regular cooking gradually fill in the low spots in Lodge’s rough texture—after months or years of use, well-seasoned Lodge feels smoother than new because the seasoning has built up in valleys while wearing away slightly on peaks, creating a more even surface.
Time and use smooth it out. Not stripping.
Five years of cooking beats five oven seasoning coats for actual smoothness.
Sanding and Polishing Options
If you want smooth Lodge, you need to physically sand/polish the cooking surface using progressively finer grits of sandpaper (80 to 400 grit) or use a flap disk on an angle grinder—this removes the pebbly texture by grinding down the iron surface itself, and yes, this requires stripping first so you’re working with bare metal.
Want smooth Lodge? Grab sandpaper. Or a grinder.
This is actual work. Hours of hand-sanding or power-tool danger.
And afterwards you still need to season it 5-7 times.
Addressing Common Factory Seasoning Problems
While most Lodge factory seasoning is functional, some common issues include sticky or tacky surfaces from improper curing, uneven or blotchy coating from inconsistent application, and rare cases of flaking or peeling that indicate a defective product.
Problems happen. Here’s how to handle them.
Sticky or Tacky New Lodge
If your new Lodge feels sticky or tacky, the factory seasoning didn’t fully polymerize—fix this by heating the skillet in a 450°F oven for one hour (no additional oil needed) to complete the curing process, or if that doesn’t work, wash off the sticky layer with hot soapy water and a scrub pad, dry it, and apply fresh seasoning.
Stickiness means incomplete polymerization. More heat usually fixes it.
Try re-baking first. Easier than washing off and starting over.
Uneven or Blotchy Coating
Blotchy factory seasoning with light and dark patches is mostly cosmetic—it doesn’t affect cooking performance significantly, and it’ll even out as you add seasoning through use, so unless it’s actually sticky or defective, just cook on it and let it improve naturally.
Ugly but functional. Use it anyway.
The blotchiness will disappear under new seasoning layers as you cook.
Flaking or Peeling Factory Seasoning
If factory seasoning is flaking or peeling off in sheets, that’s a defect—you can try to wash off all the loose material and re-season the bare spots, or just strip the whole thing and start fresh since the factory coating clearly failed.
Peeling = defect. Don’t try to save it.
Strip it or return it for replacement.
When Factory Coating Is Actually Defective
Truly defective factory seasoning is rare but happens—if your Lodge has sticky areas that won’t cure even after re-baking, excessive rust under the coating, or coating that comes off in sheets with normal washing, consider returning it for a replacement since Lodge has good customer service for defects.
Lodge will replace defective pieces. Their customer service is solid.
Don’t suffer through a genuinely bad pan. Get a replacement.
Building Superior Seasoning on Factory Base
The smartest approach for most people is keeping Lodge’s factory seasoning as a base and adding 2-3 carefully applied coats on top using proper technique—this gives you thick, durable seasoning faster than building from bare iron while saving hours of stripping work.
Best of both worlds. Factory foundation plus your enhancement.
Layer-by-Layer Improvement Strategy
Start with factory Lodge as-is, cook with fatty foods for 2-3 weeks to let it break in naturally, add one oven seasoning coat after the break-in period, continue cooking for a month, optionally add 1-2 more oven coats, then just maintain through regular use—this gradual approach builds excellent seasoning with minimal time investment.
Gradual building. Natural enhancement. Smart approach.
Let cooking do most of the work. Add oven coats strategically when needed.
Oil Choices for Supplemental Seasoning
Use the same oils that work for initial seasoning—canola, vegetable, Crisco—when adding layers on top of factory coating, and you can mix and match (factory soy oil with your canola coats) since all vegetable oils polymerize into chemically similar coatings that bond fine.
Any vegetable oil works on top of any other vegetable oil. They’re compatible.
Don’t overthink oil choices. Pick what’s cheap and available.
Oven Seasoning on Top of Factory Coating
Apply supplemental oven coats on top of factory seasoning exactly like you would on bare iron—the process is identical, and the new layers bond to the factory layer just like they’d bond to each other, creating integrated seasoning that performs as one unified coating.
Same technique. Just building on top instead of starting from bare.
Stovetop Seasoning for Quick Enhancement
Quick stovetop seasoning (heat pan, add oil, wipe out, heat to smoking, cool) can add maintenance layers between oven seasonings—this doesn’t replace proper oven seasoning but it’s a fast way to touch up areas that get worn or add a little extra protection before cooking.
Quick touch-ups. Not major building.
Heat, oil, wipe, smoke. Takes five minutes.
The Economics: Time vs. Results
The economic analysis heavily favors keeping factory seasoning—stripping and re-seasoning costs $10-15 in supplies and 8-12 hours of your time to achieve results barely distinguishable from simply adding 2-3 coats on top of factory seasoning (which costs $5 and takes 3 hours) or just cooking on it as-is.
Do the math. Your time has value.
| Approach | Time | Cost | Result Quality |
|---|---|---|---|
| Use factory as-is | 15 min | $0 | Good, improves with use |
| Add 2-3 coats on factory | 3 hours | $5 | Excellent from day one |
| Strip and re-season 5 coats | 8-12 hours | $15 | Excellent from day one |
The strip-and-season approach costs you 5-9 extra hours for the same end result. Make sense?
Hours Required to Strip and Re-Season
Realistically plan for 8-12 hours total including stripping (1-2 hours active work plus 24-48 hour waiting), cleaning (30 minutes), and applying 5-7 seasoning coats (each coat is 2.5 hours)—this assumes you’re doing multiple coats per day, otherwise spread it over a week.
A full weekend project. Minimum.
More likely you’re looking at 3-4 days spread out.
Cost of Stripping Supplies
Lye-based oven cleaner costs $5-7, you need garbage bags ($2), rubber gloves ($3-5), maybe steel wool and scrub pads ($3), plus your choice of seasoning oil ($3-8)—total investment is $15-25 depending on what you already have at home.
Not expensive. But also not free.
And that doesn’t count your time.
Value Proposition of Just Cooking
Simply cooking on factory-seasoned Lodge costs nothing extra beyond your regular groceries, requires no special time investment beyond normal meal prep, and produces excellent seasoning over 2-3 months that often surpasses carefully oven-seasoned pans because cooking builds layers naturally at varying temperatures with different fats.
Free. Effective. Low effort.
The best approach is often doing nothing special.
When the Extra Effort Pays Off
Stripping and re-seasoning pays off if you’re also sanding/polishing the surface (necessary for smooth texture), if you have dietary restrictions requiring specific oils, if you’re building a matched set and want identical seasoning, or if you genuinely enjoy the restoration process as a hobby.
These are the valid reasons. Everything else is probably unnecessary work.
Comparing New Lodge to Vintage Cast Iron
New Lodge will never feel like vintage Griswold or Wagner straight out of the box because vintage pieces have smoother machined surfaces and decades of built-up seasoning—but properly seasoned and used Lodge can approach vintage performance over time, just with a different surface texture that some people prefer and others tolerate.
Different. Not necessarily worse.
Why Vintage Feels Smoother
Vintage cast iron manufacturers machined their cooking surfaces smooth after casting, removing the rough sand-cast texture, while modern Lodge skips this step to save manufacturing costs—this fundamental difference in the iron itself (not the seasoning) is why vintage feels glassy and Lodge feels pebbly.
Vintage = ground smooth after casting
Lodge = rough sand-cast texture left as-is
That’s the difference. Not the seasoning. The iron itself.
Factory Seasoning vs. Decades of Use
A 70-year-old vintage skillet has 70 years worth of seasoning layers built up through countless meals—comparing one thin factory coat on new Lodge to that depth of seasoning is absurd, and you could strip the vintage piece to bare iron and it would still feel smoother because of how the surface was manufactured.
Unfair comparison. Vintage has time on its side.
But also: vintage has different iron. Machined smooth.
Can New Lodge Ever Match Vintage Performance?
Lodge can match vintage cooking performance (heat retention, non-stick properties, durability) but will never match the glassy-smooth feel without sanding/polishing the surface—the performance differences between smooth vintage and rough modern iron are minimal for most cooking, though some prefer the vintage feel.
Performance: basically equal
Feel: vintage wins unless you sand Lodge
For actual cooking? Both work great.
Realistic Expectations for Modern Cast Iron
Expect new Lodge to cook well but feel rough, to require 2-3 months of use before seasoning is well-developed, to have slight sticking issues initially that resolve with proper seasoning and technique, and to eventually perform comparably to vintage iron even if it never feels as smooth.
It works. Just different.
Manage expectations and you won’t be disappointed.
What Professional Cooks Do With New Lodge
Professional cooks and restaurant kitchens typically use Lodge straight out of the box without stripping—they wash it, maybe add one quick seasoning coat, then start cooking because commercial kitchens value time efficiency over perfection and find that heavy use builds excellent seasoning quickly.
Pros don’t strip new Lodge. They cook on it.
Restaurant Kitchen Approaches
Commercial kitchens often have multiple Lodge pieces that see heavy daily use—they’re washed (yes, with soap), dried, occasionally get a quick stovetop seasoning treatment, and develop excellent non-stick properties within weeks purely from constant cooking with various fats at different temperatures.
Heavy use = great seasoning. Fast.
Restaurants aren’t babying their cast iron. They’re cooking on it 8 hours a day.
Chef Recommendations on Stripping
Most professional chefs recommend against stripping new Lodge—they view it as unnecessary work that delays getting the pan into service, and they trust that proper cooking technique and regular use will develop seasoning better than any amount of careful oven seasoning anyway.
Chefs say: cook on it. Stop overthinking.
They’re focused on food, not cast iron perfection.
Commercial Use Without Stripping
Lodge skillets in commercial settings often outperform home skillets despite never being stripped or carefully seasoned—the difference is use frequency and variety, with restaurant pans cooking dozens of different dishes daily in different fats at different temps, all building seasoning naturally.
Use builds better seasoning than careful oven application. Over time.
Commercial pans prove this. They’re not maintained carefully. They’re just used constantly.
Professional Results on Factory Seasoning
Professional cooks achieve excellent results on factory-seasoned Lodge—properly heated, properly oiled for cooking, properly cleaned—the factory coating is just a starting point that develops into professional-quality seasoning through use, proving that stripping is unnecessary for high performance.
Factory coating works. For professionals. Who cook constantly.
If it works in a commercial kitchen, it’ll work in your home.
Special Considerations for Different Lodge Products
Different Lodge products have different factory seasoning quality—standard Lodge skillets get basic one-coat treatment, while the Blacklock line (premium thinner iron) sometimes gets better factory seasoning, and Dutch ovens need attention to both pot and lid seasoning.
Not all Lodge is equal. But the advice stays similar.
Lodge Skillets (Standard Line)
Standard Lodge skillets (the classic heavy pieces) have typical factory seasoning that works fine for immediate cooking but benefits from 1-2 supplemental coats or several weeks of use to really develop—these are the pieces where keeping factory seasoning makes most sense since stripping provides minimal benefit.
The basic workhorses. Factory seasoning is adequate.
Use them. Don’t strip them.
Lodge Blacklock (Premium Lighter Line)
Blacklock pieces are thinner and lighter with supposedly better surface finish than standard Lodge—some users report better factory seasoning on Blacklock, though it’s still just 1-2 coats and still benefits from supplemental seasoning or use-based enhancement.
Premium line. Still doesn’t need stripping.
Better starting point than standard Lodge but same advice applies.
Lodge Dutch Ovens and Lids
Dutch ovens and their lids both come factory-seasoned, though lids sometimes get less attention and may need supplemental seasoning sooner—treat both pieces identically (wash, optionally add coats, use) and remember the lid’s interior collects condensation so seasoning there is especially important.
Pot and lid both need seasoning. Don’t forget the lid.
The lid’s interior drips condensation back into food. Bad seasoning there means rust flakes in your dinner.
Lodge Griddles and Specialty Pieces
Griddles, grill pans, and specialty pieces get the same factory seasoning as skillets—follow the same advice (keep it, enhance if desired, use it) with the same logic that stripping is usually unnecessary work.
Same factory process. Same recommendations.
Whether it’s a skillet, griddle, or weird specialty piece—use the factory coating.
Troubleshooting New Lodge Performance Issues
If your new Lodge isn’t performing well, the problem is usually technique (too high heat, not enough fat, removing food too soon) rather than factory seasoning—before blaming the seasoning and stripping everything, make sure you’re actually using proper cast iron cooking methods.
Technique problems masquerade as seasoning problems.
Food Sticking on New Factory-Seasoned Lodge
Food sticking on new Lodge is normal for the first few uses—combat this with proper preheating (medium heat, 5-10 minutes), adequate cooking fat, and patience (let food release naturally instead of forcing it), and sticking will decrease dramatically as seasoning builds through use.
Anti-stick technique:
- Preheat properly (medium heat, several minutes)
- Use enough fat (more than you think)
- Let food develop crust before trying to move it
- Don’t use heat that’s too high
These fix 90% of sticking issues regardless of seasoning quality.
Rust Appearing Despite Factory Coating
Rust on factory-seasoned Lodge usually means water exposure (leaving it wet after washing, storing damp) rather than failed factory seasoning—dry your Lodge thoroughly after every use and store it dry, and if rust appears, scrub it off with steel wool and a little oil, dry, and continue using.
Rust = moisture problem. Not usually a seasoning problem.
Dry your pan. Every time. Completely.
Uneven Heating and Hot Spots
Lodge iron is thick and heats slowly—perceived uneven heating is usually from insufficient preheating or heat that’s too high, and the solution is longer preheating at lower temperatures, not stripping and re-seasoning which won’t fix thermal properties of the iron itself.
The iron is what it is. Seasoning doesn’t change heat distribution.
Preheat longer. Use lower heat. Let the thick iron come to temp gradually.
Dealing with Initial Cooking Frustrations
New Lodge frustrates some people because it doesn’t perform like well-seasoned vintage iron immediately—manage expectations, understand that 2-3 months of regular use will dramatically improve performance, and focus on proper technique rather than blaming the factory seasoning.
Give it time. Use it properly. It gets better.
Stripping won’t fix the learning curve of cooking on cast iron.
The First Cook: What to Expect
Your first cook on new factory-seasoned Lodge will probably have some sticking, require more fat than you’re used to, and need careful heat management—this is normal and improves quickly with use, not an indication that you should strip and re-season.
First cook is never perfect. That’s okay.
Setting Realistic Expectations
Expect new Lodge to perform adequately but not amazingly on first use—it’ll cook food successfully but may stick in places, may not release as cleanly as you want, and may feel different than non-stick or well-seasoned iron you’re comparing it to.
Adequate. Not great. Yet.
It gets there. Just takes some use.
Proper Heat Management on New Lodge
Use medium to medium-low heat and preheat for 5-10 minutes before adding food—Lodge’s thick iron takes time to heat evenly, and starting with too-high heat creates hot spots that burn food while other areas are still cool.
Low and slow. Preheat thoroughly.
Cast iron isn’t non-stick. You can’t blast it on high.
Oil Requirements for First Few Uses
Use more fat than you think you need for the first several cooks—generous oil or butter helps food release and also adds seasoning with each use, and you can reduce fat once the seasoning is better developed.
More fat now = better seasoning later = less fat needed eventually
It’s an investment in future performance.
When Performance Improves
Most people notice significant improvement after 10-15 cooking sessions (2-3 weeks of regular use), with the pan approaching good non-stick performance after 2-3 months of varied cooking with different fats and temperatures.
Two weeks: noticeably better
Two months: really good
Six months: excellent
Alternative to Stripping: Targeted Touch-Ups
Instead of stripping your entire Lodge, consider identifying and fixing only the problem areas—this saves time while addressing actual defects, and you can spot-treat sticky patches or thin spots without redoing the whole pan.
Surgical fixes beat total rebuilds.
Identifying Problem Areas Only
Closely inspect your factory seasoning and mark any areas that are actually problematic (sticky when others aren’t, flaking, bare spots)—most of the pan is probably fine and doesn’t need attention, so focus your effort on the 10-20% that has issues.
Circle the bad spots mentally. Leave the good spots alone.
Why redo what’s already working?
Spot Treatment vs. Full Strip
For isolated sticky or bare spots, scrub just those areas with steel wool and oil to remove the bad seasoning, clean and dry thoroughly, then apply 2-3 coats of fresh seasoning to those spots only—this fixes problems without the massive time investment of full stripping.
Targeted repairs. Smart approach.
Fix what’s broken. Keep what works.
Selective Re-Seasoning
After spot-treating problem areas, you can add 1-2 full-pan seasoning coats to blend the repairs with the original factory coating—this creates more uniform appearance while still saving time compared to complete stripping and rebuild.
Spot fix, then uniform coat over everything. Blends it together.
Maintaining Good Areas While Fixing Bad
The goal is fixing defects without disturbing functional factory seasoning—careful spot treatment with minimal aggressive scrubbing lets you repair problems while preserving the good coating that’s already there and working fine.
Preserve what works. Fix what doesn’t.
Long-Term Results: Stripped vs. Unstripped Lodge
After 6-12 months of regular use, there’s virtually no performance difference between Lodge that was stripped and re-seasoned versus Lodge that was used with factory coating intact—both develop excellent seasoning through cooking, and the time you saved by not stripping could’ve been spent actually cooking and enjoying your pan.
End result: the same. Time investment: very different.
Performance After 6 Months
Six months of regular cooking produces thick, durable seasoning regardless of whether you started with factory coating or bare stripped iron—the cooking itself builds the seasoning that matters, and your initial choice of keeping or stripping factory coating has become irrelevant.
Cooking builds seasoning. Always.
Whether you started with factory coating or bare iron doesn’t matter six months later.
Appearance Differences
Stripped and carefully re-seasoned Lodge might look slightly more uniform initially, but after months of cooking, both stripped and unstripped Lodge develop similar appearance with natural variation based on use patterns—no one can look at a well-used Lodge and tell whether it was originally stripped.
Visual differences fade. Use determines final appearance.
Durability Comparison
Both approaches produce durable seasoning that lasts years with proper care—there’s no evidence that stripped-and-rebuilt seasoning is more or less durable than factory-plus-supplemental seasoning after both have been in use for months.
Equal durability. Both last.
User Satisfaction Levels
Many people who stripped their Lodge report satisfaction with the process but admit the results don’t meaningfully outperform their unstripped pans—the satisfaction comes more from the control and DIY achievement than from actual cooking performance differences.
Psychological satisfaction. Not practical advantage.
If you enjoy the process, great. But don’t expect cooking miracles.
Expert Opinions: What Cast Iron Authorities Say
Cast iron experts, collectors, and Lodge itself generally recommend keeping factory seasoning and building on it rather than stripping new Lodge—the consensus is that stripping is unnecessary work that delays use without providing meaningful benefits for typical home cooking.
The experts agree. Don’t strip new Lodge.
Lodge’s Official Recommendation
Lodge explicitly states their factory seasoning is ready to use immediately and doesn’t need stripping—their official guidance is to wash the pan, maybe add a light oil coat, and start cooking, with no mention of stripping as a recommended or necessary step.
Straight from the manufacturer: don’t strip it.
They pre-season it so you don’t have to. Use their work.
Cast Iron Collector Perspectives
Vintage cast iron collectors strip everything because they’re restoring old, damaged, or poorly-maintained pieces—but many of these same collectors recommend against stripping new Lodge since it’s already in good condition and stripping serves no purpose except satisfying perfectionism.
Collectors strip rusty yard-sale finds. Different situation than new Lodge.
They know when stripping makes sense. And when it doesn’t.
Culinary Expert Advice
Professional chefs and culinary instructors consistently recommend using factory-seasoned Lodge as-is, focusing teaching time on proper cast iron cooking technique rather than seasoning methods, because they know good technique on adequate seasoning beats poor technique on perfect seasoning.
Technique matters more than seasoning quality. Always.
Learn to cook on cast iron properly. Don’t obsess over the coating.
Scientific Analysis of Factory Seasoning
From a chemistry standpoint, Lodge’s factory seasoning is polymerized vegetable oil identical to what you’d create at home—there’s no scientific basis for claims that home seasoning is superior, since the same chemical process (heat-induced polymerization) creates the same molecular structure regardless of whether it happens in a factory or home oven.
Chemistry doesn’t care where it happens. Same process, same result.
Factory seasoning is literally the same thing as home seasoning. Just applied at scale.
Making Your Decision: A Practical Framework
Decide whether to strip your new Lodge by honestly assessing your goals, available time, skill level, and tolerance for the break-in period—for most people, the practical choice is keeping factory seasoning and enhancing it through use, with stripping reserved for the small minority who have specific reasons and plenty of time.
Be honest with yourself about why you’re considering stripping.
Questions to Ask Yourself
Do you have 8-12 hours to invest in stripping and re-seasoning? Will this actually improve your cooking or just satisfy perfectionism? Are you also planning to sand/polish the surface (which requires stripping anyway)? Is the factory seasoning actually defective or are you being picky?
Self-assessment questions:
- Do I have the time?
- Is the factory coating actually bad or am I overthinking?
- Am I comfortable with chemicals/high heat stripping methods?
- Will I actually cook on this or just display it?
- Is my goal smoothness (requires sanding) or just control?
Answer honestly. Most people’s answers point toward keeping factory coating.
Skill Level Considerations
Beginners should absolutely keep factory seasoning and focus on learning cast iron cooking technique—stripping and re-seasoning requires moderate skill to do well, and beginners often create worse seasoning than the factory provided, wasting time and frustrating themselves unnecessarily.
New to cast iron? Don’t strip. Just cook.
Learn the basics first. Master those. Then consider advanced techniques.
Available Time and Resources
If you have limited free time, spending 8-12 hours stripping and re-seasoning makes no sense when that time could be spent cooking and building seasoning naturally—the time investment only makes sense if you genuinely enjoy the restoration process as a hobby activity.
Free time is precious. Spend it wisely.
Would you rather spend 10 hours seasoning a pan or 10 hours cooking on it?
Your Cooking Style and Needs
Heavy users who cook daily will develop excellent seasoning quickly through use regardless of starting point, while occasional users might benefit from adding 2-3 initial oven coats to build up protection faster—but neither situation requires stripping factory coating.
Your cooking frequency determines the best approach. Not internet advice.
Quick-Start Guide: Using New Lodge Today
To use your new Lodge skillet today without any stripping or extensive prep, wash it with soap and water, dry it thoroughly, heat it to medium and add cooking fat, then cook something fatty like bacon or sausage—you’re ready to go in 20 minutes.
Speed run. Minimal fuss.
What to Do Right Out of the Box
Remove packaging, wash with hot soapy water and a brush, rinse thoroughly, dry with towels, place on warm burner for 5 minutes to completely dry, optionally wipe with a thin coat of oil, and you’re ready to cook.
Wash. Dry. Cook. Done.
15-20 minutes from box to cooking.
Minimal Prep for Immediate Cooking
The absolute minimum prep is washing off packaging residue and drying thoroughly—you can literally skip even the oil wipe and just start cooking with fat, though a quick oil wipe doesn’t hurt and takes 30 seconds.
Wash and dry. That’s it.
Everything else is optional optimization.
First Recipe Recommendations
Cook bacon, sausage, or pan-fried chicken for your first meal on new Lodge—these fatty proteins are forgiving, add seasoning naturally, and will give you a success experience that builds confidence rather than starting with eggs which are more difficult on fresh seasoning.
Perfect first recipes:
- Bacon (can’t go wrong)
- Breakfast sausage
- Chicken thighs, skin-on
- Grilled cheese
- Cornbread
Save eggs and fish for week two.
Building Seasoning Through Use
Every time you cook with fat, you’re adding microscopic seasoning layers—this natural seasoning from cooking builds faster and more durably than oven seasoning, so the best thing you can do for your new Lodge is simply use it regularly for diverse cooking.
Cook on it. That’s the secret.
Use builds better seasoning than any amount of careful oven application. Given enough time.