Table of Contents
- 1 What Is the Upside-Down Oven Method for Cast Iron Seasoning?
- 2 The Problem: Sticky Oil Pools on Cast Iron Skillets
- 3 Understanding Oil Behavior During High-Heat Seasoning
- 4 Step-by-Step: The Upside-Down Oven Seasoning Method
- 5 Why the Upside-Down Method Works Better Than Right-Side-Up
- 6 Comparing Upside-Down vs. Right-Side-Up Seasoning
- 7 Common Mistakes Even When Using the Upside-Down Method
- 8 What to Do If You Still Get Sticky Spots
- 9 The Physics of Why Upside-Down Prevents Pooling
- 10 Optimal Oil Application for the Upside-Down Method
- 11 Temperature Control for Preventing Sticky Seasoning
- 12 Using the Upside-Down Method for Different Cookware
- 13 Drip Catchers: Foil vs. Baking Sheets
- 14 Multiple Coats and the Upside-Down Method
- 15 Troubleshooting Uneven Seasoning Despite Upside-Down Method
- 16 The Role of Oil Type in Preventing Sticky Pools
- 17 Air Circulation and Heat Distribution
- 18 Preventing Drips and Oven Mess
- 19 When the Upside-Down Method Isn’t Necessary
- 20 Alternative Methods and How They Compare
- 21 Real Results: Before and After Using Upside-Down Method
- 22 Expert Tips for Perfect Upside-Down Seasoning
- 23 The Complete Upside-Down Seasoning Timeline
What Is the Upside-Down Oven Method for Cast Iron Seasoning?
The upside-down oven method for cast iron seasoning is a technique where you place your oiled skillet face-down on the oven rack during the seasoning process, allowing gravity to pull excess oil away from the cooking surface instead of letting it pool in the center and create sticky, gummy patches.
Simple concept. Massive difference in results.
You’ve probably experienced it—you season your cast iron following all the instructions, pull it out of the oven after an hour, and the damn thing is sticky. Tacky surface. Gummy center. Total failure. Meanwhile, someone on the internet has a perfectly smooth, glass-like finish and you’re wondering what you did wrong.
Here’s what you did wrong: you left it right-side-up.
Why Oil Pools Create Sticky Seasoning Problems
Oil naturally flows toward the lowest point due to gravity, and when your skillet sits right-side-up in the oven, that lowest point is the center of the cooking surface—the oil accumulates there in a thick layer that can’t fully polymerize during the seasoning process, leaving you with partially-cured, sticky residue instead of hard, smooth seasoning.
Think about pouring water into a bowl. Where does it go? The bottom. Center. Lowest point.
Oil does the same thing. Even when you’ve wiped your skillet “dry,” there’s still microscopic amounts of mobile oil on the surface. Heat it up and that oil becomes even more liquid and mobile. Gravity pulls it to the center. It pools. And a pool of oil—no matter how thin you think it is—won’t polymerize properly.
You end up with that gross tacky spot right in the middle where eggs stick and nothing cooks right. Frustrating as hell.
How the Upside-Down Method Prevents Oil Pooling
When you flip your skillet upside-down, gravity works in your favor instead of against you—any excess oil that would normally pool in the center now drips away from the cooking surface, falling harmlessly onto the foil or baking sheet below, leaving only the thinnest possible coating of oil that polymerizes into perfect, non-sticky seasoning.
Gravity is your friend. Use it.

The oil that’s truly bonded to the iron stays put. The excess that would cause problems? Drips off the edges. Falls down. Gets caught by your drip tray. Never causes sticky seasoning because it’s not there anymore.
This is why the upside-down method has become the gold standard—it’s not just a good idea, it actively prevents the most common seasoning failure mode.
The Science Behind Gravity-Assisted Seasoning
Gravity constantly pulls liquids toward Earth’s center at 9.8 m/s², and while your oil coating seems solid at room temperature, it becomes quite fluid at seasoning temperatures (450°F+)—positioning your skillet upside-down ensures this natural force removes excess oil rather than concentrating it, allowing only molecular-level coating to remain for proper polymerization.
Physics does the work. You just position the pan correctly.
At 450°F, cooking oil has the viscosity of water or thinner. It flows easily. And gravity acts on it the entire time your skillet is in the oven—a full hour of gentle pulling, draining away anything that’s not firmly adhering to the iron surface.
The result? Only the oil that’s actually beginning to bond stays on the pan. Everything else migrates away and drips off.
The Problem: Sticky Oil Pools on Cast Iron Skillets
Sticky oil pools on cast iron skillets occur when too much oil is left on the surface during seasoning or when oil accumulates in low spots due to gravity, creating thick patches that only partially polymerize into a gummy, tacky coating instead of the hard, smooth finish you want.
This is the number one seasoning complaint. Sticky cast iron after seasoning.
What Causes Oil to Pool During Seasoning
Oil pools during seasoning because cast iron skillets have a concave cooking surface (slightly curved inward) that naturally channels liquid toward the center, and when heated right-side-up, any mobile oil follows gravity to this lowest point where it accumulates faster than it can evaporate or polymerize.
The shape of the skillet works against you. Most cast iron cooking surfaces aren’t perfectly flat—they’re slightly dished. Just a tiny curve. Barely noticeable when cold.

But heat it up with oil on it? That curve becomes a channel. Oil flows inward. Collects in the center. And once it’s pooled, it’s too late—you’ve got a thick layer that won’t cure properly no matter how long you bake it.
Why Pooled Oil Creates Sticky, Tacky Surfaces
Pooled oil can’t polymerize completely because the layer is too thick—while the top surface exposed to heat and oxygen bonds and hardens, the oil underneath remains liquid or only partially transformed, creating a coating that feels like partially-dried glue instead of hard plastic-like seasoning.
Only thin layers polymerize properly. Period.
Thick oil is like trying to dry thick paint—the surface hardens but the underneath stays wet. With cast iron seasoning, the top layer might start to polymerize, but the oil beneath stays liquid or gummy. Touch it and your finger comes away sticky.
The coating never fully cures. Ever. You can bake it for three hours and it’ll still be tacky because thick layers just don’t work.
Common Areas Where Oil Accumulates (Center, Corners, Pour Spouts)
The center of the cooking surface is the worst offender for oil pooling, but pour spouts, corners where the bottom meets the sidewalls, and any surface imperfections or rough patches also trap excess oil and create sticky spots even when the rest of the seasoning looks fine.
Problem zones on your skillet:
- The dead center (absolute worst—lowest point in the dish)
- Pour spouts (oil loves to collect in these notches)
- The junction where cooking surface meets sidewall
- Around the rivets on riveted handles
- Any pitting, rough spots, or imperfections in the iron
Right-side-up seasoning creates problems in all these areas. Upside-down fixes most of them automatically.
The Frustration of Failed Seasoning Attempts
There’s nothing worse than spending three hours seasoning cast iron—applying oil, wiping, baking, cooling, repeating—only to end up with a sticky mess that makes you want to throw the skillet in the trash and buy non-stick, except you know non-stick is garbage and cast iron is supposed to work if you just do it right.
Been there. Everyone has.

You follow the instructions. Use the right oil. Heat to the correct temperature. Do everything by the book. And still—sticky center. Tacky patches. Total failure.
That’s when you learn about the upside-down method. And you realize you weren’t doing it wrong—you just needed to flip the pan over.
Understanding Oil Behavior During High-Heat Seasoning
Oil becomes significantly more fluid and mobile at seasoning temperatures (450°F) compared to room temperature, and this increased fluidity combined with gravity’s constant pull means oil will migrate across your skillet’s surface toward low points throughout the entire baking process unless you position the pan to prevent this.
Heat changes everything about how oil behaves.
How Oil Flows on Hot Cast Iron
At 450°F, cooking oil has viscosity similar to water—it flows easily across cast iron surfaces, following gravity and surface tension, seeking the lowest available points and filling any depressions or concave areas while the molecular layer beginning to bond with the iron stays relatively stable.
Cold oil sits where you put it. Hot oil moves.
This is why you can wipe a skillet that feels dry at room temp, heat it up, and suddenly see oil appearing—it’s been hiding in the microscopic texture, and heat makes it mobile enough to flow into visible puddles.
During seasoning, your oil is liquid for the first 10-15 minutes before polymerization really kicks in. That’s plenty of time for gravity to cause problems if you’re not using the upside-down method.
The Role of Gravity in Oil Distribution
Gravity acts continuously on liquid oil for the entire hour-long seasoning process, and even tiny amounts of mobile oil will gradually migrate downward—on a right-side-up skillet this means toward the center, while on an upside-down skillet this means away from the cooking surface entirely.
Constant. Relentless. Never stops.

Think of it like water slowly running down a windshield. Not fast. But constant. Over the course of an hour, even slow migration moves a lot of oil from where you want it (evenly distributed) to where you don’t (pooled in one spot).
Flip the pan upside-down and that same constant force now works for you instead of against you.
Why Right-Side-Up Seasoning Leads to Uneven Coating
Right-side-up seasoning creates uneven coating because oil migrates away from the rim and sidewalls (high points) toward the center (low point), leaving the edges properly seasoned with thin coats while the center develops thick, problematic layers that won’t cure—you end up with a skillet that’s perfect around the edges but sticky in the middle.
The edges actually season beautifully when you go right-side-up. Why? Because excess oil runs away from them. They end up with that perfect thin coat.
The center? Gets all that excess. Becomes a sticky mess.
So ironically, right-side-up seasoning proves that thin coats work perfectly—the edges demonstrate it. You just need to get the center as thin as the edges. Upside-down does that.
Temperature Effects on Oil Viscosity and Movement
Higher temperatures decrease oil viscosity exponentially—at 450°F, vegetable oil flows about 10 times more easily than at room temperature, meaning any oil that seems firmly in place when you load your skillet into the oven will become highly mobile within minutes of reaching temperature.
The hotter it gets, the runnier the oil.
This is why you can’t just eyeball it at room temp. “Looks dry enough.” Maybe at 70°F. But at 450°F? That “dry” surface suddenly has mobile oil flowing around.
Temperature makes all the difference. And since seasoning requires high temps, you’re guaranteed to have oil movement during the process.
Step-by-Step: The Upside-Down Oven Seasoning Method
To season cast iron using the upside-down method, apply a minimal amount of oil to your clean skillet, wipe it off aggressively until the surface looks almost dry, place the skillet upside-down on your oven’s middle rack with foil below to catch drips, then bake at 450°F for one hour before cooling completely in the oven.
Here’s the full process. Do it right and you’ll never have sticky seasoning again.
Step 1: Preparing Your Cast Iron Skillet
Start with a completely clean and dry cast iron skillet—any food residue, old sticky seasoning, or moisture left on the surface will interfere with the new seasoning layer you’re about to apply.
Clean slate. That’s what you need.
Cleaning Thoroughly Before Seasoning
Wash your skillet with hot water and a stiff brush to remove any surface oils, dust, or cooking residue—a small amount of dish soap is fine despite what purists claim, since you’re building new seasoning on top and need a clean surface for proper adhesion.
Modern dish soap won’t hurt your existing seasoning. That’s a myth from when soap contained lye (it doesn’t anymore).
Scrub well. Get it clean. Rinse thoroughly.
Drying Completely to Prevent Steam Pockets
After washing, dry your skillet immediately with towels, then place it on a warm burner or in a 200°F oven for 5-10 minutes to evaporate every trace of moisture—water trapped under your new seasoning layer will create steam pockets and bubbles that ruin the finish.
Bone dry. Not “towel dry.” Actually dry.
Any water left on the surface turns to steam at seasoning temps. That steam has to escape somewhere. It creates bubbles, gaps, and weak spots in your seasoning.
Heat-dry every time. Takes five minutes. Prevents problems.
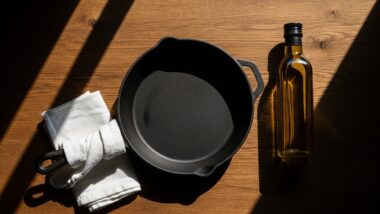
Step 2: Applying Oil to Your Skillet
Pour about half a teaspoon of your chosen seasoning oil onto the cooking surface of your warm (not hot) skillet, then use a paper towel or lint-free cloth to spread it across the entire surface including sides, bottom, handle, and any other exposed iron.
Choosing the Right Oil for Seasoning
Use vegetable oil, canola oil, or another high smoke point oil (400°F+) for best results—avoid oils prone to stickiness like flaxseed, and don’t overthink this because oil choice matters far less than proper application and the upside-down method.
Canola works. Vegetable oil works. Soybean works. Crisco works.
Pick what’s cheap and available. The upside-down method makes the oil choice almost irrelevant because you’re creating thin enough coats that any polymerizing oil performs well.
How Much Oil to Apply (Less Than You Think)
Start with just half a teaspoon for a 12-inch skillet—this seems absurdly small but you’re going to wipe most of it off anyway, and starting with less means less work removing excess and less chance of sticky results.
Oil amounts by skillet size:
| Skillet Size | Starting Oil Amount |
|---|---|
| 8-inch | 1/4 teaspoon |
| 10-inch | 1/2 teaspoon |
| 12-inch | 1/2 teaspoon |
| 14-inch | 3/4 teaspoon |
You’re going to remove 80-90% of this. The amount left is what actually seasons the pan.
Spreading Oil Evenly Across All Surfaces
Rub the oil in circular motions across the cooking surface, then work your way to the sidewalls, exterior, bottom, and handle—every exposed iron surface needs coverage because any bare spot will rust, and you want uniform protection everywhere.
Get everywhere. Inside, outside, handle, pour spouts, that awkward spot where handle meets pan body.
Miss a spot and that’s where rust appears a week later. Not worth the risk.
Step 3: Wiping Off Excess Oil (The Critical Step)
After applying oil everywhere, take a fresh paper towel and wipe the skillet like you’re trying to remove all the oil you just applied—keep wiping and buffing until the surface looks almost dry and feels just barely slick to the touch, not wet or shiny.
This step determines success or failure. More than any other step.
Why Aggressive Wiping Matters
Aggressive wiping removes excess oil that would pool and create stickiness while leaving behind only the microscopic coating that will actually polymerize into proper seasoning—the oil you wipe off isn’t wasted, it’s the difference between success and a sticky mess.
You’re not wasting oil. You’re preventing problems.
That oil you just wiped off? That would’ve become sticky gunk in the center of your pan. Good riddance.
The tiny amount left behind—so thin you can barely see it—that’s what becomes perfect seasoning.
The “Dry to the Touch” Standard
Your skillet should feel dry when you run your hand across it after wiping—if you can see shiny oil sitting on the surface or feel wetness, keep wiping with fresh paper towels until you reach the point where you almost wonder if there’s any oil left at all.
“Did I wipe too much off?”
That’s the correct thought. When you start second-guessing whether there’s enough oil, you’re probably at the right amount.
If you’re confident there’s plenty of oil, there’s too much.
Buffing Until No Visible Oil Remains
After your initial wipe-down, take another fresh paper towel and buff the entire surface for 1-2 minutes using firm circular motions—this final buffing distributes the remaining oil even thinner and creates the ideal molecular-level coating for polymerization.
Buff hard. Really work it.
The friction helps. Spreads the microscopic oil layer evenly. Generates a tiny bit of heat that helps with distribution.
Your final result should look like bare metal with maybe the slightest sheen if you catch the light right.
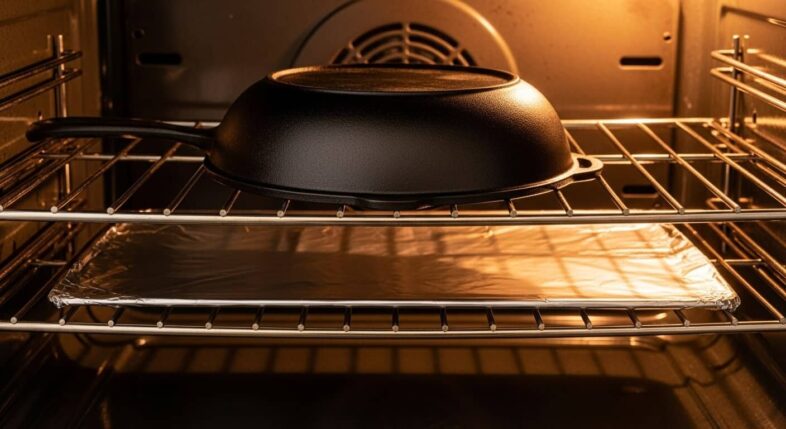
Step 4: Positioning Your Skillet Upside-Down in the Oven
Place your oiled and buffed skillet upside-down on the middle oven rack—the cooking surface should face downward, the bottom should face up, and the pan should rest stably on the rack edges without tipping or wobbling.
Flip it. Face down. This is the magic.
Placing the Skillet on the Middle Rack
The middle rack provides the most even heat distribution and allows proper air circulation above and below the skillet—avoid the top rack (too hot) or bottom rack (uneven heating) for best results.
Middle rack is the sweet spot. Heat surrounds the skillet evenly from all directions.
Top rack and you might get uneven seasoning with the top surface (which is actually the bottom of the skillet when upside-down) getting too hot. Bottom rack and air circulation suffers.
Ensuring Proper Air Circulation
Make sure there’s at least 3-4 inches of clearance on all sides of your skillet—good air flow is essential for even heating and proper polymerization, so don’t crowd multiple skillets too close together or push the pan against the oven wall.
Air needs to move. Heat needs to circulate.
Crowded oven equals uneven seasoning. Give your skillet space to breathe.
Angle and Stability Considerations
Your skillet should rest securely on the rack edges without tipping—most skillets balance perfectly upside-down on their rim, but if yours seems unstable, you can angle it slightly or place it across two parallel rack wires for better support.
It should sit steady. Not wobble or threaten to tip.
Most skillets are stable inverted. The rim is wide enough and heavy enough that they sit solid. But check before you close the oven door and walk away.
Step 5: Placing Foil or a Baking Sheet Below
On the rack directly below your upside-down skillet, place a sheet of aluminum foil or an old baking sheet to catch any oil drips—this protects your oven bottom and makes cleanup easier while not interfering with heat circulation if positioned correctly.
Catching Drips to Protect Your Oven
Even with thorough wiping, a few drops of oil will typically drip during the first 15-20 minutes of heating as the oil becomes liquid and gravity pulls excess away—catching these drips on foil beats scrubbing burnt oil off your oven floor later.
A few drops always fall. That’s normal and expected.
Better on foil than on your oven. Trust me. Burnt oil on oven elements smells terrible and takes forever to clean.
Proper Spacing Between Skillet and Drip Catcher
Leave at least 2-3 inches between your upside-down skillet and the drip catcher below—too close and you’ll block air circulation and create uneven heating, too far and you might as well not have a drip catcher.
One rack space works perfectly. Your skillet on middle rack, foil on the rack below.
Don’t put the foil directly on the oven bottom—that blocks heat and airflow. Use the rack below your skillet’s rack.
Why Clearance Matters for Even Heat Distribution
Heat needs to flow around your skillet from all directions for even polymerization—blocking airflow with a too-close drip catcher creates hot and cool zones that result in uneven seasoning with some areas properly cured and others still tacky.
Think of it like roasting a chicken. You want heat hitting it from all angles. Same with seasoning cast iron.
Block the airflow and you get uneven results.
Step 6: Setting the Correct Temperature
Set your oven to 450°F for most vegetable oils, or adjust to match your oil’s smoke point plus 25-50 degrees—this temperature is hot enough to fully polymerize the oil but not so hot that you’re burning it off as fast as you’re building coating.
450°F is the standard. Works for canola, vegetable oil, soybean, corn, and most common choices.
Optimal Seasoning Temperature (450-475°F)
The 450-475°F range provides enough heat to break down oil molecules and trigger polymerization while staying below the point where you start burning off your coating—most seasoning failures at the temperature level come from going too low (creating sticky under-polymerized oil) rather than too high.
Don’t go below 400°F. That’s the critical threshold for proper polymerization.
Above 475°F? You’re not gaining much and you risk burning instead of bonding.
The 450-475°F sweet spot works reliably across different oils and oven types.
Why Temperature Matters for Preventing Stickiness
Temperature directly determines whether oil polymerizes into hard seasoning or just gets sticky—too low and you’re essentially baking oil onto your pan without the chemical transformation that creates non-stick properties, too high and you burn off the coating before it can bond properly.
Polymerization requires specific heat. It’s chemistry. The reaction won’t happen properly at 350°F no matter how long you wait.
And yes, you can have sticky seasoning even with the upside-down method if your temp is wrong. The method prevents pooling. Correct temperature prevents stickiness from under-polymerization.
Both matter.
Step 7: Baking Time and Cooling Process
Bake your upside-down skillet for exactly one hour at temperature, then turn off the oven and leave the skillet inside to cool completely—this slow, controlled cooling is part of the curing process and prevents thermal shock that could damage fresh seasoning.
One-Hour Baking Duration
One hour at 450°F provides enough time for complete polymerization of your thin oil layer—less time and you might have incomplete bonding, more time doesn’t really help and just wastes energy.
Set a timer. One hour from when the oven reaches temperature (not from when you turn it on).
Not 45 minutes. Not “about an hour.” Exactly 60 minutes.
Cooling Completely in the Oven
After the hour is up, turn off the oven but leave the door closed with your skillet inside—let it cool naturally for at least another hour (overnight is fine) until the skillet is room temperature or just barely warm to the touch.
Patience here. Don’t rush it.
The cooling phase completes the cure. Pulling it out hot interrupts the final molecular bonding and can cause cracks or weak spots in your fresh seasoning.
Why Patience Prevents Seasoning Damage
Rapid temperature changes can cause your fresh seasoning to crack or separate from the iron—the coating is still finalizing its bond during cooldown, and shocking it with cold air (pulling a 450°F skillet into a 70°F kitchen) creates stress that weakens the finish.
Let it cool slow. In the oven. With the door closed.
You’ve already invested an hour. What’s another hour of patience to ensure perfect results?
Why the Upside-Down Method Works Better Than Right-Side-Up
The upside-down method produces superior seasoning because it uses gravity as a tool instead of fighting against it—excess oil drips away rather than pooling, resulting in consistently thin coats across the entire surface that polymerize into smooth, hard, non-stick finish instead of the sticky, uneven coating right-side-up seasoning often creates.
Physics wins. Every time.
Gravity Pulls Excess Oil Away From Cooking Surface
When your skillet is inverted, gravity pulls any mobile oil downward and away from the cooking surface (which is now facing down) toward the rim and off the edges—this automatic drainage ensures only oil that’s truly bonding to the iron stays in place while excess harmlessly drips away.
What goes down? Anything that would cause problems.
What stays? Only the good stuff. The bonding layer. The oil that’s starting to polymerize and stick.
Gravity does your quality control automatically.
Prevents Oil Pooling in the Center of the Skillet
The center of your cooking surface—normally the lowest point where oil accumulates—becomes the highest point when inverted, meaning oil actively flows away from this problem area instead of toward it, eliminating the single biggest cause of sticky seasoning failures.
That sticky center everyone complains about? Gone.
Can’t pool in the center when the center is the high point. Oil runs away from it. Problem solved.
This alone makes the upside-down method worth it.
Creates More Uniform Seasoning Layers
Right-side-up seasoning creates thick centers and thin edges, while upside-down seasoning produces uniform thickness everywhere because excess oil is removed from all areas equally by gravity—the result is consistent appearance, performance, and durability across the entire cooking surface.
Even coating. Edge to edge. Center to rim.
No thick spots. No thin spots. Just consistent, properly-polymerized seasoning that looks good and cooks great.
Reduces Sticky Spots and Tacky Patches
By preventing the oil accumulation that causes stickiness, the upside-down method dramatically reduces or eliminates tacky patches—most people who switch to this method after experiencing sticky right-side-up seasoning never have the problem again.
One try and you’re converted. That’s how effective it is.
Sticky seasoning becomes a thing of your past. You figure out the upside-down method and that frustrating problem just… disappears.
Comparing Upside-Down vs. Right-Side-Up Seasoning
Direct comparison between upside-down and right-side-up seasoning shows that inverted positioning produces consistently better results with fewer sticky failures, more uniform appearance, and superior cooking performance—the right-side-up method can work but requires even more aggressive oil wiping and offers no advantages to offset its higher failure rate.
Let’s put them head-to-head.
Right-Side-Up Seasoning Results and Common Problems
Right-side-up seasoning typically produces edges and sidewalls that look great but centers that range from slightly sticky to completely gummy, with common complaints including tacky cooking surfaces, uneven coloring (dark edges, lighter centers), and oil residue that never fully cures no matter how many times you re-bake it.
Typical right-side-up outcomes:
- Beautiful rim and edge seasoning (where oil drained away)
- Problematic center (where oil pooled)
- Frustration and re-work
- Wasted time and energy
- Beginners giving up on cast iron entirely
The method works if—and only if—you wipe so aggressively that there’s essentially no mobile oil left. But at that point, why not just flip the pan and let gravity help?
Upside-Down Seasoning Results and Benefits
Upside-down seasoning consistently produces smooth, hard, uniform finish from edge to center with minimal stickiness even for beginners who might not wipe quite aggressively enough—the method is more forgiving, more reliable, and delivers professional results without requiring expert-level technique.
What you get with upside-down:
- Consistent results every time
- Forgiving of slight over-oiling
- No sticky center problems
- Even appearance
- Works for beginners and experts alike
It’s just better. More reliable. Fewer variables to control.
Visual Differences After Multiple Coats
After 3-5 coats, right-side-up seasoned skillets often show darker, sometimes sticky centers with lighter, properly-seasoned edges, while upside-down seasoned skillets display uniform color and sheen across the entire surface with no variation between center and rim.
Put them side by side and you can immediately tell which was seasoned right-side-up (uneven) and which was upside-down (uniform).
The upside-down skillet looks professional. Factory-quality. Like a brand-new pre-seasoned Lodge.
The right-side-up skillet looks DIY. Blotchy. Amateur.
Performance Differences in Cooking
In actual cooking, upside-down seasoned cast iron releases food more easily from the center (where right-side-up tends to stick), heats more evenly because the seasoning thickness is uniform, and develops better non-stick properties faster because you’re building proper foundation layers instead of fighting with problematic sticky coats.
Cook an egg in both. The difference is immediately obvious.
Upside-down seasoned pan? Egg slides around freely. Even in the center.
Right-side-up seasoned pan? Edge is fine but center grabs and sticks.
Performance follows the quality of seasoning. Better seasoning equals better cooking.
Common Mistakes Even When Using the Upside-Down Method
Even with the upside-down method protecting you from oil pooling, you can still get sticky or uneven seasoning if you don’t wipe off enough oil before baking, use temperatures that are too low for proper polymerization, or remove the skillet from the oven before it’s completely cooled.
The method helps. Doesn’t make you foolproof.
Not Wiping Off Enough Oil Before Baking
The most common mistake is leaving too much oil on the skillet even when inverting it—while the upside-down position prevents pooling in the center, excessive oil anywhere on the surface can still create sticky patches, so you must wipe aggressively regardless of pan orientation.
Upside-down fixes pooling. Doesn’t fix over-oiling.
You still need to wipe thoroughly. The method just makes the results more forgiving if you leave slightly too much oil.
But leave WAY too much and you’ll still get stickiness—it’ll just be more evenly distributed sticky instead of concentrated in the center.
Forgetting to Place a Drip Catcher Below
Skip the foil or baking sheet below your inverted skillet and you’ll have burnt oil drips all over your oven bottom—not a seasoning failure but definitely an annoying cleanup problem that’s easily prevented with one sheet of aluminum foil.
You’ll only forget once. Then you’ll never forget again.
Cleaning burnt oil off oven surfaces is miserable. Takes elbow grease and harsh cleaners.
Just put the damn foil down. Takes five seconds.
Using Too Low a Temperature
Some people reduce temperature thinking it’s “safer” or will prevent smoking, but seasoning below 400-425°F creates under-polymerized sticky oil even with the upside-down method—the orientation prevents pooling but can’t fix chemistry that requires adequate heat to occur.
450°F minimum. Really.
Don’t baby it. The oil needs heat to transform properly.
Lower temps just create different problems—still sticky, just evenly sticky instead of pooled sticky.
Removing the Skillet Too Soon
Pulling your skillet out while still hot (even if the hour is up) interrupts the curing process and can cause your fresh seasoning to crack or remain tacky—thermal shock is real and patience during cooldown matters as much as the baking time itself.
Wait. Let it cool in the oven.
I know you’re excited to see the results. Wait anyway.
Skipping Multiple Coats
One coat—even a perfect upside-down coat—isn’t enough for durable seasoning that performs well in cooking. You need 3-5 coats minimum to build thickness and durability, and the upside-down method needs repeating for each individual coat.
Each layer builds on the previous. One coat is foundation. Three coats is functional. Five coats is excellent.
Don’t stop after one successful coat. Keep going.
What to Do If You Still Get Sticky Spots
If you get sticky spots even after using the upside-down method, you likely used too much oil or too low a temperature—the fix is to re-bake the sticky skillet at 450°F for another hour to complete polymerization, or if that doesn’t work, scrub off the sticky coating and start over with less oil.
Sticky spots CAN happen even with correct positioning. Usually from too much oil.
Identifying Sticky vs. Properly Polymerized Seasoning
Properly polymerized seasoning feels dry and smooth to the touch (like hard plastic), while sticky seasoning feels tacky, slightly soft, and may leave residue on your finger when touched—if you’re not sure, press firmly with your fingertip and see if it feels like touching glass (good) or partially-dried glue (bad).
The finger test works. Touch it.
Dry and smooth? You’re good.
Tacky or soft? That’s sticky seasoning that didn’t fully polymerize.
Re-Baking to Complete Polymerization
For minor stickiness, put the skillet back in a 450°F oven (still upside-down) for another 60-90 minutes—sometimes the oil just needed more time and heat to finish polymerizing, and the additional baking will complete the transformation and eliminate tackiness.
Extra heat often fixes it. The polymerization just wasn’t finished.
Give it another hour. Often that’s all it takes.
Scrubbing and Re-Seasoning Problem Areas
If re-baking doesn’t fix the stickiness, scrub the affected areas with coarse salt and a little oil to remove the failed seasoning, clean thoroughly, dry completely, then re-season just those spots (or the whole pan if it’s bad everywhere) using less oil and the upside-down method.
Failed seasoning needs removing. Can’t fix it in place.
Scrub it off. Start fresh. Less oil this time.
When to Strip and Start Over
If more than 30-40% of your skillet is sticky or if you’ve tried fixing it multiple times without success, it’s faster and easier to completely strip all the seasoning back to bare metal and build fresh seasoning from scratch using minimal oil and strict upside-down positioning.
Know when to quit. Sometimes starting over is the efficient choice.
Stripping takes an hour. Trying to fix terrible seasoning can take days of frustration.
The Physics of Why Upside-Down Prevents Pooling
The upside-down method works because gravity exerts constant downward force on any mobile liquid, and inverting your skillet means “downward” is now “away from the cooking surface” instead of “toward the center”—this simple geometric reversal transforms gravity from your enemy into your ally during the seasoning process.
It’s beautiful in its simplicity. Just flip the orientation and physics does the rest.
How Gravity Affects Liquid Oil on Angled Surfaces
On any angled surface, gravity pulls liquids toward the lowest available point—a skillet’s cooking surface has slight concavity (curves inward), so right-side-up means the center is lowest and oil flows inward, while upside-down means the rim is lowest and oil flows outward and away.
Gravity never stops. Acts on everything with mass. Your oil included.
Direction matters. Same force, different results based on orientation.
The Convex Shape of Skillets and Oil Migration
Most cast iron cooking surfaces are slightly concave (dish-shaped) when viewed from above, which creates a natural oil collection point in the center when positioned normally—flipping this concave surface upside-down effectively makes it convex (dome-shaped) from the new gravity perspective, so oil runs off instead of collecting.
Shape interacts with orientation and gravity. All three factors together determine where oil goes.
Concave + right-side-up + gravity = oil pools in center (bad)
Concave + upside-down + gravity = oil runs to edges and drips off (good)
Same shape. Different orientation. Opposite results.
Why Pour Spouts and Corners Are Vulnerable Right-Side-Up
Pour spouts create small low points where oil accumulates when the skillet is right-side-up, while corners where the cooking surface meets sidewalls trap mobile oil—both areas are prone to sticky patches with normal positioning but drain cleanly when inverted since they become high points rather than collection spots.
Those pour spouts? Death traps for oil when right-side-up.
Inverted? Oil runs right past them. Doesn’t collect.
Surface Tension and Oil Behavior at High Temperatures
Surface tension normally helps keep oil spread across surfaces, but at 450°F this tension decreases significantly and oil becomes more prone to flowing and collecting under gravity’s influence—the upside-down method counters this increased mobility by ensuring flow direction is away from critical cooking surfaces.
Hot oil is slippery. Low surface tension. Flows easily.
Can’t fight this. Can only account for it in your method.
Upside-down lets the oil flow but controls where it flows to.
Optimal Oil Application for the Upside-Down Method
Even with upside-down positioning protecting you from pooling, starting with minimal oil makes the process more forgiving and reliable—less oil means less to wipe off, less chance of leaving excess, and faster, easier buffing to reach that perfect thin coating.
Less is more. Always.
Starting with Minimal Oil (1/2 to 1 Teaspoon)
Begin with just half a teaspoon of oil for a 10-12 inch skillet rather than pouring liberally—this seems like too little but remember you’re spreading it across the entire surface AND wiping most of it off, so starting small makes the process easier.
Half a teaspoon feels absurdly small. Use it anyway.
You can always add more if needed (you won’t need it). Can’t easily remove excess once applied.
Application Techniques for Thin, Even Coats
Pour your small amount of oil into the center of the skillet and use circular rubbing motions with a paper towel to spread it outward toward edges and over all surfaces—the goal is complete coverage with minimal thickness, like you’re trying to make the oil cover as much area as physically possible.
Spread it thin. As thin as possible while still covering everything.
Think of it like spreading butter on toast when you’re almost out of butter. That thin.
Paying Attention to Handle, Sides, and Bottom
Don’t forget to oil the handle, exterior sidewalls, and bottom—any exposed iron needs protection, and these areas are easier to season properly than the cooking surface because they’re more vertical so oil naturally drips away from them.
Complete coverage. Everywhere.
The bottom especially gets forgotten. Then rusts. Then you’re annoyed.
The Relationship Between Oil Thickness and Stickiness
There’s a direct correlation between oil thickness and stickiness—thin coats (barely visible) polymerize perfectly into hard seasoning, while thick coats (visible shine or wetness) only partially cure and remain sticky regardless of temperature or time.
| Oil Thickness | Result After Baking |
|---|---|
| Microscopic (looks almost dry) | Perfect hard seasoning |
| Thin (slight sheen visible) | Usually good, might have minor sticky spots |
| Medium (clearly looks oiled) | Likely sticky in places |
| Thick (wet appearance) | Definitely sticky mess |
Thinner is always better. Always.
Temperature Control for Preventing Sticky Seasoning
Temperature control is critical because polymerization only occurs properly within a specific range—too low and your oil stays gummy, too high and you burn it off—and even the upside-down method can’t compensate for inadequate heat.
Get the temp right or nothing else matters.
Why 450-475°F Is the Sweet Spot
Most vegetable oils polymerize optimally between 450-475°F—this is hot enough to break down triglyceride molecules and trigger bonding but not so hot that you’re burning the coating faster than it forms, giving you the best balance of polymerization speed and coating durability.
This range has been tested and proven across millions of pans. It works.
Lower works sometimes. Higher works sometimes. This range works consistently.
What Happens at Lower Temperatures (350-400°F)
Seasoning at 350-400°F produces incomplete polymerization—the oil heats and spreads but doesn’t fully transform into bonded coating, leaving you with a surface that feels sticky or tacky and performs poorly even with perfect upside-down positioning and oil application.
Under-temp equals under-polymerized. Simple.
The chemistry requires adequate heat. Can’t cheat physics.
What Happens at Higher Temperatures (500°F+)
Above 500°F you risk burning oil faster than it bonds—while some polymerization occurs, you also get excessive smoking, potential burning of fresh seasoning, and no real benefit over the 450-475°F range that justifies the drawbacks.
More heat doesn’t mean better. Just means smokier kitchen and potential burning.
Stick with the proven range.
Oven Calibration and Accuracy Issues
Many home ovens run 25-50°F hotter or cooler than the dial indicates—if you’re getting consistent sticky results despite proper technique, check your actual oven temperature with an oven thermometer and adjust accordingly to hit true 450°F.
Your oven might be lying to you. Set to 450°F. Actually running at 375°F.
Get a cheap oven thermometer. Verify reality. Adjust your dial to compensate.
Using the Upside-Down Method for Different Cookware
The upside-down method works for all cast iron cookware—skillets, Dutch ovens, griddles, specialty pieces—though some shapes require slight positioning adjustments to ensure stability and proper drip drainage.
Not just for skillets. Universal technique.
Seasoning Skillets of Different Sizes
All skillets from 6-inch to 15-inch benefit equally from upside-down positioning—smaller pans are easier to balance and use less oil, while larger pans may need slightly more attention to ensure they’re stable on the rack and have adequate drip protection below.
Same method. Different sizes just mean minor adjustments to oil amounts and stability checks.
Dutch Ovens and Lids (Special Considerations)
Season Dutch oven pots upside-down just like skillets, and season the lid separately also inverted with the knob facing down—both pieces need the same treatment, and positioning them on separate racks (or seasoning separately if your oven is small) ensures proper air circulation around each.
Pot upside-down. Lid upside-down. Both treated identically to skillets.
The lid especially benefits from inversion since its concave interior would pool oil terribly if seasoned right-side-up.
Griddles and Flat Cast Iron Pieces
Flat griddles can be seasoned upside-down though they’re more stable right-side-up due to their flat geometry—for griddles, the upside-down method offers less dramatic benefits since there’s no concave center to trap oil, but it still helps with overall evenness.
Flatter pieces benefit less. Still worth doing but not as critical as with curved skillets.
Grill Pans and Specialty Shapes
Grill pans with raised ridges should be seasoned upside-down to prevent oil from pooling in the valleys between ridges—the inverted position lets excess oil drain out of these low spots instead of collecting there and creating sticky stripes.
Those ridge valleys are oil traps when right-side-up. Upside-down drains them clean.
Drip Catchers: Foil vs. Baking Sheets
Both aluminum foil and old baking sheets work well as drip catchers—foil is disposable and conforms to any rack size, while baking sheets are reusable and potentially more stable but require cleaning after each use.
Pick what’s convenient. Both work.
Aluminum Foil Placement and Coverage
Place a sheet of foil slightly larger than your skillet on the rack directly below your seasoning position—don’t lay it flat on the oven bottom (blocks heat flow) but rather crimp the edges over the rack wires to hold it in place and create a catch basin.
Foil on rack. Not on oven floor.
One rack below your skillet works perfectly. Catches drips without blocking airflow.
Using Old Baking Sheets or Pans
A beat-up baking sheet you don’t mind getting oily works great as a permanent drip catcher—position it on the lower rack and it’ll catch drips for years, though you’ll need to occasionally clean off accumulated burnt oil.
Designate one old sheet pan as your cast iron seasoning drip catcher. Use it forever.
Burnt oil builds up. Just scrub it off occasionally.
Maintaining Proper Air Gap for Circulation
Keep 2-3 inches between your inverted skillet and the drip catcher regardless of type—this gap allows heat to circulate and prevents the drip catcher from creating a heat shield that causes uneven seasoning.
Air needs to flow. Don’t block it.
Too close and the catcher interferes with heating. Right distance and it’s invisible to the seasoning process.
Cleaning Up After Seasoning
Disposable foil gets tossed after each use, while reusable baking sheets need scrubbing with hot water and maybe some Bar Keeper’s Friend to remove accumulated drips—either way, cleanup is minimal compared to the nightmare of burnt oil on your oven floor.
Foil: crumple and trash. Done.
Baking sheet: scrub with hot water and abrasive cleaner. Still way easier than oven cleanup.
Multiple Coats and the Upside-Down Method
Every single coat of seasoning should be applied using the upside-down method—don’t switch to right-side-up after the first coat thinking it’s now protected, because each layer benefits from the same gravity-assisted drainage that prevents pooling and ensures uniform coating.
Repeat the method. Every coat. No shortcuts.
Repeating the Process for Layered Seasoning
After your first coat cools completely, repeat the entire process—oil, wipe, invert, bake at 450°F for one hour, cool—and continue for 3-5 total coats to build durable seasoning that withstands cooking stress and develops excellent non-stick properties.
One coat: foundation
Three coats: functional
Five coats: excellent
Each layer builds on the previous. Each one needs the same careful treatment.
How Many Coats You Need (3-5 Minimum)
Three coats is the minimum for functional cooking seasoning that won’t fail immediately, while five coats provides excellent durability and performance—you can do more but returns diminish after 5-6 layers.
Don’t stop at one or two. Not enough.
Get to at least three before you start cooking.
Allowing Complete Cooling Between Coats
Each coat must cool completely to room temperature before applying the next—rushing between coats while the pan is still warm can cause the fresh oil to behave unpredictably and may result in poor bonding between layers.
Cool completely. Room temp. Then apply the next coat.
Warm pan plus fresh oil equals unpredictable results.
Building Durable Seasoning Over Time
The initial 3-5 oven seasoning coats create your foundation, and then regular cooking adds natural seasoning layers over months and years—the upside-down foundation ensures you’re building on a solid, non-sticky base rather than trying to fix problems with subsequent layers.
Start right. Build right. Maintain through cooking.
The upside-down foundation lasts for years if maintained properly.
Troubleshooting Uneven Seasoning Despite Upside-Down Method
If you’re getting uneven results even with proper positioning, the culprit is usually uneven heat distribution from your oven having hot spots, or inconsistent oil application that leaves some areas with too much oil and others with too little.
Method is right. Something else is wrong.
Dealing with Blotchy or Patchy Results
Blotchy seasoning (light and dark patches) despite upside-down positioning usually indicates uneven oil application—next time, pay more attention to spreading oil uniformly and buffing the entire surface equally, giving extra attention to areas that ended up lighter.
Some spots got more oil. Some got less.
Fix it by being more thorough and consistent during application and wiping.
Hot Spots in Your Oven Affecting Results
Ovens with hot spots create uneven seasoning because hotter areas polymerize faster and darker while cooler areas may not fully cure—test your oven with an oven thermometer in multiple locations and if hot spots exist, rotate your skillet 180 degrees halfway through the seasoning hour.
Your oven might heat unevenly. Most do to some degree.
Check with a thermometer. Rotate the pan if you’ve got significant variation.
Addressing Thin Spots vs. Thick Spots
Thin spots (light color, rough texture) need more oil in those areas during next application, while thick spots (darker, potentially sticky) need less oil or more aggressive wiping—adjust your technique based on results rather than applying oil identically every time.
Look at your results. Learn from them.
Adjust next coat based on what the previous coat showed you.
Re-Evening Out Inconsistent Seasoning
To even out already-applied uneven seasoning, do another full coat paying special attention to the deficient areas—the upside-down method will still work but you’ll need to manually adjust oil distribution to favor thin spots and minimize thick spots.
One more coat usually fixes most unevenness issues.
Pay attention. Put more oil where it’s thin. Less where it’s thick.
The Role of Oil Type in Preventing Sticky Pools
While the upside-down method works with any oil, some oils are more prone to stickiness than others—flaxseed oil particularly tends toward sticky, brittle seasoning, while vegetable oil, canola, and soybean oils produce more reliable results regardless of positioning.
Oil choice matters less with upside-down method. But it still matters some.
High Smoke Point Oils and Polymerization
Oils with smoke points above 400°F (canola, vegetable, soybean, corn) polymerize reliably in the 450-475°F seasoning range and are less likely to burn or create sticky residue—their fatty acid composition bonds well with iron when given proper heat and thin application.
High smoke point gives you more margin for error. Temperature fluctuations don’t ruin everything.
Oils Prone to Stickiness (Flaxseed, Others)
Flaxseed oil is notorious for creating beautiful initial finish that becomes sticky or flaky over time, even with perfect upside-down technique—its very high polyunsaturated content creates brittle seasoning that’s finicky and failure-prone despite what internet hype suggests.
Avoid flaxseed. Not worth the headaches.
Looks great initially. Falls apart over time. Way too much trouble.
Best Oils for Clean, Non-Sticky Results
Canola, vegetable, and soybean oils consistently produce clean, non-sticky seasoning when properly applied with the upside-down method—they’re cheap, available everywhere, and reliable enough that oil choice becomes almost irrelevant when combined with correct positioning.
Reliable choices:
- Canola oil (cheap, works great)
- Generic vegetable oil (usually soybean blend)
- Pure soybean oil
- Corn oil
Any of these plus upside-down method equals success.
How Oil Choice Interacts with Upside-Down Method
The upside-down method makes oil choice less critical because it prevents the pooling that amplifies the weaknesses of certain oils—even somewhat problematic oils work better when inverted because you’re maintaining thin coats where they perform fine rather than letting them pool where they perform poorly.
Good oil + upside-down = excellent results
Okay oil + upside-down = good results
Good oil + right-side-up = inconsistent results
Okay oil + right-side-up = frequent failures
Air Circulation and Heat Distribution
Proper air circulation around your inverted skillet ensures even heating and consistent polymerization across the entire surface—blocking airflow creates temperature variations that result in uneven seasoning even when oil distribution is perfect.
Heat needs to flow. Air needs to move.
Why Air Flow Around the Skillet Matters
Heat transfers to your skillet primarily through hot air convection in your oven—if air can’t circulate freely around the entire pan, some areas get more heat exposure than others, creating dark properly-seasoned spots next to light under-seasoned areas.
Blocked air = uneven heating = uneven seasoning
Simple cause and effect.
Convection vs. Conventional Ovens
Convection ovens with fans circulate air actively and often produce more even seasoning results, while conventional ovens rely on natural convection and may have more temperature variation—both work fine but convection makes the process slightly more foolproof.
Convection is nice but not required. Conventional ovens work fine.
Just be aware that conventional ovens might need rack repositioning or pan rotation for best results.
Rack Positioning for Optimal Results
Middle rack provides the most even heat from all directions in most ovens—avoid bottom rack (too close to heating element) or top rack (uneven heat) unless your specific oven has quirks that make other positions better.
Start with middle rack. Works 95% of the time.
Adjust if your oven is weird.
Avoiding Overcrowding in the Oven
Season one skillet at a time if possible, or at most two with plenty of space between them—crowding multiple pans close together blocks air circulation and creates uneven heating that defeats the purpose of careful positioning.
Space matters. Don’t crowd.
One pan gets perfect air circulation and even heating. Three pans crammed together fight for heat and airflow.
Preventing Drips and Oven Mess
Even with minimal oil application and thorough wiping, expect a few drops to drip during upside-down seasoning—this is normal, expected, and why you use drip catchers, not a sign that you applied too much oil.
Some dripping is normal. That’s the point.
How Much Oil Actually Drips in the Upside-Down Method
Typically 3-8 drops of oil will drip during the first 20 minutes of heating as the oil becomes fluid and gravity pulls excess away—this small amount is what would have pooled in your skillet’s center if you’d seasoned right-side-up, so dripping is actually success.
A few drops on your foil = proper technique working correctly
No drops at all = maybe you wiped TOO much (rare but possible)
Lots of drips = you didn’t wipe enough
Protecting Oven Bottom and Heating Elements
Never let oil drip directly onto oven bottom or heating elements—burnt oil is extremely difficult to clean and creates smoke during future oven use, which is why the drip catcher on a lower rack is non-negotiable.
Oven elements with burnt oil = smoke and stink for months
Clean oven = happy cooking
Use the drip catcher.
Dealing with Smoke During Seasoning
Some smoke is normal when seasoning cast iron—crack a window, run your exhaust fan, and expect your kitchen to smell like hot oil for an hour, but excessive smoke usually means too much oil or temperature that’s too high.
Normal smoke: fine, expected
Excessive smoke filling kitchen: too much oil or too hot
Cleanup Tips for Post-Seasoning Oven Maintenance
After seasoning, let your oven cool, then wipe down any oil residue on racks or oven walls with a damp cloth—regular maintenance after each seasoning session prevents buildup that becomes harder to remove later.
Quick wipe-down after cooling. Prevents long-term problems.
Don’t let oil accumulate over multiple seasoning sessions.
When the Upside-Down Method Isn’t Necessary
The upside-down method is essential for initial seasoning and major re-seasoning but less critical for quick touch-ups on well-established seasoning or pre-seasoned cast iron that just needs maintenance.
Not every situation requires it.
Stovetop Seasoning Techniques
Quick stovetop seasoning (heating pan, adding oil, wiping, heating to smoke) doesn’t benefit from inversion because the process is fast and you’re manually controlling oil distribution throughout—save upside-down for oven seasoning where the pan sits unattended for an hour.
Stovetop: you’re actively managing the process. Don’t need to flip.
Oven: hands-off for an hour. Definitely flip.
Pre-Seasoned Cast Iron Maintenance
Factory pre-seasoned cast iron like Lodge doesn’t need upside-down seasoning unless you’re doing major repair—light maintenance coats can be done right-side-up because you’re adding to already-good base seasoning rather than building from scratch.
Good existing seasoning is forgiving. Quick touch-ups work fine right-side-up.
Building from bare metal? Use upside-down religiously.
Touch-Up Seasoning on Well-Established Pans
If your skillet has years of solid seasoning and you’re just refreshing a worn spot, right-side-up application is usually fine because the surrounding good seasoning prevents major pooling and the small amount of new oil you’re adding won’t cause problems.
Established seasoning: right-side-up touch-ups work
New seasoning: upside-down is mandatory
Alternative Methods and How They Compare
The upside-down method isn’t the only way to season cast iron—stovetop seasoning, outdoor grill seasoning, and even right-side-up oven seasoning with extra-careful oil application all work, but none match the reliability and consistency of the upside-down approach.
Other methods exist. None are better.
The Right-Side-Up Method (Why People Still Use It)
Some experienced casters can make right-side-up work through aggressive oil wiping and perfect technique—they’re basically removing enough oil that pooling can’t occur even with the center facing up, but this requires more skill and attention than just flipping the pan.
Right-side-up works if you’re really good at wiping.
But why make it harder? Just flip the pan.
Stovetop Seasoning (Pros and Cons)
Stovetop seasoning (oil, heat, wipe, smoke, cool) builds layers quickly but unevenly—good for quick touch-ups or breaking in new pans but not ideal for building serious foundational seasoning like the oven method provides.
Fast. Convenient. Uneven.
Use it for quick fixes. Not major builds.
Outdoor Grill Seasoning
Seasoning on a charcoal or gas grill works well and keeps smoke out of your house—you can use upside-down positioning on grill grates though temperature control is trickier than with an oven.
Works great. Temperature management is the challenge.
Why Upside-Down Remains the Gold Standard
The upside-down oven method combines reliability, consistency, and foolproofness better than any alternative—beginners get good results, experts get perfect results, and the failure rate is minimal when basic guidelines are followed.
It’s the default for good reason. Works for everyone.
Real Results: Before and After Using Upside-Down Method
People who switch from right-side-up to upside-down seasoning typically report immediate improvement—sticky centers disappear, color becomes more uniform, and cooking performance improves dramatically with less frustration and failed attempts.
The results speak for themselves.
What Properly Seasoned Cast Iron Looks and Feels Like
Properly upside-down seasoned cast iron has a smooth, hard surface that feels like touching glass or hard plastic, displays uniform dark brown to black color from edge to center, and shows water beading up and rolling off instead of absorbing.
Touch it. Should feel dry, smooth, hard.
Look at it. Should be even color throughout.
Test it. Water should bead up.
Texture Comparison: Sticky vs. Smooth Seasoning
Sticky seasoning feels tacky or soft like partially-dried glue, leaves residue on your finger when touched firmly, and has visible thick patches or shiny wet-looking areas—properly polymerized seasoning feels completely dry, smooth, and hard with no tackiness anywhere.
Finger test is instant feedback.
Sticky: bad. Start over.
Smooth: good. Keep building.
Long-Term Durability of Upside-Down Seasoned Skillets
Cast iron seasoned properly with the upside-down method develops durable finish that lasts years with normal use and maintenance—no flaking, no premature wearing, just steady improvement as cooking adds natural layers to the solid foundation.
The initial upside-down coats last. They don’t fail or flake prematurely like right-side-up sticky coats often do.
Build it right and it lasts.
Cooking Performance Improvements
Skillets seasoned upside-down release food more easily from all areas (not just the edges), heat more evenly due to uniform seasoning thickness, and develop non-stick properties faster because you’re building on solid foundation rather than fighting with problematic base layers.
Better release. Better heating. Better performance.
All because you flipped the pan upside-down.
Expert Tips for Perfect Upside-Down Seasoning
Master seasoners recommend preheating your oven fully before loading the skillet, working quickly during oil application to prevent premature drying, using quality lint-free cloths or paper towels to avoid leaving fibers, and timing multiple skillets efficiently if you’re seasoning several pieces.
Little details that improve results.
Pre-Heating the Oven Fully Before Starting
Start your oven preheating before you begin oiling your skillet—you want the oven at full temperature when you load the pan, ensuring consistent heat from the moment seasoning begins rather than gradual ramp-up that creates uneven initial polymerization.
Oven at temp before pan goes in.
Not “getting there.” Actually there.
Working Quickly During Oil Application
Apply and wipe your oil efficiently—the thinner the coat, the faster it can start drying, so don’t leave a freshly oiled pan sitting around for 10 minutes before wiping it.
Oil, spread, wipe. Continuous process.
Don’t stop between steps.
Using Lint-Free Cloths or Paper Towels
Paper towels work fine but lint-free cloths (old t-shirts, microfiber) are better because they don’t leave fibers embedded in your oil coating—any lint left behind becomes permanent part of your seasoning and creates texture.
Blue shop towels. Old t-shirt squares. Microfiber.
All better than cheap paper towels that shed.
Timing Multiple Skillets for Efficiency
If seasoning several pans, prep them all at once (clean, dry, oil, wipe), load the oven with multiple inverted skillets ensuring adequate spacing, and season them together—saves time and energy compared to doing them individually.
Batch processing saves hours.
Just don’t crowd. Space them properly.
The Complete Upside-Down Seasoning Timeline
From start to finish, properly seasoning one coat on one skillet takes about 2.5-3 hours—15 minutes prep and oil application, 1 hour baking, 1-2 hours cooling, with the process repeated 3-5 times for complete initial seasoning.
Plan your time. It’s not quick.
Total Time Required (Including Cooling)
One complete coat: 2.5-3 hours (mostly hands-off waiting)
Five complete coats: 12-15 hours total (can spread over multiple days)
Don’t rush. Good seasoning can’t be hurried.
Planning for Multiple Coats in One Day
You can do 2-3 coats in one day if you start early—coat one in the morning, let it cool, apply coat two midday, cool, apply coat three evening, leave it to cool overnight.
Marathon seasoning day. Possible but exhausting.
Overnight Cooling Strategies
Many people apply a coat in the evening, leave it to cool in the oven overnight, then apply the next coat the following day—this ensures complete cooling and prevents rushing the process.
Evening application. Overnight cool. Morning next coat.
Slow and steady.
Building Seasoning Over Multiple Sessions
There’s no rule that says all coats must be done consecutively—apply 2-3 coats one weekend, cook with the pan for a week, add 2 more coats the next weekend, and you’ll still end up with excellent seasoning.
Space it out. No rush.
The seasoning doesn’t care if coats are days apart.