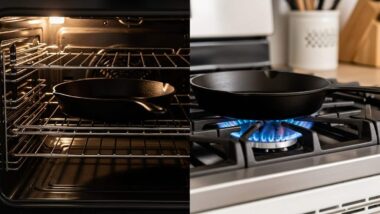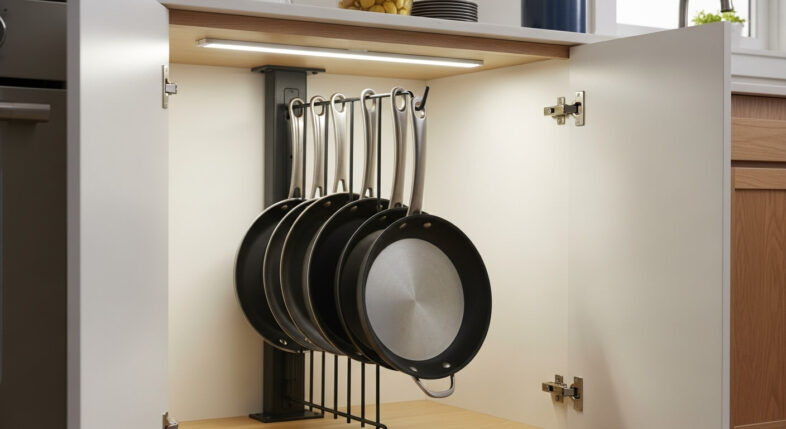
Vertical skillet storage keeps pans standing upright at waist-to-shoulder height, eliminating the need to bend down into lower cabinets—which directly reduces arthritis pain in your back, hips, knees, and hands.
Here’s the thing—you’re probably storing your skillets the worst possible way for arthritis. Stacked flat in a lower cabinet. Which means bending down (ouch), lifting the top three pans (double ouch), grabbing the one you need, then restacking everything (why are we doing this to ourselves?).
Stop. There’s a better way.
Table of Contents
- 1 Why Vertical Skillet Storage Eliminates Arthritis Pain from Bending
- 2 Understanding the Arthritis-Bending Connection in Kitchen Storage
- 3 Types of Vertical Skillet Storage Solutions for Seniors
- 4 Ideal Storage Height to Minimize Arthritis Bending
- 5 Selecting Arthritis-Friendly Vertical Organizers
- 6 Installation Considerations for Senior Safety
- 7 Organizing Skillets Vertically for Maximum Arthritis Relief
- 8 Transitioning from Horizontal to Vertical Skillet Storage
- 9 Specific Vertical Storage Products for Arthritis
- 10 Maintaining Vertical Storage Systems with Arthritis
- 11 Combining Vertical Storage with Other Arthritis Aids
- 12 Vertical Skillet Storage for Different Kitchen Types
- 13 Addressing Common Vertical Storage Challenges
- 14 Pain Tracking and Improvement Documentation
- 15 DIY Vertical Skillet Storage Projects for Seniors
- 16 Financial Assistance and Accessibility Grants
- 17 Vertical Storage Impact on Daily Cooking Routine
- 18 Teaching Family Members About Vertical Storage Benefits
- 19 Vertical Skillet Storage in Assisted Living and Senior Housing
- 20 Psychological Benefits of Arthritis-Friendly Storage
- 21 Advanced Vertical Storage Strategies
- 22 Working with Occupational Therapists on Storage
Why Vertical Skillet Storage Eliminates Arthritis Pain from Bending
Vertical storage positions skillets upright—like books on a shelf—at a height that lets you grab what you need without bending, lifting stacked pans, or straining any joints.
The Problem with Traditional Stacked Skillet Storage
Stacked pans are arthritis torture devices masquerading as organization.
You bend down to access the lower cabinet. Your knees protest. Your back complains. Then you’re lifting the top 2-3 pans with one hand while trying to grab the bottom skillet with the other, all while maintaining an awkward bent-over position that compresses your spine and stresses every joint from your neck down.
And don’t even get me started on putting them back. The balancing act of restacking while bent over? That’s asking for a flare-up.
How Vertical Storage Reduces Bending and Reaching
Vertical systems keep pans standing up at the right height. Simple physics—when items are vertical, you access them from the side at whatever height you install the organizer.
No bending below your knees. No reaching over your head. Just straight-on access at waist or chest level, which is exactly where your body handles things most comfortably.
Joint-Saving Benefits of Upright Pan Organization
Each pan has its own slot. You slide one out without moving others.
Your hands? They’re gripping one pan handle instead of juggling three pans. Your back? Staying straight instead of folded in half. Your knees? Not bearing your weight while you’re hunched over digging through a cabinet.

The difference is massive. We’re talking 15-20 bending episodes eliminated per week if you cook regularly.
Immediate Pain Relief from Proper Storage Height
Most people notice the difference the first day.
Grabbing a skillet becomes a simple reach-and-pull instead of a whole production involving multiple joint movements and awkward positions. Less movement, less pain. Math checks out.
Understanding the Arthritis-Bending Connection in Kitchen Storage
Bending to access low cabinets creates compression forces on your spine, loading stress onto your hips and knees, and requires you to lift heavy objects from mechanically disadvantaged positions—all of which aggravate arthritis inflammation.
How Bending Aggravates Arthritic Joints
Spinal Compression from Repeated Bending
Every time you bend forward, your vertebrae compress. The discs between them squish. If you’ve got spinal arthritis (and many seniors do), this compression directly irritates inflamed facet joints.
Bend once? Annoying. Bend 10 times a day for years? You’re accelerating degeneration.
Hip and Knee Stress During Low Cabinet Access
Getting down to cabinet level requires hip flexion and often knee bending. If you’ve got arthritis in these joints, you’re asking them to bear your full body weight while in a compromised position.
Then you’re lifting something while in that position. The load on your joints multiplies—you’re not just supporting yourself, you’re supporting yourself plus a 3-pound cast iron skillet.
Wrist Strain from Lifting While Bent Over
Lifting from a bent position changes leverage. You can’t use your legs properly, so your arms and wrists compensate.
Arthritic wrists don’t compensate well. They hurt, they complain, and they’re more likely to drop things—which creates a whole new set of problems.
Balance Issues That Increase Fall Risk

Bending shifts your center of gravity forward. You’re less stable.
Add in the fact that you’re often holding a heavy pan while bent, and you’ve created a fall risk. Falls are the leading cause of injury in seniors—why increase the odds unnecessarily?
Why Traditional Skillet Storage Fails Seniors
Lower Cabinet Accessibility Challenges
Most kitchen cabinets are designed for people in their 30s and 40s with no mobility issues.
Lower cabinets sit 0-24 inches off the floor. That’s below-knee height for most people, which means significant bending is required. For someone with arthritis, that’s not just inconvenient—it’s painful enough to make you avoid cooking.
Stacked Pan Problems for Arthritic Hands
Stacked pans require you to:
- Lift the top pans (grip strength)
- Hold them while reaching for the bottom pan (sustained grip)
- Balance multiple pans (coordination your arthritic hands might not have)
- Restack without dropping anything (fine motor control)
Each step stresses inflamed joints. And if your hands are having a bad day? This task becomes nearly impossible.
Weight Distribution Issues When Bent
Lifting a 2-pound aluminum pan while standing upright? Fine. Lifting that same pan while bent at 90 degrees? Your back feels like it’s lifting 10 pounds.
Physics works against you when you’re bent. The longer the lever arm (your bent torso), the more force required. More force equals more joint stress.
Recovery Time After Bending Episodes
Here’s what nobody tells you—the pain from bending doesn’t always show up immediately.
You bend, you get your pan, you stand up, you feel okay. Then 20 minutes later, your lower back starts screaming. Or tomorrow morning, you can barely get out of bed because yesterday’s kitchen bending accumulated into a flare-up.
The Cumulative Effect of Daily Kitchen Bending
Multiple Bends Per Day Add Up
Count them sometime. Getting a skillet for breakfast. Putting it away. Getting it again for dinner. Putting it away again.

That’s four bends minimum. More if you’re cooking multiple times or retrieving different pans. Four bends times seven days equals 28 weekly bending episodes just for skillets—not counting other cookware, dishware, or stored items.
Chronic Pain Development from Repetitive Motion
Repetitive stress injuries aren’t just for typing. Repetitive bending creates the same problem—small damages that accumulate faster than your body can heal them.
Arthritis already impairs healing. Add repetitive stress and you’re in a losing battle.
Energy Depletion from Unnecessary Movements
Every bend costs energy. Not much individually, but cumulatively? It matters.
Seniors have limited energy reserves. Spending them on inefficient storage systems means less energy for cooking, socializing, or activities you actually enjoy.
Long-Term Joint Deterioration Prevention
This is the big picture. Reducing daily joint stress slows arthritis progression.
You can’t stop arthritis entirely (unfortunately), but you can stop making it worse through poor storage choices. Vertical storage is preventive medicine.
Types of Vertical Skillet Storage Solutions for Seniors
Vertical skillet storage comes in four main types—cabinet-mounted systems that utilize existing cabinet space, countertop organizers that sit on work surfaces, wall-mounted holders that hang pans on walls, and drawer-based dividers that keep pans upright in deep drawers.
Cabinet-Mounted Vertical Organizers
These install inside existing cabinets. Smart choice if you’ve got cabinet space but want better organization.
Pull-Out Vertical Rack Systems
These are sneaky good. Vertical dividers mounted on a sliding base that pulls out like a drawer.
You open the cabinet door, pull the entire rack forward, and all your pans are right there at eye level. No reaching into dark cabinet depths. No bending down to see what’s in back.

Costs run $40-100 depending on size and quality. Installation usually requires screwing a track into the cabinet base.
Fixed Divider Installations
Simpler and cheaper—$20-40 typically. These are just vertical dividers (often metal or wood) that create slots inside your cabinet.
No moving parts. Just dividers that keep pans standing upright. You still need to reach into the cabinet, but at least you’re not unstacking things.
Adjustable Slot Configurations
Better divider systems let you move the slots to accommodate different pan sizes.
Got a 12-inch skillet and an 8-inch one? Adjustable dividers let you space them appropriately instead of forcing everything into fixed slots that might not fit right.
Weight Capacity Considerations for Heavy Skillets
Check the specs. Some organizers max out at 30 pounds total, others handle 50+.
If you’ve got cast iron (which you shouldn’t for arthritis, but some people insist), make sure your organizer can handle the weight. Collapsing organizers create hazards and mess.
Countertop Vertical Storage Options
Don’t have cabinet space or can’t install anything? Countertop organizers sit right on your work surface.
Freestanding Pan Organizers
These look like dish racks but for pans. Metal or wood frames with vertical slots.
No installation required. You set them on the counter, load your pans, done. Perfect for renters or people who don’t want to modify cabinets.
Price range: $15-50 depending on capacity and materials.
Compact Designs for Limited Counter Space
Counter space is precious. Look for organizers with small footprints—maybe 12 inches wide by 6 inches deep.
These hold 3-4 pans vertically in the space a toaster occupies. Not huge capacity, but enough for daily-use skillets.
Stability Features for Safe Access
Weighted bases or non-slip feet matter here. You don’t want the organizer tipping when you pull a pan out.
Test stability before buying if possible. If it wobbles in the store, it’ll wobble worse at home when you’re yanking a stuck pan out.
Material Choices: Wood, Metal, Plastic
Metal lasts longest and handles weight best. Wood looks nicer. Plastic is lightest but can crack over time.
For arthritis purposes, metal or wood work better—they’re sturdier, which means less wobbling when you’re removing pans with shaky hands.
Wall-Mounted Vertical Skillet Holders
Hang your pans on the wall. Sounds weird, works great (if you’ve got wall space).
Installation Height for Arthritis-Friendly Access
Mount at your optimal height—usually 40-50 inches from the floor, which puts handles at roughly chest height for most people.
This is critical. Too low and you’re bending. Too high and you’re reaching overhead (also bad for arthritic shoulders).
Weight-Bearing Requirements
Wall studs are your friend. Always mount heavy-duty pan storage into studs, not just drywall.
Drywall anchors can work for lightweight aluminum pans but will fail with heavier cookware. Studs handle the load properly.
Pegboard Systems for Customizable Storage
Pegboard is massively flexible. Install the board, then add hooks wherever you want them.
Rearrange anytime. Add more hooks as needed. Works great for mixing skillet storage with other kitchen tools.
Magnetic Strip Solutions for Lightweight Pans
Magnetic knife strips work for pans too—if your pans are magnetic (steel, not aluminum) and relatively lightweight.
Strong rare-earth magnet strips can hold 2-3 pound pans easily. Just grab and pull off. Super simple access.
Drawer-Based Vertical Storage Systems
Got deep drawers? Turn them into vertical pan storage.
Deep Drawer Vertical Dividers
These are adjustable dividers that create vertical slots inside drawers. Similar to cabinet dividers but designed for drawer depths.
Drawers are often at better heights than lower cabinets—maybe 32-36 inches off the floor. That’s waist-level access, which is perfect.
Sliding Organizers for Easy Access
Some drawer systems include sliding trays. The whole divider assembly slides forward when you open the drawer.
Brings pans right to you instead of making you reach into the drawer depth.
Soft-Close Features to Prevent Jarring
If you’re installing new drawer slides anyway, soft-close mechanisms prevent slamming.
Jarring impacts hurt arthritic hands and shoulders. Soft-close absorbs that shock.
Optimal Drawer Height Placement
Waist-level drawers work best. Mid-torso height where you can see into the drawer without bending and can lift from a neutral spine position.
Lower drawers defeat the purpose—you’re still bending to access them.
Ideal Storage Height to Minimize Arthritis Bending
The optimal storage height for vertical skillet storage is between your waist and shoulders—roughly 36 to 54 inches from the floor for most people—which allows access without bending down or reaching overhead.
The Ergonomic “Golden Zone” for Seniors
Ergonomics researchers identified this zone decades ago. It’s where your hands work most efficiently with least joint stress.
Waist to Shoulder Height Range
For average-height people (5’4″ to 5’10”), this means 34-56 inches off the floor.
Shorter folks shift this down 2-4 inches. Taller folks shift up. The principle stays the same—between waist and shoulders.
Individual Height Adjustments
Measure yourself. Stand normally, note your waist height. Note your shoulder height. That’s your personal golden zone.
Don’t use generic measurements if your height differs significantly from average. Customize to your body.
Avoiding Overhead Reaching
Anything above shoulder height requires lifting your arms, which stresses shoulder joints.
If you’ve got arthritis in your shoulders (rotator cuff issues, anyone?), overhead reaching is miserable. Keep everything at or below shoulder level.
Eliminating Below-Waist Storage
Below waist means bending. We’ve established bending is the enemy.
Eliminate it entirely if possible. Reserve below-waist storage for things you rarely use or don’t use at all (might as well store holiday decorations down there).
Measuring Your Personal Optimal Height
Don’t guess. Measure.
Standing Reach Test for Comfort
Stand normally. Have someone hold a skillet at different heights. Note where it feels easiest to grab and pull.
That’s your optimal height—not what some chart says, but what your actual body finds comfortable.
Seated Access Considerations
If you sometimes cook while seated (on a stool, in a wheelchair), test seated heights too.
Your seated optimal height will be lower—maybe 24-36 inches off the floor. Plan accordingly if you switch between standing and sitting.
Accounting for Mobility Aids
Walkers and wheelchairs change your reach. If you use these, factor them into height planning.
Walker users often can’t bend as easily. Wheelchair users have different reach ranges. Test with your aids in use.
Testing Before Permanent Installation
Use temporary setups first. Stack books to different heights, place a pan on top, test the reach.
Way easier to adjust book stacks than to reinstall a mounted system. Test until you’re sure, then install permanently.
Multi-Level Storage Strategies
Not everything needs prime positioning.
Most-Used Skillets at Prime Height
Your daily 10-inch skillet? Dead center of the golden zone, most accessible position.
Reserve the best spots for pans you use multiple times per week.
Occasional-Use Items at Acceptable Reaches
That specialty crepe pan you use monthly? It can live at the upper or lower edges of acceptable range.
Still vertical storage (no bending), just not the absolute prime real estate.
Retirement of Inaccessible Storage Spaces
Some storage just isn’t worth keeping. That bottom cabinet shelf at 4 inches off the floor? Forget it.
Call it retired. Store nothing there, or store items you access once a year (holiday platters, anyone?).
Seasonal Rotation Planning
Winter heavy-duty skillets move to prime spots when you’re making stews. Summer lightweight pans rotate forward when you’re cooking lighter meals.
Seasonal swapping keeps most-used items accessible without needing slots for everything simultaneously.
Wheelchair and Walker Accessibility
Different mobility aids require different solutions.
Lower Height Modifications
Wheelchair users typically work best with storage at 24-42 inches—lower than standing users.
Your lap level becomes the golden zone. Plan accordingly.
Clear Approach Space Requirements
Wheelchairs need 30-36 inches of clear floor space to approach storage.
Don’t install countertop organizers if they block wheelchair approach. Wall or cabinet systems work better.
One-Handed Access Design
Many mobility aid users effectively operate one-handed (the other hand stabilizing the walker or chair).
Storage systems need to work one-handed—grab handle, pull straight out, done. No two-handed wiggling required.
Transfer-Friendly Positioning
If transferring from wheelchair to standing to access storage, position things where you can reach them immediately after transfer.
Don’t make yourself take steps after standing—the transfer itself is hard enough.
Selecting Arthritis-Friendly Vertical Organizers
Arthritis-friendly vertical organizers feature smooth edges that won’t catch weak hands, adequate slot spacing so pans slide out easily, and lightweight construction that won’t tip over but also won’t be difficult to move if needed.
Easy-Grip Design Features
The organizer itself has to be easy to use.
Smooth Edges That Don’t Catch Hands
Sharp corners and rough edges catch on skin and cause scrapes. Seniors often have thin skin that tears easily.
Look for rounded edges, smooth finishes, no burrs on metal or splinters on wood.
Adequate Spacing Between Slots
Slots need to be wide enough that pans don’t stick together or require force to remove.
Minimum 1.5 inches between slots. 2 inches is better. Tight slots require yanking, which stresses wrists.
No Tight Friction Fits
Some organizers use rubber grips or tight tolerances to “secure” pans. Sounds good in theory.
In practice, it makes removal difficult for weak hands. Pans should slide out with minimal resistance.
Quick-Release Mechanisms
If an organizer includes any locking or securing features, they should release with simple one-handed motion.
Push-button releases or gravity drops work. Twist locks or two-handed operations don’t.
Lightweight Construction Materials
The organizer shouldn’t be a heavyweight itself.
Aluminum Versus Steel Options
Aluminum organizers weigh 40-50% less than steel equivalents. For freestanding units, this matters.
Steel is more durable but heavier. If you might need to move the organizer, aluminum wins.
Bamboo and Wood Alternatives
Wood organizers look nice and handle weight well without excessive heft.
Bamboo is particularly good—strong, relatively lightweight, and eco-friendly if you care about that.
Plastic Organizer Benefits
Plastic is the lightest option—sometimes too light, actually. They can tip easily.
But for cabinet-mounted systems where weight doesn’t matter, plastic works fine and costs less.
Balancing Durability and Weight
You want something light enough that moving it (if needed) won’t hurt, but heavy/sturdy enough that it won’t tip when you pull a pan out.
This balance point is around 3-5 pounds for a freestanding unit holding 4-5 pans.
Visibility and Identification
Seeing what you’re grabbing matters more than you’d think.
Open Design for Clear Viewing
Solid-sided organizers hide pans. Open-frame designs let you see everything at a glance.
Visual identification is faster than feeling around or reading labels. Open frames win.
Color-Coded Slot Options
Some organizers come with colored markers or labels for each slot.
Useful if you’re storing different pan types—blue for nonstick, red for stainless, whatever system works for you.
Labeled Positions for Memory Support
If memory is becoming an issue (happens to many of us), labels help. “8-inch skillet” marked on each slot.
Simple but effective for maintaining organization.
Front-Facing Handle Orientation
Organizers should position pans so handles face forward. You grab the handle and pull straight out.
Handles facing sideways or backward require awkward wrist rotation. Avoid this.
Stability and Safety Features
Safety isn’t optional.
Non-Slip Base Materials
Rubber feet or cork pads on the bottom prevent sliding on counters or shelves.
A sliding organizer is a tipping hazard. Non-slip bases are mandatory for freestanding units.
Wall Anchoring Options
Even countertop units should have wall-anchoring capability if possible. Earthquake safety applies everywhere.
Small L-brackets can secure the back of a countertop unit to the wall. Extra stability for minimal effort.
Tip-Over Prevention Design
Low center of gravity matters. Wide base relative to height creates stability.
Tall narrow organizers tip easier than short wide ones. Physics in action.
Secure Pan Retention Methods
Pans shouldn’t fall out if someone bumps the organizer. But they should still be easy to remove intentionally.
Front lips or stops that hold pans in while allowing easy lifting work well.
Installation Considerations for Senior Safety
Installing vertical skillet storage safely means knowing when to hire professional help, using proper wall anchors into studs for weight-bearing mounts, and avoiding personal injury during setup—particularly if your arthritis makes power tools or climbing difficult.
Professional Installation Versus DIY
Be honest about your capabilities.
When to Hire Help
If the installation requires:
- Drilling into tile or stone (specialized skills)
- Electrical work for lighted organizers
- Heavy lifting over 20 pounds
- Overhead work on a ladder
Hire someone. Handyman rates run $50-100/hour typically. Worth it to avoid injury or botched installation.
Adaptive Tools for Self-Installation
If you’re DIYing, ergonomic tools help:
- Electric screwdrivers with oversized grips
- Magnetic bit holders (less fumbling with screws)
- Laser levels (easier than manual levels)
- Cordless drills (no cord wrestling)
These reduce hand strain during installation.
Cost-Benefit Analysis
Professional installation adds $75-150 to project cost typically. Seems expensive until you compare it to urgent care visits for installation injuries.
Or consider the cost of messing up the installation and needing to buy replacement parts or start over.
Safety Precautions During Setup
Don’t work alone. Have someone present even if they’re just spotting you on the ladder.
Take breaks. Installation hurry-up leads to mistakes and injuries. This isn’t a race.
Wall Stud Location and Support
Studs matter for anything weight-bearing.
Finding Studs Without Excessive Bending
Electronic stud finders beat the old knock-and-listen method. They work from standing position without bending.
Run the finder across the wall at your chest height. Mark studs with painter’s tape.
Using Proper Anchors and Hardware
Into studs: regular wood screws work, sized to the weight. 3-inch screws for heavy-duty installations.
Between studs (if unavoidable): toggle bolts or snap toggles rated for at least 3x the expected weight.
Never use those cheap plastic expansion anchors for anything holding weight. They fail.
Weight Distribution Across Multiple Points
Distribute load across at least two studs if possible. A 4-foot pegboard should hit three studs ideally.
More attachment points equals more stability and less stress per point.
Testing Stability Before Loading
Mount the system. Let it sit 24 hours. Tug on it firmly (not yanking, but solid pressure).
Any movement at all? Remount more securely. Zero movement? Good to load pans.
Avoiding Installation-Related Injuries
Installation injuries are common and preventable.
Using Step Stools Safely
Three-step stools with handrails beat ladders for kitchen installation heights. More stable, easier to use.
Never stand on the top step. Never reach so far you shift your center of gravity off the stool.
Power Tool Adaptations for Arthritis
Pistol-grip drills can be tough on arthritic wrists. Palm-grip or inline-grip models distribute force better.
Variable speed triggers prevent sudden starts that jar hands. Use the lowest speed that works.
Taking Breaks During Installation
Every 15 minutes, stop. Put the drill down. Stretch your hands and wrists.
Pushing through fatigue causes mistakes and injuries. Breaks are productive, not lazy.
Asking for Assistance Strategically
You hold things in position. They drill and screw. Division of labor works.
No shame in asking for help with the parts that hurt your specific joints worst.
Temporary Versus Permanent Solutions
Rental-Friendly Options
Freestanding countertop organizers. Tension-rod systems. Cabinet organizers that install with removable adhesive.
All can be removed without damage when you move.
Damage-Free Mounting Methods
3M Command strips rated for weight work for lightweight organizers. Heavy-duty velcro. Tension systems.
These leave walls intact, which matters for rental deposits.
Easily Reversible Systems
Even if you own your home, sometimes you want to try something before committing. Temporary installation lets you test positioning before drilling holes.
Live with it a week. Adjust if needed. Permanent installation comes after you’re sure.
Long-Term Home Modifications
If you’re aging in place, permanent is fine. Drill into studs, mount properly, make it last.
The resale impact is minimal—most buyers see kitchen organization as a plus, not a negative.
Organizing Skillets Vertically for Maximum Arthritis Relief
Effective vertical skillet organization positions daily-use pans in the most accessible slots at optimal height, arranges by size or frequency depending on your cooking patterns, and keeps the heaviest items at waist level where lifting mechanics work best.
Arranging by Frequency of Use
Prime real estate goes to pans you use most.
Daily-Use Skillets in Prime Positions
That 10-inch nonstick you use every morning for eggs? Front and center, dead middle of your golden zone.
Eye-level or chest-level, easiest reach, most accessible slot. Reserve this for the workhorse pan.
Weekly-Use Items in Secondary Spots
Pans you use 2-3 times a week can sit in slightly less convenient slots—upper or lower edges of the acceptable range, or positions requiring slightly longer reach.
Still easily accessible, just not absolutely prime.
Rarely-Used Pans in Less Ideal Locations
That specialty fish pan you use monthly? It can live in the least accessible vertical slot.
Still vertical (so you’re not bending to access it), but you’re willing to make a small stretch or slightly awkward reach because it’s infrequent.
Eliminating Unnecessary Cookware
Vertical storage reveals truth—you probably don’t need eight skillets. Most people use 2-3 regularly.
Purge the rest. Donate them. Free up slots for items you actually use.
Size-Based Organization Methods
Some people prefer organizing by size instead of frequency.
Smallest to Largest Arrangements
Eight-inch on the left, progressing to 12-inch on the right. Logical, easy to remember.
Works well if you use all sizes roughly equally often.
Mixed-Size Accessibility Strategies
Or put most-used sizes (usually 10-inch) in prime position, with smaller and larger flanking them.
This prioritizes convenience over aesthetic organization. I prefer this approach.
Spacing Requirements for Different Diameters
Eight-inch skillets need 1.5-inch slots. Twelve-inch skillets need 2-inch slots minimum.
Adjustable organizers let you customize spacing. Fixed organizers require buying the right slot width for your pans.
Nested Sets Versus Separated Storage
If you have nesting skillets (smaller fits inside larger), you can store them nested or separated.
Separated is better for arthritis—you grab exactly the one you need without unstacking. But it requires more storage slots.
Weight Considerations for Placement
Weight affects where pans should live.
Heaviest Pans at Waist Height
Dead-center waist height is where you can lift heaviest items with best mechanics—using legs, not just arms and back.
Put your heaviest skillet (hopefully not too heavy if you’re buying arthritis-friendly cookware) here.
Lightweight Options Higher or Lower
Aluminum or titanium lightweight pans can go higher or lower in your range. They’re easy to lift from any position.
Save prime waist-height positions for items that benefit most from good lifting mechanics.
Balancing Load Distribution
If you’re using a freestanding organizer, distribute weight evenly across slots to prevent tipping.
Don’t load all heavy pans on one side. Balance matters.
Preventing Organizer Tipping
Related to above—test stability after loading. If the loaded organizer tips easier than the empty one, redistribute weight.
Front-heavy loading (all weight in front slots, none in back) is a common mistake.
Lid Storage Integration
Lids complicate vertical storage but they’re manageable.
Matching Lids with Skillets Vertically
Some vertical organizers have dual slots—wider slot for pan, narrower slot immediately next to it for the lid.
You store each pan with its lid beside it. Keeps pairs together, but doubles the storage width needed.
Separate Vertical Lid Racks
Or store all lids together in their own vertical rack—separate from pans. Takes less total space.
You grab the pan, then grab its corresponding lid. Two retrieval actions but more space-efficient.
Lid-Skillet Pairing Systems
Color-code or number lids and pans so you know which lid goes with which pan. Stick-on dots or permanent marker work.
Eliminates the “does this lid fit this pan” trial-and-error game.
Space-Efficient Lid Solutions
Honestly? Many people just use fewer lids. One universal lid that fits multiple pan sizes reduces storage needs dramatically.
Silicone universal lids (the stretchy ones) fit 8, 10, and 12-inch pans. One lid, three pans. Storage problem solved.
Transitioning from Horizontal to Vertical Skillet Storage
Transitioning to vertical storage starts with documenting how often your current system causes pain, then purging unnecessary cookware, planning your new layout based on actual usage patterns, and implementing changes one storage area at a time.
Assessing Current Storage Problems
Start with data, not assumptions.
Documenting Pain Points and Difficulties
Keep a week-long journal. Every time you access skillet storage, note:
- How much it hurt (scale 1-10)
- What specific movement caused pain
- How long pain lasted afterward
This creates a baseline. You’ll measure improvement against it.
Measuring Available Space
Where can vertical storage actually go? Measure:
- Cabinet interior dimensions
- Available counter space
- Wall space near the stove
- Drawer depths
Know your options before shopping.
Counting Kitchen Bending Episodes
Tally marks every time you bend to get cookware. You’ll be shocked at the number.
Most people estimate 3-4 bends daily. Actual tracking reveals 8-12. This motivates change.
Identifying Most-Accessed Items
Your top 3-5 pans get 80% of use typically. Identify these specifically.
These are what you optimize storage for. Everything else is secondary.
Purging and Downsizing Cookware
Brutal honesty time.
Eliminating Duplicate Skillets
You don’t need three 10-inch skillets. Pick the best one, donate the others.
Duplicates waste storage space and decision energy.
Donating Rarely-Used Items
Haven’t used it in six months? It goes. That’s the rule.
Exception for genuine seasonal items (canning equipment, holiday roasting pans). Everything else—if it’s not earning its storage space, it leaves.
Keeping Only Arthritis-Friendly Pans
This transition is a good time to upgrade to lightweight, ergonomic cookware. Heavy cast iron? Gone (or moved to very occasional use).
Keep pans that help your arthritis, not hurt it.
Realistic Needs Assessment for Seniors
Most seniors cooking for 1-2 people need:
- One 8-inch skillet
- One 10-inch skillet
- Maybe one 12-inch for rare large-batch cooking
That’s it. Three pans. Not ten.
Planning the Vertical Storage Layout
Sketch it out. Seriously.
Sketching Storage Zones
Draw your kitchen. Mark where vertical storage can go. Indicate measurements and heights.
Visual planning prevents buying an organizer that doesn’t fit your actual space.
Measuring Skillet Dimensions
Measure each pan’s diameter and height (when standing upright). Note handle length too.
Handle clearance matters—you need enough depth that handles don’t stick out awkwardly.
Calculating Required Organizer Capacity
Three pans need three slots plus spacing—so roughly 8-10 inches of organizer width. Five pans need 12-15 inches.
Buy based on what you’re actually keeping, not what you currently own.
Accounting for Future Additions
Build in one or two extra slots. Future-proofs your system if you add a pan or two.
Not excessive—just room to grow slightly.
Implementing the Change Gradually
Don’t overhaul everything at once.
Starting with One Storage Area
Install vertical storage for your most-used pans first. Leave everything else alone initially.
Get comfortable with the new system before expanding.
Testing Arrangements Before Finalizing
Live with the initial setup for a week before declaring it permanent. You might find adjustments needed.
“Good enough” can become “perfect” after you actually use it and see what works.
Adjusting Based on Daily Use Patterns
If you find yourself always reaching for a specific pan, move it to the most accessible position even if that wasn’t your original plan.
Let actual usage inform organization, not theoretical ideals.
Building Confidence with New System
First few days feel weird. That’s normal. Change always feels awkward initially.
Give it two weeks. By then, the new system becomes automatic and the old way feels ridiculous.
Specific Vertical Storage Products for Arthritis
Vertical storage products range from basic $15 wire dividers that sit in cabinets, to $40-60 pull-out rack systems, to $75+ premium options with assisted-access features—choose based on budget, installation ability, and specific arthritis limitations.
Budget-Friendly Options Under $30
Tight budget? Solutions exist.
Simple Wire Dividers
Basic metal dividers that create vertical slots. Nothing fancy—just function.
Examples: SimpleHouseware Cabinet Organizer ($23), mDesign Metal Pan Organizer ($18).
These sit in cabinets or on shelves. No installation required beyond placing them.
Tension Rod Systems
Mount tension rods vertically inside cabinets to create dividers. Completely removable, zero permanent installation.
Spring-loaded tension (like shower curtain rods) holds them in place. About $12 for a set of three.
Basic Countertop Racks
Simple metal frames with slots. No features, just basic vertical storage.
Target and Walmart house brands run $15-20. They work fine—they’re just not pretty.
DIY Solutions with Common Materials
Vertical file organizers ($8 at office supply stores) work for pans. Seriously.
Or build simple wooden dividers if you’ve got scrap wood. Two boards screwed together in a T-shape creates a divider.
Mid-Range Solutions $30-$75
Better quality, more features, easier installation.
Expandable Cabinet Organizers
These adjust width to fit your cabinet. Slide to narrow for 12-inch cabinets, extend for 24-inch cabinets.
Rev-A-Shelf and Lynk brands make good ones around $45-60.
Sturdy Freestanding Units
Better materials, heavier gauge metal, more stable than budget options. Can hold heavier pans without wobbling.
YouCopia StoreMore ($50) is popular. Holds 9 pans, very stable base.
Drawer Insert Systems
Custom-fit dividers for drawers. Bamboo or wood construction usually. Nicer than wire versions.
Around $40-55 depending on drawer size.
Quality Wall-Mounted Racks
Better pegboard systems or dedicated pan racks with quality hooks. Powder-coated metal that won’t rust.
Wallniture rail system runs about $35 and includes heavy-duty hooks.
Premium Arthritis-Optimized Systems $75+
Top-tier options with features specifically for limited mobility.
Custom-Fit Cabinet Solutions
Made-to-measure for your specific cabinet dimensions. Usually installed professionally.
Rev-A-Shelf premium pull-outs run $100-200 installed. Pricey but they last decades.
Heavy-Duty Professional Organizers
Restaurant-quality systems adapted for home use. Overbuilt, super stable, handles serious weight.
KV heavy-duty pull-out organizers around $120-150.
Motorized or Assisted-Access Units
For severe arthritis—motorized lowering systems or hydraulic assists that bring storage down to you.
Rare in residential, but they exist. $300+ typically. Extreme solution for extreme mobility limitations.
Modular Expandable Systems
Start with base unit, add modules as needed. Completely customizable.
Hafele Convoy systems run $150+ but you can configure them exactly to your needs and expand over time.
Product Features Worth the Investment
Not all features matter equally.
| Feature | Budget Option | Premium Option | Worth Paying For? |
|---|---|---|---|
| Pull-out mechanism | Fixed position | Smooth ball-bearing slides | Yes—much easier access |
| Material | Wire/plastic | Bamboo/coated steel | Sometimes—depends on weight of pans |
| Adjustability | Fixed slots | Movable dividers | Yes—accommodates different pan sizes |
| Installation | DIY required | Professional available | Depends on your abilities |
Maintaining Vertical Storage Systems with Arthritis
Maintaining vertical skillet storage involves minimal effort—occasional dusting with extension tools to avoid bending, checking mounting hardware every 6-12 months for tightness, and adjusting organization as your pan collection or mobility changes.
Regular Cleaning Without Bending
Vertical storage actually makes cleaning easier.
Using Extension Dusters
Long-handled dusters reach vertical organizers without bending. Microfiber extensions work great.
Quick weekly wipe takes 30 seconds. Prevents grease buildup that’d require serious scrubbing later.
Spray-and-Wipe Techniques
Spray cleaner on a cloth, wipe the organizer surfaces. If it’s a freestanding unit, rotate it to clean all sides without moving yourself much.
Don’t spray directly—overspray makes floors slippery.
Frequency Recommendations
Light dusting weekly. Deep cleaning monthly. That’s it.
Vertical systems stay cleaner than horizontal storage (no dust settling in stacks) so they need less maintenance.
Preventing Grease Buildup
Grease migrates from pans to organizers. Wipe pans before storing them (completely cool, obviously).
This prevents transfer, which means the organizer itself stays cleaner longer.
Adjusting Organization Over Time
Your needs change. Your system should too.
Recognizing When Changes Are Needed
If you’re consistently reaching past one pan to get another, reorganize. Most-accessed pan should be in prime position.
If a slot stays empty for months, you’re wasting space. Eliminate that slot or fill it with something useful.
Seasonal Reorganization
Winter cooking might favor larger pans (stews, braises). Summer cooking might prioritize smaller pans (quick sautés).
Swap positions seasonally to match actual use patterns.
Adapting to Declining Mobility
If mobility worsens, shrink your storage range. Move everything to a tighter height band—maybe just 38-48 inches instead of 36-54.
Better to have highly accessible storage for fewer items than marginally accessible storage for more items.
Simplifying as Arthritis Progresses
Eventually, you might need to reduce total pan count further. Down to just 2 pans instead of 4.
This isn’t defeat—it’s smart adaptation. Quality of life matters more than pan variety.
Safety Inspections and Maintenance
Check things periodically.
Checking Mounting Hardware
Every 6 months, tug firmly on wall-mounted or cabinet-mounted systems. Any looseness? Tighten the screws.
Vibration from daily use can loosen hardware over time.
Testing Stability Periodically
For freestanding units, test tip resistance quarterly. Pull a pan out quickly (simulating real use) and see if the unit wobbles.
Increased wobbling means something’s wearing out or weight distribution changed.
Replacing Worn Components
Rubber feet wear down. Dividers can crack. Nothing lasts forever.
Replace components as needed. Most systems sell replacement parts cheaper than buying new.
Identifying Potential Hazards
Look for:
- Sharp edges developing from wear
- Splinters on wood organizers
- Rust on metal systems
- Cracks in plastic
Fix or replace before these cause injuries.
Dealing with Organizer Failures
Sometimes things break.
Temporary Solutions During Repairs
Stack pans carefully on the counter while you’re awaiting replacement parts or installation of a new system.
Not ideal, but better than leaving them in inaccessible low cabinets.
When to Replace Versus Repair
If repair costs more than 60% of replacement cost, replace.
If the system is 5+ years old and showing multiple wear points, replacement is smarter.
Warranty Claims and Returns
Keep receipts and documentation. Good organizers have 1-5 year warranties.
Manufacturing defects should be warrantied. Normal wear usually isn’t.
Backup Storage Plans
Have a Plan B. If your primary vertical system fails, where do the pans go temporarily?
Knowing this in advance prevents panic and poor decisions when failure happens.
Combining Vertical Storage with Other Arthritis Aids
Vertical skillet storage works best when integrated with other arthritis-friendly kitchen modifications—lightweight cookware, ergonomic layouts that minimize walking, and adaptive tools that extend reach without requiring bending.
Ergonomic Kitchen Layout Integration
Vertical storage is one piece of a bigger puzzle.
Creating Work Triangles at Proper Height
Classic kitchen work triangle: stove, sink, prep area. Keep all three at the same height band (your golden zone).
Vertical skillet storage near the stove completes this—everything you need at the right height with minimal movement.
Minimizing Steps Between Storage and Stove
Ideal: storage within arm’s reach of the stove. Under 3 steps maximum.
Every extra step is energy spent and fall risk increased. Tight spacing matters.
Coordinating with Counter Height Adjustments
If you’re modifying counter heights for seated cooking or better ergonomics, coordinate storage heights to match.
Everything should work at the same level—counters, storage, appliances.
Overall Kitchen Accessibility Planning
Vertical skillet storage is usually the first modification people make because it has immediate impact.
But think about the whole kitchen—dishes, glasses, food storage, utensils. Consistent height principles throughout.
Pairing with Lightweight Cookware
Storage and cookware should complement each other.
Storing Lightweight Skillets Vertically
Lightweight aluminum or titanium pans are easier to remove from vertical storage—less friction, easier one-handed handling.
If you’re implementing vertical storage, consider upgrading to lightweight pans simultaneously.
Easy Removal and Replacement
Light pans slide in and out of slots smoothly. Heavy pans can stick or require two-handed manipulation.
The full benefits of vertical storage shine with lightweight cookware.
Matching Storage to Pan Weight
If you insist on keeping heavier pans, they need robust storage with wider slots and sturdier construction.
Lightweight pans can use lighter-duty (cheaper) organizers.
Upgrading Cookware Simultaneously
Kitchen renovation is a good time to rethink everything. New storage system + new lightweight pans = complete arthritis-friendly cooking setup.
Costs more upfront but delivers maximum benefit.
Using Grabber Tools for Higher Storage
Sometimes you need items stored slightly out of ideal range.
Extending Reach Without Bending
Reacher grabbers (those long-handled pincer tools) can retrieve items from upper edges of your storage range without overhead reaching.
But they require grip strength and coordination. Not everyone can use them effectively.
Proper Grabber Technique
Practice with lightweight unbreakable items first. Grabbers take skill—you’re operating tongs at arm’s length essentially.
Squeeze too hard and you crush things. Too soft and you drop them.
When Grabbers Make Sense
For rarely-accessed items stored at the limits of your range. Not for daily-use items—those should be directly accessible.
Grabbers are backup tools, not primary access methods.
Limitations and Safety Concerns
Grabbers can’t safely handle heavy or breakable items. Don’t try to retrieve a cast iron skillet with a grabber.
And if you drop something while using a grabber, it’s falling from height—potential for damage or injury.
Coordinating with Other Storage Solutions
Consistency matters.
Vertical Storage for Other Cookware
Pots, baking sheets, cutting boards—all can be stored vertically using similar principles.
Once you’ve solved skillets, apply the same approach to other categories.
Consistent Height Standards Throughout Kitchen
Don’t store skillets at waist height but dishes overhead. Pick a height band and stick to it for everything possible.
Consistency reduces cognitive load and creates predictable access patterns.
Unified Organizational Philosophy
“Frequently used at optimal height, rarely used further away” applies to all storage, not just skillets.
Implement this principle kitchen-wide for maximum benefit.
Comprehensive Kitchen Modification Plans
Some people tackle one storage type at a time over months or years. Others do whole-kitchen renovation at once.
Either works. The comprehensive approach delivers faster results but costs more upfront.
Vertical Skillet Storage for Different Kitchen Types
Vertical storage adapts to any kitchen size—small apartments use compact countertop or wall-mounted options, full-size homes can install cabinet pull-outs, galley kitchens maximize wall space, and accessible kitchens integrate height-adjustable systems.
Small Apartment and Condo Kitchens
Limited space requires creative solutions.
Space-Maximizing Vertical Solutions
Wall-mounted pegboard above the stove. Uses dead vertical space without taking counter or cabinet room.
Or slim countertop organizers (6-inch footprint) that hold 3-4 pans.
Compact Organizer Options
Single-stack vertical organizers. Just 4-6 inches wide, holds 3 pans.
Perfect for tiny kitchens where every inch of counter space matters.
Multi-Purpose Storage Units
Organizers that hold pans plus lids plus utensils. Combines storage types to save space.
Not always ideal (mixing categories can reduce efficiency) but sometimes necessary in tight quarters.
Temporary Installation Methods
Renters need removable solutions. Freestanding units, command strips for lightweight racks, or tension systems.
All leave no permanent marks when you move.
Full-Size Home Kitchens
More space, more options.
Utilizing Ample Cabinet Space
Deep cabinets can accommodate pull-out vertical organizers. 20+ inch depth means you can install substantial systems.
Take advantage of the space—install organizers that bring items forward for easy access.
Multiple Storage Zone Creation
Daily pans near the stove. Occasional pans across the kitchen. Specialty items in a different cabinet entirely.
Multiple zones organized by frequency prevents crowding.
Dedicated Skillet Stations
Some people dedicate an entire cabinet to just skillets and lids. If you have space, this works beautifully—everything in one place.
Integrating into Existing Layouts
Don’t rip everything out. Add vertical storage to existing cabinets with insert organizers.
Minimally invasive approach that improves function without major renovation.
Galley and Narrow Kitchens
Tight kitchens need different thinking.
Slim-Profile Vertical Organizers
Wall-mounted racks only 3-4 inches deep. Don’t intrude into the narrow aisle space.
Keep floor space clear for movement while utilizing wall space.
Wall-Mounted Solutions for Limited Floor Space
When counters and cabinets are minimal, walls become prime real estate.
Floor-to-ceiling pegboard systems can hold tremendous amounts of cookware without footprint impact.
One-Side Access Considerations
In galley kitchens, you usually access storage from one side only. Organizers should open from the aisle side.
Pull-out systems work great—they come to you instead of requiring you to reach into tight spaces.
Maximizing Vertical Rather Than Horizontal Space
Think up, not out. Taller organizers, stacked storage zones at different heights.
Use the full height from counter to ceiling if possible.
Accessible and Universal Design Kitchens
Purpose-built accessible kitchens make everything easier.
ADA-Compliant Storage Heights
ADA standards specify 15-48 inches as the accessible range for forward reach, 9-54 inches for side reach.
Design storage to fit within these bands.
Wheelchair-Accessible Vertical Systems
Lower overall height (24-42 inches works better than 36-54), pull-out systems that extend fully forward, clear approach space underneath.
Custom accessible kitchens often include specialized organizers designed specifically for seated use.
Variable Height Adjustability
Premium systems include height-adjustable mounting. You can change storage height as mobility changes.
Expensive but valuable for long-term accessibility.
Future-Proofing for Aging in Place
Install infrastructure now that can be adjusted later. Mounting systems that accommodate different organizers, reinforced walls that can support grab bars or motorized systems if needed.
Planning ahead prevents major renovation when mobility declines further.
Addressing Common Vertical Storage Challenges
Common vertical storage problems include skillets sliding or falling out of slots, difficulty accommodating different handle styles, non-standard pan shapes that don’t fit standard organizers, and space limitations that require creative solutions.
Preventing Skillets from Sliding or Falling
Gravity works against vertical storage sometimes.
Proper Slot Sizing
Slots should be just slightly wider than the pan—maybe 1/4 inch clearance on each side.
Too tight and pans stick. Too loose and they slide around or tip out.
Grip Liners and Non-Slip Materials
Shelf liner material (the grippy mesh stuff) at the bottom of each slot prevents sliding.
Cut to fit, lay it in the slot base. Pans stay put but still lift out easily.
Angle Adjustments for Security
Some organizers allow slight backward tilt—maybe 5-10 degrees. This uses gravity to keep pans in rather than letting them slide forward.
But too much tilt makes removal harder. Find the sweet spot.
Retention Clips and Barriers
Small front lips or removable barriers that prevent forward sliding. Pan can’t fall out because the barrier blocks it.
You lift slightly to clear the barrier, then pull out. Adds a step but increases security.
Managing Different Skillet Handle Styles
Handles complicate vertical storage.
Long Handle Accommodation
Long handles stick out. You need depth to accommodate them or they protrude awkwardly.
Organizers should be at least 14-16 inches deep for standard long-handled skillets.
Loop Handle Solutions
Pans with side loop handles (like some Dutch ovens) can store very compactly—they’re narrow from handle to handle.
These work great in vertical storage actually. Less protrusion than long handles.
Helper Handle Considerations
Pans with both long handle and helper handle opposite—the helper handle can catch on dividers during removal.
Angle the pan slightly during removal to prevent this. Or choose organizers with smoother dividers that don’t catch.
Universal Designs for Mixed Sets
If you have mixed handle types, choose organizers without handle-specific features. Simple slots work with everything.
Specialized handle hooks or notches only work with one handle type.
Dealing with Non-Standard Skillet Shapes
Square pans. Oval pans. They exist and they’re annoying to store.
Square and Rectangular Pans
These can store vertically but need different slot dimensions—measure diagonally for minimum width needed.
Or store them separately in dedicated square-pan storage (which might not be vertical—pick your battles).
Grill Pans and Specialty Items
Heavy grill pans with ridges often don’t play nice with standard vertical storage. The ridges catch on dividers.
These might need horizontal storage or specialized deep slots.
Woks and Deep Skillets
Deep pans tip forward in standard vertical organizers. They need deeper slots or backward-tilted systems.
Or store them separately—woks on a wok ring, deep skillets hung on heavy-duty hooks.
Flexible Divider Systems
Adjustable organizers let you customize slot size and spacing for odd items.
This is where spending more for adjustability pays off—you can accommodate anything.
Maximizing Limited Kitchen Space
Tiny kitchens require creativity.
Corner Solutions
Corner cabinets waste space usually. Lazy Susan vertical organizers or pull-out corner systems reclaim this.
Harder to install but worthwhile if corner space is all you have.
Over-Door Organizers
Over-cabinet-door hooks or racks for lightweight pans. Uses dead space on the back of doors.
Weight limits are low (10-15 pounds typically) so only for light pans.
Ceiling-Mounted Options (With Caution)
Pot racks can include vertical orientation slots. Hanging from ceiling uses truly unused space.
But overhead storage is bad for arthritis—you’re reaching up constantly. Use only for rarely-accessed items if at all.
Fold-Down Temporary Storage
Wall-mounted fold-down racks that swing up when not in use. Provides vertical storage when needed, folds flat when you need the space.
Complicated and mechanical. Potential failure points. But clever for tight spaces.
Pain Tracking and Improvement Documentation
Documenting pain reduction from vertical storage provides concrete data showing the modification’s effectiveness, supports requests for insurance coverage or grants, and encourages others with arthritis to make similar changes.
Measuring Bending Reduction Benefits
Numbers matter for proving benefits.
Before and After Bending Counts
Week before installation: count every bend to access cookware. Average per day.
Week after installation: count again. The reduction should be dramatic—often 70-80% fewer bends.
Pain Level Journaling
Daily pain ratings (1-10 scale) focusing on back, hip, and knee pain related to kitchen tasks.
Track for 2 weeks before, 2 weeks after. Look for trend improvements, not day-to-day variations (which are normal).
Energy Conservation Tracking
Subjective but meaningful—rate your energy level after cooking on a 1-10 scale.
Better storage often means more energy left after meal prep. This affects quality of life significantly.
Medication Use Changes
Are you taking fewer pain pills on cooking days after installing vertical storage?
This is concrete data. Track pain medication frequency before and after.
Sharing Results with Healthcare Providers
Your doctor should know about successful modifications.
Documenting Modifications
Photos of before/after. Receipts showing costs. Pain journals showing improvement.
Comprehensive documentation supports medical necessity if you’re seeking insurance reimbursement or tax deductions.
Occupational Therapy Consultation
OTs love this stuff. Showing them your vertical storage setup might generate additional modification ideas.
They can also provide professional documentation of improvement, which carries weight with insurance.
Physical Therapy Integration
If you’re in PT for arthritis, demonstrating reduced pain from environmental modifications supports the treatment plan.
PT might recommend additional kitchen modifications based on what worked with storage.
Getting Professional Validation
Doctor’s notes acknowledging improvement from home modifications strengthen requests for additional modifications or accessibility equipment.
Professional validation also feels good—having experts confirm your changes were smart and effective.
Encouraging Others to Adopt Vertical Storage
Spread the knowledge.
Demonstrating Your System
Invite friends with arthritis over. Show them how easy it is now to get a pan.
Demonstration beats explanation. Let them try it.
Sharing Cost and Benefit Information
“I spent $45 and two hours. Now I don’t dread getting cookware out.”
Concrete cost-benefit helps people decide if it’s worth it for them.
Supporting Peers Through Transitions
Offer to help measure their space, research options, or even assist with installation.
Community support makes change easier.
Creating How-To Guides for Friends
Write up (or show them this article!) your process. What you bought, how you installed it, what you learned.
Your experience helps others avoid mistakes you made.
Long-Term Arthritis Management Impact
Big picture stuff.
Cumulative Joint Preservation
Every bend you eliminate is stress you avoid. Multiply by days, weeks, years.
Vertical storage is long-term joint preservation, not just short-term convenience.
Quality of Life Improvements
Cooking without pain is different than cooking through pain. It’s enjoyable instead of something to endure.
This affects whether you cook (and thus eat well), which affects overall health.
Independence Maintenance
Being able to cook for yourself maintains independence longer. Vertical storage supports this.
The alternative—eventually needing prepared meals or assistance—costs more financially and emotionally.
Aging in Place Success Factors
Small modifications like vertical storage are what make aging in place possible. Each one extends the time you can manage independently.
This is about staying in your home, maintaining autonomy, and preserving dignity.
DIY Vertical Skillet Storage Projects for Seniors
DIY vertical storage projects range from simple solutions like tension rods placed vertically between shelves, to pegboard systems that customize to any configuration, to repurposed office file organizers that cost $8 and work perfectly for pans.
Simple Tension Rod Solutions
Dead simple. Shockingly effective.
Between-Shelf Installations
If you have adjustable shelves in cabinets, create vertical dividers by installing tension rods vertically between two shelves.
Space them every 2 inches. Instant vertical slots. Zero tools required.
Cabinet Interior Applications
Tension rods wedged vertically inside cabinets create dividers. The spring tension holds them in place.
Works best in cabinets with solid sides (not wire racks). About $3 per rod, need 4-6 rods for a decent setup.
No-Drill Requirements
This is the beauty—renters can use this. Completely removable, leaves zero marks.
When you move, take the rods with you and reinstall elsewhere.
Load Capacity Limitations
Tension rods max out around 5-10 pounds typically. Fine for lightweight pans, not for anything heavy.
If a pan weighs more than 2-3 pounds, tension rods probably won’t hold it securely.
Pegboard Custom Storage Systems
Pegboard is incredibly versatile.
Designing Custom Configurations
Pegboard comes in 2’x4′ or 4’x4′ sheets. Mount to wall, add hooks wherever you want them.
Rearrange hooks anytime. Add more hooks as collection changes. Perfect flexibility.
Easy Modification and Adjustment
Changed your mind about layout? Move the hooks. Takes 10 seconds.
This adaptability is worth the slightly higher cost versus fixed systems.
Hanging at Optimal Heights
Mount the pegboard sheet at your golden zone height—say 36-54 inches from bottom to top edge.
Now every hook position is at accessible height.
Painting and Personalizing
Pegboard comes in brown or white usually. You can paint it any color.
Some people color-code sections (blue area for nonstick, red for stainless). Visual organization for those who benefit from it.
Repurposing File Organizers
Office supply stores are goldmines.
Office Supply Store Finds
Vertical file holders designed for documents work perfectly for 8-10 inch skillets.
They’re built to hold weight (heavy file folders), have appropriate slot spacing, and cost $8-15.
Adapting Vertical File Holders
Mesh or solid, doesn’t matter. Step-style (stair-step design) or straight slots—both work.
Place in cabinet or on counter. Load with pans. Done.
Magazine Racks as Pan Dividers
Wide magazine racks fit 10-12 inch pans. Vertical dividers keep them separated.
Desktop magazine organizers run $10-20 and work great for 3-4 pans.
Cost-Effective Alternatives
Why pay $40 for a “pan organizer” when a $12 file holder does the exact same thing?
The pan organizer might be prettier. But functionally? Identical.
Building Basic Wooden Dividers
For the slightly handy.
Simple Carpentry for Beginners
Two boards. Screw them together in a T or L shape. That’s a divider.
Make 4-5 of these, space them in a cabinet, you’ve got vertical storage.
Pre-Cut Options from Hardware Stores
Home Depot and Lowe’s will cut boards to your specifications. You just assemble.
No sawing required. They cut, you screw together. Simple.
No-Skill Assembly Methods
Wood glue plus clamps. Let dry overnight. No screws needed.
Or use corner braces—just position the boards and screw the brace on. The brace holds everything together.
When DIY Makes Sense Versus Buying
DIY saves money if you have tools and skills. Otherwise, the time and frustration cost exceeds the $20-30 you’d save.
For simple projects (like the T-dividers), DIY is worth it. For complex pull-out systems, buy pre-made.
Financial Assistance and Accessibility Grants
Financial assistance for vertical storage comes from multiple sources—Medicare may cover it as durable medical equipment with proper documentation, non-profit accessibility programs offer grants or free installation, and home modifications can qualify as tax-deductible medical expenses.
Medicare and Insurance Coverage
Getting insurance to pay is hit-or-miss but worth trying.
Durable Medical Equipment Categories
Some insurers classify home accessibility modifications as DME. Vertical storage might qualify under “environmental modifications.”
Requires doctor’s prescription stating medical necessity—”Patient requires vertical storage to avoid bending due to lumbar arthritis” or similar.
Home Modification Benefits
Some Medicare Advantage plans or secondary insurance policies cover home modifications. Traditional Medicare usually doesn’t.
Check your specific plan. Call and ask explicitly about kitchen accessibility modifications.
Documentation Requirements
You’ll need:
- Doctor’s prescription/letter of medical necessity
- Detailed cost estimate or receipts
- Photos showing the modification
- Sometimes an occupational therapist evaluation
More documentation = better approval odds.
Appeal Processes for Denials
First denial doesn’t mean final denial. Appeal with additional documentation.
Many approvals come on second or third appeal. Persistence matters.
Non-Profit Accessibility Programs
Multiple organizations help seniors with home modifications.
Rebuilding Together
National non-profit that does free home repairs and modifications for low-income seniors.
Apply through local chapters. Services vary by area but often include kitchen accessibility improvements.
Local Arthritis Foundation Chapters
Some AF chapters offer small grants for accessibility equipment or modifications.
Usually $500-1000 max, but that covers a nice vertical storage system with installation.
Senior Center Resources
Local senior centers often know about regional programs, grants, or volunteers who help with home modifications.
They’re connected to the community in ways individuals aren’t. Ask them.
Community Development Grants
Some cities/counties have community development block grants funding senior accessibility.
Check with your city’s aging services or community development department.
Tax Deductions for Medical Modifications
Tax breaks help offset costs.
Home Accessibility Improvements
IRS allows medical expense deductions for home modifications if:
- Made for medical reasons
- Documented by physician
- Primary purpose is medical care, not home improvement
Vertical storage can qualify as a medical modification for arthritis.
Medical Expense Documentation
Keep receipts, doctor’s notes, before/after photos. Document everything.
If audited, you need proof that the expense was medical necessity, not home improvement preference.
Working with Tax Professionals
CPA or enrolled agent familiar with medical deductions can maximize your benefit.
They know what documentation IRS accepts and how to present modifications correctly.
Qualifying Criteria
Medical expenses must exceed 7.5% of adjusted gross income to deduct.
For someone with $30k income, that’s $2,250 threshold. Once you cross it (with all medical expenses combined), additional expenses are deductible.
Low-Cost and Free Alternatives
No money? Options still exist.
Requesting Help from Family
Adult children, grandchildren, nieces, nephews—many would help if asked.
“Can you help me install this organizer?” is a reasonable request. They might even pay for it.
Community Tool Libraries
Many communities have tool libraries where you borrow tools free. Install yourself with borrowed tools.
Saves buying tools you’ll use once.
Senior Volunteer Installation Services
Retired contractors often volunteer through churches, senior centers, or Habitat for Humanity.
Free labor if you provide materials.
Bartering and Skill Exchanges
You’re good at something. Someone else is good at installation.
Trade skills—you provide what you can do (bookkeeping, gardening, babysitting) in exchange for installation help.
Vertical Storage Impact on Daily Cooking Routine
Vertical skillet storage dramatically reduces pre-cooking fatigue by eliminating painful bending and heavy lifting before you even start meal prep, which preserves energy for actual cooking and increases how often seniors are willing to cook for themselves.
Reduced Pre-Cooking Fatigue
The battle starts before cooking does.
Preserving Energy for Actual Cooking
Old way: spend 5 minutes and considerable pain retrieving pans. Start cooking already tired and hurting.
New way: spend 5 seconds grabbing a pan. Start cooking fresh with energy reserves intact.
Less Pain Before Meal Prep Begins
Pain accumulates. Starting cooking in pain means you’re more likely to skip steps, make mistakes, or quit halfway through.
Starting pain-free means better cooking outcomes and willingness to actually cook.
Psychological Benefits of Easy Access
The mental barrier matters. “I should cook but I dread getting the pan out” prevents cooking before you even start.
Remove the barrier, remove the dread. Cooking becomes appealing again.
Maintaining Cooking Frequency
Easier access = more frequent cooking = better nutrition and cost savings.
The goal isn’t making cooking easy (it’ll never be zero-effort). The goal is making it easy enough that you do it regularly.
Faster Meal Preparation
Time savings add up.
Quick Pan Selection and Retrieval
Five seconds to grab a pan instead of 2-3 minutes digging through stacks.
Doesn’t sound like much per instance, but multiply by 2-3 times daily, 365 days yearly. Hours of time saved.
No Digging Through Stacked Pans
The worst part of stacked storage is finding the pan you want under three others.
Vertical storage: you see it, you grab it. Done.
Returning Items Without Struggle
Putting away is as easy as getting out. Slide the pan into its slot. One-handed, one second.
No balancing acts or careful restacking required.
Overall Time Savings
Complete meal prep typically runs 10-20% faster with good vertical storage.
That’s 5-10 minutes saved per cooking session. Real time that accumulates to hours weekly.
Increased Cooking Independence
Independence matters deeply.
Confidence from Easy Access
Knowing you can get what you need without help builds confidence. You can decide to cook on impulse instead of planning around when help is available.
Spontaneity in cooking is freedom.
Reduced Reliance on Help
Not needing someone else to retrieve pans for you maintains autonomy.
Small independence preserved, but psychologically significant.
Maintaining Self-Sufficiency Longer
Each modification that extends independent living is valuable. Vertical storage is one piece of staying self-sufficient.
It delays—possibly by years—the point where you can’t manage cooking independently.
Dignity Preservation
There’s dignity in feeding yourself. Needing help with basic tasks erodes that.
Vertical storage preserves the ability to cook independently, which preserves dignity and self-worth.
Better Kitchen Safety Overall
Safety improvements go beyond just arthritis relief.
Fewer Awkward Movements
Awkward movements cause injuries. Bent-over lifting, twisting while holding weight, off-balance reaching—all injury risks.
Vertical storage at proper height eliminates these awkward positions.
Reduced Fall Risk
Falls happen during transitions—standing up from bent position while holding something, losing balance while reaching.
Eliminating bending dramatically reduces fall opportunities.
Less Likelihood of Dropping Heavy Items
Proper height and proper grip (two hands when needed, stable positioning) reduces drops.
Dropped pans damage floors, break toes, and create mess. Prevention matters.
Improved Balance and Stability
Standing upright with good posture while accessing storage means better balance and stability.
Bent-over, twisted positions compromise balance. Neutral posture maintains it.
Teaching Family Members About Vertical Storage Benefits
Teaching family about vertical storage requires explaining your specific arthritis limitations honestly, demonstrating how the old system caused pain, showing the improvements from vertical storage, and requesting that they maintain the organization system you’ve created.
Explaining Arthritis Limitations
People who don’t have arthritis often don’t get it.
Describing Pain and Difficulty
“It’s hard to get pans” doesn’t communicate impact. Be specific.
“Bending to the lower cabinet makes my back hurt for hours afterward. I sometimes skip cooking because I dread getting the pan out.”
That paints the picture clearly.
Demonstrating Problems with Old System
Show them. Ask them to retrieve a pan from the old location (if you still have one set up that way) while imagining their knees hurt and their back is inflamed.
They’ll immediately understand why it’s problematic.
Educating on Joint Preservation
Explain that arthritis is progressive. Every time you stress joints unnecessarily, you’re accelerating deterioration.
This isn’t about convenience—it’s about preserving function for as long as possible.
Building Understanding and Support
Family support matters for long-term success. They need to understand why organization matters and respect the system you’ve created.
Without buy-in, they’ll “help” by putting things away wrong, which defeats the purpose.
Getting Buy-In for Changes
Not everyone immediately embraces change.
Addressing Aesthetic Concerns
“But it looks cluttered” or “I don’t like seeing pans out”—common objections to visible storage.
Counter: function over form. Or compromise—choose attractive organizers, but don’t sacrifice accessibility for aesthetics.
Explaining Long-Term Benefits
This modification extends your independent living, which benefits everyone. Family would rather have you able to cook than have a pristine-looking kitchen.
Frame it as investment in your continued independence.
Involving Others in Planning
Ask for input on which solution to choose, where to position things, what looks best.
Involvement creates ownership. They’re more likely to support something they helped plan.
Compromise and Collaboration
Maybe pans can be in a cabinet with vertical storage (hidden from view) instead of wall-mounted (visible).
Find solutions that work for everyone while maintaining accessibility for you.
Training Others to Use the System
If family cooks in your kitchen too, they need training.
Demonstrating Proper Pan Placement
“Pan goes in this slot, this orientation, handle facing forward.”
Specific instructions prevent well-meaning family from creating chaos.
Explaining Organizational Logic
“Most-used pans in center slots because they’re easiest to reach. Less-used pans in edge slots.”
When they understand the logic, they’re more likely to maintain it.
Requesting Cooperation
Direct but kind: “Please put pans back where you found them. The organization helps my arthritis.”
Most people will comply when asked directly.
Correcting Mistakes Gently
“Hey, the 10-inch goes in this slot, not that one—I need it in the easy-reach position.”
Gentle correction maintains the system without creating conflict.
Maintaining the System Long-Term
Systems decay without maintenance.
Setting Household Standards
If multiple people use the kitchen, establish standards. “Pans stored vertically in designated spots, always.”
Written standards (posted if necessary) help maintain consistency.
Regular Family Check-Ins
Monthly: “How’s the pan system working? Do we need to adjust anything?”
Keeps everyone engaged and allows for modifications as needs change.
Adapting as Needs Change
If your arthritis worsens, you might need to shrink the height range or reduce pan count.
Family should understand that the system will evolve with your needs.
Shared Responsibility Models
In shared households, dividing maintenance tasks works. One person handles putting pans away after cooking, another handles cleaning the organizer monthly.
Shared responsibility prevents burden on any one person.
Vertical Skillet Storage in Assisted Living and Senior Housing
Vertical storage in assisted living requires requesting management approval for modifications, proposing damage-free or reversible solutions, and sometimes advocating for facility-wide accessibility improvements that benefit all residents.
Requesting Modifications in Rentals
Assisted living is usually rental. That complicates modifications.
Knowing Tenant Rights
Fair Housing Act requires reasonable accommodations for disabilities. Vertical storage for arthritis can qualify.
Management can’t arbitrarily deny reasonable accessibility modifications, though they can require specific installation methods.
Proposing Damage-Free Solutions
Lead with solutions that require no permanent installation: freestanding countertop organizers, cabinet-insert systems.
Management is more likely to approve modifications that don’t alter the property.
Working with Property Management
Written request, doctor’s note supporting medical necessity, specific product information showing it won’t damage property.
Professional approach increases approval odds.
Documenting Medical Necessity
Doctor’s letter: “Due to arthritis, patient requires vertical pan storage at accessible height to avoid pain from bending.”
Medical documentation makes this a reasonable accommodation, not a preference.
Shared Kitchen Considerations
Some senior housing has communal kitchens.
Personal Space Organization
If you have assigned cabinet space, organize it vertically even in shared kitchen.
Your space, your organization.
Labeling Your Items
Clear labels prevent others from using (or misplacing) your pans. “Jane’s pans—please leave in assigned slots.”
Respecting Communal Areas
Don’t reorganize shared spaces without group consensus. Propose vertical storage for communal pans but get buy-in.
Unilateral changes create conflicts.
Compact Personal Solutions
Small countertop organizer that you can keep in your unit or designated space. Holds your 2-3 personal pans.
Doesn’t require facility modification—just your personal equipment.
Moving Vertical Systems to New Homes
You might move to different housing.
Portable Organizer Options
Freestanding systems move easily. Unload pans, pick up organizer, move it.
Wall-mounted systems require uninstallation and reinstallation. Factor moving difficulty into initial selection.
Reinstallation Planning
If you’re moving, measure the new space first. Ensure your current system will fit.
Sometimes you need to buy new organizers sized for the new space.
Taking Systems When You Move
Most organizers are worth taking. Exception: custom-built permanent installations might not fit new space.
Calculate whether moving the organizer saves money versus buying new for the new space.
Starting Fresh in New Spaces
Sometimes moving is a good time to upgrade or change systems entirely. Reassess needs, buy new.
You’ve learned what works and what doesn’t—apply that knowledge to the new setup.
Advocating for Better Kitchen Design
Push for facility-wide improvements.
Facility-Wide Improvements
Propose that management install vertical storage in all units as standard accessibility feature.
Benefits everyone, prevents individual accommodation requests.
Resident Council Proposals
Work through resident council to propose accessibility improvements. Group voice carries more weight than individual.
Present cost estimates, supplier information, and resident support.
Universal Design Benefits
Vertical storage isn’t just for people with arthritis—it’s better for everyone. Frame it as universal design improvement.
Management might be more receptive to “improving everyone’s experience” than “accommodating disabilities.”
Group Purchasing Power
If multiple residents want vertical storage, negotiate group discount from supplier. Management might cover costs if residents coordinate.
Collective action works better than individual requests sometimes.
Psychological Benefits of Arthritis-Friendly Storage
Beyond physical pain relief, vertical skillet storage provides psychological benefits—reduced anxiety about cooking, increased sense of control over your environment, and confidence to maintain social cooking activities that fight isolation.
Reduced Cooking Anxiety
Pain creates avoidance. Avoidance creates anxiety.
Eliminating Storage Dread
“I should cook but I don’t want to deal with getting the pan out”—this dread prevents cooking before you start.
Remove the painful step, remove the dread. Cooking becomes psychologically easier.
Confidence in Kitchen Tasks
Knowing you can access what you need independently builds confidence. You can cook when you want, not only when help is available or pain is tolerable.
Confidence feeds more cooking, which feeds better nutrition, creating a positive cycle.
Willingness to Cook More Often
Easier access means you’re willing to cook more frequently. You stop avoiding it.
This directly impacts nutrition, cost, and independence.
Mental Health Improvements
Chronic pain contributes to depression. Reducing pain points (literally) improves mood.
Small environmental changes create measurable mental health benefits over time.
Sense of Control and Autonomy
Arthritis often makes you feel out of control—your body doesn’t work like it used to.
Managing Your Own Space
Choosing, installing, and organizing vertical storage is exercising control over your environment.
You identified a problem and solved it. That agency matters psychologically.
Making Proactive Changes
Proactive versus reactive. You didn’t wait until you literally couldn’t get pans anymore—you adapted while you still could.
This mindset of proactive adaptation is healthy aging.
Problem-Solving Successfully
Successfully solving the skillet storage problem demonstrates that arthritis doesn’t have to win. You can outsmart it.
Each successful adaptation builds confidence for addressing other challenges.
Empowerment Through Adaptation
Adaptation isn’t admitting defeat—it’s outsmarting limitations. Vertical storage is a win, not a surrender.
Framing matters. This is taking control, not giving in.
Social Cooking Opportunities
Isolation kills. Literally. Social connection extends life.
Hosting Without Stress
Easier cooking makes hosting feasible. You can have friends over for a meal without dreading the pre-cooking preparation.
Social cooking maintains relationships and fights isolation.
Demonstrating Capabilities
Hosting shows others you’re still capable and independent. This matters for self-image.
Plus you might inspire others with arthritis to make similar changes.
Sharing Meals with Less Fatigue
Cooking for others is rewarding. But it’s not rewarding if you’re exhausted and in pain afterward.
Vertical storage lets you cook for others without suffering, making social cooking sustainable.
Maintaining Social Connections
Regular cooking and sharing meals maintains social bonds. These bonds predict longevity and quality of life.
Kitchen modifications that enable social cooking are life-extending modifications.
Positive Aging Mindset
How you think about aging affects how you age.
Adapting Rather Than Giving Up
“I can’t cook anymore” versus “I adapted my kitchen so I can keep cooking”—completely different mindsets.
Adaptation mindset is resilient. Giving-up mindset accelerates decline.
Investing in Long-Term Solutions
Spending money and effort on home modifications signals you’re planning to continue living actively.
This investment mentality supports ongoing engagement and adaptation.
Viewing Arthritis as Manageable
Arthritis is a problem to solve, not a sentence to serve. Vertical storage proves you can solve problems.
Manageable challenge versus insurmountable obstacle—the framing affects quality of life.
Role Modeling for Peers
Other seniors see your solutions and adopt them. You’re demonstrating healthy aging through adaptation.
Being a positive example matters—for yourself and for your community.
Advanced Vertical Storage Strategies
Advanced vertical storage strategies include color-coding slots for visual identification, rotating seasonal cookware to keep relevant items accessible, eliminating duplicate pans to free up storage space, and future-proofing systems for progressive arthritis.
Color-Coded Organization Systems
Visual cues help when arthritis affects memory or processing speed.
Visual Identification Benefits
Color-coded slots: blue for nonstick, red for stainless, green for specialty pans. You see the color, you know the pan type.
Faster identification, less cognitive load.
Reducing Cognitive Load
Arthritis pain itself affects cognition (pain is distracting). Visual systems reduce mental effort required for organization.
Less thinking, more doing.
Memory Support Through Colors
If memory is declining, color coding provides consistent retrieval cues. “I need the blue pan for eggs” becomes automatic.
Works better than remembering “third slot from left.”
Consistent Coding Schemes
Pick a color system and stick to it throughout the kitchen. Same colors for drawer dividers, shelf markers, whatever.
Consistency makes the system actually work.
Rotating Seasonal Cookware
Your cooking changes with seasons. Storage should too.
Summer Lightweight Pans Forward
Summer cooking uses lighter pans, quicker cooking. Move these to prime positions May-September.
Heavy-duty pans move to less accessible positions since you’re not braising in July.
Winter Heavy-Duty Items Accessible
October-April, heavy pans for stews and braises move to prime spots. Lightweight pans shift back.
Matches storage to actual use patterns.
Holiday Special Pans Temporary Placement
That turkey roaster you use once yearly? It can live in horrible storage 51 weeks annually.
Two weeks before Thanksgiving, move it to accessible position. After Thanksgiving, back to storage.
Regular Rotation Schedule
Spring and fall reorganization. Takes 15 minutes, keeps most-used items always accessible.
Set phone reminder for April 1 and October 1. Make it routine.
Duplicate Pan Elimination Strategy
Ruthless simplification.
Identifying True Needs
“I might need three 10-inch skillets someday” versus “I actually use one 10-inch skillet regularly.”
Be honest about actual use, not theoretical needs.
One Skillet Per Size Philosophy
One 8-inch. One 10-inch. One 12-inch. That’s it.
Unless you’re simultaneously cooking three dishes (rare for seniors), duplicates are wasteful.
Quality Over Quantity
Better to have one excellent lightweight skillet than three mediocre heavy ones.
Invest in the single best pan per size instead of keeping multiples.
Freeing Up Storage Space
Fewer pans means fewer slots needed. Smaller organizer works, or more space for other items.
Less clutter, more efficiency.
Future-Proofing Your System
Arthritis progresses. Plan for that.
Anticipating Increased Limitations
If bending is hard now, it’ll be harder in 5 years. If overhead reaching is doable now, it might not be later.
Install systems now that accommodate future increased limitations.
Building in Flexibility
Adjustable organizers adapt as needs change. Fixed systems might require replacement if mobility declines significantly.
Flexibility costs more upfront but saves long-term.
Choosing Adaptable Solutions
Modular systems you can reconfigure. Height-adjustable mounting. These adapt to changing needs.
Future-you will thank present-you for planning ahead.
Planning for Progressive Arthritis
Sad reality: arthritis usually worsens over time. Modifications that barely work now won’t work later.
Err toward more accessibility than you currently need. You’ll grow into it.
Working with Occupational Therapists on Storage
Occupational therapists provide professional kitchen assessments identifying arthritis challenges, recommend specific vertical storage solutions based on your individual limitations, and integrate storage modifications into comprehensive arthritis management plans.
Professional Kitchen Assessments
OTs are trained for exactly this.
What OTs Evaluate
They watch you cook. They note every awkward movement, pain point, safety concern, and inefficiency.
Then they recommend modifications—usually including vertical storage among other changes.
Recommendations You Can Expect
OT assessment for arthritis typically recommends:
- Vertical storage for frequently-used items
- Height optimization for counters and storage
- Adaptive tools for cooking
- Layout improvements for efficient movement
Vertical storage is standard OT recommendation for arthritis.
Implementing Professional Advice
Follow their recommendations. They’re educated in exactly this—making daily activities doable despite physical limitations.
Their advice is evidence-based and tested.
Follow-Up and Adjustment
Good OTs schedule follow-up to see how modifications are working. Adjustments happen based on real-world use.
Not one-and-done—it’s iterative improvement.
Prescription for Home Modifications
Medical necessity documentation matters.
Medical Necessity Documentation
OT evaluation becomes part of medical record. This supports insurance claims or grant applications.
Professional documentation carries more weight than your self-assessment.
Insurance Submission Support
Some OTs help with insurance paperwork or write supporting letters for modification requests.
Their professional recommendation strengthens claims.
Vendor Recommendations
OTs often know which products work best for specific limitations. They’ve seen what works for other patients.
Their product recommendations save you trial-and-error.
Progress Monitoring
OT tracks functional improvements from modifications. “Patient reports 80% reduction in cooking-related back pain following vertical storage installation.”
Documented improvements justify modifications and suggest additional changes.
Exercises to Support New Storage Use
Storage alone isn’t enough—you need functional capacity too.
Range of Motion Maintenance
Gentle exercises maintaining shoulder, elbow, and wrist range of motion make reaching for vertical storage easier.
OTs prescribe specific exercises for your limitations.
Strength Building for Reaching
Light resistance exercises building the strength needed to pull pans from slots and lift them.
Functional strength for functional tasks.
Balance Exercises for Safety
Better balance makes standing while accessing storage safer. Reduces fall risk.
Simple exercises OTs prescribe improve balance significantly.
Coordination Improvements
Hand-eye coordination exercises help with the grab-and-pull motion required for vertical storage.
Maintaining coordination keeps storage usable as you age.
Integrating Storage with Overall Arthritis Management
Vertical storage is one piece of a bigger plan.
Comprehensive Treatment Plans
Medication + physical therapy + occupational therapy + home modifications + assistive devices = comprehensive management.
Vertical storage fits into the broader picture.
Lifestyle Modification Strategies
Diet, exercise, stress management, environmental modifications—all work together for arthritis management.
OTs help coordinate these elements into a cohesive plan.
Medication and Storage Synergy
Medications reduce inflammation. Reduced inflammation means better tolerance for the remaining necessary movements (like grabbing pans).
Storage modification and medication work together, each making the other more effective.
Total Joint Protection Approach
Joint protection principle: minimize stress on joints in all activities. Vertical storage protects joints during cooking.
Same principle applies throughout life—sleep position, sitting posture, all daily activities. Consistent approach across activities maximizes joint preservation.