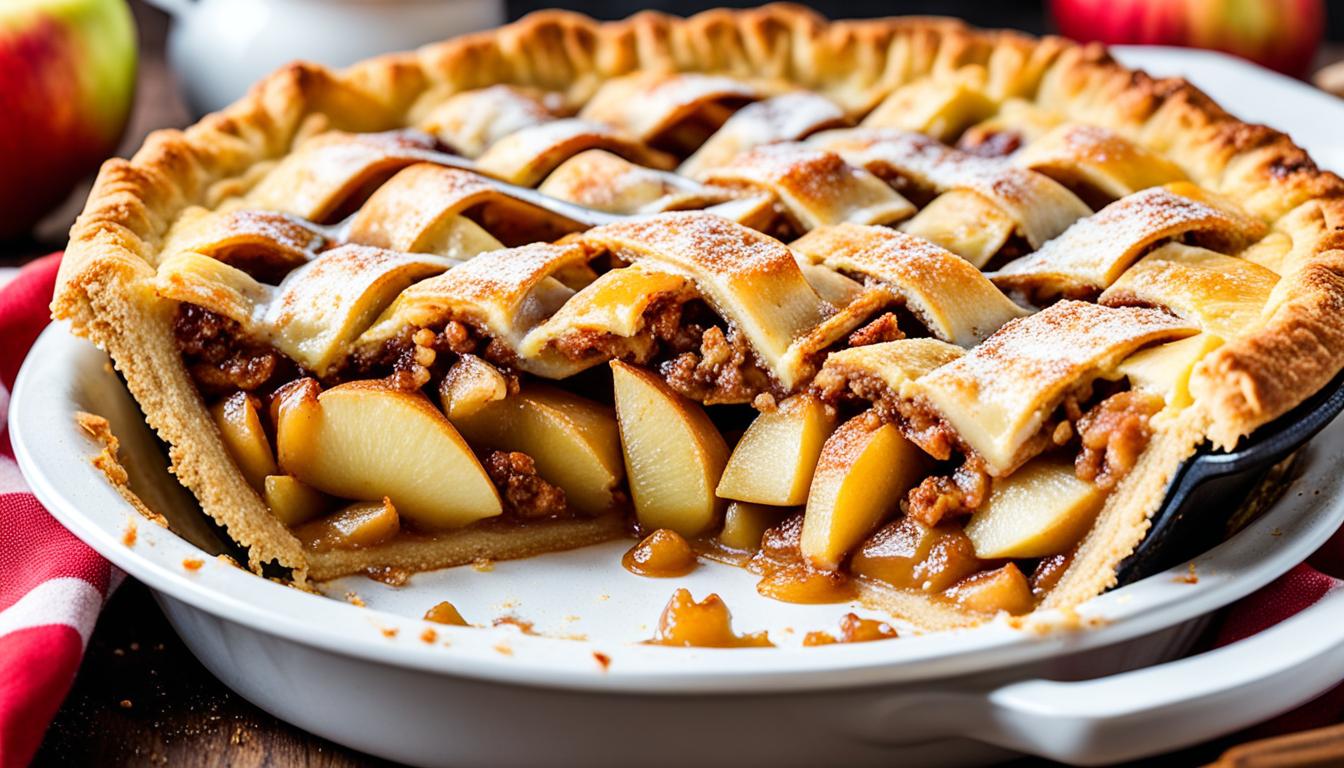
A cast iron skillet lemon bar cake gives you everything a classic lemon bar promises — crisp, buttery crust, custardy lemon filling — except baked in one pan that holds heat evenly and gets you that golden edge no other pan really pulls off. I’ve made every recipe on this list more than once. Some are worth your time right away. Others ask for a bit more patience first.
Table of Contents
- 1 Why People Love Cast Iron Skillet Baking
- 2 Essential Ingredients for Lemon Bar Cakes
- 3 Preparing Your Cast Iron Skillet for Baking
- 4 Classic Lemon Bar Skillet Cake Recipe
- 5 Lemon Lavender Skillet Cake with Honey Drizzle
- 6 Upside-Down Lemon Skillet Cake: A Twist on Tradition
- 7 Lemon Blueberry Skillet Cake Fusion
- 8 Lemon Poppy Seed Skillet Cake: Texture and Flavor
- 9 Lemon Coconut Delight: Tropical Twist in Iron
- 10 Lemon Almond Ricotta Cake: Creamy and Tangy
- 11 Gluten-Free Lemon Bar Skillet Cake Option
- 12 Vegan Lemon Bar Skillet Cake: Plant-Based Perfection
- 13 Lemon Meringue Skillet Cake: Two Desserts in One
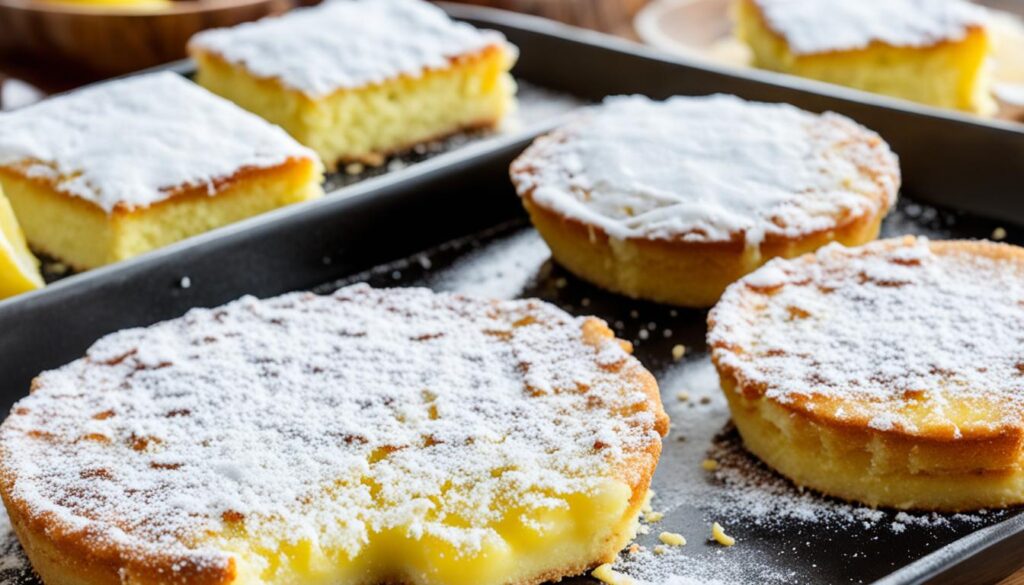
- 14 Serving and Storing Your Lemon Bar Skillet Cakes
- 15 Troubleshooting Common Lemon Bar Cake Issues
- 16 Topping and Garnish Ideas for Lemon Bar Skillet Cakes
- 17 How to Adapt These Recipes for Different Skillet Sizes
- 18 Caring for Your Cast Iron Skillet After Baking
Why People Love Cast Iron Skillet Baking
Cast iron bakes better. That’s the short answer.
The longer one: cast iron holds heat in a way that thin aluminum pans simply don’t. When you pour a lemon filling into a properly preheated skillet, the bottom starts cooking immediately — you get that set, slightly firm underside that’s the whole point of a lemon bar. Aluminum gives you uneven heat and soft, underbaked centers. Not ideal.
A well-seasoned skillet also means natural non-stick behavior, which matters when you’re cutting into something with a sticky citrus curd on top. The crust releases cleanly. The edges crisp. The whole thing slides out (or serves straight from the pan) without disaster.
Also — and this is underrated — cast iron goes from stovetop to oven without drama. Some of these recipes call for a quick stovetop toast of the crust before baking, and a cast iron skillet is the only pan that actually makes that worth doing.
Essential Ingredients for Lemon Bar Cakes
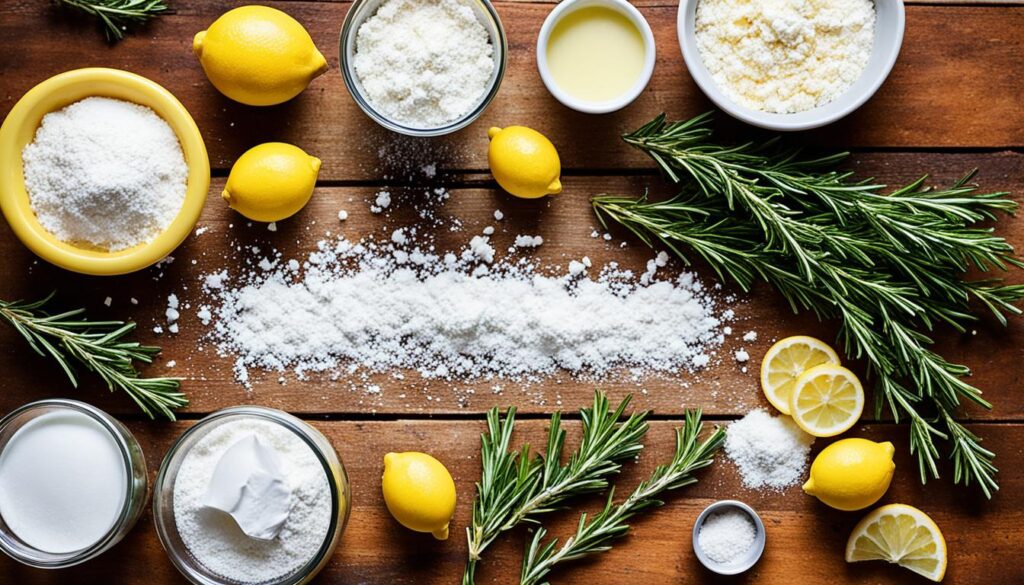
Lemon bar cakes aren’t complicated — but the ingredient quality really does show here. A few things to keep in mind before you start:
- Fresh lemons, always. Bottled juice is flat and a little bitter. You’ll taste the difference immediately.
- Real butter. Not margarine. Not “butter-flavored spread.” Actual butter, unsalted so you control the salt level.
- Room temperature eggs. Cold eggs can cause the filling to curdle slightly when it hits the heat. Pull them out 30 minutes before you start.
- All-purpose flour for the crust works in most recipes here. The gluten-free version swaps it out — more on that below.
- Powdered sugar for dusting and in some fillings. Granulated won’t dissolve smoothly in a lemon curd.
- Zest. Don’t skip it. The oils in lemon zest are more intensely lemony than the juice itself.
A family of four is well covered here — every recipe below yields 8–10 generous servings out of a 10- or 12-inch skillet, so you’ll have leftovers, not just enough.
Preparing Your Cast Iron Skillet for Baking
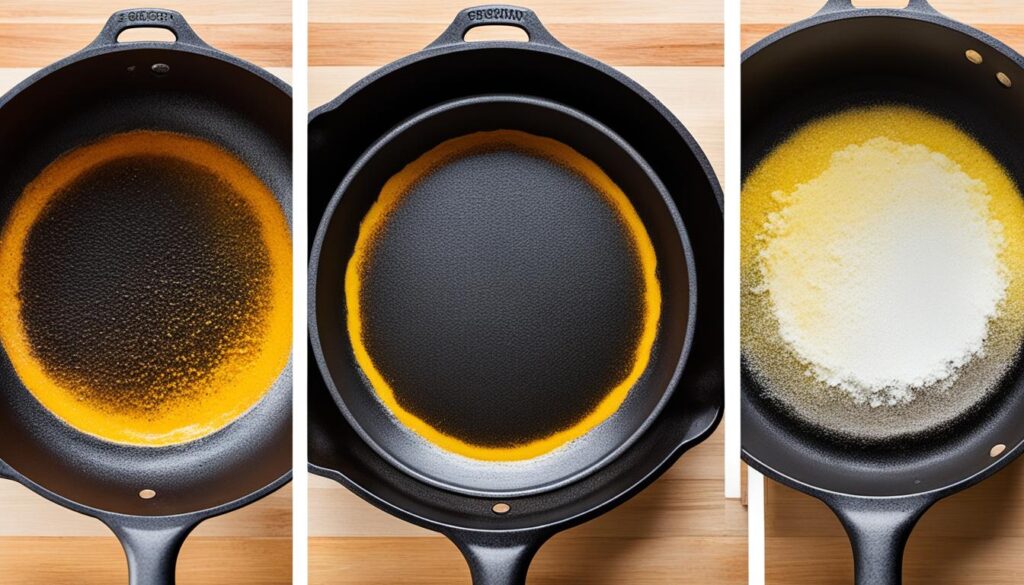
Do this before any of the recipes below. Seriously.
Preheat the skillet in the oven at the recipe temperature for at least 10 minutes before adding your crust. A cold skillet means a soggy bottom. Not what you want.
Grease it well. Sugar sticks, even to a pan that’s well-seasoned — so a thin layer of butter or cooking spray underneath earns its keep here.
Don’t panic if the edges cook faster. Cast iron radiates heat from the sides too, so the edges will always be a bit more done. That’s a feature, not a bug — the edges of a lemon bar are often the best bite.
Got a newer skillet, or one with patchy seasoning? Look over these skillet seasoning tips before you start. Skip that step and an under-seasoned pan will hand you sticky, frustrating results every time.
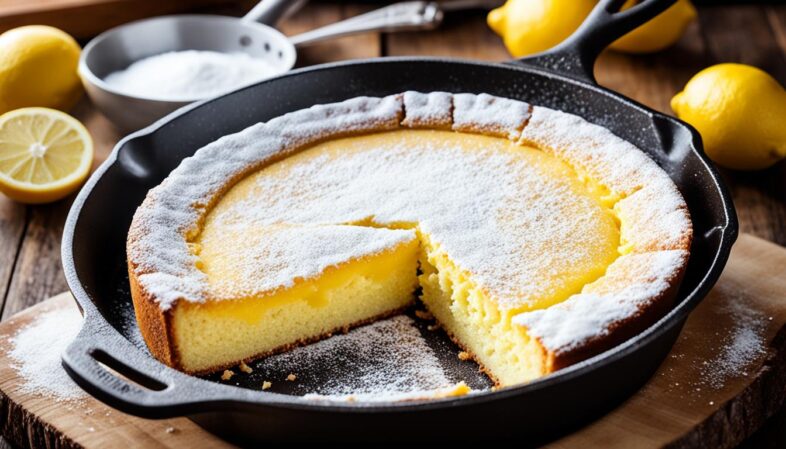
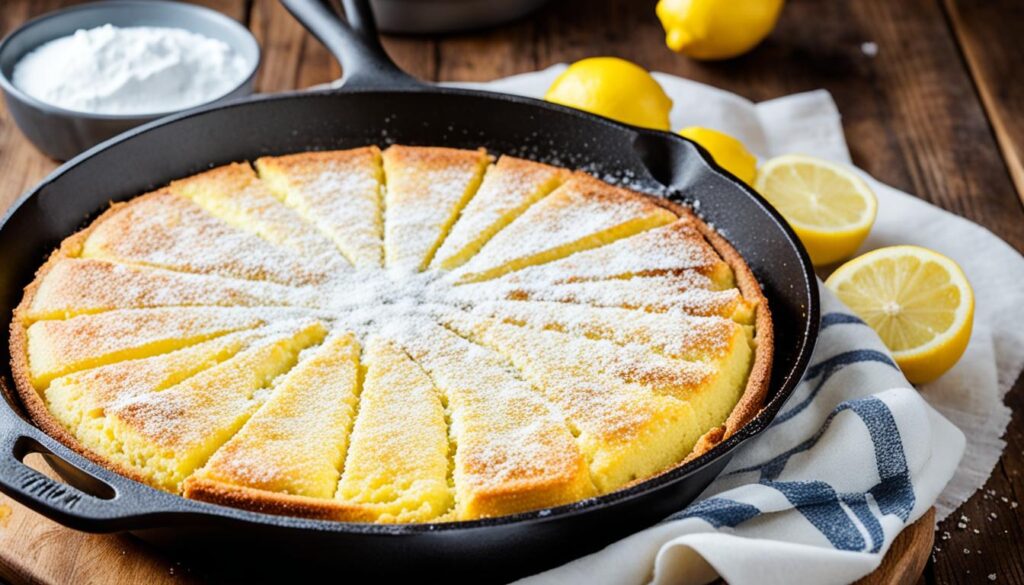
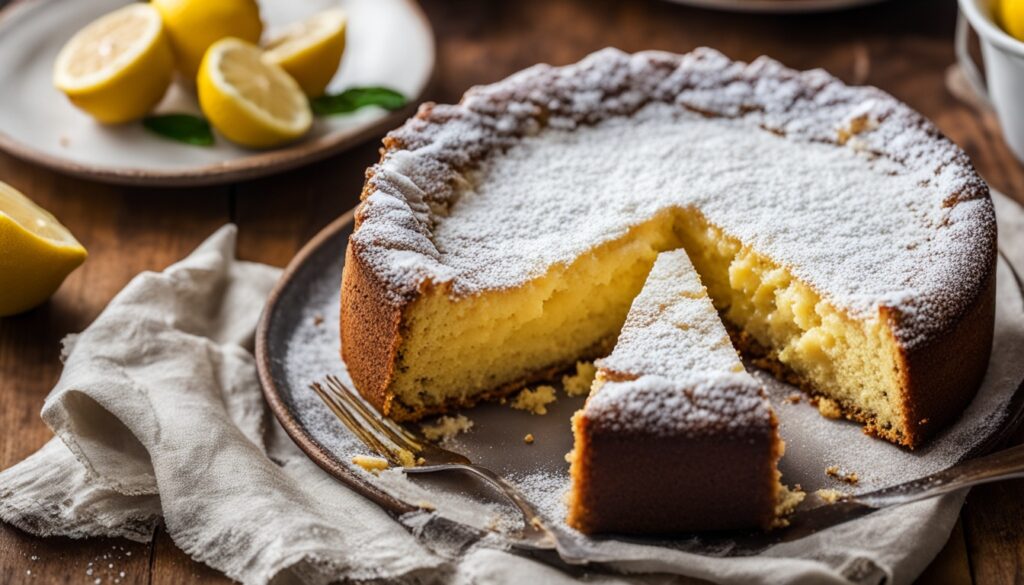
Classic Lemon Bar Skillet Cake Recipe

This is where I’d tell anyone to start. The classic exists for a reason — bright, tart lemon filling on a shortbread crust that’s just barely sweet. It’s the recipe I make when I need something reliable, something I know will work. No surprises.
Ingredients
For the crust:
- 1-1/2 cups all-purpose flour
- 1/3 cup powdered sugar
- 3/4 cup (1-1/2 sticks) unsalted butter, cold and cubed
- 1/4 tsp salt
For the filling:
- 4 large eggs
- 1-1/3 cups granulated sugar
- 1/3 cup fresh lemon juice (about 3 lemons)
- 2 tbsp lemon zest
- 1/4 cup all-purpose flour
- 1/4 tsp baking powder
- Pinch of salt
Instructions
Preheat your oven to 350°F. Put the skillet in while it heats.

Start the crust in a food processor — pulse the flour, powdered sugar, and salt together first, just to combine. Then drop in the cold butter and pulse again. You’re aiming for something that looks like coarse sand, slightly damp. Not a smooth dough. Not wet clumps. Sand. Press it into the bottom of your warm (not scorching) greased skillet, pushing down evenly so there are no thin spots. Eighteen to twenty minutes in the oven, and the edges should just be turning golden when it’s ready.
Meanwhile, whisk the eggs with the granulated sugar until the color goes pale yellow and the mixture thickens slightly. Lemon juice next, then the zest, the flour, the baking powder, and that pinch of salt. Whisk again — it should be smooth, thin, and very yellow.
Pull the crust out. It should look set and lightly browned at the edges. Pour the filling directly over the hot crust, get it back in the oven fast, and bake another 22–25 minutes. The filling is done when the edges are firm but the center still has a gentle, slow wobble — like set Jell-O, not liquid.
Cool completely before dusting with powdered sugar and cutting.
Nutritional Information (per serving)
| Nutrient | Amount per Serving |
|---|---|
| Calories | 312 |
| Carbohydrates | 42g |
| Protein | 5g |
| Fat | 13g |
| Fiber | 0.5g |
| Sodium | 105mg |
Lemon Lavender Skillet Cake with Honey Drizzle

Of all eleven recipes on this list, this is the one I’d serve to guests. The lavender is subtle — not perfume-y, not overwhelming — and the honey drizzle at the end ties the whole thing together. It feels fancy without being difficult. That’s exactly why I love it.
The lemon lavender skillet cake is a step up from the classic, but only slightly.
Ingredients
For the crust:
- 1-1/2 cups all-purpose flour
- 1/3 cup powdered sugar
- 1 tsp dried culinary lavender, finely crushed
- 3/4 cup (1-1/2 sticks) unsalted butter, cold and cubed
- 1/4 tsp salt
For the filling:
- 4 large eggs
- 1-1/4 cups granulated sugar
- 1/3 cup fresh lemon juice
- 2 tbsp lemon zest
- 1/2 tsp dried culinary lavender, steeped in 1 tbsp warm water for 5 minutes, then strained
- 1/4 cup all-purpose flour
- 1/4 tsp baking powder
For finishing:
- 3 tbsp good honey
- Fresh lavender sprigs (optional)
Instructions
Crush the lavender between your fingers before adding it to the crust — you want the oils released, not just dry flakes. Mix into the flour and sugar, then cut in the cold butter until sandy. Press into your preheated, greased skillet and bake at 350°F for 18 minutes.
For the filling, steep your lavender in that tablespoon of warm water while you whisk eggs and sugar. Strain the lavender water — you don’t want the actual flowers in the filling, just the flavor. Add the strained lavender water to your egg mixture along with lemon juice, zest, flour, and baking powder.
Pour over the hot crust. Bake 22–24 minutes. The top should have a matte, set appearance — if it still looks wet and shiny in the center, give it another 3 minutes.
While it’s still warm (not hot), drizzle the honey over the top in a slow back-and-forth motion. Let it cool completely before cutting.
Nutritional Information (per serving)
| Nutrient | Amount per Serving |
|---|---|
| Calories | 328 |
| Carbohydrates | 46g |
| Protein | 5g |
| Fat | 13g |
| Fiber | 0.5g |
| Sodium | 100mg |
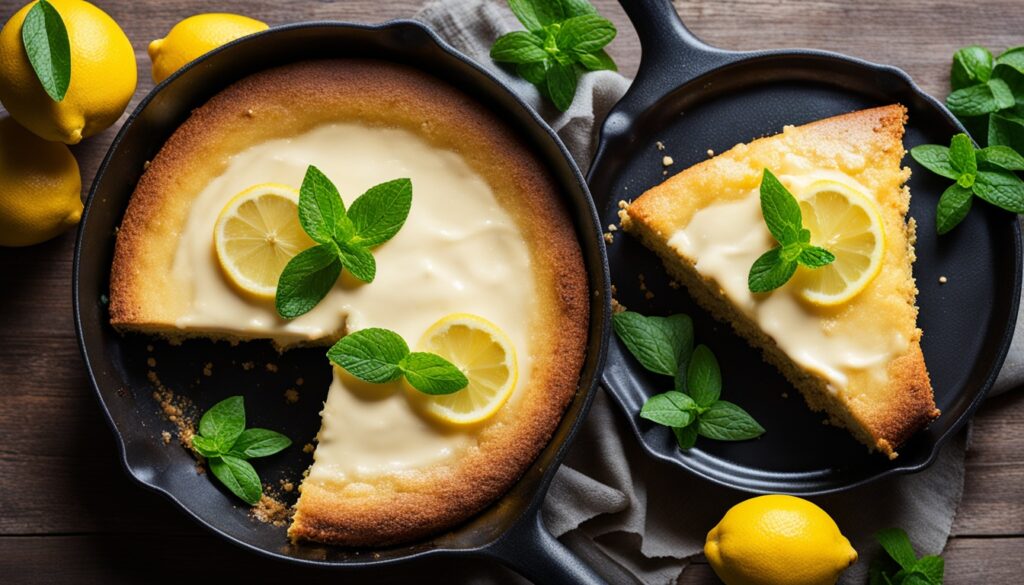
Upside-Down Lemon Skillet Cake: A Twist on Tradition
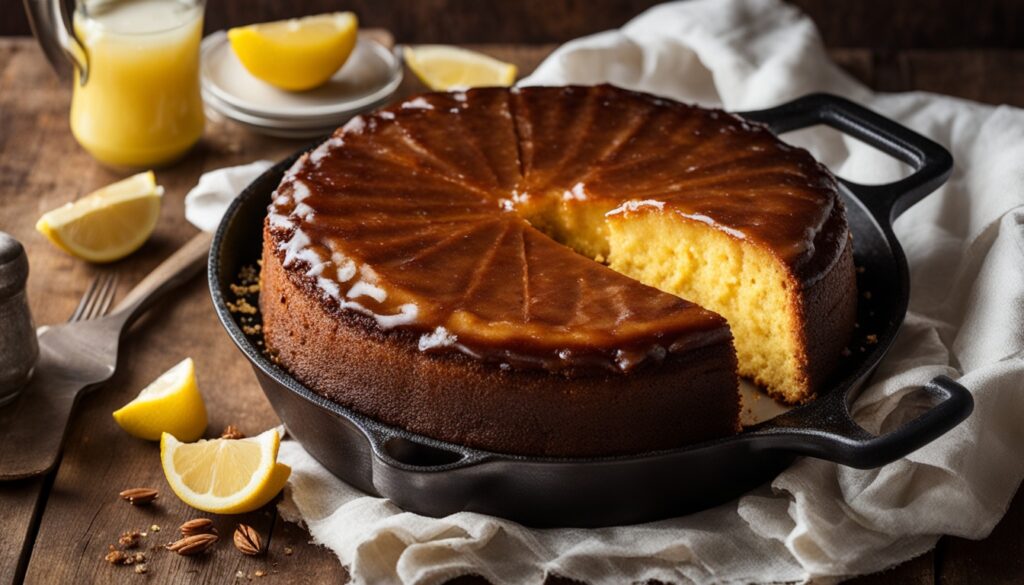
This one’s a little more dramatic. Thinly sliced lemons caramelize on the bottom of the skillet, then a light, buttery cake batter goes over the top — and when you flip it, those lemons are now gorgeous, translucent, amber-edged rounds on top of the cake. I like making this one because it always gets a reaction. And honestly? The caramelized lemon slices taste incredible.
Ingredients
For the caramelized lemon layer:
- 2 medium lemons, very thinly sliced and seeds removed
- 1/2 cup granulated sugar
- 3 tbsp unsalted butter
For the cake batter:
- 1-1/2 cups all-purpose flour
- 1 tsp baking powder
- 1/4 tsp baking soda
- 1/4 tsp salt
- 1/2 cup (1 stick) unsalted butter, softened
- 1 cup granulated sugar
- 2 large eggs
- 1/3 cup fresh lemon juice
- 1 tbsp lemon zest
- 1/2 cup sour cream
Instructions
On the stovetop over medium heat, melt the 3 tablespoons of butter right in your skillet, then stir in the 1/2 cup sugar. Keep stirring until the sugar dissolves and just starts turning a light amber — it moves fast at this stage, so don’t look away for long. Once it hits that color, take it off the heat right away. Arrange the lemon slices over the caramel in overlapping circles — they’ll shift around a little as you place them, which is completely fine, just nudge them back into position.
For the batter, cream the softened butter and sugar together until pale and fluffy — figure on about 3 minutes for that. Beat in the eggs one at a time, then the lemon juice and zest. Don’t be alarmed if it looks a touch curdled at this point; that’s just how the batter behaves here. Mix in the sour cream, then fold in the flour, baking powder, baking soda, and salt — stop the second it’s combined, no further than that.
Spoon the batter over the lemon slices, working gently as you go. Don’t press or stir — just even it out softly so you don’t disturb the lemons underneath.

Bake at 350°F for 35–40 minutes. The top should spring back when lightly pressed. Let it cool in the skillet for exactly 10 minutes — no more. Then run a knife around the edges and flip it onto a plate. If a lemon sticks, just press it back into place. No one will know.
Nutritional Information (per serving)
| Nutrient | Amount per Serving |
|---|---|
| Calories | 348 |
| Carbohydrates | 52g |
| Protein | 4g |
| Fat | 15g |
| Fiber | 1g |
| Sodium | 145mg |
Lemon Blueberry Skillet Cake Fusion
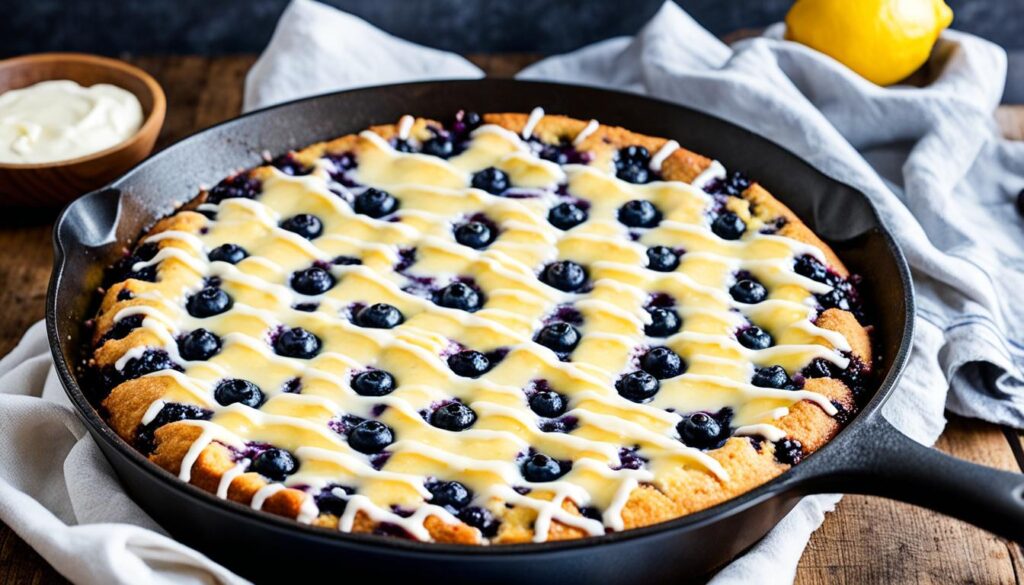
Lemon and blueberry is one of those combinations that works every time. I love this recipe in the summer when blueberries are actually good — not those pale, watery winter ones. Fresh blueberries pop open as they bake, leaving little jammy pockets scattered through the lemon filling. Visually, this is the most striking lemon bar-style recipe on the list — and it consistently ranks among the best-tasting too.
Ingredients
For the crust:
- 1-1/2 cups all-purpose flour
- 1/3 cup powdered sugar
- 3/4 cup (1-1/2 sticks) unsalted butter, cold and cubed
- 1/4 tsp salt
For the filling:
- 4 large eggs
- 1-1/4 cups granulated sugar
- 1/3 cup fresh lemon juice
- 2 tbsp lemon zest
- 1/4 cup all-purpose flour
- 1/4 tsp baking powder
- 1-1/2 cups fresh blueberries
- Pinch of salt
Instructions
Make the crust the same way as the classic version — pulse, press, bake at 350°F for 18 minutes until lightly golden.
Whisk the eggs and sugar until pale, then add lemon juice, zest, flour, baking powder, and salt. Stir together, then fold in 1 cup of the blueberries.
Pour over the hot crust and scatter the remaining 1/2 cup of blueberries over the top. They’ll sink a little — that’s intentional.
Bake for 24–28 minutes. The blueberries on top will burst and look almost jammy. The filling will be set with that familiar slow wobble in the center. Cool completely, dust with powdered sugar, and cut.
Nutritional Information (per serving)
| Nutrient | Amount per Serving |
|---|---|
| Calories | 318 |
| Carbohydrates | 45g |
| Protein | 5g |
| Fat | 13g |
| Fiber | 1.5g |
| Sodium | 108mg |
Lemon Poppy Seed Skillet Cake: Texture and Flavor
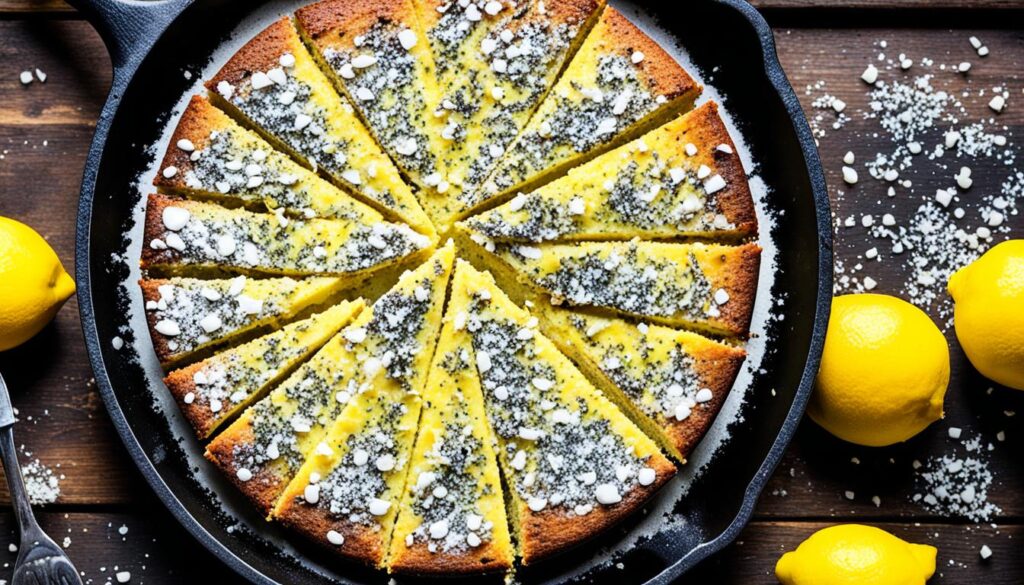
Poppy seeds don’t add much flavor — they add texture. That slight crunch against the smooth lemon filling is why I keep coming back to this one. It’s a small thing but it makes the whole eating experience more interesting. I’d call this the most underrated version on the list.
Ingredients
For the crust:
- 1-1/2 cups all-purpose flour
- 1/3 cup powdered sugar
- 2 tbsp poppy seeds
- 3/4 cup (1-1/2 sticks) unsalted butter, cold and cubed
- 1/4 tsp salt
For the filling:
- 4 large eggs
- 1-1/3 cups granulated sugar
- 1/3 cup fresh lemon juice
- 3 tbsp lemon zest (a little extra here — it’s worth it)
- 1/4 cup all-purpose flour
- 1/4 tsp baking powder
- 1-1/2 tbsp poppy seeds
- Pinch of salt
Instructions
Add the poppy seeds right into the crust mixture before cutting in the butter. Press into the preheated greased skillet and bake at 350°F for 18–20 minutes.
Whisk the filling ingredients together, adding the poppy seeds last. The batter will look speckled and dark — that’s right. Pour over the hot crust.
Bake another 22–25 minutes. Cool completely. The poppy seeds will have risen slightly during baking and create a subtle texture on top. Dust with powdered sugar before serving.
Nutritional Information (per serving)
| Nutrient | Amount per Serving |
|---|---|
| Calories | 322 |
| Carbohydrates | 43g |
| Protein | 6g |
| Fat | 14g |
| Fiber | 1g |
| Sodium | 108mg |
Lemon Coconut Delight: Tropical Twist in Iron
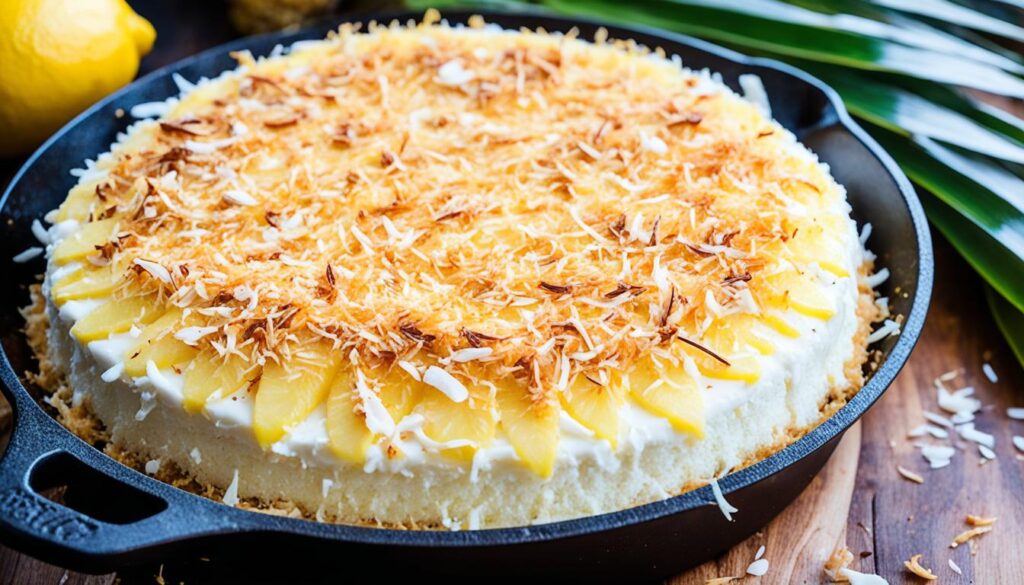
This one asks for a bit more effort — toasting the coconut separately isn’t a skip-able step — but it pays off. The toasted coconut on top adds a nutty, slightly chewy layer over the smooth filling, and since coconut’s also worked into the crust, the flavor carries through the whole bite. Bright, tropical, and somehow it still feels right no matter the season.
Ingredients
For the crust:
- 1-1/4 cups all-purpose flour
- 1/2 cup sweetened shredded coconut, toasted
- 1/3 cup powdered sugar
- 3/4 cup (1-1/2 sticks) unsalted butter, cold and cubed
- 1/4 tsp salt
For the filling:
- 4 large eggs
- 1-1/4 cups granulated sugar
- 1/3 cup fresh lemon juice
- 2 tbsp lemon zest
- 2 tbsp coconut cream
- 1/4 cup all-purpose flour
- 1/4 tsp baking powder
- Pinch of salt
For topping:
- 1/2 cup sweetened shredded coconut, toasted
Instructions
Toast the coconut first — spread it in a dry pan over medium-low heat, stirring constantly until golden brown and fragrant. About 4–5 minutes. It burns fast. Watch it.
Mix the toasted coconut into your crust mixture before adding the butter. Press into the skillet and bake at 350°F for 18 minutes.
Whisk the eggs, sugar, lemon juice, zest, coconut cream, flour, baking powder, and salt. Pour over the hot crust.
Bake 22–25 minutes until just set. While still warm, scatter the remaining toasted coconut over the top — it’ll stick lightly to the surface as the cake cools. Cool fully before cutting.
Nutritional Information (per serving)
| Nutrient | Amount per Serving |
|---|---|
| Calories | 345 |
| Carbohydrates | 44g |
| Protein | 5g |
| Fat | 17g |
| Fiber | 1.5g |
| Sodium | 115mg |
Lemon Almond Ricotta Cake: Creamy and Tangy
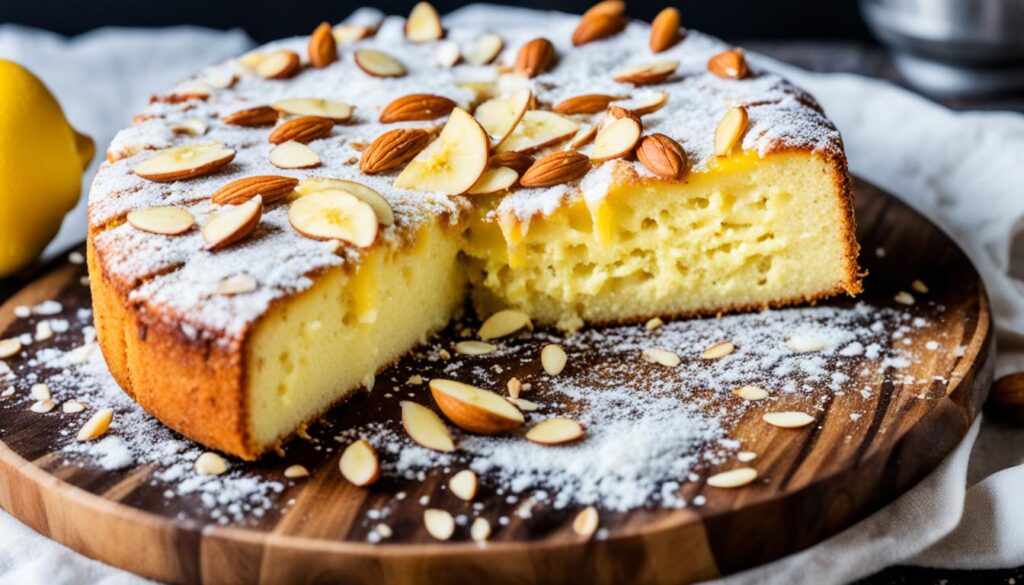
This is a different beast — more cake than lemon bar, but it belongs on the list because the ricotta gives the filling a creamy, almost cheesecake-like texture that’s completely different from the other versions here. It’s rich, in the way a good dessert should be — heavy without feeling like too much. What pulls it together is the almond crust underneath, nutty enough to stand up against that tangy ricotta-lemon filling instead of disappearing under it. I go for this one when I want a dessert that actually feels like the end of a meal, not just a quick square of something sweet.
Ingredients
For the almond crust:
- 1 cup all-purpose flour
- 1/2 cup almond flour
- 1/3 cup powdered sugar
- 3/4 cup (1-1/2 sticks) unsalted butter, cold and cubed
- 1/4 tsp almond extract
- 1/4 tsp salt
For the filling:
- 1-1/2 cups whole-milk ricotta
- 3 large eggs
- 3/4 cup granulated sugar
- 1/3 cup fresh lemon juice
- 2 tbsp lemon zest
- 1/4 cup all-purpose flour
- 1/4 tsp vanilla extract
- Pinch of salt
For finishing:
- 1/4 cup sliced almonds, toasted
- Powdered sugar for dusting
Instructions
Mix both flours, powdered sugar, and salt. Add the cold butter and almond extract, working it in until crumbly. Press firmly into the greased, preheated skillet. Bake at 325°F (lower temp here — the almond flour browns faster) for 20 minutes.
For the filling, whisk the ricotta until smooth before adding anything else. It needs to be smooth, not lumpy — whisk until you don’t see any curds. Add eggs one at a time, then sugar, lemon juice, zest, flour, vanilla, and salt.
Pour over the hot crust. Scatter sliced almonds over the top.
Bake at 325°F for 35–40 minutes. The filling will puff slightly and then settle — it’s done when the center no longer jiggles at all. Let it cool completely (at least 1 hour) before cutting and dusting with powdered sugar.
Nutritional Information (per serving)
| Nutrient | Amount per Serving |
|---|---|
| Calories | 382 |
| Carbohydrates | 38g |
| Protein | 9g |
| Fat | 22g |
| Fiber | 1.5g |
| Sodium | 132mg |
Gluten-Free Lemon Bar Skillet Cake Option
Gluten-free baking can go wrong in a lot of ways. This one doesn’t. The trick is using a good 1-to-1 gluten-free flour blend — not almond flour alone, not coconut flour alone. A blend that includes xanthan gum will hold the crust together the way regular flour would. I’ve made this alongside the classic for people who need gluten-free, and honestly, most people couldn’t tell the difference.
Ingredients
For the crust:
- 1-1/2 cups 1-to-1 gluten-free flour blend (with xanthan gum)
- 1/3 cup powdered sugar
- 3/4 cup (1-1/2 sticks) unsalted butter, cold and cubed
- 1/4 tsp salt
For the filling:
- 4 large eggs
- 1-1/3 cups granulated sugar
- 1/3 cup fresh lemon juice
- 2 tbsp lemon zest
- 3 tbsp gluten-free 1-to-1 flour blend
- 1/4 tsp baking powder (ensure certified gluten-free)
- Pinch of salt
Instructions
The method here mirrors the classic almost exactly. Pulse the GF flour blend, powdered sugar, and salt, then cut in the cold butter until the mixture looks like damp sand. It’ll feel slightly different from regular flour — a little stickier, a little more fragile. That’s normal.
Press into the greased, preheated skillet. Press firmly — GF crusts need a bit more compression to hold together. Bake at 350°F for 18–20 minutes.
Whisk the filling ingredients together and pour over the hot crust. Bake 22–25 minutes. The GF filling sets up a touch faster than a regular one — start checking at 20 minutes.
Cool completely before cutting. GF lemon bars need full cooling time to firm up properly.
Nutritional Information (per serving)
| Nutrient | Amount per Serving |
|---|---|
| Calories | 308 |
| Carbohydrates | 43g |
| Protein | 5g |
| Fat | 13g |
| Fiber | 0.5g |
| Sodium | 105mg |
Vegan Lemon Bar Skillet Cake: Plant-Based Perfection
I’ll be straight with you — vegan lemon bars are harder to get right than any other version on this list. The filling relies on eggs for structure, and replacing them takes some doing. But this version, using coconut cream and cornstarch, actually works. The filling isn’t quite as custardy as the egg-based versions, but it’s bright and tangy and sets up firm enough to slice cleanly. Worth making if vegan is what you need.
Ingredients
For the crust:
- 1-1/2 cups all-purpose flour
- 1/3 cup powdered sugar
- 3/4 cup vegan butter (such as Miyoko’s or Earth Balance), cold and cubed
- 1/4 tsp salt
For the filling:
- 1 can (13-1/2 oz) full-fat coconut cream
- 1/2 cup fresh lemon juice (about 4-5 lemons)
- 2 tbsp lemon zest
- 3/4 cup granulated sugar
- 1/3 cup cornstarch
- 1/4 tsp turmeric (for color — don’t skip this)
- Pinch of salt
Instructions
Make the crust exactly as you would the classic — pulse, press, bake at 350°F for 18–20 minutes until lightly golden.
For the filling, whisk together the coconut cream, lemon juice, zest, sugar, cornstarch, turmeric, and salt in a small saucepan over medium heat. Stir constantly. The mixture will thicken — you’re looking for a texture like a thick pudding, one that coats the back of a spoon heavily. This takes about 8–10 minutes.
Pour the warm filling over the hot crust immediately and spread evenly. Bake at 350°F for 15 minutes — this helps the filling bond with the crust.
Refrigerate for at least 2 hours before cutting. Vegan lemon bars need the cold to fully set. Dust with powdered sugar right before serving.
Nutritional Information (per serving)
| Nutrient | Amount per Serving |
|---|---|
| Calories | 328 |
| Carbohydrates | 46g |
| Protein | 2g |
| Fat | 16g |
| Fiber | 0.5g |
| Sodium | 118mg |
Lemon Meringue Skillet Cake: Two Desserts in One

This is the showstopper. Lemon bar base, lemon curd filling, torched meringue on top. It’s three components and the most effort on this list — but when you pull it out and torch that meringue into golden peaks, it looks absolutely incredible. I only make this one for occasions. It deserves an occasion.
Ingredients
For the crust:
- 1-1/2 cups all-purpose flour
- 1/3 cup powdered sugar
- 3/4 cup (1-1/2 sticks) unsalted butter, cold and cubed
- 1/4 tsp salt
For the lemon filling:
- 4 large egg yolks (save the whites for meringue)
- 1-1/4 cups granulated sugar
- 1/3 cup fresh lemon juice
- 2 tbsp lemon zest
- 1/4 cup all-purpose flour
- 2 tbsp cornstarch
- Pinch of salt
For the meringue:
- 4 large egg whites (room temperature)
- 1/2 cup granulated sugar
- 1/4 tsp cream of tartar
- Pinch of salt
Instructions
Make and bake the crust at 350°F for 18–20 minutes.
Whisk the egg yolks and sugar until pale, then add lemon juice, zest, flour, cornstarch, and salt. Pour over the hot crust and bake at 350°F for 20–22 minutes until the filling is fully set and doesn’t wobble at all.
Let it cool for 20 minutes while you make the meringue. Beat the egg whites with cream of tartar and salt on medium speed until foamy. Add the sugar one tablespoon at a time, beating on high between each addition. Keep going until you have stiff, glossy peaks — the meringue should hold its shape when you lift the beater.
Spread the meringue over the cooled (not cold) filling, making peaks with a spatula. Go all the way to the edges so the meringue is touching the crust — this prevents the dreaded “meringue slide.”
Torch the peaks until deeply golden. Or bake at 425°F for 4–5 minutes. Watch it closely — meringue goes from golden to burned in about 30 seconds.
Serve the same day. Meringue doesn’t keep well overnight.
Nutritional Information (per serving)
| Nutrient | Amount per Serving |
|---|---|
| Calories | 362 |
| Carbohydrates | 55g |
| Protein | 7g |
| Fat | 13g |
| Fiber | 0.5g |
| Sodium | 112mg |
Serving and Storing Your Lemon Bar Skillet Cakes
Serving:
Powdered sugar goes on right before serving. If you dust it too early, the lemon filling absorbs it and it disappears. Wait until you’re ready to cut.
For clean slices, use a sharp knife wiped clean between cuts. The filling is sticky. Don’t fight it — just wipe the knife.
Serve at room temperature for the best texture. Cold lemon bars right from the fridge are fine, but the crust gets a little hard.
Storing:
- Covered in the skillet or transferred to an airtight container — up to 4 days in the refrigerator
- Do not stack the pieces directly — the filling will stick together
- Freeze for up to 2 months, individually wrapped in plastic wrap then stored in a freezer bag
- The meringue version does not freeze well. Eat it within a day.
Troubleshooting Common Lemon Bar Cake Issues
The filling is still liquid after the full bake time. Your oven is probably running cool. Give it another 5–8 minutes and check again. A thermometer oven check is worth doing if you bake frequently.
The crust is soggy. Two likely causes: the skillet wasn’t preheated, or you didn’t bake the crust long enough before adding the filling. The crust should look set and just barely golden before the filling goes on.
Cracks in the filling. It baked too long or the oven was too hot. Cracks don’t affect flavor, but they do affect the look. Powdered sugar covers a lot of sins.
The meringue is weeping (leaking liquid underneath). Undissolved sugar in the meringue, or the filling was too cold when the meringue was applied. Add sugar slowly, and apply meringue while the filling is still slightly warm.
Filling sticks to the pan. The skillet wasn’t greased well enough. Cast iron needs butter or spray even when well-seasoned for sugary fillings.
Topping and Garnish Ideas for Lemon Bar Skillet Cakes
Beyond the standard powdered sugar dusting, here’s what actually works:
- Lemon curd drizzle — thick, glossy, intensely lemony. Make a quick curd and drizzle it over the top right before serving.
- Candied lemon slices — simmer thin lemon rounds in simple syrup for 20 minutes and lay them across the top. Beautiful and edible.
- Fresh berries — raspberries and blueberries on top of a classic lemon bar just works. Acidity on acidity.
- Whipped cream — lightly sweetened, barely sweetened. A dollop on the side is better than slathering it on top.
- Toasted almond slices — good on the ricotta version but honestly good on most of them.
- Flaky sea salt — a pinch on top before serving cuts through the sweetness in the best way.
How to Adapt These Recipes for Different Skillet Sizes
All of these recipes are written for a 10-inch cast iron skillet, which feeds four people with good-sized servings.
For a 12-inch skillet: Increase all ingredients by 25–30%. The filling will be thinner, so reduce bake time by about 5 minutes and watch closely.
For an 8-inch skillet: Reduce all ingredients by about 20%. The filling will be thicker — add 5–7 minutes to the bake time and lower the temperature by 10°F to avoid over-browning the edges.
For individual ramekins or mini cast iron skillets: Divide the standard recipe among four 5- or 6-inch skillets. Bake time drops significantly — start checking at 15 minutes for the filling.
The most important thing with any size adjustment: the ratio of crust to filling should stay roughly 1:2 by height. Too much crust and the whole thing tastes like shortbread with a thin veneer of lemon. Too little crust and it won’t hold together when you cut it.
Caring for Your Cast Iron Skillet After Baking
Sugary bakes can be hard on cast iron skillets if you don’t clean them properly. Here’s what to do:
While the skillet is still warm (not hot — don’t rush this), add hot water and let it soak for 5–10 minutes. The sugar residue softens and scrubs off easily.
Use a stiff brush or a chainmail scrubber — not steel wool, which strips seasoning. Not dish soap, which does the same.
Dry it completely over low heat on the stovetop. Cast iron that air-dries can rust.
Rub a very thin layer of neutral oil (flaxseed, vegetable, or shortening) over the inside while it’s still warm from drying. Wipe off any excess. Store uncovered or loosely covered.
Do this every time after baking something sweet and your skillet will last decades. Skip it a few times and you’ll start to see rust spots and sticking. Not worth the shortcut.