Table of Contents
- 1 Why Stay-Cool Handles Are Critical for Arthritis Burn Prevention
- 2 Understanding Stay-Cool Handle Technology
- 3 Types of Stay-Cool Handle Materials for Arthritis Safety
- 4 Best Stay-Cool Skillet Handle Designs for Arthritis
- 5 Evaluating Handle Grip Ergonomics for Arthritic Hands
- 6 Temperature Tolerance: What “Stay-Cool” Really Means
- 7 Top Stay-Cool Skillet Handle Brands for Seniors
- 8 Material-Specific Handle Performance Comparison
- 9 Handle Attachment Methods and Safety
- 10 Aftermarket Handle Solutions for Existing Skillets
- 11 Testing Stay-Cool Handles Before Purchase
- 12 Handle Heat Protection vs. Oven-Safe Requirements
- 13 Arthritis-Specific Handle Features to Prioritize
- 14 Common Handle Design Flaws That Cause Burns
- 15 Pot Holder and Oven Mitt Compatibility
- 16 Cleaning and Maintaining Stay-Cool Handles
- 17 Weight Considerations with Stay-Cool Handles
- 18 Heat Distribution from Handle Attachment Points
- 19 Special Handle Designs for Specific Arthritis Types
- 20 Stay-Cool Handles for Different Cooking Methods
- 21 Price vs. Performance in Stay-Cool Handles
- 22 Combining Stay-Cool Handles with Other Safety Features
- 23 Occupational Therapy Recommendations
- 24 Real-World Burn Prevention Success Stories
- 25 Warranty and Replacement Considerations
- 26 Shopping Guide: Where to Find Stay-Cool Skillets
- 27 Alternative Solutions When Handles Aren’t Enough
- 28 Handle Safety for Progressive Arthritis
- 29 Coordinating Handles with Complete Cookware Set
Why Stay-Cool Handles Are Critical for Arthritis Burn Prevention
Stay-cool skillet handles prevent burn injuries in seniors with arthritis by eliminating the primary burn hazard in cooking—hot handles that arthritic hands can’t quickly release when pain strikes or reduced sensation fails to detect dangerous temperatures in time.
Burns happen fast. Recovery takes months.
The Dangerous Combination of Hot Handles and Reduced Sensation
Arthritis doesn’t just hurt your joints. It messes with nerve function.
You might not feel that the handle’s scorching hot until it’s already burned you. Inflammation compresses nerves. Medications dull sensation. Years of joint damage reduce tactile feedback.
The deadly sequence:
- Grab hot handle without realizing temperature
- Pain receptors finally register burn (2-3 seconds delayed)
- Try to release grip quickly
- Arthritic fingers won’t open fast enough
- Burn worsens with every extra second of contact
Normal reaction time: 0.15 seconds. Arthritic reaction time: 0.5-1 second or more.
That difference matters.
How Arthritis Slows Reaction Time to Burns
Joint pain creates mental fog. Chronic inflammation affects processing speed. Medications cause drowsiness.
When you grab something hot, your brain needs to:
- Register the sensation
- Process the threat
- Send release signal to hand muscles
- Overcome joint stiffness to actually let go
Each step takes longer with arthritis. By the time you’ve dropped the hot handle, you’ve got a second or third-degree burn instead of minor discomfort.
And here’s what makes it worse—arthritic hands often grip tighter when startled or in pain (involuntary reflex). So you might actually clamp down harder on the burning handle instead of releasing it.
Statistics on Kitchen Burns in Seniors

Kitchen burns send 100,000+ seniors to emergency rooms annually in the US.
Breakdown:
- 40% involve hot cookware handles
- 30% from spills (often while handling hot pans)
- 20% from stovetop contact
- 10% other sources
Seniors with arthritis are 3-4 times more likely to experience serious kitchen burns than those without joint disease.
Recovery time doubles. Complications triple. Some burns never fully heal on aging, compromised skin.
The Physics of Heat Transfer in Cookware Handles
Heat moves from pan to handle through conduction. Metal conducts heat readily. The question is how to stop or slow that transfer.
Three main heat transfer paths:
- Direct metal-to-metal contact (fastest, most dangerous)
- Conduction through attachment points like rivets
- Radiant heat from stovetop burners (gas especially)
Stay-cool handles interrupt these paths through material choice, air gaps, or both. The best handles use multiple strategies simultaneously.
Understanding Stay-Cool Handle Technology
Stay-cool handle technology works by interrupting heat conduction through air-gap designs, insulating materials, heat-break engineering, or combinations of these methods—keeping handle temperatures safe to touch even during extended high-heat cooking.
Engineering matters here.
Air-Gap Handle Design and Insulation
Air is a terrible heat conductor. That’s good.
Hollow handles with air gaps between the metal pan body and the outer handle surface create thermal barriers that slow heat transfer dramatically.

How it works:
- Heat tries to conduct from pan through metal
- Hits air gap (which doesn’t conduct well)
- Takes much longer to reach outer surface
- Handle stays cool for 15-30 minutes of cooking
Some designs use foam insulation inside hollow handles. Even better thermal performance, but check if it’s oven-safe (foam can degrade at high temps).
Heat-Break Engineering Principles
A heat break is a junction point designed to minimize heat transfer.
Think of it like a firebreak in forestry—a gap that stops fire from spreading. Heat breaks stop thermal energy from moving from pan to handle.
Common heat-break designs:
- Narrow connection point (reduces surface area for conduction)
- Insulating washer between handle and pan
- Materials with different thermal properties at junction
The narrower and more insulated the connection, the better the heat break works.
Material Science Behind Cool-Touch Handles
Different materials conduct heat at vastly different rates.
| Material | Thermal Conductivity | Handle Application |
|---|---|---|
| Copper | Extremely high | Never for handles |
| Aluminum | Very high | Avoid |
| Stainless steel | Moderate (can work with air-gap) | Common in hollow designs |
| Phenolic resin | Very low | Excellent for handles |
| Silicone | Very low | Perfect for coatings |
Materials with low thermal conductivity naturally stay cooler. Combine low-conductivity materials with smart design and you get handles that barely warm up.
Conduction Prevention Methods
Manufacturers prevent heat conduction through:
- Material substitution – Use plastic or silicone instead of metal where possible
- Geometry tricks – Long, thin attachment points minimize contact area
- Composite construction – Metal core for strength, insulating outer layer
- Isolation – Physical air gap between hot pan and handle surface you touch
Best handles use all four methods together.
Types of Stay-Cool Handle Materials for Arthritis Safety

Different handle materials provide varying levels of heat resistance, grip comfort, and durability—with silicone-coated, phenolic resin, and hollow stainless steel options offering the best protection for arthritic hands that can’t quickly release hot surfaces.
Let’s break down what actually works.
Silicone-Coated Handles
Silicone over a metal or composite core. Sneaky good for arthritis.
Temperature resistance and grip benefits
Silicone withstands 400-500°F continuous exposure without degrading.
Grip advantages:
- Naturally tacky surface (high friction, won’t slip)
- Compresses slightly under grip (cushions arthritic joints)
- Textured options available (even better grip)
- Stays cool to touch even when core heats up
The insulating properties plus the cushioned grip make silicone ideal for painful, weak hands.
Cushioning properties for painful joints
Every time you grip something hard, your inflamed joints compress. Hurts.
Silicone cushions that compression. It’s like gripping with a soft pad between your hand and the hard handle core.
Real-world difference: You can hold a silicone-coated handle 2-3 times longer before pain forces you to set it down compared to bare metal or hard plastic.
Durability and maintenance requirements
Silicone is tough. Resists oils, doesn’t absorb odors, easy to clean.

Maintenance: Wipe with damp cloth. Dishwasher-safe usually. Occasionally wash with soap if greasy.
Lifespan: 5-10 years typically before the coating shows significant wear. Way longer than you’ll keep most pans anyway.
Phenolic Resin Handles
Heat-resistant plastic. Old school, still effective.
Heat-resistant plastic composition
Phenolic resin is thermoset plastic—once formed, it won’t melt or deform under normal cooking temperatures.
Handles heat up to 350-400°F without issues. That covers 99% of stovetop cooking.
Appearance: Usually black or dark brown. Can be molded into ergonomic shapes.
Ergonomic shaping possibilities
Because phenolic is molded during manufacturing, you can create complex ergonomic contours.
Arthritis-friendly shapes:
- Finger grooves that guide hand placement
- Wider diameter in the center (fills hand better)
- Slight curve that matches natural grip
- Textured surface for secure hold
Metal handles are usually straight cylinders. Phenolic can be whatever shape works best.
Long-term reliability
Phenolic handles last decades if you don’t abuse them.
Durability factors:
- Won’t melt or warp
- Resists impacts and drops
- Doesn’t absorb flavors or odors
- Color stays consistent (doesn’t fade much)
Vintage cast iron skillets often have phenolic handles that are 50+ years old and still functional. That’s reliability.
Bakelite Handles
The OG heat-resistant plastic. Still around on some cookware.
Classic heat-resistant properties
Bakelite was the first synthetic plastic (invented 1907). Heat-resistant was literally its main selling point.
Tolerates 300-350°F easily. Not quite as heat-resistant as modern phenolics, but plenty for most cooking.
Weight and balance considerations
Bakelite is slightly heavier than modern plastics.
Can actually be an advantage—adds weight to the handle end, which can improve balance on front-heavy pans.
For severe arthritis, though, every ounce matters. Modern lightweight alternatives might be better.
Availability in modern cookware
Bakelite’s not as common anymore. Some vintage cookware. Occasional modern pieces going for “retro” aesthetic.
If you’ve got old skillets with Bakelite handles in good condition, they work fine. But don’t seek them out specifically—better options exist now.
Hollow Stainless Steel Designs
Stainless steel handles with air gaps inside.
Air-gap technology explained
Hollow tube of stainless steel attached to the pan. The tube walls are thin, and there’s air inside.
Heat transfer path:
- Heat conducts from pan into the solid part of handle base
- Tries to move through thin stainless tube wall
- Encounters air gap (poor conductor)
- Takes way longer to reach outer surface
Handle can stay cool for 20-30 minutes while pan is actively cooking.
Aesthetic and functional balance
Stainless steel handles look professional. Clean, modern aesthetic.
Functional benefits:
- Oven-safe to very high temps (500-600°F+)
- Durable (won’t crack or degrade)
- Easy to clean
- Dishwasher-safe
Tradeoff: Not as naturally grippy as silicone or textured plastic. Can be slippery when wet or greasy.
Care and cleaning advantages
Stainless wipes clean instantly. Doesn’t stain, doesn’t absorb anything.
Toss the whole pan in the dishwasher if it’s dishwasher-safe. The hollow handle drains and dries just fine.
Wood and Bamboo Options
Natural materials. Insulating properties built in.
Natural insulation properties
Wood is a poor heat conductor naturally. Bamboo even more so.
A wooden handle can stay cool indefinitely during stovetop cooking. Heat just doesn’t transfer well through wood grain.
Grip texture for weak hands
Raw or lightly finished wood has natural texture. Not slippery at all.
The grain creates microscopic ridges that increase friction. Your arthritic hand can maintain grip with less force than on smooth surfaces.
Maintenance challenges
Here’s where wood falls short.
Problems:
- Can’t usually go in dishwasher (warps or cracks)
- Absorbs moisture (can swell or develop mold)
- Requires periodic oiling to prevent drying
- Not oven-safe typically (wood chars at high heat)
- Can loosen at attachment points over time
For arthritis, the maintenance demands often outweigh the cooling benefits. Stick with low-maintenance options.
Best Stay-Cool Skillet Handle Designs for Arthritis
The best stay-cool handle designs for seniors with arthritis feature long lengths for leverage, dual-handle configurations for bilateral weight distribution, helper handles for versatility, and angled positioning that maintains neutral wrist alignment during use.
Design beats materials sometimes.
Long Handle Advantages
Longer handles provide mechanical advantage and keep your hands farther from heat sources.
Benefits for arthritis:
- More leverage when lifting (reduces force needed)
- Cooler—farther from the hot pan means less heat transfer
- Room for two-handed grip if needed
- Easier to balance when pan is heavy
Ideal length: 8-10 inches for skillets up to 12 inches diameter.
Short Handle Considerations
Short handles save space, make storage easier.
But for arthritis? Usually not worth it.
Drawbacks:
- Hand closer to heat source
- Less leverage (need more grip force)
- Harder to use with pot holders (not enough room)
- Heat travels shorter distance so handle gets hot faster
Only go short if storage space is severely limited and you’re using lightweight pans for quick cooking.
Dual-Handle Configurations
Two handles opposite each other. We’ve covered this extensively before, but it bears repeating.
Arthritis benefits:
- Weight splits 50/50
- Both wrists work together (stronger than one)
- If one hand weakens, other maintains control
- Better balance during pouring
For pans larger than 10 inches, dual handles aren’t optional—they’re mandatory for safe arthritis cooking.
Helper Handle Additions
One main handle plus a smaller assist handle on the opposite side.
When this works:
- Main handle has great stay-cool properties
- Helper handle is just for stabilization/support
- You alternate which hand does heavy lifting
Not as good as full dual handles, but way better than single handle alone.
Angled vs. Straight Handle Positioning
Straight handles force your wrist into extension when lifting.
Angled handles (tilting slightly upward from pan) let your wrist stay more neutral.
Optimal angle: 15-25 degrees up from horizontal. Matches natural grip position, reduces wrist stress.
Evaluating Handle Grip Ergonomics for Arthritic Hands
Handle ergonomics for arthritic hands require specific diameter ranges (1.25-1.5 inches optimal), textured surfaces for secure grip with minimal force, contoured shapes matching natural hand curvature, and sufficient length for two-handed holds when needed.
Ergonomics matter as much as cooling.
Optimal Handle Diameter for Weak Grip
Too thin, and you can’t get a secure grip. Too thick, and arthritic fingers can’t wrap around.
Sweet spot: 1.25-1.5 inches diameter for most hands.
This fills the palm without requiring excessive finger spread. You can grip firmly without maxing out your limited range of motion.
Test it: Can you wrap your fingers around so thumb and middle finger nearly touch? That’s good diameter. Big gap or fingers overlapping significantly? Wrong size.
Textured vs. Smooth Grip Surfaces
Texture provides friction. Friction means you don’t have to grip as tightly.
Good textures:
- Fine ribbing (parallel ridges)
- Light cross-hatching
- Soft-touch silicone (naturally tacky)
- Matte finish (vs. glossy)
Avoid: Mirror-polished smooth handles. They’re slippery when wet or greasy, requiring death-grip force to maintain hold.
Contoured Shapes That Fit Natural Hand Position
Your hand isn’t a perfect cylinder when relaxed. It’s slightly oval, with natural finger placement.
Ergonomic contours include:
- Slight flatten on sides (oval cross-section)
- Depression where palm heel rests
- Subtle finger grooves (not aggressive, just hints)
- Flare at the end (prevents hand from sliding off)
Molded handles can incorporate these features. Simple metal tubes can’t.
Handle Length for Two-Handed Use
Sometimes you need both hands on the handle for lifting or stability.
Minimum length for two-handed grip: 7-8 inches of grippable length.
Shorter than that, and your hands are cramped together fighting for space. Longer is fine—gives you options for hand placement.
Weight Distribution and Balance Points
Handle weight affects pan balance.
Ideal scenario: Pan balances at a point about 1/3 back from the front edge when empty. This means:
- Weighted toward handle (good)
- Won’t tip forward when you set it down
- Feels stable during one-handed lifts
Heavy handles help here. Light handles on heavy pans create front-heavy balance that’s dangerous for weak grips.
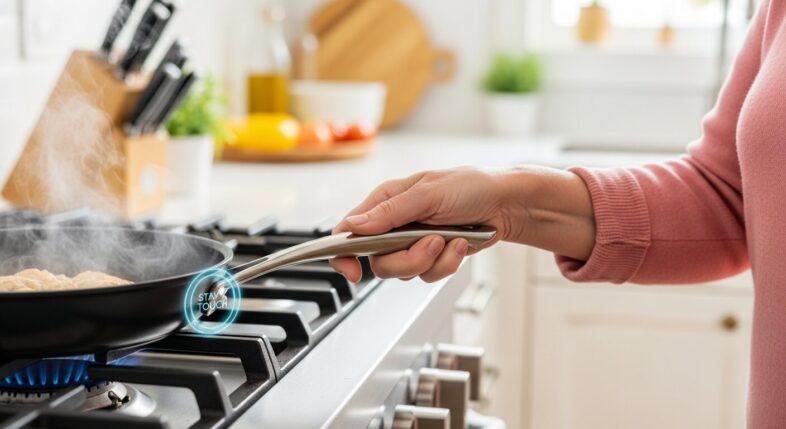
Temperature Tolerance: What “Stay-Cool” Really Means
“Stay-cool” handles typically maintain temperatures below 120-140°F during normal stovetop cooking for 15-30 minutes—safe to touch briefly with bare hands, though actual temperatures vary based on cooking method, duration, material, and design quality.
Let’s get specific about numbers.
Actual Temperature Ranges Achieved
Truly stay-cool handles:
- 100-120°F after 15 minutes of cooking (warm but safe)
- 120-140°F after 30 minutes (hot but touchable briefly)
- Under 100°F with low-temperature cooking
Mediocre “stay-cool” handles:
- 140-160°F after 15 minutes (uncomfortably hot, use pot holders)
- 160°F+ after 30 minutes (will burn you)
Marketing lies: Some handles labeled “stay-cool” hit 180°F+ after brief cooking. That’s not stay-cool. That’s dangerous.
How Long Handles Stay Cool During Cooking
Time matters as much as temperature.
Performance timeline for quality handles:
- 0-10 minutes: Cool to touch (under 100°F)
- 10-20 minutes: Warm but safe (100-120°F)
- 20-30 minutes: Getting hot (120-150°F)
- 30+ minutes: Use pot holders (150°F+)
Most cooking sessions are under 20 minutes. Good stay-cool handles work for the entire session.
Variables That Affect Handle Temperature
Factors that make handles hotter:
- High heat cooking (searing, stir-frying)
- Gas burners (radiant heat warms handles from below)
- Longer cooking times
- Smaller pans (handle closer to heat source)
- Oven use (most handles aren’t stay-cool in ovens)
Factors that keep handles cooler:
- Lower cooking temperatures
- Induction cooking (no radiant heat)
- Shorter cooking sessions
- Larger pans (more distance from heat to handle)
Testing Methods for Heat Resistance
How to test stay-cool performance:
- Heat pan on medium-high for 10 minutes with food/water
- Touch handle briefly with back of hand (more sensitive than palm)
- Note temperature perception
- Repeat at 20 and 30 minutes
What you’re looking for:
- 10 min: Should feel barely warm
- 20 min: Warm but not uncomfortable
- 30 min: Hot but not instantly burning
If it’s painful to touch at 10 minutes, the handle isn’t stay-cool enough for arthritis safety.
Top Stay-Cool Skillet Handle Brands for Seniors
Leading cookware brands offering superior stay-cool handle technology for arthritis include All-Clad’s stainless steel stay-cool designs, Calphalon’s cool-grip handles, Cuisinart’s ergonomic systems, T-fal’s Thermo-Spot indicators with cool-touch handles, and OXO’s Good Grips innovation.
Brand quality varies significantly.
All-Clad Stay-Cool Handle Technology
All-Clad uses hollow stainless steel handles with long, narrow attachment points.
Performance: Excellent. Handles stay touchable for 20-25 minutes of stovetop cooking.
Arthritis considerations:
- Handles are somewhat thin (might want to add silicone sleeve)
- Durable and dishwasher-safe
- Oven-safe to 600°F
- Expensive ($150-300 per skillet)
Bottom line: Top-tier performance if budget allows and you add grip enhancement for thin handles.
Calphalon Cool-Handle Features
Calphalon’s mid-range and premium lines feature stay-cool handles—usually stainless with silicone touch points.
Performance: Good to very good depending on model.
Arthritis benefits:
- Silicone provides grip AND insulation
- Handle diameter is arthritis-friendly (1.3-1.4 inches)
- Moderate pricing ($60-150)
- Wide availability
Drawback: Some models have oven temp limits (400-450°F) due to silicone components.
Cuisinart Ergonomic Handle Designs
Cuisinart offers various handle designs across their lines. The better ones feature hollow stainless or phenolic resin.
Performance: Decent to good. Not premium tier, but functional.
Value proposition:
- Affordable ($40-100 range)
- Replacement parts available
- Decent ergonomics in premium lines
Watch out for: Budget Cuisinart lines sometimes have mediocre handles that heat up faster. Stick with their better series.
T-fal Thermo-Spot and Cool-Touch Handles
T-fal specializes in non-stick cookware with phenolic handles.
Performance: Very good for the price point.
Arthritis advantages:
- Lightweight aluminum construction (light pans overall)
- Ergonomic phenolic handles
- Thermo-Spot indicator (shows when pan is preheated—useful safety feature)
- Budget-friendly ($25-70)
Best for: Seniors on fixed incomes who still need quality stay-cool performance.
OXO Good Grips Handle Innovation
OXO built their brand on ergonomic kitchen tools. Their cookware follows the same philosophy.
Handle features:
- Silicone-coated stainless steel
- Contoured for natural grip
- Textured surface
- Designed specifically for reduced hand strength
Performance: Excellent stay-cool properties plus superior grip comfort.
Price: Mid to upper-mid range ($80-180).
Budget-Friendly Options That Work
Quality budget brands:
- T-fal (mentioned above)
- Tramontina (similar to Calphalon, lower price)
- Cook N Home (decent phenolic handles)
What to look for in budget options:
- Phenolic or silicone-coated handles (avoid bare metal)
- Helper handle on larger skillets
- Reviews specifically mentioning cool handles
- Return policy so you can test
Skip the absolute cheapest options ($15-20 skillets). The handles are usually terrible and potentially dangerous.
Material-Specific Handle Performance Comparison
Handle performance varies significantly by skillet material, with non-stick aluminum pans offering lightweight stay-cool advantages, stainless steel requiring hollow-handle designs, cast iron needing maximum insulation, and carbon steel presenting similar challenges to stainless.
Match handle to pan type.
Non-Stick Skillet Handle Options
Non-stick pans are usually aluminum (lightweight, heats fast).
Common handle types:
- Phenolic resin (most common, works well)
- Silicone-coated (premium option)
- Bakelite (older pans)
Performance: Generally excellent because:
- Lightweight pan means less strain when lifting
- Aluminum body doesn’t retain heat as long as stainless
- Lower cooking temps typically used with non-stick
Best choice for arthritis: Non-stick with phenolic or silicone handles. Lightest weight plus best cooling.
Stainless Steel Skillet Handles
Stainless pans are heavier. Handles need to be robust.
Handle types that work:
- Hollow stainless with air gap (premium brands)
- Silicone-coated stainless (mid-range)
- Cast handles with heat breaks (varies)
Challenge: Stainless pans retain heat longer than aluminum, so heat conducts into handles more aggressively.
Solution: Look for longer handles with well-designed heat breaks. The extra length gives heat more distance to dissipate.
Cast Iron Skillet Handle Solutions
Cast iron is heavy (5-8 lbs) and retains heat forever.
Traditional approach: Short cast iron handle integral to pan. Gets scorching hot. Always requires pot holder.
Better options:
- Removable wooden handles (some modern cast iron)
- Silicone handle covers (aftermarket)
- Dual handles for safer lifting
Reality check: Even with stay-cool solutions, cast iron is too heavy for most people with significant arthritis. Consider enameled cast iron or skip cast iron entirely.
Carbon Steel Handle Characteristics
Carbon steel pans are lighter than cast iron (3-4 lbs), heavier than aluminum.
Typical handles:
- Welded steel handle (heats up quickly, dangerous)
- Riveted steel with epoxy coating (better)
- Removable handles (best for stay-cool)
Recommendation: If using carbon steel with arthritis, get one with removable silicone-coated handle or add aftermarket silicone sleeve to existing handle.
Handle Attachment Methods and Safety
Handle attachment methods affect both cooling performance and long-term safety, with riveted handles offering maximum security, welded handles providing durability, and screw-on handles requiring periodic inspection—loose handles pose serious burn and drop risks for arthritic users.
How handles attach matters.
Riveted Handle Security
Rivets are permanent mechanical fasteners. Three rivets is standard, some pans use two.
Advantages:
- Can’t come loose (rivets are permanent)
- Very strong attachment
- Time-tested method
Disadvantages:
- Rivets conduct heat from pan into handle (creates thermal bridge)
- Can’t be tightened if they develop play over time
- Rivet heads inside pan can trap food
For stay-cool performance, look for rivets with insulating washers between handle and pan.
Welded Handle Durability
Handles welded directly to pan body. Common on cheaper cookware.
Pros:
- Simple, no extra parts
- Smooth interior (no rivet bumps)
- Can be very strong if done right
Cons:
- Weld creates direct thermal path (handle heats fast)
- If weld fails, handle is gone (can’t repair)
- Quality varies wildly based on manufacturing
For arthritis safety: Welded handles need excellent insulation or air-gap design to stay cool. Many cheap welded handles are dangerous.
Screw-On Handle Concerns
Handles attached with screws or bolts.
Benefits:
- Can tighten if loose
- Can replace handle if damaged
- Some designs allow insulating washers
Risks for arthritis:
- Screws can loosen over time (especially with thermal cycling)
- Loose handle can rotate mid-use (dangerous)
- Requires periodic checking and maintenance
Safety protocol: Check screw-on handles monthly. Tighten immediately if any play develops.
Signs of Handle Loosening
Warning signs that a handle is failing:
- Visible wobble when pan is lifted
- Clicking or popping sounds when gripping handle
- Handle rotates even slightly
- Gaps visible between handle and pan
- Cracks in handle material near attachment point
Any of these? Stop using immediately. That pan’s a burn or drop hazard.
Aftermarket Handle Solutions for Existing Skillets
Aftermarket handle solutions including silicone sleeves, heat-resistant wraps, clip-on protectors, and DIY cooling methods can retrofit existing skillets with improved stay-cool properties for $5-30—an affordable alternative to replacing entire cookware collections.
Don’t replace pans. Upgrade handles.
Silicone Handle Covers and Sleeves
Slip-on silicone tubes that slide over existing handles.
How they work:
- Add insulating layer between hot handle and your hand
- Increase handle diameter (better for arthritis grip)
- Provide cushioning and texture
Where to buy: Amazon, kitchen stores, medical supply stores. $8-15 typically.
Application: Choose size based on your handle diameter. Stretch slightly to slip on. Should fit snugly.
Heat-Resistant Handle Wraps
Fabric wraps with heat-resistant filling, secured with velcro or ties.
Performance: Good insulation, but bulkier than silicone sleeves.
When to use:
- Extremely hot handles that silicone alone won’t protect against
- Handles with odd shapes that sleeves won’t fit
- When you want maximum cushioning
Downsides: Can trap grease and food particles. Harder to clean than silicone.
Clip-On Handle Protectors
Metal or silicone clips that attach to handle temporarily during cooking.
Function: Create air gap between hot handle and your grip point.
Mixed results: Some work great, others are clumsy and fall off. Read reviews carefully before buying.
Best use case: Pans you only occasionally use at high heat. Not for daily-use skillets.
DIY Handle Cooling Solutions
Creative low-cost options:
- Wrap handle with several layers of aluminum foil (surprisingly effective, cheap, disposable)
- Bicycle handlebar tape (foam or cork, provides insulation and grip)
- Heat-shrink tubing (electrical department, sizes for different handle diameters)
Reality: DIY solutions work short-term but usually aren’t as effective or durable as purpose-built products. Fine for testing concepts or emergency fixes.
Testing Stay-Cool Handles Before Purchase
Testing stay-cool handles before purchase requires in-store grip assessment, at-home temperature evaluation with real cooking, comfort testing during extended holds, and reliability verification over weeks of use—with generous return policies enabling thorough testing without financial risk.
Don’t guess. Test.
In-Store Testing Techniques
What to check in the store:
- Grip comfort: Hold handle for 30 seconds. Does it feel good or create pressure points?
- Weight balance: Lift empty pan by handle. Does it feel front-heavy or balanced?
- Diameter: Can your arthritic hand wrap around comfortably?
- Texture: Is the surface grippy or slippery?
- Length: Enough room for two hands if needed?
Bring a grip strength meter if you have one. Compare force needed to lift different pans.
Temperature Testing at Home
Home testing protocol:
- Cook something real (not just boiling water—actual food)
- Use medium-high heat for 15-20 minutes
- Touch handle at 5, 10, 15, 20 minute marks (CAREFULLY—back of hand first)
- Note when it becomes too hot to touch comfortably
Within return window (usually 30-90 days), so you can return if performance is inadequate.
Grip Comfort Assessment
Comfort during extended holding tells you about real-world usability.
Test: Hold the pan (with food in it to simulate weight) for 2-3 minutes continuously. As if you’re:
- Pouring slowly into multiple containers
- Walking from stove to table
- Waiting for someone to move out of your way
Does your hand start hurting? Fingers going numb? Pressure points developing? Those are deal-breakers for arthritis.
Long-Term Reliability Evaluation
Use the pan normally for 2-4 weeks.
What to monitor:
- Does handle stay cool consistently or degrade?
- Any loosening at attachment points?
- Material holding up to washing?
- Still comfortable after repeated use?
Some handles start fine but develop issues. Better to discover this during return window than six months later.
Handle Heat Protection vs. Oven-Safe Requirements
Stay-cool handles optimized for stovetop cooking often have temperature limits that restrict oven use, creating a tradeoff between maximum handle cooling and high-heat oven capability—with detachable handle systems offering one solution to this conflict.
Here’s the problem.
Balancing Cool Handles with Oven Use
Materials that stay cool on the stovetop often can’t handle oven temperatures.
Temperature limits:
- Silicone: 400-500°F max
- Phenolic resin: 350-450°F typically
- Wood: 250-300°F (not really oven-safe)
- Hollow stainless: 500-600°F+ (oven-safe)
If you need oven use above 400°F: You’re limited to all-metal handles (which don’t stay cool) or detachable handles.
Detachable Handle Systems
Handles that clip or screw off before oven use.
Brands offering this:
- Analon (some models)
- T-fal Ingenio
- Various brands with removable silicone handles
Advantages:
- Stay-cool on stovetop
- Unlimited oven temp (no handle to worry about)
- Compact storage
Arthritis considerations:
- Attaching/removing handle requires grip strength and dexterity
- Need to remember to reattach before lifting hot pan
- Extra step adds complexity
Temperature Limits for Different Materials
| Handle Material | Max Oven Temp | Stovetop Stay-Cool? |
|---|---|---|
| Silicone-coated | 400-500°F | Excellent |
| Phenolic resin | 350-450°F | Very good |
| Hollow stainless | 600°F+ | Good |
| Bare stainless | Unlimited | Poor |
| Wood/bamboo | 250-300°F | Excellent |
Choose based on your actual cooking needs. If you rarely use oven above 400°F, silicone or phenolic handles work fine.
When Pot Holders Are Still Necessary
Even the best stay-cool handles require pot holders in certain situations:
- Oven use (handles heat up in oven regardless of material)
- Extended cooking (30+ minutes)
- Very high heat searing
- When you’re unsure (always err on safe side)
For arthritis: Get high-quality silicone oven mitts with textured grip. Way better than traditional pot holders for weak hands.
Arthritis-Specific Handle Features to Prioritize
Handles optimized for arthritis should feature extra-wide grip diameters (1.3-1.5 inches), soft-touch coatings for cushioning, anti-slip textures requiring minimal grip force, finger grooves guiding proper hand placement, and ambidextrous designs accommodating either hand equally.
Prioritize these features.
Extra-Wide Grip Diameter
1.5 inches is about perfect for most arthritic hands.
Thinner than that and you’re concentrating pressure on fewer grip points. Thicker and you can’t close your fingers around it properly.
Why wider helps:
- Distributes pressure across more of your palm
- Doesn’t require fingers to curl as tightly
- Fills hand naturally without strain
Soft-Touch Coatings
Silicone or rubberized coatings that compress slightly under grip.
Benefit: Every compression point on your arthritic joints hurts less when there’s cushioning.
Think of it like the difference between walking on concrete vs. a padded mat. Same principle for your hands.
Anti-Slip Textures
Texture creates friction. Friction means less grip force needed.
Effective textures:
- Fine cross-hatching
- Raised dots or bumps
- Waffle pattern
- Natural silicone tackiness
You should be able to hold the pan securely with 50-60% of the grip force you’d need on smooth metal.
Finger Grooves and Contours
Subtle depressions that guide finger placement.
Why they help arthritis:
- Fingers automatically find optimal position
- Grip is more secure with less conscious effort
- Reduces fumbling when grip is awkward
- Natural feedback about hand placement
Don’t want aggressive grooves (too restrictive). Just gentle guidance.
Ambidextrous Design
Handles that work equally well in either hand.
Important because: Arthritis is often asymmetric. Your left hand might be having a bad day while right feels okay, or vice versa.
Ambidextrous handles let you switch hands mid-cooking without awkward grip adjustment.
Common Handle Design Flaws That Cause Burns
Dangerous handle designs include thin metal construction that heats rapidly, lack of proper insulation or heat-breaks, poor junction engineering where handles attach to pans, and handles positioned too close to heat sources—flaws that cause preventable burns in users with delayed arthritis reactions.
These designs are dangerous. Avoid them.
Too-Thin Handles That Heat Quickly
Thin handles have less thermal mass and less surface area for heat dissipation.
Problem: They heat up fast and stay hot.
A 0.5-inch diameter metal handle will be burning hot after 5 minutes of cooking. A 1.5-inch diameter handle might stay cool for 20 minutes.
Red flag: If the handle looks spindly or delicate, it’s probably a burn hazard.
Metal Handles Without Insulation
Bare stainless steel or aluminum handles with no insulating features.
Heat transfer: Direct conduction from pan to handle to your hand. Nothing stopping it.
These are everywhere on cheap cookware. They’re dangerous for everyone, catastrophic for arthritis.
Rule: Never buy cookware with bare metal handles unless you’re committed to always using pot holders (which defeats the stay-cool purpose).
Poor Heat-Break Placement
Heat breaks only work if they’re positioned correctly.
Common mistakes:
- Heat break too close to pan (heat bypasses it)
- Too close to grip area (heat has already transferred)
- Inadequate insulation at break point
Where heat break should be: Within 1-2 inches of where handle attaches to pan. This intercepts heat before it travels down the handle.
Handles Too Close to Pan Body
Short handles or handles that don’t extend far enough from the pan edge.
Danger: Your hand is right next to the hot pan rim. Radiant heat warms the handle. You might accidentally touch the pan edge.
Minimum safe distance: 1.5-2 inches between pan rim and where you grip the handle.
Pot Holder and Oven Mitt Compatibility
Stay-cool handles should accommodate pot holders and oven mitts without compromising grip security, requiring adequate clearance (2+ inches) between handle and pan rim, compatible diameter and texture for mitt grip, and design that prevents mitt slippage during use.
Even stay-cool handles sometimes need pot holders.
Handles That Work with Thick Mitts
Thick silicone mitts add 0.5-0.75 inches to your hand dimensions.
Handle requirements for mitt compatibility:
- Wide enough that mitt doesn’t compress handle grip
- Long enough that mitt doesn’t hit hot pan edge
- Textured enough that mitt doesn’t slip
Test: Try gripping handle while wearing your usual oven mitt. Can you maintain secure hold?
Clearance Requirements for Arthritic Hands
2 inches minimum between handle base and pan rim.
Why this matters with mitts: Thick mitts plus arthritic hands (potentially with swollen joints) need extra room. If clearance is tight, you’ll burn your knuckles on the pan rim.
Ideal clearance: 2.5-3 inches. Plenty of room even with thickest mitts and swollen hands.
Silicone Mitt Grip on Different Surfaces
Silicone mitts grip well on:
- Textured surfaces
- Other silicone
- Phenolic resin
Silicone mitts slip on:
- Polished metal
- Smooth plastic
- Wet or greasy any surface
Best combo: Silicone-coated or textured phenolic handles with silicone mitts. Maximum friction, minimum slip risk.
When Handle Design Reduces Pot Holder Need
Great stay-cool handles should rarely require pot holders for stovetop cooking under 30 minutes.
Signs of truly excellent stay-cool design:
- Handle touchable bare-handed after 20 minutes
- Comfortable to grip without protection
- Even extended cooking only makes it warm, not hot
If you’re constantly using pot holders with “stay-cool” handles, they’re not actually staying cool.
Cleaning and Maintaining Stay-Cool Handles
Proper handle maintenance includes regular cleaning to prevent grease buildup, appropriate dishwasher use based on material, replacing worn components before they fail, and tightening loose handles immediately—maintenance that’s especially important for users whose arthritis makes emergency responses difficult.
Keep handles functional and safe.
Dishwasher Safety for Different Materials
| Handle Material | Dishwasher-Safe? | Notes |
|---|---|---|
| Silicone-coated stainless | Usually yes | Check manufacturer specs |
| Phenolic resin | Usually yes | Might fade over time |
| Hollow stainless | Yes | Drains and dries fine |
| Wood/bamboo | No | Will warp/crack |
| Bakelite | Usually yes | Some vintage pieces say no |
For arthritis: Dishwasher-safe handles are clutch. No grip strength needed for cleaning.
Preventing Grease Buildup
Cooking grease accumulates on handles over time, making them slippery.
Prevention:
- Wipe handles with damp cloth after each use
- Deep clean weekly with degreasing dish soap
- Don’t let splatters sit and harden
Why this matters for arthritis: Greasy handles require stronger grip to prevent slipping. Keep them clean, keep grip force minimal.
Replacing Worn Handle Components
When to replace:
- Silicone coating cracked or peeling
- Phenolic handle cracked
- Visible wear that affects grip
How: Some handles have replaceable sleeves or grips. Others require replacing the entire pan.
Check manufacturer website for replacement parts. Many premium brands sell replacement handles or components.
Tightening Loose Handles Safely
For screw-on handles:
- Locate screw heads (usually underneath or inside pan)
- Use appropriate screwdriver
- Tighten firmly but don’t over-torque
- Check monthly
For riveted handles that develop play:
- Nothing you can do to tighten
- Indicates rivet failure
- Stop using that pan
Weight Considerations with Stay-Cool Handles
Handle material affects overall skillet weight and balance, with phenolic and hollow stainless options adding minimal weight while providing insulation, silicone coatings adding negligible mass, and the ideal design balancing adequate insulation against overall pan weight for arthritic lifting capacity.
Handle weight impacts usability.
How Handle Material Affects Overall Pan Weight
Weight additions (typical 10-inch skillet handle):
- Hollow stainless handle: 3-4 oz
- Solid phenolic handle: 2-3 oz
- Silicone-coated handle: 3-4 oz
- Solid wood handle: 4-6 oz
- Cast iron integral handle: included in pan weight
A few ounces don’t sound like much. But when you’re lifting 50+ times per cooking session with arthritic wrists, every ounce accumulates.
Balance Between Insulation and Weight
Thicker insulation = better cooling. But also = more weight.
The tradeoff: You want enough insulation to stay cool, but not so much that the handle itself becomes heavy and unwieldy.
Sweet spot: 2-4 oz handle weight with good insulating properties. More than 6 oz is excessive unless it’s a very large pan.
Front-Heavy vs. Well-Balanced Skillets
Pan balance point should be roughly 1/3 back from front edge when empty.
Handle weight helps here: Heavier handle counterbalances the weight of food in the pan, preventing front-heavy tipping.
Test: Fill pan 2/3 full with water. Lift by handle. Does it feel stable or like it’s trying to tip forward? Stable = good balance.
Heat Distribution from Handle Attachment Points
Handle attachment creates thermal bridges where heat conducts from pan into handle, with rivet-based systems transferring significant heat unless insulated, welded attachments varying by design quality, and optimal junction engineering minimizing conduction through narrow connection points and heat-break materials.
Attachment points are thermal weak points.
Rivet Heat Transfer Issues
Each rivet is a metal rod connecting pan to handle. Heat conductor.
Problem: Even with insulating handle materials, heat flows through rivets into the handle core.
Solution designs:
- Insulating washers between pan and handle
- Rivets made from lower-conductivity metals
- Air gaps around rivet shanks
Premium cookware addresses this. Cheap cookware doesn’t.
Insulated Attachment Solutions
Best insulation methods:
- Phenolic or silicone washers at rivet points
- Air gap created by spacers
- Thermal break material in handle base
- Minimal contact area between pan and handle
Look for handles that attach at a single narrow point rather than broad contact.
Handle-to-Pan Junction Design
Good junction design:
- Narrow connection (minimizes heat transfer surface area)
- Long transition zone (gives heat distance to dissipate)
- Insulating material at junction
- Angled attachment (reduces direct thermal path)
Bad junction design:
- Broad, flat contact between handle and pan
- Short transition (heat quickly reaches grip area)
- All-metal construction with no breaks
You can often see this just by looking at where handle meets pan. Narrow, angled connection = better. Broad, flat connection = worse.
Special Handle Designs for Specific Arthritis Types
Different arthritis types benefit from targeted handle designs—thumb arthritis requires minimal pinch-grip handles, wrist arthritis needs straight-aligned grips, finger joint arthritis benefits from contoured shapes, and bilateral arthritis demands symmetric dual-handle configurations.
Customize to your specific arthritis pattern.
Handles for Thumb Arthritis (CMC Joint)
Thumb base arthritis makes pinch gripping excruciating.
What helps:
- Thick handles (can use power grip instead of pinch)
- Dual handles (lift with both hands, less thumb involvement)
- Textured surfaces (need less grip force overall)
What to avoid:
- Thin handles requiring thumb opposition
- Handles with thumb rests (concentrate pressure on CMC joint)
Wrist Arthritis Considerations
Wrist arthritis is aggravated by extension and deviation.
Ideal handle features:
- Angled upward 15-20 degrees (keeps wrist neutral)
- Long enough for two-handed grip (shares load)
- Balanced pan (doesn’t force wrist extension to stabilize)
Avoid:
- Straight handles parallel to pan (force wrist extension)
- Front-heavy pans (create wrist strain)
Finger Joint Arthritis Solutions
Finger joints (knuckles) hurt when gripping anything.
Helpful design:
- Soft cushioning (silicone coatings)
- Contoured finger grooves (distribute pressure)
- Large diameter (less finger flexion needed)
Avoid:
- Hard, narrow handles
- Aggressive textures (can dig into joints)
Bilateral Arthritis Adaptations
Both hands affected equally? Dual handles mandatory.
Single-handle pans will always overload one wrist. Even alternating hands just means you’re hurting both sides instead of one.
Go full dual-handle system: Every pan you use regularly should have two handles for bilateral weight distribution.
Stay-Cool Handles for Different Cooking Methods
Handle cooling performance varies by cooking method, with stovetop cooking providing the best stay-cool results, oven use heating handles regardless of insulation, high-heat searing testing handle limits, and low-temperature simmering keeping even mediocre handles comfortable.
Method matters.
Stovetop Cooking Handle Requirements
Standard stovetop cooking (medium to medium-high heat) for 10-30 minutes.
Handle requirements:
- Phenolic or silicone coating minimum
- Heat-break or air-gap design preferred
- At least 8 inches long
Most good stay-cool handles work fine for normal stovetop use.
Oven-to-Table Handle Needs
If you’re starting on stovetop then moving to oven, handles need dual capability.
Requirements:
- Oven-safe to your cooking temps (check limits)
- Still cool enough to grab coming out of oven (unlikely with most handles)
- Pot holders are basically mandatory for oven use
Reality: True stay-cool in the oven is rare. Plan to use pot holders for anything over 300°F oven cooking.
High-Heat Searing Considerations
Searing meat at maximum heat for 3-5 minutes.
Even the best stay-cool handles will warm up faster at high heat.
What works:
- Metal handles with excellent air-gap design
- Very long handles (more distance from heat)
- Short cooking time (finish before handle heats)
Silicone-coated handles might approach their temp limits. Watch for degradation.
Low-Temperature Simmering
Low heat for extended periods (30+ minutes).
Advantage: Lower heat means slower heat transfer. Even mediocre stay-cool handles often work fine.
Best practice: Still choose good handles, but you’ve got more safety margin with low-temp cooking.
Price vs. Performance in Stay-Cool Handles
Stay-cool handle pricing ranges from $25 budget options with basic phenolic protection to $200+ premium designs with advanced insulation—with the $60-100 mid-range offering optimal value by combining effective cooling, ergonomic design, and durability for most arthritis needs.
What’s actually worth spending?
Budget Handles That Actually Work
$25-45 range. Mostly phenolic handles on non-stick aluminum pans.
Brands that work:
- T-fal
- Tramontina
- Cook N Home
Performance: Decent. Not amazing, but functional for most cooking.
Tradeoffs: Less ergonomic, might heat up after 25-30 minutes, questionable longevity.
Mid-Range Sweet Spot
$60-100. This is where value peaks.
What you get:
- Silicone-coated or premium phenolic handles
- Better ergonomics
- Quality construction that lasts
- Stay cool for full cooking sessions
Brands: Calphalon, Cuisinart (premium lines), OXO
For most seniors with arthritis, spend here. The improvements over budget options justify the extra cost.
Premium Handles Worth the Investment
$150-300. Top-tier construction and materials.
Examples:
- All-Clad stainless with hollow handles
- Le Creuset (though heavy)
- High-end brands with advanced engineering
When premium makes sense:
- You cook daily
- Budget allows
- Want cookware to last decades
When it’s overkill: Occasional cooking, tight budget, or you’ll need lighter pans as arthritis progresses anyway.
When to Splurge on Safety
If money’s tight, splurge on safety features before aesthetic ones.
Priority spending:
- Stay-cool handles (prevent burns)
- Lightweight construction (prevent drops)
- Dual handles (prevent spills)
- Everything else
A $60 pan with excellent handles beats a $150 pan with mediocre handles every time for arthritis safety.
Combining Stay-Cool Handles with Other Safety Features
Maximum arthritis safety requires stay-cool handles combined with pour spouts for controlled liquid transfer, straining lids reducing steam exposure, non-slip bases preventing stovetop sliding, and heat indicators showing when surfaces are hot—creating comprehensive burn prevention.
Stack safety features.
Pour Spouts and Drip-Free Lips
Pour spouts direct liquid flow, reducing the tilting angle needed.
Burn prevention: Less tilting = less exposure to steam and hot pan surface = fewer opportunities for burns.
Good pour spouts let you pour smoothly at a 30-40 degree tilt instead of 60+ degrees.
Straining Lids
Lids with holes around the edge for draining liquid while keeping food in pan.
Safety benefit: No need to carry hot pan to sink and pour into colander. Drain right at the stove with minimal handling.
Combined with stay-cool handles, straining lids majorly reduce burn risk during draining tasks.
Non-Slip Pan Bases
Textured or designed pan bottoms that grip the stovetop/burner.
Why this matters: Pan sliding while you’re trying to stir or adjust is dangerous. You might grab at it reflexively, possibly touching hot surfaces.
Non-slip bases keep pans stable, reducing sudden movements that could cause burns.
Heat Indicators
Temperature-sensitive spots that change color when pan is hot.
T-fal Thermo-Spot is the classic example: Spot changes color when pan hits 350-375°F, showing it’s preheated.
Arthritis benefit: Visual confirmation reduces guesswork. You’re not testing with your hand (which has reduced sensation anyway).
Occupational Therapy Recommendations
Occupational therapists assess handle safety through grip testing, heat tolerance evaluation, and burn risk analysis—prescribing specific handle dimensions, materials, and features while training proper usage techniques as part of comprehensive kitchen safety plans for arthritis patients.
Professional guidance helps.
How OTs Assess Handle Safety
Standard OT evaluation:
- Measure grip strength and hand size
- Test heat sensation in hands
- Evaluate reaction time
- Assess current cookware for hazards
- Observe actual cooking techniques
From this, they determine which handle types will work safely.
Prescribed Handle Specifications
OTs often prescribe:
- Minimum handle diameter (based on grip testing)
- Required cooling performance (based on reaction time)
- Ergonomic features needed (based on joint limitations)
- Maximum safe pan weight (based on strength)
This is way more precise than generic recommendations. Worth getting professional assessment if possible.
Training for Safe Handle Use
Even great handles require proper technique.
OT training covers:
- How to test handle temperature safely (back of hand first)
- Proper grip technique for minimal joint stress
- When to use pot holders vs. bare hands
- Emergency release if you grab something too hot
Combining with Other Kitchen Adaptations
Stay-cool handles work best as part of complete kitchen modification.
Complementary adaptations OTs recommend:
- Counter-height cooking surfaces
- Non-slip floor mats
- Task lighting
- Accessible storage
- Emergency shut-off systems
Real-World Burn Prevention Success Stories
Seniors switching from standard to stay-cool handle skillets report dramatically fewer burns, renewed cooking confidence, reduced kitchen anxiety, and maintained independence—with family caregivers noting significant safety improvements and decreased emergency room visits.
This stuff works in real life.
Seniors Who Avoided Injuries
Common story: Someone with arthritis experiences a serious burn from grabbing a hot handle. Delayed reaction time meant they couldn’t let go fast enough.
They switch to stay-cool handle cookware. Burns drop to zero or near-zero.
The relief: Not just physical (no more burns), but psychological (no more fear of cooking).
Handle Upgrades That Made a Difference
Typical upgrade: $30 non-stick pan with mediocre metal handle → $70 pan with silicone-coated stay-cool handle.
Results reported:
- Can cook full meals without burns
- Handles stay comfortable throughout cooking
- Less anxiety about kitchen tasks
- Renewed enjoyment of cooking
Caregiver Reports on Safety Improvements
Adult children worry about aging parents cooking alone.
After stay-cool handle adoption, caregivers report:
- Fewer frantic phone calls about burns
- Visible marks on parents’ hands decrease
- Parents cook more often (because it’s safer)
- Reduced need for caregiver intervention
Peace of mind for everyone involved.
Warranty and Replacement Considerations
Quality cookware warranties typically cover handle defects for 1-10 years depending on brand, with replacement handle availability varying widely—factors especially important for seniors whose arthritis progression may require different handle features over time.
Warranty matters for long-term value.
Handle Warranties from Major Brands
| Brand | Warranty Length | Covers Handles? |
|---|---|---|
| All-Clad | Lifetime | Yes, defects |
| Calphalon | 10 years-lifetime (varies) | Yes |
| Cuisinart | Lifetime | Manufacturing defects only |
| T-fal | 1-2 years | Limited |
Read the fine print: Most warranties cover manufacturing defects but not normal wear or damage from misuse (like using metal utensils on non-stick).
Replacement Handle Availability
Brands with good parts availability:
- All-Clad (sells replacement handles)
- Lodge (cast iron handle replacements)
- Some premium brands
Most brands: Don’t sell replacement handles separately. Pan becomes trash if handle fails.
For arthritis: This argues for buying quality pans where handles are less likely to fail.
When to Replace vs. Repair
Replace the pan when:
- Handle is cracked or broken
- Attachment is loose and can’t be tightened
- Handle material has degraded (melted, seriously worn)
Repair might work when:
- Screw-on handle just needs tightening
- Silicone sleeve is worn but handle itself is fine (replace just the sleeve)
- Minor cosmetic damage that doesn’t affect function
For handles critical to burn safety, err on the side of replacement. Don’t risk it.
Shopping Guide: Where to Find Stay-Cool Skillets
Quality stay-cool handle skillets are available through kitchen specialty stores offering hands-on testing, medical supply retailers focused on adaptive equipment, major online marketplaces with extensive reviews, and manufacturer websites—each source providing different advantages for informed purchasing decisions.
Where to actually buy.
Kitchen Specialty Retailers
Williams-Sonoma, Sur La Table, local kitchen stores.
Advantages:
- Can handle pans in person
- Test grip and weight before buying
- Staff may be knowledgeable
- Often good return policies
Disadvantages:
- Limited selection of arthritis-specific options
- Higher prices
- Staff might not understand arthritis needs
Medical Supply Stores
Stores specializing in adaptive equipment and daily living aids.
Pros:
- Products specifically vetted for accessibility
- Staff understand arthritis challenges
- Can often try before buying
Cons:
- Limited selection
- Sometimes higher prices
- May not have latest cookware innovations
Online Sources and Reviews
Amazon, manufacturer websites, specialty cookware sites.
Benefits:
- Huge selection
- Customer reviews (search for “arthritis” to find relevant feedback)
- Competitive pricing
- Easy comparison shopping
Drawbacks:
- Can’t test before buying
- Photos can be misleading
- Return shipping hassle
Tip: Read 3-star reviews. They’re usually most honest about pros AND cons.
Testing Before Buying
Best approach: Buy from retailers with generous return policies (30-90 days).
Test thoroughly at home with real cooking. If handles don’t perform as needed, return without guilt.
This is safety equipment, not just cookware. You have every right to be picky.
Alternative Solutions When Handles Aren’t Enough
When stay-cool handles prove insufficient for advanced arthritis, alternatives include electric skillets with cool-touch exteriors, induction cooking eliminating radiant heat, slow cookers requiring minimal handling, and accepting assistance for high-risk cooking tasks—maintaining nutrition while prioritizing safety.
Sometimes handles aren’t the answer.
Electric Skillets with Cool Exteriors
Electric skillets sit on the counter. Heating element is in the base, not a burner under the pan.
Why this helps beyond stay-cool handles:
- Entire cooking process at counter height
- Can cook sitting down
- Handles barely warm (not over direct heat)
- Can serve directly from skillet (no lifting/pouring)
We covered this extensively in the earlier electric skillet article, but it bears repeating—for severe arthritis, electric skillets often work better than any stovetop pan.
Induction Cooking Benefits
Induction cooktops stay cool. Only the pan heats.
Handle benefit: No radiant heat from the cooktop warming handles from below. Handles genuinely stay cool much longer.
Covered in detail in the induction article, but worth considering as part of handle safety strategy.
Slow Cookers and Alternative Methods
Slow cookers have cool exterior walls and handles that never get hot.
Tradeoff: Different cooking style, longer times, less versatility.
When it makes sense: If handle safety is a serious concern and you’re willing to adapt your cooking methods.
When to Accept Cooking Assistance
Advanced arthritis sometimes progresses past what adaptive equipment can compensate for.
Signs it’s time for help:
- Frequent near-miss burns despite good equipment
- Anxiety about cooking preventing you from eating well
- Physical inability to safely handle even lightweight pans
- Cognitive issues making burn safety difficult
Accepting help isn’t failure. It’s smart adaptation to changing circumstances.
Handle Safety for Progressive Arthritis
Arthritis worsens over time, requiring handle selection that anticipates progression—early-stage patients benefit from establishing safe habits with quality handles, moderate cases require premium stay-cool features, and advanced arthritis demands maximum protection or alternative cooking methods.
Plan for progression.
Early-Stage Arthritis Handle Selection
Mild arthritis, minimal functional limitation.
Strategy: Build good habits now with quality stay-cool handles. Don’t wait until you’re desperate.
What to buy:
- Mid-range handles with good cooling
- Ergonomic features even if you don’t strictly need them yet
- Lighter pans you can continue using as strength declines
You’re investing in 5-10 years of use as arthritis progresses.
Moderate Arthritis Adaptations
Noticeable pain and weakness. Some tasks becoming difficult.
Handle priorities:
- Premium stay-cool performance (can’t afford mistakes)
- Maximum ergonomic support
- Dual handles on anything over 10 inches
- Lightweight pans only
This is where equipment really matters. Right handles enable continued cooking. Wrong ones force you to stop.
Advanced Arthritis and Maximum Protection
Severe arthritis, significant functional loss, high burn risk.
Options:
- Ultra-lightweight pans with best stay-cool handles available
- Switch to electric skillets/alternative methods
- Accept assistance for high-risk tasks
- Combine equipment with technique modifications
At this stage, there’s no such thing as too much safety margin.
Coordinating Handles with Complete Cookware Set
Building an arthritis-safe cookware collection requires consistent handle designs across pieces for predictable performance, strategic mixing of handle types for different tasks, and storage solutions protecting handle integrity—creating a comprehensive system rather than disconnected individual pans.
Think system, not pieces.
Consistent Handle Design Across Pieces
Advantages of matching handles:
- Muscle memory (every pan feels familiar)
- Predictable performance (know what to expect)
- Easier storage (same dimensions)
- Often cost savings (buying sets vs. individual pieces)
When to match: If you’re building a collection from scratch and found a handle design that works great for you.
Mixing Handle Types Strategically
Sometimes mixing makes sense:
- Small pan with single handle (lightweight, quick use)
- Medium pans with stay-cool single handles
- Large pans with dual handles (heavy when full)
Key: Each handle type should have clear purpose based on pan size and how you use it.
Storage Solutions for Handle Protection
Protect handles from damage:
- Don’t stack pans directly on handles
- Use pan protectors between stacked pieces
- Hang pans if you can reach hanging storage easily
- Store frequently-used pans accessibly (less handling during retrieval)
Damaged handles are safety hazards. Proper storage extends handle life and maintains safety.