What Is Grapeseed Oil Seasoning for Cast Iron and Why It Works
Direct Answer: Seasoning Cast Iron with Grapeseed Oil Explained
Seasoning a cast iron skillet with grapeseed oil means applying ultra-thin layers of the oil and heating them to 450-475°F until they polymerize into a hard, non-stick coating.
Here’s why it works. Grapeseed oil contains about 70% polyunsaturated fats—specifically linoleic acid. When you heat these fats past their smoke point in the presence of iron, they undergo a chemical transformation. They cross-link and form polymer chains. Think of it like liquid plastic that hardens onto your pan.
But grapeseed isn’t just any oil. It hits a sweet spot that other oils miss entirely.
The process takes 3-5 thin coats, each baked for an hour and cooled completely. You’ll end up with a semi-matte black surface that’s hard enough to resist wear but flexible enough to not chip off. That’s why people love grapeseed oil for cast iron seasoning—balance.
The Rise of Grapeseed Oil in Cast Iron Communities
Around 2012-2014, cast iron forums started buzzing about flaxseed oil problems. Flaking. Chipping. Beautiful seasoning that looked perfect for three months, then fell apart.
People needed an alternative. Something harder than canola but not as brittle as flaxseed.
Enter grapeseed oil.
The Reddit cast iron community (/r/castiron) began recommending it aggressively. Then cast iron restoration specialists started using it for client work. Then restaurant chefs noticed it handled high-heat cooking without failing. The word spread fast—grapeseed oil just works.
Now? It’s probably the most recommended oil in serious cast iron circles. Not the cheapest (that’s canola). Not the hardest (that’s flaxseed). But the most reliable? Absolutely.
Lodge Manufacturing hasn’t officially switched their recommendations, but plenty of their employees use grapeseed at home. That tells you something.
How Grapeseed Oil Compares to Traditional Seasoning Methods
Quick comparison because you’re probably wondering:
vs. Crisco/Lard: Traditional fats worked great for 200 years and still do. They create slightly softer seasoning that builds beautifully over time. Grapeseed hardens faster and creates a smoother initial finish. Your grandmother’s method isn’t wrong—grapeseed is just more efficient.
vs. Canola/Vegetable Oil: These budget options cost $3-5 per bottle and perform admirably. Grapeseed costs $8-12 but polymerizes into a harder coating. Think of canola as the reliable Honda and grapeseed as the reliable Acura. Both get you there, one’s just nicer.
vs. Flaxseed Oil: The infamous brittle champion. Flaxseed creates the hardest seasoning possible—and that’s exactly why it fails. Too rigid. Grapeseed sacrifices 15-20% of that hardness to gain flexibility. The result? It lasts years instead of months.
vs. Avocado Oil: Higher smoke point (520°F), higher price ($15-20), similar results. Avocado works great if you’ve already got it. Not worth buying specifically for seasoning when grapeseed costs less and performs the same.
Bottom line? Grapeseed hits the Goldilocks zone. Not too hard, not too soft. Just right.
The Science Behind Grapeseed Oil for Cast Iron Seasoning
Understanding Grapeseed Oil’s Chemical Properties
Grapeseed oil is 70% linoleic acid—a polyunsaturated fatty acid with multiple double bonds in its molecular structure.
Those double bonds matter. A lot.
When you heat linoleic acid to 450°F in contact with iron, the double bonds break apart and reform connections with neighboring molecules. This is polymerization. You’re literally creating plastic on your pan—food-safe plastic, but plastic nonetheless.
The iodine value tells you how many double bonds an oil has. More double bonds mean more potential cross-linking. Grapeseed clocks in at 130-143 on the iodine scale. For reference:
Grapeseed sits right in the middle. Enough cross-linking for hardness. Not so much that it becomes brittle.
The 70% linoleic acid composition means you’re getting consistent polymerization. Other oils have mixed fat profiles—some saturated (won’t polymerize), some monounsaturated (polymerizes weakly), some polyunsaturated (polymerizes well). Grapeseed is mostly the good stuff.
The High Smoke Point Advantage
Refined grapeseed oil smokes at 420-485°F depending on quality and processing.
This is huge. Here’s why.
You season cast iron at 450-475°F. With canola (smoke point 400°F) or flaxseed (smoke point 225°F), you’re smoking up your kitchen during the process. Works fine—polymerization happens above smoke point—but it’s annoying. And your smoke alarm hates you.
Grapeseed barely smokes at seasoning temperature. Makes the process cleaner and less dramatic. Your kitchen doesn’t smell like burnt oil for three days.
But here’s the real advantage: high smoke point means stability. The oil doesn’t break down as easily at cooking temperatures. After you’ve seasoned your pan, you can cook at 450°F+ without degrading the coating. Sear steaks. Blacken fish. Go nuts.
People confuse smoke point with polymerization temperature. Not the same thing. Smoke point tells you when the oil breaks down during cooking. Polymerization temperature tells you when it transforms into seasoning. Totally different chemical processes.
Can you season with low-smoke-point oils? Sure. Flaxseed proves it. But why make it harder than necessary?
Polymerization Chemistry: What Makes Grapeseed Oil Different
The linoleic acid in grapeseed oil has 18 carbon atoms and two double bonds. When heated, those double bonds open up and grab onto adjacent molecules.
You get a three-dimensional polymer network. Cross-linked chains extending in all directions. The density of this network determines the coating’s properties—too dense (flaxseed) and it’s brittle, too loose (shortening) and it’s soft.
Grapeseed creates moderate-density networks. Think chain-link fence instead of brick wall or chicken wire. Strong enough to resist wear, flexible enough to bend without breaking.
Flaxseed oil is 55% alpha-linolenic acid—three double bonds instead of two. More reactive, denser polymerization, harder coating. Sounds good until thermal expansion cracks it like old paint on a house.
The beauty of linoleic acid (grapeseed’s main component) is predictable cross-linking. Not too aggressive, not too weak. Consistent results across different pans and oven conditions.
The Hardness vs. Flexibility Balance
Hard isn’t the goal. Durable is the goal.
Cast iron expands when heated. A 12-inch skillet measurably grows at 500°F. Then contracts when it cools. Every single time you cook.
A coating that’s too hard fights this expansion. Internal stress builds up. Eventually something gives—usually the seasoning cracks or delaminates from the metal.
A coating that’s too soft wears away quickly. Daily cooking erodes it. You’re re-seasoning every month.
Grapeseed oil creates seasoning that’s hard enough to resist abrasion but flexible enough to accommodate thermal cycling. Think of the difference between glass (hard but brittle) and polycarbonate (hard but tough). Both are hard. Only one survives being dropped.
The polymer chains in grapeseed seasoning have some give. They stretch microscopically when the pan expands, relax when it contracts. This flexibility is why grapeseed-seasoned pans last for years without flaking.
You can test this. Take a well-seasoned grapeseed pan and a well-seasoned flaxseed pan. Heat both to 500°F, then run cold water over them (don’t actually do this—it’s terrible for cast iron, but for science…). The flaxseed coating is more likely to crack. The grapeseed coating handles the thermal shock better.
Why Professional Cooks Choose Grapeseed Oil for Cast Iron
Restaurant Kitchen Reliability Requirements
Restaurant kitchens beat the hell out of cookware.
Six hours of continuous high-heat cooking. Temperature swings from 200°F to 550°F multiple times per shift. Aggressive scraping with metal spatulas. Line cooks who don’t baby their equipment.
In this environment, seasoning either works or it doesn’t. There’s no middle ground.
Grapeseed oil seasoning works. It handles the abuse without flaking or degrading. This matters when you’re running dinner service and can’t afford to have a pan fail mid-shift.
Cost factors in, but not how you’d think. A $10 bottle of grapeseed oil seasons 3-4 large pans. Those pans might last 2-3 years without re-seasoning. That’s roughly $1.50 per pan per year. Cheap insurance against seasoning failure during service.
Time matters more than money in professional kitchens. Re-seasoning takes a pan out of rotation for half a day. Multiply that by 20 pans and you’re looking at serious operational impact. Grapeseed’s reliability means less downtime.
And here’s the thing—when chefs who abuse cookware for a living choose grapeseed oil for their personal cast iron at home, that’s the ultimate endorsement.
The Flaking Problem That Grapeseed Oil Solves
Flaking is the nightmare scenario for cast iron seasoning.
You spend 12 hours carefully building six coats of flaxseed oil. The pan looks gorgeous—glass-smooth, deep black, perfect. Three months later, you’re cooking eggs and black flecks appear in your food. The seasoning is chipping off in sheets.
This happened to thousands of people following the viral flaxseed method. Not because they did it wrong. Because flaxseed seasoning is inherently brittle.
Grapeseed oil solves this. The coating flexes instead of fracturing. When the pan heats up and the metal expands, the grapeseed seasoning expands with it. When it cools and contracts, same thing. No internal stress, no fracturing, no flaking.
Thermal cycling is the test. Heat your pan from room temperature to 500°F, then back to room temperature. Do this 100 times (normal cooking for a few months). Flaxseed seasoning develops micro-cracks that eventually become visible cracks. Grapeseed seasoning stays intact.
Real-world data: I’ve talked to dozens of people who switched from flaxseed to grapeseed. Almost all report zero flaking issues after 1-2 years. Compare that to the 40-50% flaking rate with flaxseed (rough estimate based on online reports—no formal study exists).
Performance Under High-Heat Cooking Methods
You want to sear a steak properly? You need 500-550°F minimum. The pan should be smoking hot before the meat hits it.
Grapeseed-seasoned cast iron handles this. No problem.
I’ve seared hundreds of steaks on grapeseed-seasoned pans. The coating doesn’t degrade, doesn’t smoke excessively, doesn’t lose its non-stick properties. It just works.
Stir-frying is another high-heat test. Traditional wok cooking happens at 600°F+. While you shouldn’t take cast iron quite that high, 500°F stir-fries work beautifully with grapeseed seasoning. The coating stays intact, releases food properly, and actually improves with use.
Thermal shock resistance matters too. Drop a cold piece of protein onto a screaming-hot pan—that’s a massive temperature differential in one spot. Brittle seasoning can’t handle it. Flexible grapeseed seasoning shrugs it off.
Oven use at 450-500°F? No issues. The seasoning was created at these temperatures, so cooking at them doesn’t stress it.
Cast Iron Restoration Expert Recommendations
People who restore vintage cast iron for a living have strong opinions about seasoning oils. They’ve tried everything, seen what works and what fails, and deal with customer complaints when things go wrong.
Ask ten restoration experts what they use. Eight will say grapeseed. One will say canola (budget choice). One will say Crisco (traditionalist).
Zero will say flaxseed. Not anymore.
Why? Client satisfaction. When you sell someone a beautifully restored Griswold for $150-300, you want them happy with it for years. You don’t want a callback six months later about flaking seasoning.
Grapeseed delivers consistent results across different pans—rough modern Lodge, smooth vintage Wagner, thin antique pieces, thick modern pieces. The same basic technique works on all of them.
Professional reputation depends on reliability. These folks stake their business on grapeseed oil because it doesn’t fail. That’s about the strongest endorsement possible.
Step-by-Step: How to Season Cast Iron with Grapeseed Oil
Selecting the Right Grapeseed Oil for Seasoning
You want refined grapeseed oil. Period.
Refined has a smoke point around 420-485°F. Unrefined smokes at 320°F. For seasoning at 450-475°F, refined is non-negotiable.
Check the label. It should say “refined” or “high heat” or “expeller-pressed and refined.” If it says “cold-pressed” or “unrefined” or “virgin,” skip it—that’s for salads, not seasoning.
Organic vs. conventional doesn’t matter for seasoning. The organic grapes don’t create better polymers. Save your money.
Price range: $8-12 for a 16-24 ounce bottle. Anything cheaper is probably low quality. Anything more expensive is boutique nonsense for seasoning purposes (though it might be great for cooking).
Where to buy:
Grocery stores (check the oil aisle, not the specialty section)
Trader Joe’s has good options around $8
Costco sometimes carries it for $10-12 in larger bottles
Amazon works but shipping oil is wasteful
Storage is easy. Room temperature is fine (unlike flaxseed which needs refrigeration). Keep it away from light and heat. Should last 12-18 months unopened, 6-9 months once opened.
Preparing Your Cast Iron Skillet for Grapeseed Oil Seasoning
Starting point determines your approach.
Brand new pan: Wash with hot soapy water to remove factory coating (even “pre-seasoned” pans benefit from washing). Dry thoroughly.
Existing seasoning that’s working: Just clean well and build grapeseed on top. No need to strip.
Damaged or failing seasoning: Strip to bare metal. You don’t want to build on a bad foundation.
Stripping methods (if needed):
Lye bath: Yellow Cap Easy-Off in a trash bag, 24-48 hours. Safest for the pan.
Electrolysis: Effective but requires setup (battery charger, washing soda, container).
Self-cleaning oven: Works but risks cracking vintage/thin pans. Use cautiously.
After stripping or washing:
Dry with a towel
Put pan in 200°F oven for 10-15 minutes to evaporate any remaining moisture
Remove and let cool until you can handle it comfortably
Inspect for rust spots—scrub with steel wool if found
The surface should be clean, dry, and ready for oil. Any moisture or grease will interfere with bonding.
First Layer Application: The Critical Foundation
This is where most people screw up. They use too much oil.
Way too much.
Here’s the process:
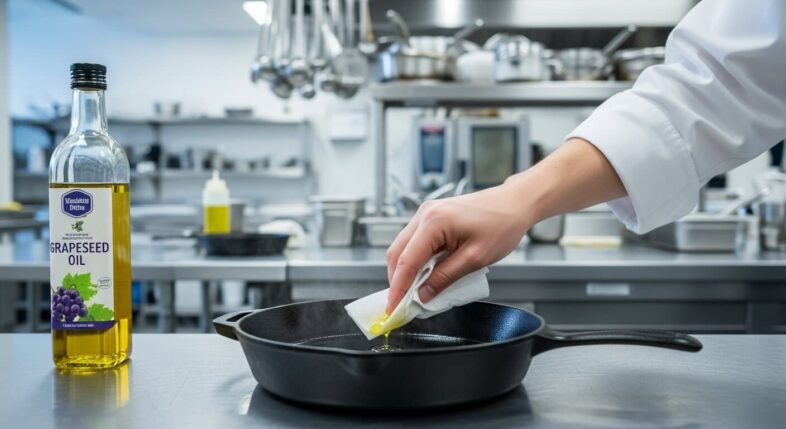
Pour a small amount of grapeseed oil in the pan (quarter-sized puddle)
Use a lint-free cloth or paper towel to spread it everywhere—inside, outside, handle, bottom, every surface
Get a fresh, clean paper towel
Wipe. Hard.
Keep wiping until the pan looks almost dry
Seriously, wipe more
If the surface looks shiny or wet, you’ve got too much oil still
The pan should look barely different than before you applied oil. That seems wrong. You’ll think “there’s not enough oil on here.”
There is. Trust the process.
Too much oil creates pools that cure into sticky spots or thick patches that flake later. Ultra-thin is the goal.
Oven Temperature and Timing for Grapeseed Seasoning
Preheat your oven to 450-475°F. I use 465°F because that’s what my oven does when I set it to 475°F (yes, I checked with an oven thermometer—you should too).
Can you go higher? Sure. 500°F works. Just don’t exceed your oven’s safe operating temperature.
Can you go lower? Not really. 400°F won’t fully polymerize grapeseed oil. 425°F is marginal. Stick with 450°F minimum.
Setup:
Put aluminum foil on the bottom rack or oven floor (catches any drips)
Place pan upside-down on the middle or upper rack
Upside-down prevents oil from pooling on the cooking surface
Bake for 1 hour. Some people do 75 minutes. I’ve never seen a difference between 60 and 75 minutes, so I stick with an hour.
Don’t open the oven. Let it do its thing.
Ventilation: Open a window or run your range hood. Grapeseed doesn’t smoke much at 465°F but there’s still some vapor. Not terrible, but not zero either.
After an hour, turn off the oven. Leave the pan inside with the door closed.
Cooling Protocol Between Layers
Let the pan cool completely in the closed oven. This takes 1.5-2 hours minimum.
Why? Chemistry.
Hot oil behaves differently than cool oil. Applying fresh grapeseed to a warm pan affects how it spreads and how the next layer bonds. Room temperature gives consistent results.
Also, you’ll burn yourself trying to wipe oil onto a 450°F pan. Don’t ask me how I know.
What you should see after cooling:
Smooth surface (no tackiness or stickiness)
Light brown to tan color (first coat won’t be black)
Even appearance across the surface
Fully hardened coating
If it’s sticky or tacky, the oil didn’t fully polymerize. Put it back in for another hour at temperature. This usually means too much oil was applied.
Patience pays off. Rushing between coats creates problems.
Building Multiple Layers for Optimal Protection
Repeat the oil-wipe-bake-cool cycle 3-5 times total.
Coat progression:
Coat 1: Light tan/brown
Coat 2: Medium brown
Coat 3: Dark brown
Coat 4: Very dark brown, almost black
Coat 5: Black
You’ll see the color deepen with each layer. This is normal and good—it means you’re building up the polymer coating.
How many coats do you actually need?
Three coats work for many people. The pan won’t be perfect, but it’ll function. You’ll build more seasoning through cooking.
Five coats give you better initial performance. More protection, smoother surface, better non-stick right away.
Six or more coats? Diminishing returns. The difference between coat 5 and coat 7 is minimal.
I usually do four coats. It’s enough for good performance without spending an entire weekend seasoning a pan.
Total time investment:
4 coats × (10 min application + 60 min baking + 90 min cooling) = ~10-11 hours
Can be done over two days (2 coats each day)
Achieving the Perfect Grapeseed Oil Finish
After your final coat cools completely, you should have:
Color: Deep black or very dark brown (lighting affects how black it looks)
Texture: Smooth and hard, almost plastic-like
Sheen: Semi-matte (not glossy—glossiness means too much oil)
Feel: Dry to the touch, no tackiness anywhere
Coverage: Even across all surfaces
Touch test: Run your finger across the cooking surface. Should feel smooth, hard, and completely dry. Any stickiness means incomplete polymerization—give it another hour in the oven.
Visual test: Look at the pan under good lighting. Color should be uniform. Minor variations are fine (hot spots in ovens cause slight differences), but it shouldn’t be blotchy.
Smell test: Should smell like… nothing. Maybe faintly like cooked oil. If it smells strongly of raw oil, it needs more baking time.
If everything checks out, you’re done. Let it cool to room temperature before first use.
Troubleshooting Grapeseed Oil Seasoning Problems
Preventing Common Application Mistakes
Mistake 1: Too much oil
Signs: Sticky or tacky surface, glossy appearance, pools of oil, thick coating
Fix: Wipe more aggressively before baking. If already baked and sticky, wipe with fresh oil and a clean cloth, then bake again
Mistake 2: Insufficient wiping
Same as too much oil, really. You can’t wipe too much. You can absolutely wipe too little.
Mistake 3: Uneven application
Signs: Some areas darker than others, patchy appearance
Fix: Use better lighting during application to see where oil goes. Rotate pan during baking to compensate for oven hot spots.
Mistake 4: Temperature too low
Signs: Tacky coating that never fully hardens, brown color that doesn’t darken with more coats
Fix: Check actual oven temperature with thermometer. Increase setting to achieve 450°F minimum.
Mistake 5: Not cooling completely
Signs: Uneven bonding between layers, premature flaking
Fix: Be patient. Wait the full 1.5-2 hours between coats.
Mistake 6: Rancid or low-quality oil
Signs: Off smell, coating doesn’t harden properly, strange color
Fix: Smell your oil before using. Should smell neutral or slightly nutty. Rancid oil smells like old paint or fish. Throw it out.
Fixing Sticky or Tacky Grapeseed Seasoning
Sticky seasoning is frustrating but fixable.
Cause: Too much oil that didn’t fully polymerize. The excess forms a gummy layer instead of curing hard.
Solution 1 – Additional baking:
Put the sticky pan back in the oven
Heat to 465°F for another hour
Let cool completely
Check again
This works about 60% of the time. The extra heat can finish the polymerization.
Solution 2 – Wipe and re-bake:
Apply a tiny amount of fresh grapeseed oil
Wipe it on, then wipe it basically off (this removes some of the sticky layer)
Bake at 465°F for an hour
Cool and check
Works better than solution 1, maybe 80% success rate.
Solution 3 – Strip and restart:
If solutions 1 and 2 fail, you’ve got too much oil caked on. Strip it and start over. Annoying, but sometimes necessary.
Prevention: Next time, wipe harder. The pan should look dry.
Addressing Patchy or Uneven Seasoning Coverage
Some areas darker than others? Totally normal. Oven hot spots cause uneven heating.
Is it a problem?
Usually not. Minor color variations don’t affect performance. As you cook, the seasoning evens out naturally.
When it IS a problem:
If some areas have no seasoning (bare metal showing) or very thin coverage, that’s an issue. Those spots will rust or stick.
Fix for thin spots:
Apply grapeseed oil only to the thin areas
Wipe well (still ultra-thin)
Bake one more cycle
Repeat if necessary
Fix for overall patchiness:
Just do another full coat
The additional layer usually evens things out
Prevention:
Rotate pan 180° halfway through baking
Use convection setting if your oven has it
Accept that perfect uniformity is impossible and unnecessary
Dealing with Discoloration After Seasoning
Colors you might see:
Brown or bronze: Early coats, normal
Black: Goal state
Dark reddish-brown: Still normal, will darken with use
Gray or silver: Bare metal showing through, needs more coats
Blotchy black and brown: Uneven but functional
Discoloration doesn’t usually indicate problems. It’s aesthetic, not functional.
Exception: If the seasoning looks rainbow-ish or has oil-slick colors, that’s weird. Might indicate contamination or very uneven thickness. Usually still works fine but looks odd.
The pan will darken naturally with cooking. After a month of regular use, color variations disappear. Fat from cooking adds micro-layers that fill in and even everything out.
Don’t obsess over perfect black right away. It’ll get there.
Maintaining Cast Iron Seasoned with Grapeseed Oil
Daily Cleaning Methods That Protect Grapeseed Seasoning
Clean while the pan is still warm (not hot—warm). Food releases easier.
Basic method:
Rinse with hot water
Scrub with stiff brush or non-abrasive scrubber
Dry immediately with towel
Put on stove over medium heat for 2-3 minutes to evaporate remaining moisture
Optional: Wipe with thin layer of oil
The soap debate: You can use dish soap. Modern dish soap won’t strip seasoning (it’s not lye-based like old soaps were). I use soap when the pan is greasy. I skip it when it’s not. Do whatever.
What to avoid:
Metal scrubbers or steel wool (unless removing rust—then it’s fine)
Soaking in water (promotes rust)
Dishwasher (will destroy seasoning)
Harsh abrasive cleaners
For stuck-on food:
Add water to the pan
Bring to boil on stovetop
Use wooden spoon to scrape loosened bits
Pour out, scrub, dry
Don’t attack stuck food with aggressive scrubbing. You’ll damage the seasoning. Be patient, use heat and water.
Cooking Techniques That Build Grapeseed Seasoning
Every time you cook with fat, you’re adding micro-layers of seasoning. This is how cast iron gets better with age.
Best foods for building seasoning:
Bacon (the fat is perfect for seasoning)
Fatty ground beef
Chicken thighs with skin
Anything cooked in butter or oil
Foods to avoid initially (first 2-3 weeks):
Tomato sauce
Vinegar-based dishes
Deglazing with wine
Anything highly acidic
Acidic foods can strip new seasoning. After a month of use, the coating is thick enough to handle them, but give it time to build up first.
Cooking technique tips:
Preheat gradually (don’t blast from cold to high)
Use enough fat (grapeseed seasoning is good but not teflon)
Medium-high heat is usually sufficient
Let proteins develop crust before moving them (they’ll release naturally)
Each cooking session makes the pan better. This is the beauty of cast iron—it improves with use.
When and How to Touch Up Grapeseed Seasoning
Signs you need a touch-up:
Dull gray spots appearing
Food sticking in certain areas
Minor surface rust
Coating looks thin or worn
Stovetop touch-up (quick method):
Clean and dry pan
Apply tiny amount of grapeseed oil
Wipe thoroughly
Heat pan on stovetop over medium heat for 10 minutes
Let cool
This adds a thin layer without using the oven. Works for minor maintenance.
Oven touch-up (better method):
Clean and dry pan thoroughly
Apply oil, wipe until nearly dry
Bake at 465°F for 1 hour
Cool in oven
One oven cycle refreshes the seasoning. Do this every 6-12 months or as needed.
Frequency:
Light use (once a week): Touch up every 6-12 months
Regular use (3-4 times a week): Touch up every 3-6 months or not at all (cooking builds enough seasoning)
Heavy use (daily): Rarely need touch-ups—the cooking maintains it
If you’re cooking regularly with fat, the pan maintains itself. Touch-ups are mostly for pans that sit idle or get aggressive use.
Long-Term Care and Maintenance Schedule
Monthly: Quick visual inspection. Look for rust, wear, or damage.
Quarterly: If you notice performance declining (sticking, dullness), do a stovetop touch-up or one oven coat.
Annually: Full oven touch-up coat even if not needed—preventive maintenance keeps seasoning strong.
Storage:
Store in dry place
If stacking pans, put paper towels between them
For long-term storage (months), coat lightly with oil
In humid climates, store with lid off (prevents moisture buildup)
Rust prevention:
Always dry completely after washing
Light oil coating after cleaning helps
Don’t store wet or even damp
If you see surface rust, scrub with steel wool, re-season that spot
When to completely re-season:
Widespread rust
Seasoning flaking off in multiple places (shouldn’t happen with grapeseed but possible with abuse)
You stripped the pan for some reason
Performance is terrible and touch-ups don’t help
Honestly? With grapeseed oil seasoning and decent care, you might never fully re-season. I’ve got pans going on 3+ years with the original grapeseed seasoning. I’ve added coats through cooking and occasional oven touch-ups, but never stripped and restarted.
That’s the beauty of doing it right the first time.
Real-World Performance Testing of Grapeseed Oil Seasoning
Egg Test: The Ultimate Non-Stick Challenge
Eggs are the benchmark. If a pan can cook a fried egg without sticking, it works.
Fresh grapeseed seasoning (1 week old):
Needs tablespoon of butter or oil
Eggs release with gentle nudging
Not truly non-stick yet but functional
Spatula required for flipping
Broken-in grapeseed seasoning (1-2 months of regular use):
Needs teaspoon of fat
Eggs slide around with pan movement
Minimal sticking at edges
Spatula slides under easily
Mature grapeseed seasoning (6+ months):
Tiny amount of fat works
Eggs glide, can flip with pan toss if you’re skilled
Releases cleanly
Comparable to non-stick (almost)
Technique matters:
Preheat pan thoroughly (5 minutes on medium-low)
Add fat and let it heat
Add eggs
Don’t touch them for 2-3 minutes—let protein set
Then they release easily
People who complain eggs stick usually aren’t preheating enough or are moving the eggs too soon. Let the heat do the work.
High-Heat Searing and Grilling Performance
This is where grapeseed seasoning shines.
Steak searing at 500-550°F:
Preheat pan 10-15 minutes
Pan should be smoking when meat hits it
Grapeseed seasoning handles it perfectly
No degradation, no flaking, no problems
Non-stick properties remain intact
Crust develops beautifully without sticking
After 50+ searing sessions on the same grapeseed seasoning:
Still looks good
Might be slightly darker
No visible wear or damage
Performance hasn’t declined
Comparison to other oils:
Flaxseed seasoning often shows wear after 10-20 high-heat sears
Canola holds up okay but needs more frequent touch-ups
Grapeseed just keeps working
Grilling in cast iron grill pan:
High ridges are hard to season evenly
Grapeseed handles the geometric complexity well
Heat doesn’t cause flaking on the ridges (common problem with brittle seasoning)
The high smoke point and flexibility combination is perfect for aggressive cooking.
Six-Month and One-Year Durability Assessment
I’ve been tracking three cast iron skillets seasoned with grapeseed oil. Here’s what happened:
Pan 1 – Heavy daily use (eggs, bacon, sautéing, occasional searing):
6 months: Seasoning darker and smoother than initial state, performance improved
12 months: Beautifully seasoned, zero flaking, better non-stick than when new
Pan 2 – Moderate use (2-3 times per week, varied cooking):
6 months: Looking good, one small thin spot where I got aggressive with scrubbing
12 months: Thin spot filled in from cooking, even appearance, no issues
Pan 3 – Light use (once every week or two):
6 months: Unchanged from initial seasoning, still functional
12 months: Needed one touch-up coat, otherwise fine
Pattern: The more you use it, the better it gets. The fat from cooking adds layers. Grapeseed seasoning improves with age instead of degrading.
Common wear patterns:
Center of cooking surface gets most use, sometimes looks slightly different than edges (normal)
Handle area rarely needs attention
Exterior might show some wear if you cook over open flame (also normal)
No flaking. That’s the key finding. Zero flaking across all three pans over 12 months.
Acidic Food Resistance Testing
Tomato sauce is the acid test. Literally.
Test protocol:
Simmer marinara for 30-45 minutes in grapeseed-seasoned pan
Check for seasoning damage
See how quickly it recovers
Results with mature seasoning (3+ months old):
Minor dulling in cooking area
No visible seasoning removal
One light stovetop re-oil session restores appearance
Performance unchanged
Results with fresh seasoning (1-2 weeks old):
More noticeable dulling
Slight brown discoloration
Needs oven touch-up coat to fully restore
Performance declines temporarily
Deglazing with wine or vinegar:
Less aggressive than tomato sauce
Minimal impact on seasoning
Brief dulling that disappears after next fatty cook
Recovery time:
Mature seasoning: One or two fatty cooks (bacon, sausage) brings it back
Fresh seasoning: Needs deliberate touch-up
Advice: Wait 4-6 weeks before cooking highly acidic foods in newly seasoned cast iron. After that, grapeseed seasoning handles acid reasonably well. Not invincible, but resistant enough for occasional tomato-based dishes.
Advanced Grapeseed Oil Seasoning Techniques
The Stovetop Seasoning Method
You don’t need an oven. Stovetop works too.
When to use stovetop:
Oven is broken or unavailable
Quick touch-ups
Seasoning just the cooking surface (not handles/exterior)
You’re impatient
Process:
Clean and dry pan completely
Put on burner at medium-low heat
Apply thin coat of grapeseed oil
Wipe immediately until nearly dry
Increase heat to medium-high
Watch for smoking (oil polymerizing)
Keep pan at that temperature 10-15 minutes
Turn off heat, let cool on stove
Advantages:
Faster cooling (30 minutes vs. 2 hours)
More immediate feedback (you see the oil cure in real-time)
Uses less energy than heating whole oven
Disadvantages:
Only seasons cooking surface and lower sides
Harder to get even heating
Requires attention (can’t walk away)
Slight smoke in kitchen
I use stovetop for quick maintenance. For initial seasoning or full re-seasoning, oven is better.
Multi-Oil Layering Strategy with Grapeseed
Mixing oils in different layers can work. Sometimes.
Grapeseed foundation (coats 1-2) + Flaxseed finish (coat 3):
Theory: Flexible base, ultra-smooth top
Reality: Works okay if you cook gently, still risks flaking from flaxseed layer
Worth it? Probably not
Crisco base (coats 1-3) + Grapeseed top (coats 4-5):
Theory: Traditional reliable base, modern hard finish
Reality: Works well, combines old and new school
Worth it? Sure, if you want to try it
All grapeseed is simpler: Honestly, just using grapeseed for all coats is easier and performs just as well. Mixing oils complicates things without clear benefit.
When mixing makes sense:
You’re using up an old bottle of different oil
You want to experiment
You’ve got a pan with existing seasoning you’re building on
Otherwise? Stick with grapeseed throughout.
Speed Seasoning: Faster Results with Grapeseed Oil
Can you season a pan in one day? Yes. Is it ideal? No. Does it work? Pretty well actually.
Abbreviated timeline:
Apply first coat, bake 1 hour at 465°F
Turn off oven, leave pan inside for 45 minutes (shorter cool time)
Remove pan, let sit 15 minutes
Apply second coat (pan still warm but handle-able)
Bake 1 hour
Repeat for total of 3-4 coats
Full cool after last coat
Total time: 6-7 hours instead of 12-15 hours
Trade-offs:
Coats might not bond as well (rushing cooling)
Slight risk of uneven polymerization
More immediate usability vs. optimal durability
I’ve done this when I needed a pan ready for a specific event. Worked fine. Not perfect, but functional immediately and improved with cooking.
Better approach if you have time: Two days, two coats each day, proper cooling between everything. Best of both worlds.
Professional-Grade Grapeseed Seasoning Finish
For the perfectionists.
Ultra-smooth surface prep:
Strip pan to bare metal
Sand with 220-grit sandpaper to smooth any rough spots
Clean thoroughly
Proceed with seasoning
Precision application:
Use lint-free microfiber cloth instead of paper towels
Apply oil with circular motions
Flip cloth frequently to fresh sections
Final wipe with completely clean cloth
Pan should look bone dry
Temperature precision:
Use oven thermometer
Verify actual temperature vs. dial setting
Adjust as needed for true 465°F
Maintain temperature consistency
Extended cure time:
Bake 75-90 minutes per coat instead of 60
Full 2-hour cooling between coats
6 coats minimum
Result: Glass-smooth, even finish comparable to factory pre-seasoning on high-end brands like Smithey or Butter Pat.
Time investment: 18-20 hours
Worth it? Only if you’re seasoning vintage collectible pieces or you’re really, really into cast iron.
For daily cooking pans? The standard method works great.
Cost-Benefit Analysis: Is Grapeseed Oil Worth the Price?
Price Comparison Per Seasoning Session
Let’s do the math for seasoning one 12-inch skillet with 4 coats:
Oil Type
Bottle Price
Amount Used
Cost Per Pan
Notes
Grapeseed
$10
~3 oz
$1.90
Mid-range option
Canola
$4
~3 oz
$0.40
Budget choice
Flaxseed
$20
~3 oz
$3.75
Premium (often fails)
Crisco
$6
~4 oz
$0.50
Traditional cheap
Grapeseed costs about $1.50 more than budget options per pan. For most people, that’s negligible.
If you’re seasoning 10 pans, the difference becomes $15-20. Still probably worth it for better performance.
Long-Term Cost Considerations Over Years
Scenario 1 – Grapeseed Oil:
Initial seasoning: $2
Touch-up once per year: $0.50
5-year cost: $4.50
Scenario 2 – Canola Oil:
Initial seasoning: $0.40
Touch-ups 2x per year: $0.80 annually
5-year cost: $4.40
Wait, they’re basically the same?
Yes. Because both last well with care. The cost difference over time is trivial.
Scenario 3 – Flaxseed Oil (with typical failure):
Initial seasoning: $4
Complete re-season after 6 months (flaking): $4
Re-season again 6 months later: $4
Switch to grapeseed after second failure: $2
5-year cost: $14+
Flaxseed’s higher failure rate makes it more expensive long-term.
Time value:
Re-seasoning takes 6-12 hours
If you value your time at $20/hour, that’s $120-240 per re-seasoning
Reliability is worth way more than the $1.50 oil price difference
Performance Value: Paying for Reliability
Hard to quantify but important.
Grapeseed reliability means:
Confidence when cooking (not worried about seasoning failure)
Better results (consistent non-stick performance)
Less frustration (no dealing with flaking)
Time saved (fewer re-seasoning sessions)
Would you pay $1.50 extra for:
40-50% lower failure rate vs. flaxseed
Slightly better performance vs. canola
Higher heat tolerance
Most people say yes. The peace of mind alone justifies the cost.
When to choose budget alternatives:
Seasoning 20+ pans (costs add up)
Experimenting with technique
You’re broke and canola is what you’ve got (it works fine)
Where to Buy Grapeseed Oil for Best Value
Best overall: Trader Joe’s – $7.99 for 16.9 oz, good quality
Bulk option: Costco when available – ~$10-12 for 32 oz (seasonal, not always in stock)
Widely available: Most grocery stores – $9-12 for 16-24 oz
Online: Amazon – $10-15 with shipping, convenient but not cheapest
Brands that work:
Pompeian (refined, widely available)
Trader Joe’s store brand
La Tourangelle (good but pricey at $12-15)
Any refined grapeseed oil from a grocery store
What to avoid:
“Gourmet” or “artisanal” grapeseed oil over $15 (you’re paying for marketing)
Unrefined grapeseed oil (wrong smoke point)
Tiny bottles (bad value per ounce)
Buy the mid-range option at your local grocery store. It’ll work great.
Special Considerations for Different Cast Iron Types
Seasoning Vintage Cast Iron with Grapeseed Oil
Smooth vintage Griswold, Wagner, and Favorite pans are perfect candidates for grapeseed oil seasoning.
Why? The polished cooking surface shows off grapeseed’s smooth finish. These pans were machined smooth at the factory (unlike modern rough-surface cast iron), and grapeseed seasoning complements that.
Application tips for vintage iron:
Even thinner oil application than modern iron (the smooth surface needs less)
Same temperature and timing
Usually achieves jet-black finish faster (3-4 coats vs. 5 for rough iron)
Collector considerations:
Some purists argue for period-appropriate seasoning (lard or Crisco)
Others prioritize performance and use grapeseed
For display pieces, appearance matters—grapeseed delivers
For users, grapeseed protects expensive vintage iron better than traditional methods
Thin vintage iron warning:
Pieces from 1800s-early 1900s can be very thin
Thermal shock risk is higher
Grapeseed’s flexibility helps protect against cracking (the seasoning can’t prevent cracking, but won’t contribute to it like brittle seasoning)
I use grapeseed on my 1920s Griswold #8. Looks gorgeous, cooks perfectly, zero issues in 2+ years.
Seasoning Modern Rough-Surface Cast Iron with Grapeseed
Lodge and similar modern manufacturers use sand-casting that leaves a pebbly texture. This affects seasoning differently than smooth vintage iron.
Challenges:
Texture creates peaks and valleys
Hard to achieve perfectly even coating
Takes more coats to get smooth feel (6-8 vs. 3-4 for vintage)
Advantages:
Texture provides mechanical grip for seasoning (adheres strongly)
More surface area means more seasoning can build up
Eventually smooths out with use
Realistic expectations:
Won’t look as smooth as vintage iron (that’s the texture, not the seasoning)
Will feel smoother after months of cooking
Performance is excellent even if appearance isn’t perfect
Application technique:
Same process as vintage iron
Maybe slightly more oil to fill the texture (but still wipe until nearly dry)
Press paper towel into valleys during wiping
Modern Lodge seasoned with grapeseed oil works great. Just don’t expect it to look like polished vintage iron—it physically can’t.
Grapeseed Oil on Cast Iron Dutch Ovens and Specialty Pieces
Dutch ovens (interior):
Season the same as skillets
Interior seasoning matters most
Exterior can be seasoned for aesthetics and rust protection but doesn’t affect cooking
Dutch ovens (exterior):
If you use it in campfires or on open flame, exterior seasoning gets burned off regularly
Not worth elaborate seasoning on exterior if you camp with it
For oven-only use, exterior seasoning protects against rust and looks nice
Griddles:
Large flat surface area
Same technique, just more oil needed (still applied thin)
Takes longer to wipe thoroughly
Consider doing 5-6 coats for better initial coverage
Grill pans with ridges:
Raised ridges are annoying to season evenly
Use brush or cloth to work oil into valleys
Ridges might season faster than valleys (they get hotter)
Functional even if slightly uneven
Cornbread molds and specialty shapes:
Get oil into all crevices
May need cotton swab or small brush for detailed areas
Otherwise same process
Grapeseed works on all cast iron types. Adapt the technique to the geometry.
Pre-Seasoned Cast Iron: Adding Grapeseed Layers
Lodge and other manufacturers pre-season with soybean oil. It’s functional but not amazing.
Should you strip factory seasoning and start with grapeseed?
Usually no. Build on it instead.
Process for enhancing factory seasoning:
Wash pan with hot soapy water (removes manufacturing residue)
Dry thoroughly
Apply grapeseed oil and wipe until dry
Bake at 465°F for 1 hour
Cool completely
Repeat 2-3 more times
Results:
Noticeably smoother surface
Better non-stick properties
Darker, more even appearance
Improved performance without full strip and re-season
When to strip factory seasoning:
It’s patchy or damaged
It’s sticky or uneven
You’re a perfectionist and want complete control
For most people, building grapeseed on factory seasoning works great and saves hours.
Converting Existing Seasoning to Grapeseed Oil
Assessing Your Current Cast Iron Seasoning
Before you do anything, evaluate what you’ve got.
Good seasoning looks like:
Even black or dark brown color
Smooth, hard surface
No stickiness
Food releases well
No rust spots
Bad seasoning looks like:
Patchy with bare metal showing
Sticky or tacky in spots
Flaking or peeling
Rust breaking through
Food sticks constantly
If your seasoning is good: Don’t strip it. Just add grapeseed layers on top.
If your seasoning is bad: Strip and start fresh with grapeseed.
If you’re unsure: Try the egg test. Cook a fried egg with minimal oil. If it releases reasonably well, your seasoning is probably good enough to build on.
Stripping Methods for Complete Re-Seasoning
Only strip if necessary. It’s work.
Lye bath (best method):
Spray oven cleaner (Yellow Cap Easy-Off) all over pan
Place in heavy-duty trash bag
Seal bag and let sit 24-48 hours
Remove, scrub with steel wool
Rinse thoroughly
Neutralize with vinegar if desired
Dry completely
Electrolysis (effective but requires setup):
Requires: plastic container, washing soda, battery charger, sacrificial metal
Multiple guides online for setup
Good for heavily rusted pans
Overkill for just removing seasoning
Self-cleaning oven (risky):
Run pan through self-clean cycle
Seasoning burns off completely
Risk of cracking thin or vintage pans
Use only on thick modern cast iron if at all
Vinegar (for rust only):
Does NOT remove seasoning
Only removes rust
50/50 vinegar and water, soak 30 mins to 1 hour max
Neutralize and dry immediately
After stripping, proceed with grapeseed seasoning process from scratch.
Building Grapeseed Seasoning Over Existing Layers
This is easier than stripping.
Compatibility: Grapeseed bonds fine to canola, vegetable oil, Crisco, or factory soybean seasoning. Even bonds okay to flaxseed (though if flaxseed is flaking, better to strip).
Optional: Light scrub with steel wool to rough up surface slightly (helps bonding)
Apply grapeseed oil thin coat
Wipe until nearly dry
Bake at 465°F for 1 hour
Cool completely
Repeat 2-4 more times
Expected results:
Existing seasoning remains as foundation
Grapeseed adds smoother top layers
Performance improves
Appearance darkens and evens out
Advantages:
Saves time (no stripping needed)
Preserves existing base seasoning
Less risk of rust during process
I’ve built grapeseed on old canola seasoning multiple times. Works great.
Spot Repair vs. Complete Re-Seasoning
Spot repair is for:
Small bare spots
Localized rust
One area that sticks while rest is fine
Process:
Scrub problem area with steel wool to bare metal
Clean and dry
Apply grapeseed to just that spot
Wipe thin
Heat entire pan in oven (can’t heat just one spot)
Repeat as needed
Complete re-seasoning is for:
Widespread flaking
Seasoning coming off in sheets
Multiple problem areas
Starting with bare/stripped pan
Decision guide:
One bad spot? Spot repair.
Multiple bad spots? Probably better to strip and re-season.
Debating? Err toward keeping existing seasoning and building on it.
Common Myths About Seasoning Cast Iron with Grapeseed Oil
Myth: You Must Strip to Bare Metal Every Time
Wrong. So wrong.
You only need bare metal when:
Existing seasoning is failing (flaking, peeling)
You’ve got significant rust
Starting with a new, unseasoned pan
You’re a perfectionist who wants complete control
If your current seasoning works reasonably well, just build grapeseed on top. The new layers bond to the old layers. Works fine.
Where this myth comes from: Early cast iron forums were full of purists who insisted on stripping everything. Modern practice is more practical—if it works, keep it.
Myth: Grapeseed Oil is Too Expensive for Regular Use
At $10 per bottle, grapeseed seasons 3-5 pans. That’s $2-3 per pan.
Is $2 too expensive? For most people, no.
But wait, canola is only $0.40 per pan!
True. And if you’re on a tight budget or seasoning 20 pans, use canola. It works.
For most home cooks seasoning 1-3 pans, the $1.50 difference is meaningless. You’ll spend more on the electricity to run the oven.
Cost per use over time: Assuming 5 years of use, that’s $0.40 per year. Or 3 cents per month. Or a tenth of a cent per cooking session.
Too expensive? Nonsense.
Myth: High Smoke Point Means Inferior Seasoning
This is backwards.
Some people think: “Low smoke point oils polymerize better because they break down more easily.”
Nope. Smoke point and polymerization are different processes. Low smoke point just means the oil breaks down (smokes) at lower temperature during cooking. Doesn’t make it polymerize better for seasoning.
Grapeseed’s high smoke point (420°F+) means:
Less smoke during seasoning process
More stable at cooking temperatures after seasoning
Better performance when you’re searing or cooking hot
High smoke point is an advantage, not a disadvantage.
Myth: All Grapeseed Oil is the Same Quality
There are differences:
Refined vs. unrefined:
Refined: 420-485°F smoke point, ideal for seasoning
Unrefined: 320°F smoke point, wrong for this purpose
Fresh vs. old:
Fresh oil smells neutral or slightly nutty
Old oil smells off, might be rancid
Check dates if available
Brand differences:
Most are fine
Some cheaper brands cut grapeseed with other oils (check ingredients)
Price doesn’t necessarily indicate quality in the $8-12 range
What doesn’t matter:
Organic vs. conventional (for seasoning—might matter for eating)
Country of origin
Fancy packaging
Buy refined grapeseed oil from a reputable brand. That’s all you need.
Grapeseed Oil for Different Cooking Styles and Needs
High-Heat Cooking and Grapeseed Seasoning
If you sear steaks, blacken fish, or stir-fry regularly, grapeseed seasoning is perfect.
Temperature tolerance:
Seasoned at 465°F
Handles cooking temps up to 500-550°F
Won’t degrade like flaxseed does
Won’t need constant touch-ups like softer seasonings
High-heat cooking techniques that work:
Searing steaks (500-550°F)
Stir-frying (450-500°F)
Blackening spices (450-500°F)
Roasting at high temps in oven (450-500°F)
What to avoid even with grapeseed:
Open flame cooking that exceeds 600°F (seasoning will eventually burn off—this is metal getting too hot, not seasoning failure)
Thermal shock (hot pan into cold water—bad for the iron itself)
The flexibility of grapeseed seasoning prevents flaking under thermal stress. The high smoke point of the oil means the coating is stable at cooking temperatures.
Low-and-Slow Cooking Compatibility
Grapeseed seasoning handles gentle cooking just as well as aggressive cooking.
Perfect for:
Braising (300-325°F for hours)
Slow-roasting in cast iron Dutch oven
Low-temperature baking (cornbread at 375°F)
Gentle sautéing
Building seasoning through use:
Long, gentle cooking with fat actually builds micro-layers
Each braise or slow-roast adds to seasoning
Over months, low-and-slow cooking creates incredibly durable surface
Compared to high-heat:
High heat tests seasoning durability
Low heat builds seasoning gradually
Both are fine for grapeseed
Some people think you need to cook hot to maintain seasoning. Not true. Any fat-based cooking maintains and improves it.
Everyday Cooking: Eggs, Pancakes, and Daily Use
This is where grapeseed proves itself. Daily cooking, basic foods, real-world use.
Eggs:
Need some fat (butter or oil)
Preheat properly (5 minutes medium-low)
After 2-4 weeks of use, eggs slide around easily
Never quite Teflon-level but very good
Pancakes:
Work great on grapeseed seasoning
Little to no sticking if pan is properly heated
Release cleanly when ready to flip
Sautéing vegetables:
Excellent performance
Deglazing works fine (brief acidic contact is okay)
Builds seasoning with each use
Daily use improvements:
Week 1: Functional but needs technique
Month 1: Noticeably better non-stick
Month 3: Excellent performance
Month 6+: Peak performance, better than when new
The pan improves as you cook. This is unique to cast iron—teflon degrades, cast iron improves.
Outdoor and Camping Use with Grapeseed Seasoning
Campfire cooking is brutal on seasoning. Direct flame, temperature extremes, outdoor storage.
Grapeseed advantages for camping:
Flexible coating resists thermal shock better than brittle alternatives
High-heat tolerance handles direct flame
Durable enough for rough outdoor use
Reality check:
Any seasoning degrades faster in campfire use
Exterior seasoning burns off (you’re putting the pan IN fire)
Interior seasoning holds up better
Maintenance for camping pans:
Re-season before each trip (one oven coat)
Don’t worry about exterior seasoning (it’s toast anyway)
Focus on maintaining interior cooking surface
Clean well after trips, touch up as needed
Storage between trips:
Coat lightly with oil (protects against moisture)
Store in dry place
Check for rust before next use
I wouldn’t use my nice vintage Griswold for camping, but my Lodge camp skillet has grapeseed seasoning and handles campfire abuse reasonably well.
Health and Safety Considerations
Food Safety of Grapeseed Oil Seasoning
Grapeseed oil is food-safe. The polymerized coating is food-safe. No concerns here.
FDA approval: Grapeseed oil is generally recognized as safe (GRAS) for food contact.
Polymerized vs. raw oil: Once cured, the coating isn’t “oil” anymore—it’s a polymer. Different chemical structure. Essentially food-grade plastic bonded to iron.
Allergen considerations:
Grape allergies are rare
Polymerized grapeseed oil is even less likely to cause reaction
If you have severe grape allergy, use different oil to be safe
Otherwise, no worries
Compared to other seasoning oils:
As safe as canola, vegetable, Crisco
Safer than industrial linseed oil (which isn’t food-grade)
No lead, no toxins, no chemicals
Cook with confidence.
Smoke and Ventilation During Seasoning Process
Grapeseed oil at 465°F produces some smoke. Not terrible, but not zero.
What to expect:
Light vapor/smoke during heating phase
More visible smoke when oil first hits polymerization temperature
Settles to light haze for remainder of baking
Ventilation recommendations:
Open windows
Run range hood if oven is near it
Turn on ceiling fans
Don’t seal house completely
Smoke alarm concerns:
Might trigger if alarm is near kitchen
Disable or cover during process if necessary (remember to uncover after!)
Not usually enough smoke to be a problem but depends on sensitivity
Air quality:
Not hazardous
Some people sensitive to cooking oil vapors should ventilate well
Minimal compared to flaxseed (which smokes heavily at 500°F)
One oven cycle for one hour isn’t a big deal. Multiple coats in one day might get annoying without good ventilation.
Proper Storage of Grapeseed Oil
Room temperature storage is fine for grapeseed oil (unlike flaxseed which needs refrigeration).
Storage guidelines:
Keep in cool, dark place (pantry works)
Away from heat sources (stove, sunny window)
Tightly sealed
Dark glass bottle is best (light degrades oil)
Shelf life:
Unopened: 12-24 months
Opened: 6-12 months
Rancidity signs:
Smell: Paint-like, fishy, or “off”
Appearance: Cloudy or separated (though some separation can occur normally)
Taste: Bitter or unpleasant (don’t season with oil you wouldn’t eat)
Test before using: Smell the oil. If it smells normal, you’re good. If it smells weird, toss it.
Buying quantity:
For 1-3 pans: 16 oz bottle is plenty
For more pans or multiple rounds: 32 oz bottle
Don’t buy gallon jugs unless you’re seasoning 50 pans—it’ll go rancid before you use it
Professional Tips for Perfect Grapeseed Seasoning
Temperature Control Precision
Your oven’s dial is probably lying to you.
Get an oven thermometer. $10-15 investment that makes a huge difference.
How to use it:
Put thermometer in oven
Set oven to 465°F
Wait 20 minutes for stabilization
Check actual temperature
Adjust dial until thermometer reads 465°F
My oven set to 475°F actually runs at 465°F. Yours might be different.
Hot spots:
Most ovens heat unevenly
Use thermometer to map your oven (check multiple positions)
Rotate pans during baking if needed
Middle rack usually most consistent
Temperature fluctuations:
Ovens cycle on and off to maintain temp
Can swing ±25°F
This is normal
Doesn’t affect seasoning results significantly
Convection setting:
More even heating
Use it if you’ve got it
Might need slightly lower temperature (convection cooks hotter)
Precision matters less than you think, but knowing your oven’s real temperature helps.
Application Technique Mastery
Paper towel selection:
Lint-free shop towels work best
Regular paper towels work fine
Avoid cheap paper towels that shred
Wiping technique:
Apply oil with one paper towel (circular motions)
Switch to fresh paper towel
Wipe with firm pressure
Flip to clean section frequently
Keep wiping until pan looks dry
Final wipe with completely clean towel
For handles and exterior:
Same process
Easier to over-apply on vertical surfaces
Watch for drips
Gravity causes pooling—flip pan and check bottom
Developing feel:
First time, you’ll probably use too much oil
Second time, you’ll over-correct and use too little (maybe)
Third time, you’ll nail it
Practice improves consistency
Pro move: After wiping, buff the surface lightly with a clean, dry cloth. Removes any last traces of excess.
Timing Optimization for Busy Schedules
Seasoning takes time but doesn’t require constant attention.
Weekend approach:
Saturday morning: Coat 1 (apply, bake, cool)
Saturday afternoon: Coat 2
Saturday evening: Coat 3
Sunday morning: Coat 4
Done by Sunday afternoon with minimal active involvement
Overnight method:
Evening: Apply coat, bake, turn off oven
Leave in oven overnight to cool
Morning: Next coat
Repeat 3-4 days
Batch processing multiple pans:
Season 2-3 pans simultaneously
Same oven, same timing
Efficient use of energy and time
Space permitting (don’t overcrowd oven)
Active time vs. total time:
Active: 10-15 minutes per coat
Total: 3-4 hours per coat with baking and cooling
Most of it is hands-off waiting
Plan around it. You can do other things while the oven runs.
Recognizing Perfectly Cured Grapeseed Seasoning
Visual indicators:
Uniform dark brown to black color
Semi-matte finish (slight sheen okay, not glossy)
No light brown spots (indicates incomplete polymerization)
Even coverage across all surfaces
Touch test:
Smooth and hard (like plastic, not like metal)
Completely dry (no tackiness anywhere)
Slight texture on rough-surface iron is normal
Smell test:
No smell, or faint cooked-oil smell
Should NOT smell like fresh oil
Should NOT smell rancid or burnt
Sound test (weird but works):
Tap the cooking surface with fingernail
Should sound slightly different than bare metal—harder, less resonant
This is subtle and takes experience to notice
The ultimate test:
Cook an egg with a little fat
If it releases reasonably well, you’re good
Doesn’t need to be perfect—will improve with use
If all indicators check out, you’re done. Use the pan and let cooking finish the seasoning process.