Table of Contents
- 1 What You Need to Know About Salt and Oil Scrubbing for Cast Iron
- 2 How to Clean Your Cast Iron Skillet with a Salt and Oil Scrub
- 3 How to Season Your Cast Iron Skillet with Oil
- 4 Combining Salt Scrubbing and Seasoning in Your Cast Iron Care Routine
- 5 Common Mistakes When Using Salt and Oil on Cast Iron
- 6 Troubleshooting Cast Iron Skillet Problems
- 7 Alternative Cleaning Methods for Cast Iron Skillets
- 8 Daily Care Tips to Minimize Deep Cleaning Needs
- 9 Special Considerations for Different Cast Iron Cookware
What You Need to Know About Salt and Oil Scrubbing for Cast Iron
You can clean and season your cast iron skillet using just coarse salt and oil—no soap, no special cleaners, nothing fancy.
Here’s the thing: salt acts as a gentle abrasive that scrubs away food particles without damaging your skillet’s seasoning, while oil conditions the surface and prevents rust. Together? They’re sneaky good at keeping cast iron in top shape.
But (and this matters) cleaning and seasoning aren’t the same process. You’ll use salt and oil differently depending on what you’re trying to accomplish.
Why Salt and Oil Work Together for Cast Iron Maintenance
Salt crystals are coarse enough to break down stuck-on food but won’t scratch the polymerized oil layer that makes cast iron non-stick. Think of it like using sandpaper—except way gentler.
The oil does three things:
- Helps salt glide across the surface without gouging
- Lifts away grease and food residue
- Leaves behind a protective coating
Physics at work here. Oil bonds to both the food particles and the iron surface, making everything slide off easier. Salt provides the mechanical action. Simple.
Most dish soaps strip away protective oils (yeah, even the “mild” ones). Salt and oil don’t. They clean while preserving what you’ve built up over months or years of cooking.
The Difference Between Cleaning and Seasoning Your Cast Iron Skillet
Cleaning removes food and gunk from your skillet after cooking. You’re maintaining what’s already there.
Seasoning builds up that slick, non-stick surface by baking thin layers of oil into the iron. You’re creating something new—or restoring what’s been damaged.
Different goals. Different techniques.
When you clean with salt and oil, you’re using just enough oil to scrub—maybe a tablespoon. The skillet doesn’t get heated beyond stovetop temps. Quick process.

Seasoning requires coating the entire skillet (inside and out) with oil, then heating it in a 450-500°F oven for an hour. The high heat transforms the oil into a hard, protective layer through polymerization. Not quick.
You’ll clean after every use. You’ll season maybe 2-3 times a year (unless you’ve stripped the pan or bought it new).
When to Use a Salt and Oil Scrub on Your Cast Iron
Use it after cooking when:
- Food’s stuck to the bottom
- There’s a greasy film that won’t wipe away
- You’ve got burnt bits that need removing
- Regular wiping with a towel isn’t cutting it
Don’t use it when:
- The skillet just needs a quick wipe (overkill)
- You’re dealing with serious rust (you need restoration, not cleaning)
- The pan’s already clean and you just want to add seasoning (wrong method)
Daily light cooking? Often you can just wipe out the pan with a paper towel while it’s warm. Save the salt scrub for the messier situations.
If you’ve made something sticky (hello, teriyaki chicken) or crusty (frittatas, I’m looking at you), that’s salt scrub territory.
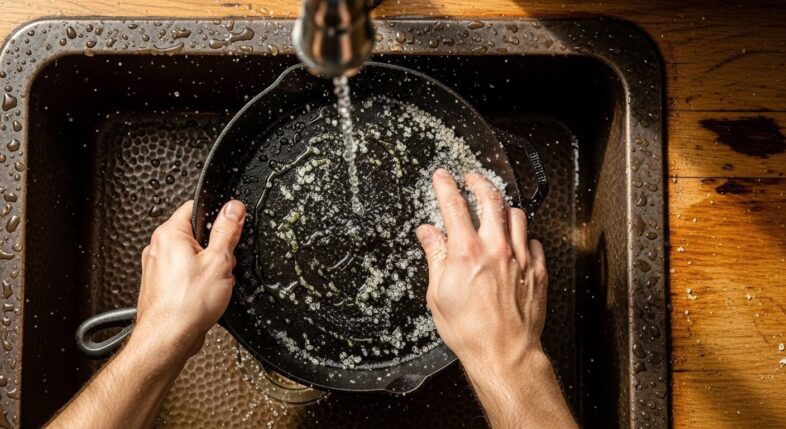
How to Clean Your Cast Iron Skillet with a Salt and Oil Scrub
To clean your cast iron skillet with salt and oil, sprinkle coarse salt on the warm surface, add a small amount of oil, scrub with a cloth or paper towel in circular motions, then rinse and dry completely.
Takes maybe 3 minutes. Maybe 5 if things got really messy.
What You’ll Need for Cast Iron Cleaning
Get this stuff ready before you start:
Must-haves:
- Coarse salt (kosher or sea salt)
- Cooking oil (vegetable, canola, or grapeseed work great)
- Paper towels or a clean rag
- Hot water (for rinsing)

Optional but helpful:
- Chain mail scrubber (for stubborn spots)
- Stiff brush with natural bristles
- Extra towels for drying
That’s it. You probably have everything already.
Essential Materials
Coarse salt — You want crystals big enough to provide scrubbing action. Regular table salt’s too fine. Won’t do much.
Oil — Any neutral cooking oil works. Don’t overthink it. Whatever you cook with is fine (except olive oil if you’re planning to season afterward—more on that later).
Something to scrub with — Paper towels are easiest. Old kitchen rags work. Your hand wrapped in a towel? Sure. Some people use half a potato as a scrubber (weird but effective).
Heat source — You’ll want the skillet warm but not screaming hot. Stovetop works. Or clean it right after cooking while it’s still got residual heat.
Choosing the Right Salt for Your Scrub
Best options:
- Kosher salt — Perfect crystal size, cheap, what most people use
- Coarse sea salt — Works great, bit more expensive
- Rock salt — Also good if you’ve got it
Don’t use:
- Table salt (too fine, basically useless)
- Fancy finishing salts (waste of money)
- Salt with additives (iodized salt can leave residue)
Morton’s kosher salt? Diamond Crystal? Either one. Doesn’t matter. Just needs to be coarse enough to grab onto food particles.
You’ll use about 2-4 tablespoons per cleaning session, depending on pan size and how dirty it is.
Best Oils for Cleaning Cast Iron

For cleaning (not seasoning—different requirements), use whatever’s convenient:
| Oil Type | Why It Works | Notes |
|---|---|---|
| Vegetable oil | Cheap, effective, neutral | Go-to option |
| Canola oil | Inexpensive, widely available | Works perfectly fine |
| Grapeseed oil | Higher smoke point | Bit pricier but great |
| Coconut oil | Solid at room temp, melts easily | Some people swear by it |
You need maybe a tablespoon. Not much.
Avoid flavored oils (sesame, walnut, fancy infused stuff) unless you want your next meal tasting like the last cleaning session. Which you don’t.
Step-by-Step Cast Iron Cleaning Process
Here’s how it actually goes down.
Step 1: Clean While the Skillet Is Still Warm
Don’t let the pan cool completely. Warm iron is easier to clean—food hasn’t had time to really bond.
But also? Don’t burn yourself. If it’s too hot to touch the handle, wait 2-3 minutes. You want warm, not blistering.
Never put a screaming-hot cast iron skillet under cold water. Thermal shock can crack it. Seriously. I’ve seen it happen.
Let it cool to “comfortably warm.” You should be able to touch the cooking surface briefly without yanking your hand back.
Step 2: Apply Coarse Salt to the Cooking Surface
Dump 2-4 tablespoons of coarse salt right onto the cooking surface. More if it’s a 12-inch skillet, less for an 8-inch.
Spread it around a bit with your fingers (if the pan’s cool enough) or tilt the skillet to distribute the salt evenly.

You want decent coverage across the entire bottom where food was cooked. Don’t be stingy. Salt’s cheap.
Step 3: Add Oil to Create Your Scrubbing Paste
Pour about 1 tablespoon of oil over the salt. Maybe a bit more if you’re working with a large pan or serious stuck-on mess.
The oil and salt should combine into a slightly pasty mixture—not soup, not dry sand. Somewhere in between.
Too much oil? The salt just slides around uselessly. Too little? Feels like you’re scratching the surface with dry salt (you’re not, but it’s not comfortable).
Step 4: Scrub the Cast Iron Surface
Take your paper towel, rag, or scrubber and work the salt-oil mixture across the cooking surface using firm, circular motions.
Apply real pressure. You’re not going to hurt the seasoning—it’s tougher than you think.
Focus on:
- Stuck-on food spots
- Discolored areas
- The center of the pan (where things usually stick most)
- Corners where the sides meet the bottom
Scrub for 30-60 seconds. Maybe 2 minutes if things are really stuck. You’ll feel the salt breaking down the residue.
The mixture will turn brown or black—that’s food particles lifting away. Good sign.
Step 5: Remove the Salt and Oil Mixture
Dump out the dirty salt-oil slurry. Just tip it into the trash or compost.
Some people wipe it out with paper towels first, then dump what’s left. Either way works.
Check the cooking surface. Still see stuck bits? Add fresh salt and oil, scrub again. Most times, one round does it.
Step 6: Rinse and Dry Thoroughly
Rinse the skillet under hot water. Yes, water is fine. (The “never use water on cast iron” thing is mostly myth—just don’t soak it.)
Use your hand or a soft cloth to wipe away any remaining salt or oil residue.
Then—and this is critical—dry it completely.
Towel dry first. Then stick it on the stovetop over medium-low heat for 2-3 minutes to evaporate any water you missed. You’ll see steam come off, then stop.
Water is cast iron’s enemy. Gets into the porous surface and causes rust. So yeah. Dry it thoroughly. Every time.
Once it’s bone dry, rub a super thin layer of oil across the cooking surface (just a few drops on a paper towel). This maintains the seasoning between cooks.
Dealing with Stubborn Stuck-On Food
Sometimes salt and oil aren’t enough. Happens.
How to Remove Burnt Residue from Cast Iron
For really stuck food:
Add about ¼ cup of coarse salt and 2 tablespoons of oil. Use a chain mail scrubber instead of a towel—they provide way more abrasive action without damaging seasoning.
Scrub hard. Like, really put your shoulder into it.
Still stuck? Try this: add about ½ inch of water to the pan, put it on the stove, bring it to a simmer for 5-10 minutes. The steam helps loosen burnt-on crud. Pour out the water (carefully—it’s hot), then hit it with the salt and oil scrub.
Works on even the nastiest messes.
What if it’s carbon buildup? (That black, crusty stuff that accumulates over years of cooking.) Salt and oil won’t touch it. You’ll need to strip and re-season the whole pan. Different process entirely.
Treating Rust Spots During Cleaning
Spot a little rust? Small spots can be scrubbed away with salt and oil plus some extra elbow grease.
Wet the rust spot slightly, add salt directly to it, scrub with a rough cloth or scrubber. The salt acts as an abrasive that removes surface rust.
After removing the rust, dry the pan completely and apply a thin coat of oil immediately. You’ve just removed some seasoning along with that rust, so you’ll want to re-season that spot (or the whole pan) soon.
Heavy rust? Salt scrubbing won’t fix it. You need steel wool, vinegar soaks, and a full restoration. Beyond the scope of a simple cleaning session.
How to Season Your Cast Iron Skillet with Oil
To season your cast iron skillet, coat the entire pan (inside, outside, handle) with a thin layer of high smoke point oil, wipe away all excess until it looks almost dry, then bake it upside down in a 450-500°F oven for one hour.
This isn’t cleaning. This is building up that legendary non-stick surface everyone talks about.
Understanding the Science of Cast Iron Seasoning
Seasoning is polymerized oil. Sounds fancy. It’s not that complicated.
What Happens During the Seasoning Process
When you heat oil past its smoke point in the presence of iron, the fat molecules break down and reorganize into a hard, slick, plastic-like coating that bonds to the metal surface.
This is called polymerization. Same process that makes paint harden.
Each layer you bake on adds to the coating, making it thicker, darker, and more non-stick. Multiple thin layers beat one thick layer (which just gets sticky and gross).
The oven provides even, sustained heat that allows the oil to fully polymerize. Stovetop heating doesn’t work as well—too inconsistent.
Why Proper Seasoning Prevents Rust and Sticking
That polymerized layer creates a barrier between iron and moisture. No moisture contact? No rust.
It also fills in the porous, slightly rough surface of bare iron, creating a smooth, slick cooking surface. Food slides right off instead of grabbing onto microscopic pits in the metal.
Good seasoning = non-stick performance + rust protection. Two birds, one stone.
But (here’s what people mess up) you can’t just slap oil on and call it seasoned. You need heat. Lots of it. For a sustained period.
Choosing the Best Oil for Seasoning Cast Iron
Not all oils polymerize equally. Some create hard, durable finishes. Others stay sticky or don’t bond well.
High Smoke Point Oils for Seasoning
Best choices:
| Oil | Smoke Point | Why It Works Well |
|---|---|---|
| Grapeseed oil | 420°F | Polymerizes beautifully, hard finish |
| Canola oil | 400°F | Cheap, effective, widely available |
| Vegetable oil | 400-450°F | Works fine, what most people use |
| Crisco/shortening | 490°F | Old-school favorite, very durable |
You want oils with high smoke points (400°F+) and high levels of polyunsaturated fats. Those polymerize best.
Solid option: Grapeseed creates one of the hardest, most durable finishes. But it costs more. Canola works nearly as well for a fraction of the price.
Oils to Avoid When Seasoning Your Skillet
Don’t use:
- Flaxseed oil — Creates a beautiful finish initially, but it flakes off. Super frustrating.
- Olive oil — Too low a smoke point, can get sticky
- Butter — Milk solids cause problems, low smoke point
- Coconut oil — Mostly saturated fat, doesn’t polymerize well
Flaxseed deserves special mention. It got popular a few years back because it polymerizes into this gorgeous, glassy black finish. But it’s brittle. Chips and flakes with normal use. Just skip it.
Complete Seasoning Process for Cast Iron Skillets
Alright. Here’s how you actually do it.
Step 1: Start with a Clean, Dry Skillet
Your pan needs to be completely clean and dry before seasoning. Any food residue or moisture will interfere with the oil bonding properly.
If you just cleaned it with salt and oil, you’re probably good. If it’s been sitting around, give it a quick wash with hot water and dry it thoroughly on the stovetop.
Preheat your oven to 450-500°F. (Some people go as low as 400°F, but higher temps polymerize better.)
Step 2: Apply a Thin Layer of Seasoning Oil
Pour about a teaspoon of oil onto the cooking surface. Maybe a bit more for a big skillet.
Use a paper towel to spread the oil over the ENTIRE pan:
- Inside cooking surface
- Exterior bottom
- Sides (inside and out)
- Handle
Every inch of exposed iron should have oil on it.
Step 3: Wipe Away Excess Oil
This is where people mess up.
Take a fresh paper towel and wipe the pan down like you’re trying to remove ALL the oil. Seriously. Buff it hard. The pan should look almost dry when you’re done—barely a sheen.
Too much oil creates a sticky, gummy finish that never fully hardens. You want the thinnest possible layer. If you can see oil pooling anywhere, wipe more.
When in doubt, wipe more. You can’t wipe too much.
Step 4: Heat the Skillet in the Oven
Place the skillet upside down on the middle oven rack. (Upside down prevents oil from pooling in the bottom.)
Put aluminum foil or a baking sheet on the rack below to catch any drips. There shouldn’t be drips if you wiped properly, but just in case.
Bake for one hour at your chosen temp (450-500°F).
The pan will smoke a bit during the first 10-15 minutes. Normal. That’s the oil polymerizing. Open a window, turn on your vent fan.
After an hour, turn off the oven but leave the pan inside to cool completely. Takes 1-2 hours.
Step 5: Cool and Repeat for Best Results
Once cool, the pan should have a noticeably darker, slightly glossy appearance.
One layer isn’t enough for a new or stripped pan. You’ll want 3-5 layers minimum for good performance.
Repeat the process: apply thin layer of oil, wipe almost dry, bake for an hour, cool completely. Do this 3-5 times.
Yeah, it takes time. But you’re building up a finish that’ll last years.
After 3-5 rounds, your pan should have a dark, semi-gloss finish that feels smooth to the touch.
How Many Seasoning Layers Your Cast Iron Needs
New or stripped pans: 4-6 layers before first use. Gives you a solid foundation.
Maintenance seasoning: 1-2 layers every few months, or whenever the finish looks dull or food starts sticking.
Damaged spots: 2-3 layers focused on the affected area.
More layers = darker color, better non-stick performance. But there are diminishing returns. After 10-12 layers, additional coats don’t add much.
Most well-used pans have 20+ layers built up over years. But that happens gradually through cooking and occasional re-seasoning—you don’t need to do 20 rounds in your oven.
Seasoning New vs. Restored Cast Iron Skillets
New pans usually come pre-seasoned from the factory. That coating is mediocre at best. Thin, spotty, not very durable.
Add 3-4 layers of your own seasoning before using it. The factory seasoning provides a base, but you’ll want to build on it.
Restored pans (ones you’ve stripped to bare metal) need more work. The iron’s porous and thirsty. Start with 5-6 layers minimum.
Some people notice the first layer on bare iron doesn’t look great—splotchy, uneven color. Don’t worry. Subsequent layers even it out.
Vintage cast iron (Wagner, Griswold, old Lodge) has smoother surfaces than modern cast iron. Takes seasoning better, becomes non-stick faster. But the process is the same.
Combining Salt Scrubbing and Seasoning in Your Cast Iron Care Routine
You’ll clean way more often than you season. That’s normal.
When to Clean and Re-Season Your Skillet
Clean with salt and oil:
- After every use that leaves stuck-on food
- Weekly if you use the pan daily
- Whenever the pan looks dirty or greasy
Re-season in the oven:
- Every 3-6 months with regular use
- Immediately if you see rust spots
- When food starts sticking more than usual
- After cleaning with soap (if you had to go nuclear on a mess)
- When the finish looks dull, gray, or patchy
You’ll develop a feel for when your pan needs seasoning. The cooking surface loses its sheen, eggs stick where they used to slide, things just don’t feel right.
Maintaining Seasoning Between Deep Cleans
After each cooking session and cleaning, wipe a thin layer of oil across the cooking surface while the pan’s still warm.
Just a few drops on a paper towel. Rub it in, buff it out. Takes 10 seconds.
This “stovetop seasoning” adds micro-layers over time. Not as effective as oven seasoning, but it helps maintain what’s there.
Some people heat the oiled pan on the stovetop for 1-2 minutes after wiping to help the oil polymerize a bit. Works, but not necessary unless you’ve got time.
Cook fatty foods (bacon, sausage, fried chicken) regularly. The fats contribute to seasoning naturally. Win-win.
Quick Salt and Oil Maintenance After Cooking
For light messes that need more than a wipe but less than a full scrub:
Sprinkle a tablespoon of salt while the pan’s still warm, add a teaspoon of oil, quick 15-second scrub, dump it out, rinse with hot water, dry on the stove.
Done.
This becomes second nature after a few weeks. Faster than loading a pan in the dishwasher (which, for the record, you should NEVER do with cast iron).
Common Mistakes When Using Salt and Oil on Cast Iron
People mess this up in predictable ways.
Using Too Much Water During the Cleaning Process
Water’s fine for rinsing. It’s not fine for soaking.
Never leave cast iron sitting in water. Never put it in the sink “to soak for a bit” while you eat dinner. That’s how you get rust.
A quick rinse under hot water? Sure. Extended water exposure? No.
And if you do use water, dry the pan immediately and thoroughly. On the stove until all moisture evaporates.
Choosing the Wrong Type of Salt for Scrubbing
Table salt doesn’t work. The crystals are too small. You’re basically just rubbing oil around.
Need something coarse enough to provide actual scrubbing action. Kosher salt, sea salt, rock salt.
Also? Don’t use salt that’s been sitting in a humid environment and clumped together. Get fresh, free-flowing crystals.
Not Drying Your Cast Iron Completely
This is probably the #1 reason people end up with rust.
You think you dried it with a towel. You didn’t. There’s still moisture in the pores of the iron.
Always—always—put the pan on the stovetop over low heat for 2-3 minutes after towel drying. You’ll see tiny wisps of steam. When the steam stops, it’s actually dry.
Then apply your maintenance oil layer.
Skip this step and you’ll wake up to rust spots. Guaranteed.
Over-Scrubbing and Removing Too Much Seasoning
Can you scrub too hard? Yes. But it’s hard to do with just salt and oil.
Chain mail scrubbers can remove seasoning if you’re overly aggressive on the same spot repeatedly. So can stiff-bristled brushes if you really go at it.
If you notice the surface looking lighter or copperish (the color of bare iron), you’ve scrubbed through the seasoning.
Fix it by re-seasoning that area with 1-2 coats.
Applying Too Much Oil During Seasoning
Thick, gummy, sticky coating that never fully dries? That’s from too much oil.
The fix: wipe the pan down with fresh paper towels to remove excess, then stick it back in the oven for another hour. Sometimes that hardens up a sticky layer.
If it’s really bad, you might need to scrub it off and start over.
Remember: thin layers. If you can see oil shining on the surface before it goes in the oven, you used too much.
Skipping the Heating Step After Cleaning
After a salt and oil cleaning and rinse, some people just towel dry and put the pan away.
Bad move. Even if it seems dry, there’s moisture lurking.
Heat the pan on the stove for a few minutes. Evaporate everything. Then—and only then—store it.
Takes 3 minutes. Prevents days of frustration dealing with rust.
Troubleshooting Cast Iron Skillet Problems
Things go wrong. Here’s how to fix them.
My Skillet Feels Sticky After Seasoning
You used too much oil. The layer’s too thick and hasn’t fully polymerized.
Fix: Wipe the pan down with a clean cloth to remove any tacky residue, then put it back in a 450°F oven for another hour. Often, additional heating will harden it up.
If it’s still sticky after that, you’ll need to scrub it off with salt and oil, dry completely, and re-season with thinner layers.
Prevention: wipe until the pan looks almost dry before heating.
Food Keeps Sticking to My Cast Iron Surface
Either your seasoning’s too thin, damaged, or you’re not preheating the pan properly.
Seasoning fix: Add 2-3 layers of oven seasoning. That usually solves it.
Cooking technique fix: Preheat the pan for 5 minutes before adding food. Cast iron takes longer to heat than other materials. A properly preheated, well-seasoned pan is naturally non-stick.
Also? Use enough fat when cooking. Even seasoned cast iron needs some oil or butter.
My Skillet Developed Rust Spots
Moisture got to the iron. Happens when you don’t dry thoroughly or store the pan in a humid environment.
Small spots: Scrub with salt and oil, then re-season the area with 1-2 coats.
Larger areas: Use steel wool to remove all rust, wash with soapy water (yes, soap is fine for this), dry completely, then re-season the entire pan with 3-4 coats.
Prevent it by drying thoroughly after every wash and storing in a dry place. Some people stick a paper towel in the pan when storing to absorb any ambient moisture.
The Seasoning Is Flaking or Peeling Off
Usually means the seasoning didn’t bond properly to the iron—either too thick, or built up on top of something (food residue, old gummy coating) instead of clean metal.
Sometimes flaxseed oil seasoning does this. It looks great initially but becomes brittle.
Fix: Scrub off the flaking areas with salt and oil or steel wool if needed. Get down to a stable layer or bare iron. Re-season those spots with 2-3 thin coats of a different oil (grapeseed or canola).
If it’s flaking everywhere, you might need to strip and re-season the whole pan.
My Cast Iron Has an Uneven Finish
Splotchy areas? Some spots darker than others? Totally normal, especially on newer pans or recently re-seasoned ones.
Keep cooking with it. The finish evens out over time as you build up more layers naturally.
If the uneven spots bother you aesthetically, do 2-3 more rounds of oven seasoning. That usually creates a more uniform appearance.
Function matters more than looks. If the pan cooks well, don’t stress about color variations.
Alternative Cleaning Methods for Cast Iron Skillets
Salt and oil isn’t the only option. Just one of the best.
When to Use Just Salt Without Oil
Dry salt scrubbing works for removing stuck-on food when you don’t have oil handy or when the pan’s not particularly greasy.
Sprinkle coarse salt on the warm pan, scrub with a dry cloth or scrubber, dump out the dirty salt, rinse with hot water, dry thoroughly.
It’s more abrasive than salt plus oil (since there’s no lubrication). Use it when you need extra scrubbing power on stubborn spots.
After dry salt scrubbing, always apply a light coat of oil to the surface before storing.
Using Chain Mail Scrubbers for Cast Iron
Chain mail scrubbers (those mesh things that look like medieval armor) work great on cast iron.
They provide serious scrubbing power without scratching through seasoning the way steel wool would. Use them with salt and oil for stuck-on messes.
Work in circular motions, applying firm pressure. They’ll remove food without damaging your finish (assuming you’re not scrubbing the same spot for 10 minutes straight).
Rinse the scrubber after use and let it dry to prevent rust on the scrubber itself.
The Boiling Water Method for Stubborn Residue
For seriously stuck food, add about ½ inch of water to the pan and bring it to a boil on the stovetop. Let it simmer for 5-10 minutes.
The boiling water loosens everything. Pour it out (carefully), then scrub with salt and oil. Stuck-on bits usually come right off at this point.
Downside: you’re adding moisture to the pan, so you absolutely must dry it thoroughly afterward. Heat it on the stove until bone dry, then apply oil.
How These Methods Compare to Salt and Oil Scrubbing
Salt and oil: Best for routine cleaning, conditions while cleaning, gentle on seasoning.
Dry salt: More abrasive, good for stuck food, doesn’t condition the surface.
Chain mail scrubbers: Excellent for tough messes, more aggressive than cloth scrubbing.
Boiling water: Nuclear option for seriously stuck food, requires extra drying care.
Most of the time, salt and oil handles everything. Save the other methods for specific situations.
Daily Care Tips to Minimize Deep Cleaning Needs
Prevention beats cure.
Proper Cooking Techniques That Protect Your Seasoning
Preheat properly. Heat the pan for 3-5 minutes before adding food. A hot pan prevents sticking.
Use enough fat. Even well-seasoned cast iron needs some oil or butter when cooking.
Don’t crank the heat. Cast iron retains heat like crazy. Medium or medium-low is enough for most cooking. High heat can damage seasoning and make food stick.
Let food release naturally. If something’s sticking, leave it alone for another minute. It’ll usually release on its own once a crust forms.
How to Clean Your Cast Iron After Each Use
For light use (eggs, sautéed vegetables, nothing burnt):
Wipe out the warm pan with paper towels while it’s still warm. That’s it. No salt, no oil, no water needed.
For moderate messes:
Quick salt and oil scrub, rinse with hot water, dry on stove, apply thin oil layer.
For disasters:
Full salt and oil scrub, possibly the boiling water method, thorough cleaning, complete drying, oil coating.
Match the cleaning intensity to the mess level. Don’t over-clean.
Storage Tips to Prevent Rust and Damage
Dry completely before storing. (Worth repeating again.)
Store with a paper towel inside. Absorbs any ambient moisture.
Don’t stack pans directly on seasoned surfaces. If you must stack, put a paper towel or cloth between them to prevent scratching.
Avoid humid storage areas. Not under the sink. Not in a damp basement. Keep it somewhere with good air circulation.
Some people hang their cast iron. Works great—lots of air exposure, no stacking issues.
Building Seasoning Through Regular Cooking
Every time you cook with fat (oil, butter, lard, bacon grease), you’re adding micro-layers to your seasoning.
Frying is especially good for building seasoning. Deep-frying, pan-frying, even shallow frying in oil contributes.
Acidic foods (tomato sauce, vinegar-based dishes) can break down seasoning. Cook those occasionally but not exclusively, and re-season if you notice the finish degrading.
The most well-seasoned pans are the ones that get used regularly. Cooking = seasoning. Sitting unused in a cabinet? Not helping.
Special Considerations for Different Cast Iron Cookware
Not all cast iron is identical.
Seasoning and Cleaning Cast Iron Griddles
Flat griddles have more surface area but the same cleaning principles apply.
Salt and oil scrubbing works perfectly. You might need more salt and oil to cover the larger surface, but the technique’s identical.
Griddles are great for building seasoning quickly because you’re constantly cooking fatty foods (bacon, pancakes with butter, grilled cheese).
Clean while warm, dry thoroughly, apply maintenance oil. Same routine.
Maintaining Enameled Cast Iron with Salt and Oil
Wait. Don’t use salt and oil on enameled cast iron.
Enameled pieces (Le Creuset, Staub, etc.) have a glass coating. They don’t need seasoning and shouldn’t be scrubbed with abrasive salt.
Wash them with soap and water like regular cookware. The enamel prevents rust and provides a non-stick surface without seasoning.
This whole guide applies to bare cast iron only. Different material, different care.
Caring for Vintage and Antique Cast Iron Skillets
Older cast iron (pre-1960s Wagner, Griswold, unmarked vintage pieces) has smoother surfaces than modern Lodge.
They were machined and polished. Modern cast iron is left with the rough, sandy texture from the casting process.
Smooth vintage iron takes and holds seasoning better. Becomes glassier, more non-stick.
But the cleaning and seasoning process is identical. Salt and oil scrub, oven seasoning with thin layers. Same rules.
Vintage iron is thinner and lighter, so it heats faster but also cools faster. Adjust your cooking accordingly.
Dutch Ovens and Other Cast Iron Pieces
Dutch ovens, cornbread pans, waffle irons—all bare cast iron gets the same treatment.
Season them with thin oil layers baked at high heat. Clean them with salt and oil when needed. Dry them thoroughly always.
Dutch oven lids need seasoning too (both sides). Don’t forget the lid.
Deep pots hold water when rinsing, so be extra careful about drying. Tip them upside down on the stove to let heat reach all surfaces.
Some specialized pieces (waffle irons, Aebleskiver pans) have tight corners that are hard to scrub. Use a small brush or cloth-wrapped chopstick with salt and oil to get into crevices.
But fundamentally? Cast iron is cast iron. The shape might differ, but the care requirements don’t change much.