Table of Contents
- 1 How to Season Cast Iron on a Gas Grill: The Complete Method
- 2 What You Need to Season a Cast Iron Skillet on Your Gas Grill
- 3 Preparing Your Cast Iron Skillet Before Gas Grill Seasoning
- 4 Step-by-Step: Using Your Gas Grill to Season Cast Iron
- 5 Managing Gas Grill Temperature for Perfect Seasoning
- 6 Common Problems When Seasoning Cast Iron on Gas Grills
- 7 Gas Grill-Specific Challenges and Solutions
- 8 Maintaining Your Gas Grill-Seasoned Cast Iron
- 9 Gas Grill vs. Other Seasoning Methods Compared
- 10 Advanced Gas Grill Seasoning Techniques
- 11 Safety Tips for Gas Grill Cast Iron Seasoning
How to Season Cast Iron on a Gas Grill: The Complete Method
You can season a cast iron skillet on your gas grill by heating it to 400-500°F with a thin layer of high smoke point oil for about an hour, and it’s actually easier than using your kitchen oven because the heat stays outside and you won’t smoke up your house.
Here’s the deal.
Gas grills give you controlled, consistent heat without turning your kitchen into a smoke alarm testing facility. You’re doing the exact same seasoning process—baking oil into the iron’s pores to create that protective, non-stick coating—but outdoors where ventilation isn’t a problem.
The method works. Really well, actually. Your gas grill can hit and hold the temperatures needed for proper polymerization (that’s when oil transforms into a hard, bonded coating). And unlike charcoal grills with their unpredictable temperature swings, gas gives you dial-in control.
But there’s a catch. Gas grills have quirks you need to work around.
Why Your Gas Grill Works for Seasoning Cast Iron
Temperature control is the main advantage. Turn the knob, set your temp, and the grill maintains it. Most modern gas grills with decent burners hold within 15-25 degrees of your target temperature. Not perfect, but good enough for seasoning cast iron.
No kitchen mess. All that smoke and smell? Stays outside. Your smoke detector stays silent. Your kitchen doesn’t reek of heated oil for two days. Win-win.
Space for multiple pieces. Got a three-burner grill? You can season three skillets at once (one per zone). That’s efficiency.
Consistent heat from below. Unlike stovetop seasoning where one side gets way hotter than the other, gas grill burners provide relatively even heat distribution across the cooking surface.
And here’s something people don’t think about—you can walk away. Set it and check your phone. Grab a beer. Do literally anything else for an hour while your cast iron seasons itself.
The Science Behind Using Gas Grills for Cast Iron Seasoning

Polymerization needs heat. Specific heat. Generally 400-500°F depending on which oil you’re using.
At these temperatures, the fat molecules in your oil break apart and recombine into long polymer chains that bond to the iron’s surface. These polymers fill the microscopic pores and create a smooth, hard, protective layer. That’s your seasoning.
Gas grills produce heat through combustion—propane or natural gas burns, heating metal plates or bars that radiate warmth upward. The lid traps this heat, creating an oven-like environment. Convection happens naturally as hot air circulates inside the closed grill.
The key? Maintaining temperature long enough for complete polymerization. Too short and you get sticky, incomplete seasoning. Too long at too high a temp and you burn the oil to carbon instead of creating seasoned coating.
Gas grills can do this. They just need babysitting because of hot spots.
Gas Grill vs. Kitchen Oven: Which is Better for Seasoning?
Honestly? Ovens are more consistent. They’re designed for precise temperature control and even heat distribution. If you’ve got a reliable oven, it’s probably technically superior for seasoning.
But gas grills win on practicality:
- Zero kitchen smoke (huge advantage)
- No lingering smell in your house
- Season multiple pieces if you’ve got grill space
- Summer heat stays outside (matters in July)
Ovens win on:
- Better temperature accuracy (usually within 5-10 degrees)
- More even heat throughout the cavity
- Weather doesn’t matter (try seasoning on a windy day)
- Set it and truly forget it
What I actually do? Gas grill in summer. Oven in winter. Use what makes sense for the season and your situation.
What You Need to Season a Cast Iron Skillet on Your Gas Grill
Don’t overthink the gear. You need basics.
Required Tools and Materials

Here’s your shopping list:
- Cast iron skillet (duh)
- High smoke point oil – 1-2 tablespoons per layer
- Paper towels or clean rags – you’ll go through several
- Heat-resistant grill gloves – because grabbing hot cast iron barehanded is a bad life choice
- Grill thermometer (optional but recommended) – your built-in temp gauge probably lies
- Aluminum foil – for catching drips and protecting burners
- Dish soap and scrub brush (first-time cleaning only)
- Propane or natural gas – enough for 2-3 hours of grilling
That’s it. Simple.
Best Oils for Gas Grill Cast Iron Seasoning
Oil choice matters more than you think. Wrong oil gives you gummy, sticky results. Right oil creates glass-smooth seasoning.
High Smoke Point Oils That Work Best
You want oils that can handle sustained heat at 400-500°F without breaking down prematurely.
Grapeseed oil – My go-to. Smoke point around 420°F. Affordable. Available everywhere. Creates durable, smooth seasoning that just works.
Avocado oil – Smoke point hits 520°F. Handles high heat like a champ. Pricey, but if you’re serious about cast iron maintenance, it’s worth the investment.
Crisco or vegetable shortening – Old school. Smoke point around 360°F so you’ll season at lower temps (375-400°F). Your grandmother probably used this. Still works great.
Canola oil – Budget option. Smoke point 400°F. Gets the job done without drama.
Flaxseed oil – Smoke point 450°F. Creates extremely hard seasoning. But it’s finicky—tends to flake if applied too thick. Use with caution.
| Oil | Smoke Point | Cost | Seasoning Quality | Gas Grill Temp |
|---|---|---|---|---|
| Grapeseed | 420°F | Medium | Excellent | 425-450°F |
| Avocado | 520°F | High | Outstanding | 450-500°F |
| Crisco | 360°F | Low | Very good | 375-400°F |
| Canola | 400°F | Low | Good | 400-425°F |
| Flaxseed | 450°F | High | Hard (can flake) | 450-475°F |
Oils You Should Never Use on Gas Grills
Skip these. They’ll cause problems.

Olive oil – Smoke point too low (325-375°F). Burns before proper polymerization happens. You get sticky residue and disappointment.
Butter or bacon grease – Low smoke points. Plus they contain water and proteins that interfere with the seasoning process. Save them for cooking, not building seasoning layers.
Coconut oil – Smoke point around 350°F. Marginal performance. The seasoning tends to be softer and less durable than you want.
Corn oil – Technically works but tends to create softer seasoning. Better options exist.
Getting Your Gas Grill Ready for Seasoning
Clean your grill grates first. Old food residue and grease can cause flare-ups when you’re running at high temps for an hour.
Check your propane level. Running out of gas mid-seasoning ruins the whole layer. You need enough fuel for 2-3 hours of continuous cooking if you’re doing multiple layers.
Line the bottom of your grill (under the grates, above the burners) with aluminum foil. This catches oil drips and protects your burners and flavorizer bars from getting gunked up. Makes cleanup way easier.
Test your ignition. Make sure all burners light properly. Last thing you want is discovering a faulty burner when you’re ready to start.
Preparing Your Cast Iron Skillet Before Gas Grill Seasoning
You can’t season dirty iron. Or wet iron. Or iron with factory coating still on it.
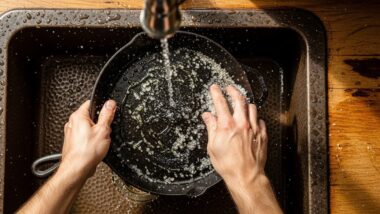
Cleaning Brand New Cast Iron Skillets
New skillets come with protective coating. Wax or food-safe oil. Sometimes both. It’s gotta go before you can build real seasoning.

Wash with hot water and dish soap. Yeah, soap. The “never use soap” rule applies to seasoned pans, not bare metal. Scrub hard with a stiff brush or plastic scrubber.
Rinse thoroughly. Keep washing until nothing feels waxy or slick. Water should sheet off the iron, not bead up.
Dry completely. First with a towel, then put it on your stovetop burner over medium heat for 5 minutes. Every bit of moisture needs to evaporate. Any water left behind causes rust spots or interferes with seasoning.
How to Strip and Restore Old Cast Iron for Re-Seasoning
Got rusty cast iron from a garage sale? Or a pan with damaged, flaking seasoning?
Strip it bare first.
For rust removal: Soak in 50/50 white vinegar and water for 1-4 hours (check frequently—longer than 6 hours can pit the metal). Scrub with steel wool. Rinse. Dry immediately on the stovetop.
For removing old seasoning: Use Easy-Off oven cleaner (the lye-based formula). Spray it on, seal the pan in a garbage bag, wait 24 hours. The seasoning will wipe right off. Wash thoroughly with soap and water. Dry completely.
For serious damage: Electrolysis tank. But that’s overkill for most home situations.
Once stripped, you’ve got bare iron ready for fresh seasoning layers.
The Critical Step: Drying Your Skillet Completely
This matters more than people realize.
After washing, towel dry thoroughly. Then—and this is crucial—heat dry on a burner or in a 200°F oven for 5-10 minutes.
Watch for moisture evaporation. When the pan looks completely dry and maybe slightly dull, you’re ready.
Why such paranoia about water? Because even microscopic moisture causes problems during seasoning. Steam pockets form under your oil layer. Rust spots develop. Uneven polymerization happens. The seasoning won’t bond properly to wet metal.
Bone dry. That’s the goal.
Step-by-Step: Using Your Gas Grill to Season Cast Iron
Time to actually do this.
Step 1: Preheat Your Gas Grill to the Right Temperature
Turn on your burners and set them to achieve your target temperature based on your oil choice.
Close the lid. Let the grill preheat for 10-15 minutes minimum. The entire interior needs to reach temperature, not just the grates.
Target Temperature Range for Gas Grill Seasoning
Match your temp to your oil:
- 375-400°F – For Crisco or shortening
- 400-425°F – For canola oil
- 425-450°F – For grapeseed oil
- 450-475°F – For flaxseed oil
- 475-500°F – For avocado oil
You want to hit just above the oil’s smoke point. That’s where polymerization happens most effectively.
Too low? Incomplete polymerization. Sticky seasoning. Too high? You burn the oil to carbon before it bonds properly. Black sooty coating instead of smooth seasoning.
Understanding Burner Zones and Heat Distribution
Here’s where gas grills get tricky.
Most gas grills have hot spots—areas that run 25-50 degrees hotter than others. Usually directly above burners. Cooler spots exist between burners or near the edges.
Three-burner grills typically run hottest in the center. Two-burner grills often have one side hotter than the other (usually the left side, don’t ask me why).
You need to know your grill’s personality. Where are the hot zones? Where are the cool zones?
How to Check Actual Grill Temperature
Don’t trust the built-in thermometer. Those hood-mounted gauges measure air temperature at the top of the grill. Not helpful when your skillet is sitting on the grates.
Use a grill surface thermometer (the kind that sits on the grates) or an infrared thermometer to check actual cooking surface temperature. Point it at different spots. Map out your hot and cool zones.
If you don’t have either of these, use the hand test—hold your hand 6 inches above the grate. If you can only keep it there for 2-3 seconds, you’re around 450-500°F. 4-5 seconds is 400-450°F.
Not precise. But better than guessing.
Step 2: Apply Oil to Your Cast Iron Skillet
Pour about 1 tablespoon of oil into your clean, dry skillet. Maybe a bit more if it’s a huge 12″ or 14″ pan.
The Right Way to Coat Your Skillet
Grab a paper towel or clean lint-free rag. Rub the oil everywhere—cooking surface, bottom, sides, handle. Every exposed bit of iron gets covered.
Work it in with circular motions. Press firmly. You’re trying to get oil into all those microscopic pores.
Flip the pan. Make sure the bottom and handle get the same attention as the cooking surface.
Why Less Oil is Better for Gas Grill Seasoning
This is where most people screw up.
They leave puddles of oil. Thick coatings. They think more oil equals better seasoning.
Wrong.
Thick oil layers turn into sticky, gummy varnish. They don’t polymerize properly. You get tacky surfaces that never fully harden.
Thin layers—almost invisibly thin—polymerize completely into hard, durable seasoning.
The Wipe-Off Technique That Prevents Sticky Seasoning
After coating every surface with oil, take a clean paper towel and wipe it all off.
Seriously. Wipe like you’re trying to remove the oil completely.
Press hard. Buff it off. The pan should look almost dry when you’re done—maybe a very faint sheen. That’s perfect.
What remains is a microscopic layer that’s been worked into the iron’s pores. That’s what polymerizes properly.
If you can see oil pooling or the surface looks wet, you’ve still got too much. Wipe more.
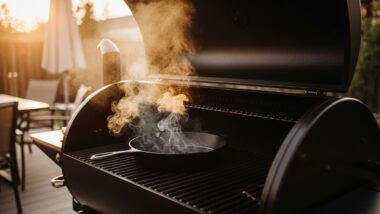
Step 3: Position Your Skillet on the Gas Grill
Open your preheated grill. Place the skillet on the grates.
Direct Heat vs. Indirect Heat Setup
For seasoning, you want indirect heat if possible.
Indirect setup: Turn on outer burners, leave the center burner off. Place skillet in the center. Heat surrounds the pan without direct flame underneath. More even seasoning, less risk of hot spots causing uneven polymerization.
Direct heat: All burners on, skillet directly over burners. Works fine but requires more temperature monitoring. Hot spots are more likely.
If you’ve only got a two-burner grill, indirect heat isn’t really possible. Just go direct and monitor closely.
Where to Place Your Skillet for Even Seasoning
Center of the grill is usually best. That’s where heat circulation is most consistent (assuming you’re using indirect heat).
Avoid the edges. Cooler near the sides. Temperature can vary by 30-40 degrees from center to edge.
If you mapped your hot spots earlier (you did, right?), place the skillet in the most even-temperature zone.
Using Multiple Burners Effectively
Three-burner grill? Set outer burners to medium-high, center burner to medium-low (or off). This creates more even heat distribution than all burners at the same setting.
Two-burner grill? Both burners on, adjusted to reach your target temp. You’ll probably need both set to medium or medium-high.
Single burner? You get what you get. Just maintain target temperature as best you can.
Step 4: Monitor and Maintain Temperature While Seasoning
Close the lid. Check the temperature after 5 minutes.
Gas grills fluctuate more than you’d think. Wind, outside air temperature, even opening the lid briefly—all affect internal temp.
How Long to Season Cast Iron on a Gas Grill
One hour per layer. That’s your baseline.
During the first 15 minutes, you’ll see smoke (assuming you hit the smoke point). That’s normal. By 30 minutes, smoking should decrease. After 45-60 minutes, polymerization is complete and the coating has hardened.
Don’t cut it short. Incomplete polymerization gives you sticky seasoning. Give it the full hour.
Adjusting Burners During the Process
Check temperature every 15-20 minutes.
Running too hot? Turn down burners slightly. Running too cool? Bump them up.
Wind picking up? You might need to increase burner settings to compensate for heat loss.
The goal is maintaining consistent temperature throughout the hour-long session. Some fiddling with burner knobs is normal and expected.
What to Watch For During Seasoning
Excessive smoke after 20 minutes: Probably means you used too much oil or temperature spiked. Not much you can do now except let it finish and learn for the next layer.
No smoke at all: Temperature is too low. Bump it up. If oil isn’t smoking (at least initially), polymerization isn’t happening properly.
Flare-ups: Shouldn’t happen with properly wiped oil, but if flames appear, reduce heat immediately.
Temperature swings of 50+ degrees: Adjust burners more aggressively to stabilize.
Step 5: Cool Down Your Skillet Properly
After an hour, turn off all burners.
Leave the skillet on the grill. Don’t touch it. Don’t open the lid yet.
Why Gradual Cooling Matters
Rapid temperature changes stress the seasoning. Going from 450°F to room temperature in 5 minutes can cause the newly formed polymer layer to crack or separate from the metal.
Gradual cooling lets everything contract slowly and evenly. The bonding between oil polymers and iron stays intact.
Plus, cast iron holds heat forever. Pull it out too soon and you’ll burn yourself. Not worth it.
When You Can Remove Your Skillet Safely
Wait 45-60 minutes minimum after turning off burners.
Open the lid after 20-30 minutes to speed cooling slightly (but still let it cool gradually). When you can hold your hand 6 inches above the skillet comfortably, it’s safe to handle with grill gloves.
The pan should be warm but not hot. Comfortable to touch with gloved hands.
Step 6: Build Multiple Seasoning Layers
One layer isn’t enough. Never has been. Never will be.
How Many Layers You Need on a Gas Grill
Minimum three layers. Better? Five to six.
Each layer adds durability and smoothness. First layer seals pores. Second strengthens. By the third, you’re getting legitimate non-stick properties. Layers 4-6 make the surface noticeably darker and slicker.
Some people do 8-10 layers on bare cast iron. That’s commitment.
Timing Between Seasoning Layers
Let the skillet cool completely between layers. Once it’s cool enough to handle comfortably (warm but not hot), you’re ready for the next round.
Wipe down with a clean towel first. Sometimes light carbon residue forms during seasoning. Remove it before applying more oil.
Apply oil. Wipe off excess (remember: thin layers). Reheat the grill. Back on for another hour.
Repeat until you hit your target number of layers. Yes, this takes all day. That’s how proper seasoning works.
Managing Gas Grill Temperature for Perfect Seasoning
Temperature consistency matters more on gas grills than pellet grills or ovens. You’ve got less thermal mass, more exposure to weather, and burner-specific hot spots.
Setting Up Two-Zone Heat Configuration
If you’ve got three or more burners, use two-zone setup.
Turn on burners on both ends. Leave the middle burner off (or very low). This creates indirect heat with good circulation.
Place your skillet in the center zone. Heat comes from both sides, surrounding the pan without direct flame underneath. More even temperature distribution across the entire cooking surface.
Two-burner grills can’t really do true two-zone for something centered. But you can offset the skillet to one side, with only one burner directly underneath and the other providing secondary heat.
Using a Grill Thermometer for Accuracy
Built-in hood thermometers lie. Consistently. They measure air temp at the top of the grill, which can be 50-75 degrees different from grate-level temperature.
Get a grill surface thermometer. The kind that sits directly on the grates next to your skillet. This tells you actual cooking temperature where it matters.
Or use an infrared thermometer. Point it at the grate surface (not the skillet itself once it’s on there). Take readings in multiple spots to identify temperature variation across your cooking surface.
Check every 15-20 minutes during seasoning. Adjust burners based on actual measured temperature, not what the hood gauge says.
Adjusting for Wind and Weather Conditions
Wind is gas grill seasoning’s biggest enemy.
Even moderate wind (10-15 mph) can drop internal grill temperature by 25-50 degrees. Strong wind? Forget about it. You’ll burn through propane trying to maintain temp.
Solutions:
- Position your grill to block prevailing wind (against a wall or fence)
- Increase burner settings to compensate for heat loss
- Consider rescheduling for a calmer day (seriously, it matters that much)
Cold outside air also affects performance. Seasoning cast iron at 40°F outside temperature requires higher burner settings than doing the same thing at 75°F.
You might need all burners on high in winter to achieve the same 450°F you’d get with burners on medium in summer.
Preventing Temperature Spikes and Drops
The main causes of temperature instability:
Opening the lid: Drops temp by 50-75 degrees instantly. Minimize lid openings. Check through the window if your grill has one.
Wind gusts: Not much you can do except position the grill strategically and adjust burners as needed.
Running out of propane: Check your tank level before starting. Have a backup tank if you’re doing multiple layers.
Burner inconsistency: Some burners run hotter than others. Map this out before seasoning and adjust individual burner knobs accordingly.
Common Problems When Seasoning Cast Iron on Gas Grills
Things go sideways. Here’s how to fix them.
Dealing with Uneven Heat Distribution
This is the gas grill’s fundamental weakness. Burners create zones of different temperatures.
Hot Spots and Cold Zones on Gas Grills
Hot spots usually sit directly above burners—especially at the burner’s midpoint. Temperature can be 50-75 degrees hotter there than between burners.
Cold zones exist at the edges and between burners. These areas might run 30-50 degrees cooler than your target temp.
The result? Uneven seasoning. Some areas polymerize perfectly. Others stay sticky or don’t season at all.
How to Compensate for Uneven Heating
Rotate the skillet: At the 30-minute mark, rotate your skillet 180 degrees. This exposes different areas to hot and cool zones, evening out the overall seasoning.
Use indirect heat: Keep the skillet away from direct burner flames. Let circulating heat do the work.
Lower the temperature slightly: If one spot is way hotter, reducing overall temp prevents burning in hot zones while still seasoning cool zones adequately.
Accept minor imperfections: Multiple layers will even things out. The first layer might be slightly patchy. By layer 3-4, it’ll smooth out.
Fixing Sticky or Tacky Seasoning
Most common problem. Most annoying problem.
Cause: Too much oil. Or insufficient time/temperature for complete polymerization.
Fix: Put the skillet back on the grill at 450°F for another 30-60 minutes. No additional oil. Just heat. This finishes polymerizing what’s there.
Still tacky after that? You used way too much oil. Strip this layer with steel wool, wipe clean, and start over with a thinner application.
Solving Flaking and Peeling Issues
Seasoning chips off in flakes. Not good.
Cause: Usually too much oil applied too thick (creates weak adhesion). Can also happen from thermal shock—rapid heating or cooling.
Fix: Strip the flaking areas with steel wool. Clean thoroughly. Re-season those spots with properly thin coats.
Prevention: Thinner oil application. Gradual heating and cooling. If using flaxseed oil, switch to grapeseed—it’s more forgiving.
Preventing Flare-Ups During Seasoning
Shouldn’t really happen if you wiped oil properly. But sometimes…
Cause: Excess oil dripping onto burners or flavorizer bars.
Prevention:
- Wipe oil thinner (again, this is critical)
- Place aluminum foil under the grates to catch drips
- Use indirect heat so oil doesn’t drip directly onto flames
If it happens: Reduce burner heat immediately. Let flames die down. Don’t open the lid (oxygen feeds flames). Once settled, continue at slightly lower temperature.
Managing Excessive Smoke Production
Some smoke is expected. A lot of smoke means something’s wrong.
Normal smoke: First 15-20 minutes as oil reaches smoke point and begins polymerization. Should taper off after that.
Excessive smoke: Continuing heavy smoke throughout the hour means too much oil or temperature spikes causing oil to burn rather than polymerize.
Solution for next layer: Use less oil. Wipe more aggressively. Check that your temperature isn’t spiking above your target by 50+ degrees.
Gas Grill-Specific Challenges and Solutions
Gas grills have particular quirks you need to work around.
Working with Limited Temperature Control
Some gas grills—especially older or cheaper models—have limited temperature range. They run too hot on low, or can’t get hot enough on high.
If your grill runs too hot: Use indirect heat exclusively. Turn off the burner under your skillet. Use only side burners. This can drop effective temperature by 50-100 degrees.
If your grill can’t get hot enough: You might max out at 375-400°F. That’s fine. Use oils suited to lower temps like Crisco. Extend seasoning time to 75-90 minutes per layer to ensure complete polymerization.
Handling Wind Interference
Already covered this but it bears repeating—wind kills gas grill temperature stability.
Light breeze (under 5 mph)? No big deal. Moderate wind (10-15 mph)? Increases burner settings and watch temps carefully. Strong wind (20+ mph)? Reschedule or move the grill to a protected area.
Windbreaks help. Position your grill against a wall. Set up a temporary barrier. Even your car can work as a windbreak in a pinch.
Seasoning When You Can’t Reach High Temps
Not all gas grills hit 500°F. Some struggle to break 400°F.
That’s okay. Adjust your approach:
- Use lower smoke point oils (Crisco, canola)
- Season at whatever max temp your grill achieves (even 375°F works)
- Extend time to 75-90 minutes per layer
- Be patient—polymerization happens slower at lower temps but it still happens
The results won’t be worse. Just takes a bit longer.
Dealing with Burner Hot Spots
Every gas grill has them. Some worse than others.
Map them before you start (infrared thermometer or the hand test at different locations). Then work around them:
- Place skillet away from the hottest spots
- Use indirect heat
- Rotate the pan halfway through seasoning
- Adjust individual burner knobs if your grill allows—turn down the burner creating the hot spot
You’re managing imperfection, not eliminating it.
Maintaining Your Gas Grill-Seasoned Cast Iron
Seasoning isn’t permanent without maintenance.
Cleaning After Each Use to Preserve Seasoning
Let the pan cool after cooking. Still warm is fine for cleaning.
Rinse with hot water. Use a stiff brush or plastic scrubber to remove stuck food. A chain mail scrubber works great for stubborn bits without damaging seasoning.
The soap debate? Modern dish soap won’t hurt properly polymerized seasoning. Use a small amount if needed. But hot water and scrubbing handle most cleanup jobs.
Dry immediately and completely. Towel first, then 2-3 minutes on the stovetop over medium heat to evaporate all moisture.
Optional but recommended: wipe with a very thin layer of oil while still warm. This maintains and gradually builds on existing seasoning.
When to Add Touch-Up Layers on Your Gas Grill
Signs you need touch-up seasoning:
- Dull gray patches appearing where seasoning has worn
- Food sticking in specific spots that used to be non-stick
- Slight rust spots forming (from moisture exposure)
For touch-ups, clean the pan thoroughly, dry completely, and add 1-2 fresh seasoning layers using your gas grill. No need to strip everything—just build on what’s there.
Storage Tips for Gas Grill-Seasoned Cookware
Store in a dry location. Humidity causes rust even on seasoned cast iron (eventually).
Don’t stack pans directly on top of each other without protection. Put a paper towel or cloth between them to prevent scratching seasoning.
If storing long-term (months), coat with a thin layer of oil first. Extra protection against moisture and oxidation.
Never store wet. Not even slightly damp. Completely dry or don’t put it away.
Signs Your Cast Iron Needs Re-Seasoning
Full re-seasoning (strip and start over) becomes necessary when:
- Seasoning is flaking or peeling in multiple areas
- Large rust spots that won’t scrub off
- Surface is consistently sticky despite touch-up attempts
- The pan just doesn’t perform well anymore despite maintenance
For minor issues, touch-up layers work fine. For widespread problems, strip and re-season from scratch.
Gas Grill vs. Other Seasoning Methods Compared
How does gas grill seasoning stack up?
Gas Grill vs. Charcoal Grill Seasoning
Charcoal grills can season cast iron. But they’re inconsistent.
Charcoal challenges:
- Temperature fluctuates wildly (50-100 degree swings)
- Hot spots are extreme
- Maintaining steady temp for an hour requires constant attention
- Wind affects them even more than gas grills
Gas advantages:
- Stable temperature with minimal adjustment
- Predictable heat output
- Easy to maintain for extended periods
Charcoal works if that’s all you have. But gas is easier and more reliable for seasoning.
Gas Grill vs. Kitchen Oven Method
Ovens are more consistent. Period.
Oven advantages:
- Better temperature accuracy (within 5-10 degrees usually)
- More even heat distribution
- Weather-proof
- Set and forget
Gas grill advantages:
- No kitchen smoke
- No smell in the house
- More space for multiple pieces
- Summer heat stays outside
If you don’t care about smoking up your kitchen, oven is technically superior. But keeping the mess outside is a huge practical advantage.
Gas Grill vs. Stovetop Seasoning
Stovetop seasoning is possible but problematic.
Uneven heat is the main issue. The bottom gets way hotter than the sides. You end up with inconsistent seasoning—the cooking surface might be fine but the sides and handle barely season at all.
Gas grill provides heat from all sides (with the lid closed). More uniform results across the entire piece of cookware.
Stovetop wins on convenience and simplicity. Gas grill wins on quality and evenness.
Why Gas Grills Are Ideal for Outdoor Seasoning
Bottom line? Gas grills give you 85-90% of the performance of a kitchen oven with none of the smoke and smell issues.
That’s a trade-off worth making for most people. The slight reduction in temperature consistency doesn’t meaningfully impact final seasoning quality if you monitor and adjust burners properly.
Plus you can season on a Saturday afternoon without making your house smell like heated oil for the next 48 hours.
That alone makes it worth using your gas grill for cast iron seasoning.
Advanced Gas Grill Seasoning Techniques
Ready to level up?
Seasoning Multiple Cast Iron Pieces at Once
Most gas grills have room for 2-4 skillets at once. That’s efficiency.
Space them at least 1-2 inches apart. Heat needs to circulate around each piece. Don’t let them touch.
If using indirect heat, arrange pieces in the cool zone (center with outer burners on). If going direct, spread them across the grates with decent spacing.
Each piece gets the same oil application process—thin coating, wipe off excess. All of them season simultaneously for the same hour.
Monitor that spacing doesn’t create new cool zones. Air circulation matters.
Using Indirect Heat for Larger Cookware
Big Dutch ovens or 14″+ skillets benefit from indirect heat setup.
These large pieces need more even heating than small skillets. Direct flames underneath cause hot spots on bigger surfaces.
Turn on outer burners, leave center burner(s) off. Place large cookware in the center. Heat surrounds from both sides without direct flame contact.
Takes slightly longer to come up to temperature but results in much more even seasoning across large surfaces.
Creating a Convection-Style Setup on Your Gas Grill
Some gas grills have fans or vents that enhance air circulation. Use them.
For grills without built-in convection, you can create circulation by strategically using burner placement:
All burners on at slightly different temperatures creates natural convection currents inside the closed grill. Hot air rises from the hottest burner, circulates, cools slightly, sinks near cooler areas.
This isn’t true convection (no fan) but it improves heat distribution compared to perfectly uniform burner settings.
Seasoning Cast Iron Dutch Ovens and Griddles on Gas Grills
Dutch ovens need special attention. Season the pot and lid separately if possible.
Remove the lid during seasoning so heat reaches the interior surfaces. The lid can go right on the grates next to the pot.
For griddles—those large flat cast iron pieces—use indirect heat if possible. Their wide surface area makes hot spots more noticeable. Rotate at the 30-minute mark.
Same oil application process. Same thin coating and wipe-off technique. Just adjust placement for size.
Temperature Modifications for Different Cast Iron Sizes
Small skillets (6″-8″) heat up faster and can run slightly cooler (375-425°F) because their thermal mass is lower.
Large pieces (12″-14″ skillets, Dutch ovens) benefit from higher temps (450-475°F) because they take longer to fully heat through.
Adjust based on size and thickness. Thicker cast iron needs higher temps or longer seasoning times to ensure complete polymerization all the way through.
Safety Tips for Gas Grill Cast Iron Seasoning
Don’t burn down your deck. Or yourself.
Preventing Grease Fires
Shouldn’t be an issue with properly wiped oil. But just in case:
- Use aluminum foil under grates to catch any drips
- Don’t over-oil your cast iron (thin layers!)
- Keep a fire extinguisher nearby (general grilling safety)
- If flames appear, close the lid and turn off gas—don’t spray with water
Grease fires on gas grills are rare during seasoning (you’re not cooking fatty meat). But being prepared doesn’t hurt.
Handling Hot Cast Iron Safely
Cast iron holds heat for an insanely long time. That 10″ skillet you just seasoned? Still dangerously hot 30 minutes after you turn off the grill.
Safety rules:
- Use proper heat-resistant grill gloves (not regular oven mitts)
- Never handle until cool enough to hold hand 6″ above comfortably
- Set hot cast iron on heat-resistant surface, not plastic or wood
- Keep kids and pets away from cooling cast iron
Burns from cast iron are serious. Respect the thermal mass.
Ventilation and Smoke Management
You’re outside so ventilation isn’t really an issue. But still:
Position your grill away from open windows and doors. That smoke finds its way inside if you’re right next to an entrance.
Don’t season directly under a covered porch if possible. Smoke can accumulate and stain ceilings.
Warn neighbors if you’re in close quarters (apartments, townhomes). Nobody wants unexpected smoke alarm tests.
Gas Safety Considerations
Standard propane safety applies:
- Check for leaks before starting (soapy water test on connections)
- Don’t overfill propane tanks
- Turn off gas at the tank when finished, not just at burner knobs
- Never store propane tanks indoors
- Replace old, damaged, or rusty tanks
And specific to extended high-temp sessions: you’ll use more gas than typical grilling. Make sure you’ve got enough fuel for multiple hour-long sessions if doing several seasoning layers.
Running out of propane mid-season ruins that layer. Check your tank level before starting.