Table of Contents
- 1 Can You Actually Season Cast Iron in a Slow Cooker?
- 2 The Real Use Case: Seasoning Cast Iron Handles in Your Slow Cooker
- 3 Understanding Temperature Requirements for Cast Iron Seasoning
- 4 What You Need to Season Cast Iron with a Slow Cooker
- 5 The Modified Approach: Using Your Slow Cooker for Cast Iron Maintenance
- 6 Step-by-Step: Using a Slow Cooker for Cast Iron Handle Treatment
- 7 Why Slow Cookers Don’t Replace Traditional Seasoning Methods
- 8 Alternative Uses for Slow Cookers in Cast Iron Care
- 9 The Right Way to Season Cast Iron (Not in a Slow Cooker)
- 10 Hybrid Method: Slow Cooker Prep + Oven Finish
- 11 Common Misconceptions About Slow Cooker Cast Iron Seasoning
- 12 What Actually Works: Proven Cast Iron Seasoning Methods
- 13 Troubleshooting Failed Slow Cooker Seasoning Attempts
- 14 Better Alternatives to Slow Cooker Seasoning
- 15 When Slow Cookers Make Sense for Cast Iron
Can You Actually Season Cast Iron in a Slow Cooker?
No, you can’t properly season cast iron in a slow cooker because slow cookers max out at 200-250°F while proper seasoning requires 400-500°F for oil polymerization—but slow cookers can help with handle conditioning and oil preparation before you finish the job properly.
Let’s be clear about this upfront.
The internet is full of “life hacks” that sound clever but don’t actually work. Slow cooker cast iron seasoning is mostly one of them. Mostly. Because there’s a tiny sliver of usefulness buried in this method if you know what you’re doing.
But as a complete seasoning solution? Not happening.
The Truth About Slow Cooker Cast Iron Seasoning
Seasoning requires high heat. Period. You need temperatures that break down oil molecules and reorganize them into polymers that bond to the iron surface. This chemical process—polymerization—doesn’t happen at slow cooker temperatures.
Your slow cooker runs at maybe 200°F on low, 250°F on high (if you’re lucky). Some models barely hit 180°F. That’s nowhere close to the 400-500°F range where oils actually polymerize and create that hard, protective coating everyone’s after.
What happens at slow cooker temps? The oil warms up. Spreads nicely. Penetrates into the iron’s pores. Then just sits there. Liquid. Not bonding. Not hardening. Not becoming seasoning.
When it cools down, you’ve got oily cast iron. Not seasoned cast iron.
Why Temperature Matters for Proper Seasoning
Chemistry doesn’t care about convenience.
Oil molecules need specific heat to transform. Each oil has a smoke point—the temperature where it starts breaking down. Just past that smoke point is where polymerization happens most effectively. The molecules restructure into long chains that bond to metal and each other.

Below the smoke point? Nothing useful occurs. The oil might get hot enough to flow and spread, but it won’t create those polymer bonds. It won’t harden. It won’t protect the iron.
That’s why ovens work for seasoning (they hit 450-500°F). That’s why grills work (same temps). That’s why slow cookers don’t (they max out 200 degrees below where they need to be).
What Slow Cookers Can (and Can’t) Do for Cast Iron
What slow cookers CAN do:
- Warm cast iron gently for oil absorption
- Help oil penetrate into pores before high-heat seasoning
- Condition handles and exterior surfaces at low temps
- Maintain already-seasoned pieces with oil treatment
- Pre-warm before transferring to oven
What slow cookers CAN’T do:
- Create actual polymerized seasoning
- Build protective non-stick layers
- Replace oven or grill seasoning methods
- Harden oil into durable coating
- Give you results worth the time investment (usually)
So why are we even talking about this?
The Real Use Case: Seasoning Cast Iron Handles in Your Slow Cooker
Here’s where it gets interesting. And where the slow cooker method actually has merit.
Why Handles Need Different Treatment Than Cooking Surfaces
Cast iron handles—especially on vintage pieces or skillets with detailed casting—can be tricky to season evenly in an oven or on a grill.
The handle is further from direct heat. It’s often thinner than the pan body. And if you position the skillet upside down (which many people do to prevent oil pooling), the handle sticks up away from heat circulation.
Result? Poorly seasoned handles. Gray, rough texture while the cooking surface is smooth and black.
Slow cookers can help here. The gentle, even heat wraps around the entire piece—including handles—allowing oil to penetrate and condition these hard-to-reach areas. You’re not creating full seasoning, but you’re prepping the handle for better results when you finish with high heat.
How Slow Cookers Excel at Low-Temp Handle Conditioning

Think of it as a pre-treatment, not the main event.
Place your oiled skillet in a slow cooker on low for 2-3 hours. The sustained warmth (even at just 200°F) helps oil work into every crevice of the handle, the pouring spouts, any decorative elements in the casting.
This oil penetration creates a better foundation. When you then move the skillet to a 450°F oven, that pre-conditioned handle polymerizes more evenly because the oil was already worked deep into the metal’s pores.
Does it make a huge difference? Sometimes. On handles with intricate details or rough casting, it can improve the final seasoning quality noticeably.
When Slow Cooker Seasoning Makes Sense
Specific scenarios where it’s worth considering:
- Antique skillets with ornate handles that need gentle oil penetration first
- Rough, pitted handle surfaces where oil struggles to penetrate at room temp
- Winter seasoning when you want to warm the iron gradually before hitting it with oven heat (prevents thermal shock on very cold metal)
- Maintenance treatments on already-seasoned pieces where you’re just adding a conditioning layer
For standard seasoning of a normal skillet? Skip the slow cooker entirely. Not worth the hassle.
Understanding Temperature Requirements for Cast Iron Seasoning
Let’s talk numbers. Real numbers.
The Science of Polymerization and Heat
Polymerization is a chemical reaction. Fat molecules (triglycerides) break apart when heated past their smoke point. The broken pieces recombine into long-chain polymers—think of them like plastic molecules.
These polymers bond to iron and to each other, creating a hard matrix that fills the metal’s pores. Layer upon layer builds that glossy black patina everyone wants.
But this reaction requires energy. Heat energy. Specific amounts of it based on the oil you’re using.

No shortcuts exist. You can’t polymerize at low temps over long periods instead of high temps for short periods. It doesn’t work that way. Either you hit the activation temperature or you don’t.
Why 400-500°F is the Standard Range
Most cooking oils have smoke points between 350-450°F. To polymerize them effectively, you need to go slightly above their smoke point—typically 25-50 degrees higher.
Common seasoning temps:
- 400-425°F for Crisco, canola, and similar lower smoke point options
- 450°F for grapeseed and most neutral oils
- 475-500°F for avocado oil and other high smoke point varieties
These temperatures ensure the oil breaks down and reorganizes properly. Go lower and you get incomplete polymerization (sticky seasoning). Go way higher and you burn the oil to carbon before polymers form (sooty coating instead of smooth seasoning).
What Happens at Lower Temperatures (200-250°F)
At slow cooker temperatures, oil behaves completely differently.
It liquefies (if it was solid at room temp). It flows nicely. It spreads easily. It penetrates into porous surfaces. But chemically? Nothing happens. The molecules stay intact. No breaking. No recombining. No polymer formation.
You’re essentially giving your cast iron an oil bath. Which isn’t terrible—oil does provide some temporary rust protection. But it’s not seasoning. It won’t harden. It won’t become durable. It won’t create non-stick properties.
When the iron cools, the oil either stays liquid or congeals back into its original state (depending on the oil type). Wipe the skillet and the oil comes right off. Because it never bonded.
Slow Cooker Temperature Limitations
Most slow cookers operate in these ranges:
| Setting | Typical Temp | What It’s Good For |
|---|---|---|
| Low | 180-200°F | Keeping food warm, not much else |
| High | 200-250°F | Slow cooking, still too cold for seasoning |
| Max | 250-275°F (rare) | Still 150+ degrees below seasoning range |
Some newer models claim higher temps. Maybe you’ve got one that hits 300°F. Still not enough. You need at minimum 375-400°F for even the lowest smoke point oils.

The gap is too big. Slow cookers simply weren’t designed for this purpose.
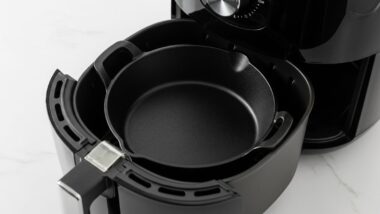
What You Need to Season Cast Iron with a Slow Cooker
If you’re doing the hybrid method (slow cooker prep + oven finish), here’s what you need.
Required Materials and Tools
- Cast iron skillet (obviously)
- Slow cooker large enough to fit your skillet (this is the main limitation—most slow cookers can’t fit a 12″ skillet)
- High smoke point oil – about 1-2 tablespoons
- Paper towels or lint-free cloths
- Access to an oven or grill for the actual seasoning part
- Dish soap and scrub brush for initial cleaning
- Tongs or heat-resistant gloves for removing hot cast iron from slow cooker
That’s the realistic list. Because you’re not actually completing the seasoning in the slow cooker alone.
Best Oils for Low-Temperature Seasoning
For the slow cooker portion (handle conditioning), any oil works since you’re just doing penetration, not polymerization.
But you’ll still finish in the oven, so choose oils suited for high-heat seasoning:
- Grapeseed oil – Great all-around choice, works well for both stages
- Avocado oil – Handles the oven stage perfectly, maybe overkill for slow cooker prep
- Canola or vegetable oil – Budget-friendly, totally adequate
- Crisco – Traditional choice, works fine
Avoid olive oil, butter, and other low smoke point options. Even though the slow cooker won’t polymerize anything, you’ll use the same oil in the oven stage, so pick something appropriate for high heat.
Preparing Your Slow Cooker for the Process
Clean the slow cooker insert first. Any old food residue or smells will transfer to your cast iron (nobody wants chili-scented seasoning).
Line the bottom with parchment paper if you want easier cleanup. Optional but helpful if oil drips.
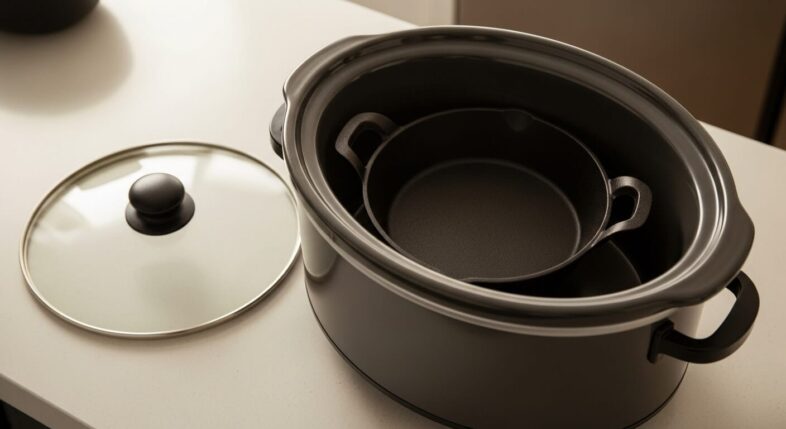
Make sure your skillet actually fits. Try placing it in the slow cooker before oiling it up. If it doesn’t fit comfortably, this whole method is pointless.
No lid needed. In fact, leave the slow cooker lid off or propped open to allow moisture to escape. Trapped condensation causes rust issues.
The Modified Approach: Using Your Slow Cooker for Cast Iron Maintenance
Since we’ve established slow cookers can’t actually season cast iron properly, let’s talk about what they’re legitimately useful for.
Pre-Seasoning Preparation (Warming and Oil Absorption)
Start with clean, completely dry cast iron. Apply your oil (thin coat, wipe off excess—same as any seasoning method).
Place in slow cooker on low. Let it sit for 1-2 hours. The gentle warmth helps oil penetrate deeply, especially into rough surfaces, casting details, and handle crevices.
This is prep work. Not the main event.
After the slow cooker session, transfer immediately to a preheated oven at 450°F for the actual seasoning (60 minutes). The oil that’s been worked into the iron’s pores will polymerize properly at oven temps.
Handle-Specific Seasoning Technique
For handles that always seem to stay light gray while the rest of your pan darkens beautifully:
Apply extra oil specifically to the handle and exterior surfaces (not the cooking surface). Place the skillet in the slow cooker positioned so the handle sits in the warmest area (usually near the heating element on the bottom or sides).
Run on low for 2-3 hours. The extended exposure to warmth helps oil really soak into those problem areas. Then finish with high heat as usual.
Does this solve stubborn handle seasoning issues? Sometimes. Depends on the casting quality and how rough the handle surface is.
Maintenance Coating Application
On already-seasoned cast iron that just needs a light maintenance treatment (not building new layers):
Apply a very thin coat of oil. Place in slow cooker on low for an hour. Remove and let cool naturally. The warm oil penetrates and provides a protective coating without adding significant thickness.
This isn’t seasoning. It’s conditioning. Like oiling a leather boot. Temporary protection and maintenance rather than building durable layers.
Useful? Occasionally. Essential? Never.
Step-by-Step: Using a Slow Cooker for Cast Iron Handle Treatment
If you’re going to try this, at least do it right.
Step 1: Clean and Dry Your Cast Iron Completely
Wash with hot water and dish soap if needed (bare or lightly seasoned cast iron can handle it). Scrub thoroughly.
Dry with a towel first. Then heat dry—either on the stovetop over medium heat for 5 minutes or in a 200°F oven for 10 minutes.
Every bit of moisture must be gone. Putting damp cast iron in a slow cooker is asking for rust issues, especially during the long, low-temp session.
Step 2: Apply Oil to Handles and Exterior Surfaces
Focus on the areas you want to condition. Usually the handle and outer surfaces.
Pour a small amount of oil (1/2 to 1 tablespoon) onto a paper towel. Rub it into the handle, paying special attention to rough spots, crevices, and decorative details.
You can do the whole skillet if you want, but the cooking surface will season fine with standard methods. The handle is where slow cooker treatment potentially helps.
Don’t wipe off the excess as aggressively as you would for oven seasoning. For this low-temp treatment, leaving slightly more oil is fine since it won’t polymerize anyway.
Step 3: Set Up Your Slow Cooker Properly
Place the oiled skillet in your slow cooker. Position it so the handle (or whichever area you’re focusing on) sits where it’ll get consistent heat.
Temperature Settings That Work
Use the low setting. You’re aiming for 180-200°F, sustained for 2-3 hours.
High setting might work too, but some slow cookers run hot on high and could potentially cause smoking if you’ve got excess oil (unlikely but possible).
How to Position Cast Iron in a Slow Cooker
If your skillet fits flat on the bottom, that’s fine. If it’s too big, you might need to prop it at an angle—make sure it’s stable and won’t tip.
Leave the slow cooker lid off or cracked open. You don’t want moisture building up and dripping back onto the iron.
Step 4: Low-Heat Oil Conditioning Process
Turn on the slow cooker. Set a timer for 2 hours minimum.
Timing for Slow Cooker Sessions
2-3 hours is the sweet spot for oil penetration. Less than 2 hours and you might as well just hand-rub oil at room temperature. More than 4 hours is overkill with no added benefit.
Check occasionally to make sure nothing weird is happening (smoking, oil pooling, condensation forming). Shouldn’t be any drama, but better safe than sorry.
What’s Actually Happening at Low Temps
Oil is warming, thinning, and soaking into the iron’s pores. It’s working its way into microscopic crevices that would resist oil at room temperature. The metal is also warming slightly, which helps absorption.
But again—no polymerization. No bonding. No hardening. Just oil penetration.
Think of it like marinating meat. You’re not cooking it yet. You’re prepping it.
Step 5: Finish with Proper High-Heat Seasoning
After 2-3 hours, remove the skillet from the slow cooker (it’ll be warm but not dangerously hot).
Now wipe off the excess oil—same technique as standard seasoning. The iron should look almost dry with just a faint sheen.
Into the oven at 450°F for 60 minutes. Or onto your grill at the same temp. This is where actual seasoning happens.
The slow cooker did the prep. The oven does the work.
Why Slow Cookers Don’t Replace Traditional Seasoning Methods
In case it’s still not clear—they don’t. They can’t. They won’t.
The Polymerization Problem at Low Temperatures
We keep coming back to this because it’s fundamental.
Chemical reactions require activation energy. For oil polymerization, that energy comes from heat. Specific amounts of heat. There’s no workaround. No “low and slow” alternative that produces the same results.
At 200°F, you’re roughly 200 degrees below the minimum temperature for even the lowest smoke point oils to polymerize. That’s not a small gap. That’s not “close enough.” That’s a completely different chemical state.
Incomplete Seasoning and Sticky Results
People who try complete seasoning in slow cookers end up with gummy, sticky cast iron that never hardens.
Because the oil never polymerized. It just spread around and congealed. When they cook with it, the oil breaks down into sticky residue. Food sticks like crazy. The surface feels tacky to the touch.
They’ve essentially ruined their cast iron until they strip the gummy oil layer and start over with proper high-heat seasoning.
Hours wasted. Cast iron temporarily unusable. Frustration achieved.
When You’re Wasting Your Time
If you’re attempting slow cooker seasoning because:
- You don’t have an oven (you need one to properly season cast iron—no way around it)
- You think it’s “easier” (it’s not—it takes longer and requires oven finishing anyway)
- You saw it on Pinterest (the internet is full of bad advice)
- You want to avoid kitchen smoke (just do it outside on a grill then)
…you’re going to waste several hours and end up with oil-coated but unseasonable cast iron.
Don’t do it. Use the slow cooker hybrid method for handle conditioning if you must. But never as a complete seasoning solution.
Alternative Uses for Slow Cookers in Cast Iron Care
So what ARE slow cookers legitimately useful for with cast iron?
Pre-Warming Before Traditional Seasoning
If you’re seasoning cast iron that’s been stored in a cold garage or basement (especially in winter), going from 40°F metal directly to a 450°F oven can theoretically cause thermal stress.
Using a slow cooker to gradually warm the iron from cold to warm (not hot, just warm) before oven seasoning reduces this stress. Put cold cast iron in the slow cooker on low for 30-45 minutes, then transfer to the preheated oven.
Does this make a meaningful difference for most people? Probably not. But for valuable vintage pieces or if you’re paranoid about thermal shock, it’s an option.
Oil Penetration and Absorption
Already covered this, but it’s the main legitimate use.
Rough, pitted, or porous cast iron benefits from extended warm oil treatment before high-heat seasoning. The slow cooker provides consistent gentle heat that helps oil work into difficult surfaces.
Not necessary for smooth, modern cast iron. Potentially helpful for vintage or poorly manufactured pieces.
Gentle Rust Prevention Treatment
For storage protection (not active seasoning), you can use slow cooker warming to apply and spread a protective oil coat.
Clean, dry cast iron + thin oil layer + 1 hour in slow cooker on low = well-distributed protective coating for long-term storage.
Again, this isn’t seasoning. It’s just rust prevention. The oil won’t bond or harden. But for pieces you’re storing for months, it’s adequate protection.
Maintaining Wooden Handles on Cast Iron
Here’s a sneaky good use—some cast iron comes with wooden handles or wood-wrapped grips.
You can’t put these in a 450°F oven without damaging the wood. But a slow cooker at 200°F? Safe for wood, and warm enough to help oil penetrate the cast iron portions of the handle while conditioning the wood.
Apply food-safe mineral oil to wooden handles, place in slow cooker on low for an hour. The wood absorbs oil without heat damage, and the attached cast iron gets conditioning too.
This is actually useful. Rare scenario, but legitimate.
The Right Way to Season Cast Iron (Not in a Slow Cooker)
Let’s reset and talk about methods that actually work.
Oven Seasoning: The Gold Standard
Preheat oven to 450°F. Apply thin oil coat to clean, dry cast iron. Wipe off excess aggressively. Place in oven upside down (with foil on rack below to catch drips) for 60 minutes. Cool in oven. Repeat 3-6 times.
This works. It’s been working for decades. Temperature is consistent. Heat distribution is even. Results are predictable.
No gimmicks needed.
Grill Seasoning for Outdoor Options
Gas or pellet grill at 450°F works basically the same as an oven. Keeps the smoke outside. Same thin oil application, same timing, same results.
Covered in detail elsewhere. But the point is—actual high heat, actual polymerization, actual seasoning that hardens and protects.
Stovetop Methods for Quick Touch-Ups
For small repairs to damaged seasoning spots, you can use stovetop heat. Not ideal for full seasoning (uneven heat), but workable for touch-ups on specific areas.
Heat the area over a burner, apply oil, keep heating until it smokes and polymerizes. Move the pan to heat different spots as needed.
Crude but effective for minor maintenance.
Hybrid Method: Slow Cooker Prep + Oven Finish
If you’re determined to involve a slow cooker, this is how to do it without wasting your time.
Step 1: Slow Cooker Oil Application and Warming
Clean and dry cast iron thoroughly. Apply oil with focus on handles and exterior. Place in slow cooker on low for 2-3 hours to warm the iron and help oil penetrate deeply.
This is your prep stage. You’re conditioning the metal, not seasoning it.
Step 2: Transfer to Oven for High-Heat Polymerization
Remove from slow cooker. Wipe off excess oil (important—the slow cooker session leaves more oil on the surface than you want for oven seasoning).
Transfer to preheated 450°F oven. Season for 60 minutes using standard method.
The slow cooker prep helps with oil penetration. The oven does the actual seasoning.
Why This Two-Step Process Can Work
For specific situations—rough handles, porous vintage cast iron, pieces with intricate details—the extra oil penetration from slow cooker treatment can improve final seasoning quality in those problem areas.
The handle that usually stays gray might darken more evenly. Rough spots might smooth out better. Pitted areas might season more completely.
Sometimes. Maybe. If you’re lucky.
Time Investment vs. Results
Here’s the reality check: you’re spending 2-3 extra hours (slow cooker) for marginal improvement in specific areas, followed by the same 60-minute oven session you’d do anyway.
Total time: 3-4 hours for a single layer. Standard oven method: 60 minutes for the same layer.
Is the improvement worth tripling your time investment? Rarely. For most people with most cast iron, the answer is no.
For someone restoring a valuable antique skillet with problematic handle seasoning? Maybe worth trying.
Common Misconceptions About Slow Cooker Cast Iron Seasoning
Let’s clear up the nonsense floating around the internet.
Debunking the “Low and Slow” Myth
“Low and slow works for smoking brisket, so it works for seasoning cast iron.”
Wrong. Different chemistry entirely. Brisket is breaking down collagen into gelatin—time and moisture matter more than temperature (within reason). Seasoning is polymerizing fat molecules—temperature is everything, time is secondary.
You can’t substitute longer time for necessary temperature in chemical reactions that require activation energy. It’s like saying you can boil water at 150°F if you just wait long enough. Not how thermodynamics works.
Why Pinterest Hacks Don’t Always Work
Pinterest and TikTok are full of “life hacks” created by people who don’t understand the underlying principles of what they’re doing.
Someone tried using their slow cooker for cast iron, got temporarily okay results (oiled surface that looked different), and posted it as a “hack” without understanding they didn’t actually create seasoning.
Six months later their cast iron is sticky and rusty because the oil never bonded. But the viral post stays up, misleading thousands of people.
Always question hacks. Understand the why, not just the how.
Understanding What Actually Bonds to Iron
Polymerized oil bonds to iron. Liquid oil doesn’t.
Slow cookers produce liquid/warm oil. Ovens and grills produce polymerized oil.
That’s the entire difference. That’s why one works and one doesn’t.
What Actually Works: Proven Cast Iron Seasoning Methods
Stick with what’s been tested and proven effective over decades.
Temperature-Verified Techniques
Methods that actually reach 400-500°F:
- Kitchen oven seasoning
- Gas grill seasoning
- Pellet grill seasoning
- Charcoal grill seasoning (though temp control is tricky)
- Commercial pizza oven (if you have access)
- Self-cleaning oven cycle for stripping (800°F+, different purpose)
Methods that don’t reach necessary temps:
- Slow cookers (obviously)
- Most toaster ovens (max out around 450°F at best, often less)
- Warming drawers (way too low)
- Food dehydrators (someone will try this, I guarantee it)
Oil Selection That Matters
Pick oils based on smoke point and how they polymerize:
Best: Grapeseed, avocado, flaxseed (careful with application thickness)
Good: Canola, vegetable, Crisco, sunflower
Avoid: Olive oil, butter, coconut oil, anything with low smoke point
The oil matters. But only if you’re actually reaching temperatures where polymerization occurs.
Building Durable Seasoning Layers
Multiple thin layers beat one thick layer. Always. No matter which method you use.
3-6 layers minimum for new cast iron. Each layer baked at proper temperature for full polymerization. Each application wiped thin before heating.
This creates durable, non-stick seasoning that lasts years with proper maintenance.
Shortcuts don’t exist. Slow cookers don’t change this fundamental requirement.
Troubleshooting Failed Slow Cooker Seasoning Attempts
For people who already tried it and now have problems…
Dealing with Sticky, Gummy Surfaces
Your cast iron feels tacky. Oil never hardened. Food sticks like crazy.
Fix: Strip the gummy oil layer with hot water and dish soap + scrubbing. Or use steel wool for stubborn buildup. Dry completely. Start over with proper oven seasoning.
The slow cooker left you with un-polymerized oil coating. It has to come off before you can build real seasoning.
Why Your Seasoning Never Hardened
Because it isn’t seasoning. It’s oil.
Slow cooker temps don’t polymerize oil. You coated your pan in warm oil that spread nicely but never bonded. When it cooled, it stayed as oil (maybe slightly congealed depending on type).
That’s why it never hardened. Temperature wasn’t high enough for the chemical reaction to occur.
Fixing Oil That Won’t Polymerize
You can’t retroactively polymerize oil that’s been sitting on cast iron at room temperature for days/weeks.
Strip it off. Start fresh. Use proper temperature this time.
There’s no salvaging failed slow cooker seasoning attempts. Reset and do it right.
When to Strip and Start Over
If your cast iron is sticky, gummy, attracting dust, or food sticks worse than before you “seasoned” it—strip completely and start over.
Use the lye method (Easy-Off oven cleaner in a sealed bag for 24 hours) or the vinegar method for rust. Get back to bare iron. Then season properly in an oven or on a grill.
Don’t try to build on top of failed seasoning. You’re just making the problem worse.
Better Alternatives to Slow Cooker Seasoning
Literally anything else works better.
Why Your Kitchen Oven is Superior
Reaches proper temperatures. Distributes heat evenly. Has decades of proven results. Takes one hour per layer instead of 3-4.
The oven is right there in your kitchen. Use it.
Gas and Pellet Grill Options
If you want to avoid kitchen smoke, grill seasoning works great. Covered extensively in other guides.
Gas grills hit 450-500°F easily. Pellet grills maintain stable temps perfectly. Both produce properly polymerized seasoning that’s durable and functional.
Way better than slow cookers.
Even Stovetop Beats Slow Cooker
Stovetop seasoning is imperfect due to uneven heating. But at least it reaches polymerization temperatures.
You can actually create bonded seasoning on a stovetop burner, even if distribution is uneven. The cooking surface will season properly even if the sides and handle don’t.
That’s still infinitely better than slow cooker “seasoning” where nothing polymerizes anywhere.
When Slow Cookers Make Sense for Cast Iron
The few legitimate use cases worth considering.
Specific Scenarios Where Low Heat Helps
- Pre-warming very cold cast iron before oven seasoning (reduces thermal shock risk)
- Deep oil conditioning of rough, porous vintage pieces before high-heat seasoning
- Protective oil coating application for long-term storage
- Wood handle conditioning on pieces that can’t go in hot ovens
Notice these are all prep or maintenance tasks. Never complete seasoning.
Handle Conditioning on Antique Pieces
Vintage cast iron with ornate or rough handles benefits most from slow cooker pre-treatment.
The gentle extended warmth helps oil penetrate deeply into problem areas that resist room-temperature oil application. When you follow up with oven seasoning, those handles polymerize more evenly.
Worth it for valuable antiques. Not worth it for a $20 Lodge skillet from Target.
Pre-Treatment Before Traditional Seasoning
If you’re building seasoning from bare metal and want maximum oil penetration before polymerization, slow cooker warming can help.
It’s a marginal improvement at best. But for people who want to maximize every aspect of the process, it’s an option that doesn’t hurt (as long as you finish properly in the oven).
Maintaining Already-Seasoned Cookware
For cast iron that already has good seasoning and just needs periodic conditioning, slow cooker oil treatment provides gentle maintenance.
Apply thin oil coat. Warm in slow cooker for an hour. Let cool. The warm oil distributes evenly and provides temporary protection. Not building new seasoning layers, just maintaining existing ones.
This actually works for its intended purpose. Just don’t confuse it with building seasoning from scratch.