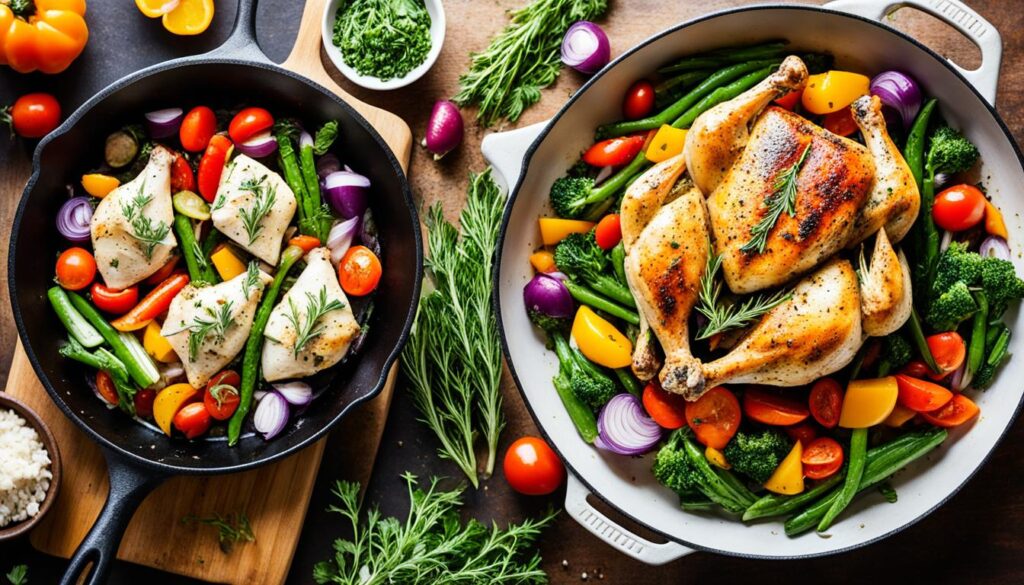
Eleven cast iron skillet roasted chicken recipes — a basic weeknight technique, herb butter under the skin, smoky paprika, harissa and preserved lemon, honey mustard glaze, soy and ginger, beer and barbecue, bacon-wrapped, buttermilk brine, and more — all tested in my actual kitchen, all sized for four people.
Table of Contents
- 1 Why People Love Cast Iron Skillet Cooking
- 2 Essential Tools for Perfect Skillet Roasted Chicken
- 3 Preparing Your Chicken for Roasting
- 4 Basic Cast Iron Skillet Roasted Chicken Technique
- 5 Herb-Infused Lemon Garlic Roasted Chicken
- 6 Smoky Paprika and Rosemary Skillet Chicken
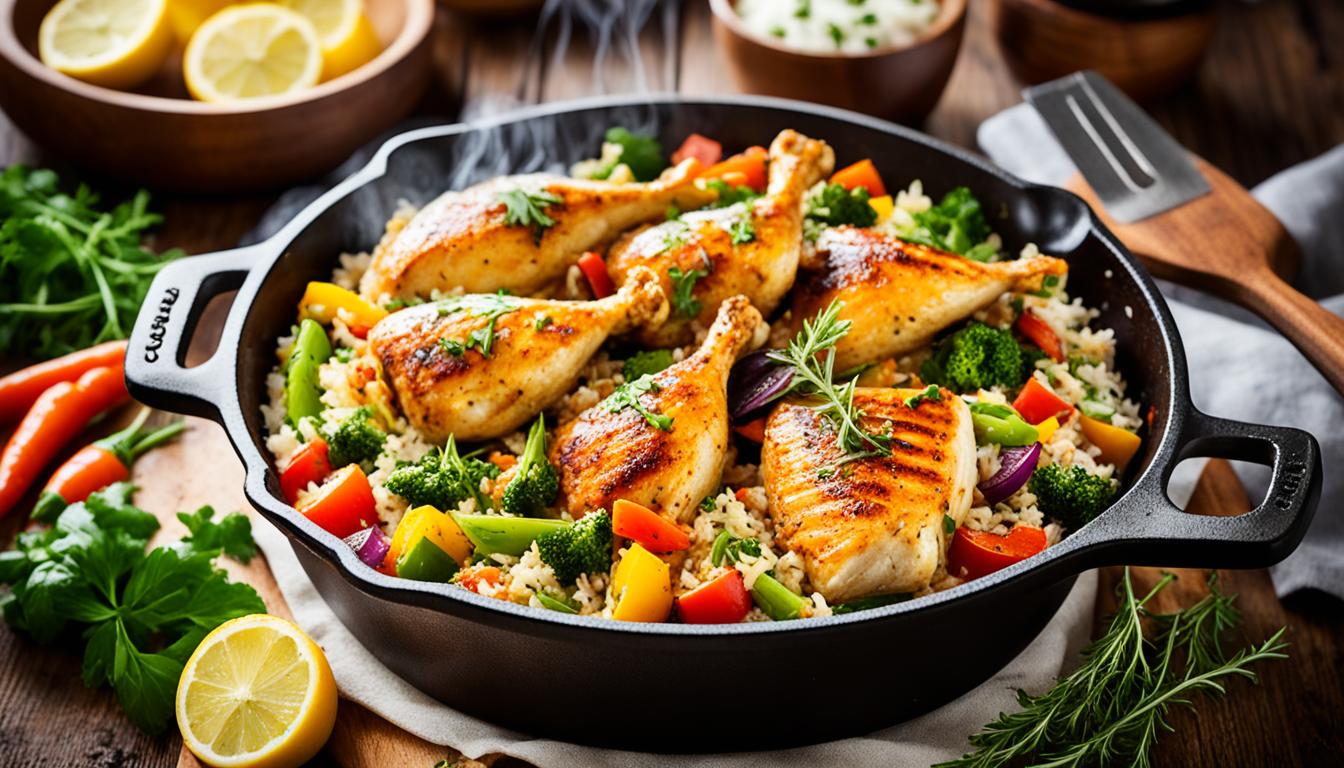
- 7 One-Pan Chicken and Root Vegetable Roast
- 8 Mediterranean-Inspired Olive and Tomato Chicken
- 9 Honey Mustard Glazed Cast Iron Chicken
- 10 Spicy Harissa and Preserved Lemon Roasted Chicken
- 11 Asian-Inspired Soy and Ginger Skillet Chicken
- 12 Bacon-Wrapped Herb Butter Stuffed Chicken
- 13 Cast Iron Skillet Roasted Chicken Recipes with Beer and Barbecue Sauce
- 14 Crispy-Skinned Buttermilk Roasted Chicken
- 15 Tips for Cleaning and Maintaining Your Cast Iron Skillet
Why People Love Cast Iron Skillet Cooking
There’s a moment — right around the 5-minute mark when chicken skin is sitting flat against a hot cast iron surface — where the whole kitchen changes. The sizzle shifts. The smell deepens. And if you’ve done it right, the skin starts pulling away at the edges on its own, which means it’s building the kind of crust you genuinely cannot fake in a non-stick pan or on a sheet tray.
That’s the whole reason to do this.
I’ve been making cast iron skillet roasted chicken for long enough that my wife now just assumes Sunday nights smell a certain way. My two teenage sons — who have strong and frequently updated opinions about dinner — fight over the crispy bits without being asked. You want the people in your house to fight over something? Get your sear right.
Same pan handles steaks, stir-fries, cornbread, frittatas. It’s the most useful thing in my kitchen by a significant margin. If you’re shopping for one, I’ve also written about skillets with removable pans — different use case, worth knowing about.
According to the USDA Economic Research Service, chicken overtook beef as the most consumed meat in the U.S. back in 2010 — and by 2021, Americans were putting away 68.1 pounds of chicken per person each year versus 56.2 pounds of beef. There’s an obvious reason for that. It’s affordable. It’s fast. And in cast iron, it’s something people actually get excited about eating.
Essential Tools for Perfect Skillet Roasted Chicken
Short list. Everything on it matters.
The pan. A 10 to 12-inch cast iron skillet is what you need. Go smaller and the chicken pieces crowd each other — moisture builds up and the whole thing steams instead of roasting. That’s not what we’re after.
Seasoning. A properly seasoned pan means the skin releases cleanly when it’s ready. A poorly seasoned pan means you’ll tear the crust trying to flip it and end up frustrated. Season ahead of time — not in the middle of a recipe.
An oven thermometer. I ignored this for years. Big mistake. Oven dials are often inaccurate — sometimes by 25 to 50 degrees. A cheap hanging thermometer tells you what’s actually happening in there.
A meat thermometer. 165°F at the thickest part, not touching bone. That’s the number. Guessing by color or pressing the meat with your finger is how you either undercook chicken or turn it into leather.
Tongs. Just good ones. For flipping without piercing the meat — every hole you put in a thigh is juice leaving the thigh.
That’s the whole list.
Preparing Your Chicken for Roasting
Most people skip dry brining. That’s a mistake, and it’s the reason their chicken tastes good but not great.
Salt it generously — all over, not a polite sprinkle — at least an hour before cooking. The night before is better. Here’s what actually happens: the salt pulls surface moisture out of the meat, and then that same moisture reabsorbs back in over the following hours as a seasoned liquid. The result is chicken that’s salted all the way through, not just on the exterior.
Pat it dry before it hits the pan. Genuinely dry — paper towels, every surface, press down and hold for a second. Any moisture still sitting on the skin when it touches hot cast iron turns to steam. Steam is the opposite of crust.
Same logic I use when making cast iron skillet Chicago deep dish pizza — pan prep and moisture control change the outcome completely.

Pull the chicken out of the fridge 20 to 30 minutes before cooking. Cold chicken dropped into a screaming hot pan creates an uneven cook — the outside hits the heat hard before the inside has had any chance to warm. Room-temperature start gives you more control.
Air-chilled chicken is worth buying when you can find it. It retains less water than water-chilled chicken, which means drier skin from the start. Drier skin crisps better. Simple.
Basic Cast Iron Skillet Roasted Chicken Technique
This is the foundation. Every flavored recipe further down this page uses this same sequence — the only thing that changes is what’s rubbed on the outside. Get this technique dialed in and the rest becomes easy.
Tuesday nights, this is what I make. A stir-fry pan gets dinner on the table faster, sure — but when I want something that actually feels like I cooked and not just assembled food, this is it. Twenty minutes of active work. Then the oven does everything.
Ingredients (Serves 4)
- 4 bone-in, skin-on chicken thighs (thighs and drumsticks both work)
- 1-1/2 tsp kosher salt
- 1 tsp black pepper
- 1 tsp garlic powder
- 1 tsp onion powder
- 1/2 tsp smoked paprika
- 1 tbsp olive oil
Instructions
Season the chicken all over — get under the skin too, push the seasoning directly onto the meat where you can. Do this an hour minimum before cooking, overnight in the fridge if you have the time. Leave it uncovered on a plate so the skin can start drying out.
When you’re ready to cook, blot every surface dry. The skin should feel almost papery — if it’s still tacky or damp, more time with paper towels.
Preheat the oven to 425°F. Set the cast iron on a burner over medium-high and let it heat for a full 4 to 5 minutes. Not 2. Not 3. Add the oil — it should shimmer the moment it hits the pan.
Lay the chicken skin-side down. Press it gently with a spatula for the first 10 seconds to get full contact with the pan surface. Then leave it alone. The skin will stick at first — that’s expected, not a problem. After 5 to 7 minutes it will release on its own when the sear has properly formed. If you’re trying to lift it and it’s resisting, it’s telling you it needs more time.
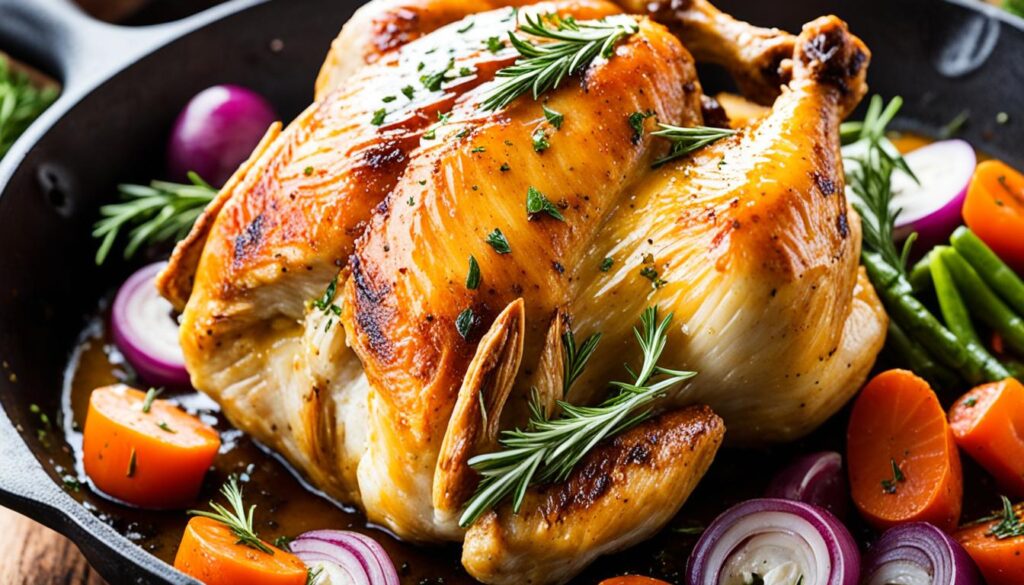
Flip it over. Slide the whole skillet into the oven. Roast 20 to 25 minutes until internal temp reads 165°F and the skin has gone a deep, burnished gold — not pale, not light brown, genuinely dark and slightly glossy.
Five minutes rest before serving. Non-negotiable.
Nutritional Information (Per Serving)
| Nutrient | Amount per Serving |
|---|---|
| Calories | 310 |
| Carbohydrates | 1g |
| Protein | 32g |
| Fat | 20g |
| Fiber | 0g |
| Sodium | 580mg |
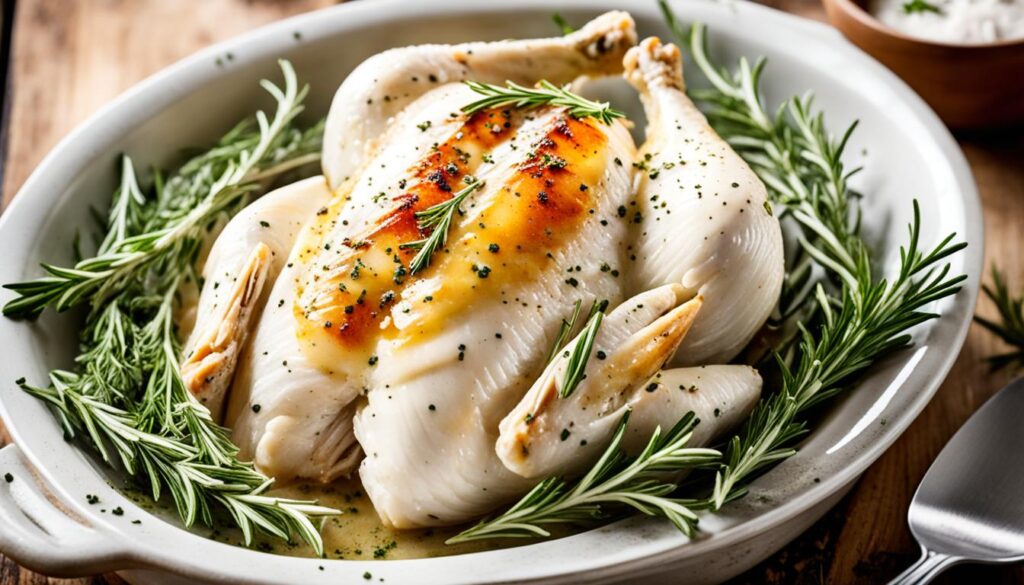
Herb-Infused Lemon Garlic Roasted Chicken
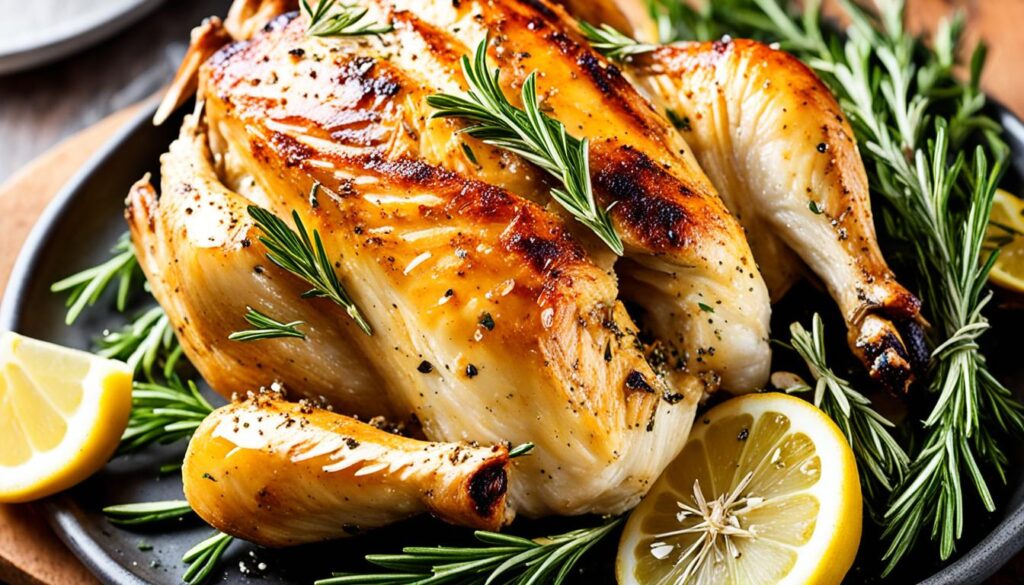
My wife asks for this one by name. She doesn’t ask for most things by name. This one she does — “the lemon garlic one” — and has since about the third time I made it.
The compound butter under the skin is doing something specific: it melts as the chicken roasts and bastes the meat from the inside rather than the outside. The result is breast meat that doesn’t dry out, which — if you’ve ever roasted a chicken breast and ended up with something resembling chalk — you’ll appreciate isn’t a given.
Also, the lemon isn’t just there for flavor. The acidity in the zest works on the surface protein of the skin and actually helps it crisp. So it’s functional. Not decorative.
Ingredients (Serves 4)
- 4 bone-in, skin-on chicken breasts
- 4 tbsp unsalted butter, softened to actual room temperature (not cold, not melted)
- 4 cloves garlic, minced
- Zest of 1 large lemon plus 2 tbsp fresh juice
- 2 tbsp fresh rosemary, finely chopped
- 2 tbsp fresh thyme leaves
- 1 tbsp fresh flat-leaf parsley, chopped
- 1-1/2 tsp kosher salt
- 1/2 tsp black pepper
- 1 tbsp olive oil
- A few lemon slices to toss in the pan
Instructions
Start with the compound butter. Mix softened butter with the garlic, lemon zest, rosemary, thyme, parsley, half a teaspoon of the salt, and the pepper. It should smell like something you’d happily spread on bread at a nice restaurant. Set it aside.
Work your fingers gently between the skin and breast meat to open up a pocket — go slowly, it tears if you rush. Push about 1-1/2 tablespoons of butter into each pocket and smooth it over the meat from the outside. You can feel it spreading. Season the exterior with remaining salt and rub with olive oil.
If you have an hour, refrigerate uncovered. Overnight is genuinely better — the skin dries further and the butter firms up, so it releases into the meat more evenly during roasting rather than running straight out.
Preheat to 425°F. Heat cast iron over medium-high. Add a small splash of oil. Sear the chicken skin-side down 5 to 6 minutes until the exterior is a deep golden color. Flip. Drop the lemon slices in around the chicken — they caramelize in the drippings and turn sweet and intensely flavored.
Into the oven for 25 to 30 minutes. The skin will look lacquered and golden, with herbs just barely visible underneath. Check for 165°F internally.

Squeeze the caramelized lemon slices over everything before serving. By that point the juice is concentrated and slightly smoky from the pan — completely different from fresh lemon.
Nutritional Information (Per Serving)
| Nutrient | Amount per Serving |
|---|---|
| Calories | 420 |
| Carbohydrates | 2g |
| Protein | 38g |
| Fat | 28g |
| Fiber | 0g |
| Sodium | 640mg |
Smoky Paprika and Rosemary Skillet Chicken
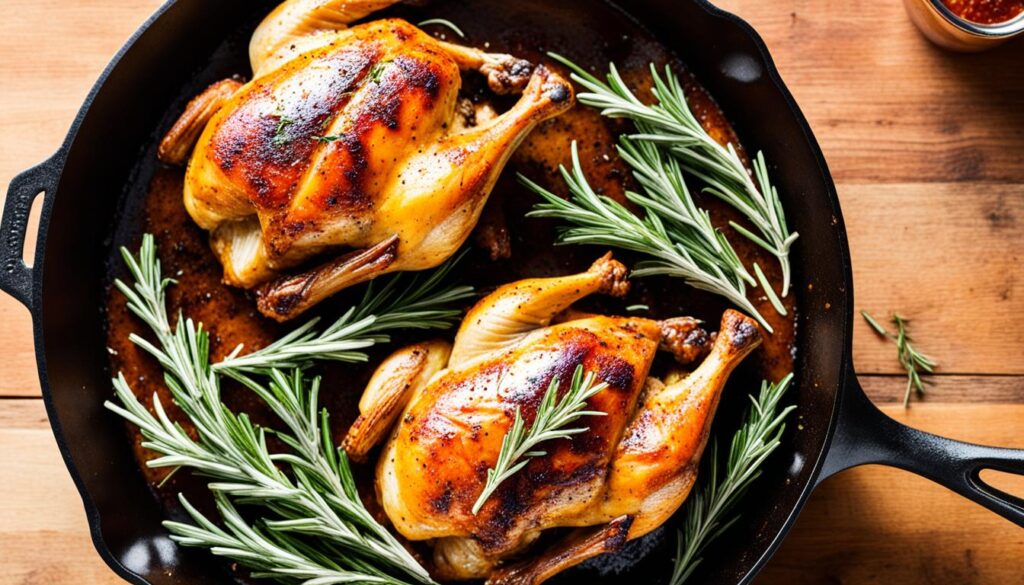
My older son’s pick. Consistently, for about three years. He’s not a kid who volunteers opinions about food — but he will specifically say “can we make the paprika chicken this week?” which, for a teenage boy, is the equivalent of a five-star review.
Smoked paprika turns the skin a dark mahogany red that looks and smells almost exactly like wood-smoked chicken. Except you made it in a regular kitchen on a Thursday night. That trick doesn’t get old.
Important: it has to be smoked paprika. Regular sweet paprika gives color and nothing else. Hot smoked works great if your family handles heat — sweet smoked is the safer bet for a mixed crowd. I usually go sweet and let a little cayenne handle the heat separately.
On nights when I want something smoky alongside something more umami-forward, I’ll pair this with a shrimp and broccoli stir-fry with oyster sauce. Very different flavor worlds. Works well together.
Ingredients (Serves 4)
- 4 bone-in, skin-on chicken thighs
- 2 tsp smoked paprika
- 1 tsp garlic powder
- 1 tsp onion powder
- 1 tsp kosher salt
- 1/2 tsp black pepper
- 1/4 tsp cayenne pepper
- 2 tbsp fresh rosemary, finely chopped
- 1 tbsp olive oil
- 4 cloves garlic, smashed but not peeled
- 1/2 cup chicken broth
Instructions
Combine the smoked paprika, garlic powder, onion powder, salt, pepper, cayenne, and rosemary in a small bowl. Mix it together, then rub it hard into the chicken — under the skin where you can reach, all over the surface. The coating should be a rust-red paste that clings to everything. Let it sit at minimum 30 minutes; an hour is better.
Heat the cast iron over medium-high and add olive oil. Lay the chicken skin-side down — the paprika blooms in the hot oil almost immediately and the kitchen will smell genuinely great. The skin will look very dark after a few minutes. That is the paprika doing its job, not the chicken burning. As long as it’s not black and acrid, keep going. Five to 6 minutes.
Flip. Tuck the smashed garlic cloves around the pieces. Pour the chicken broth into the bottom of the pan — not over the chicken, just the base. It keeps the drippings from scorching while the chicken finishes and adds depth to the fond.
Roast at 400°F for 20 to 25 minutes. Internal temp 165°F.
Nutritional Information (Per Serving)
| Nutrient | Amount per Serving |
|---|---|
| Calories | 320 |
| Carbohydrates | 2g |
| Protein | 32g |
| Fat | 20g |
| Fiber | 0g |
| Sodium | 620mg |
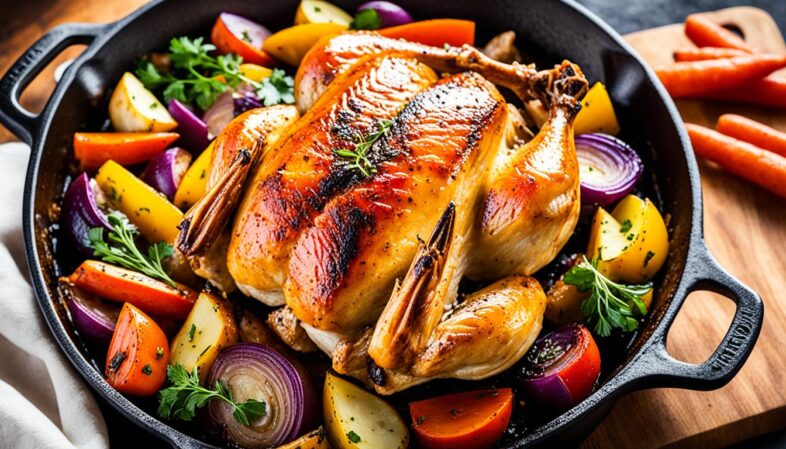
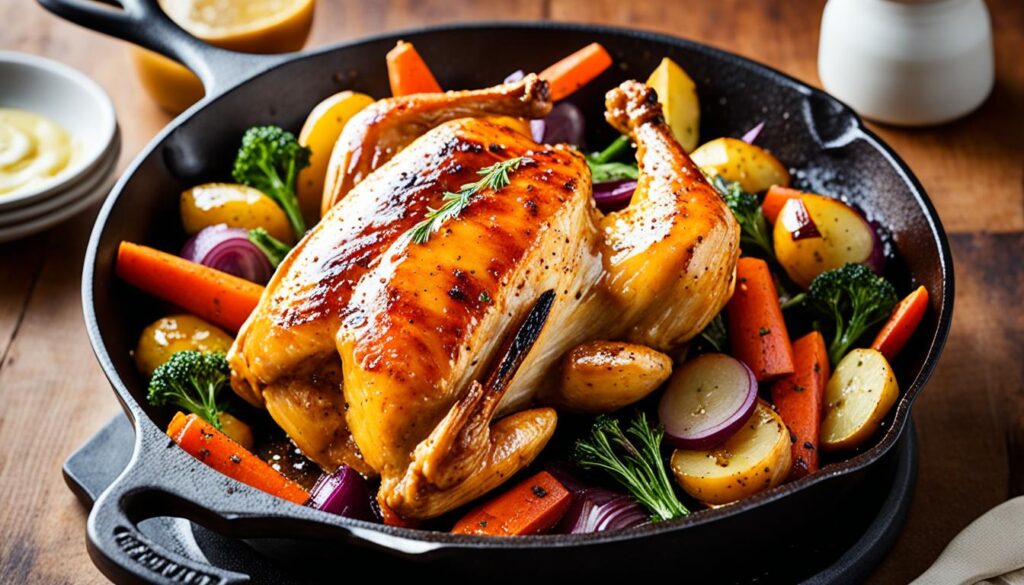
One-Pan Chicken and Root Vegetable Roast
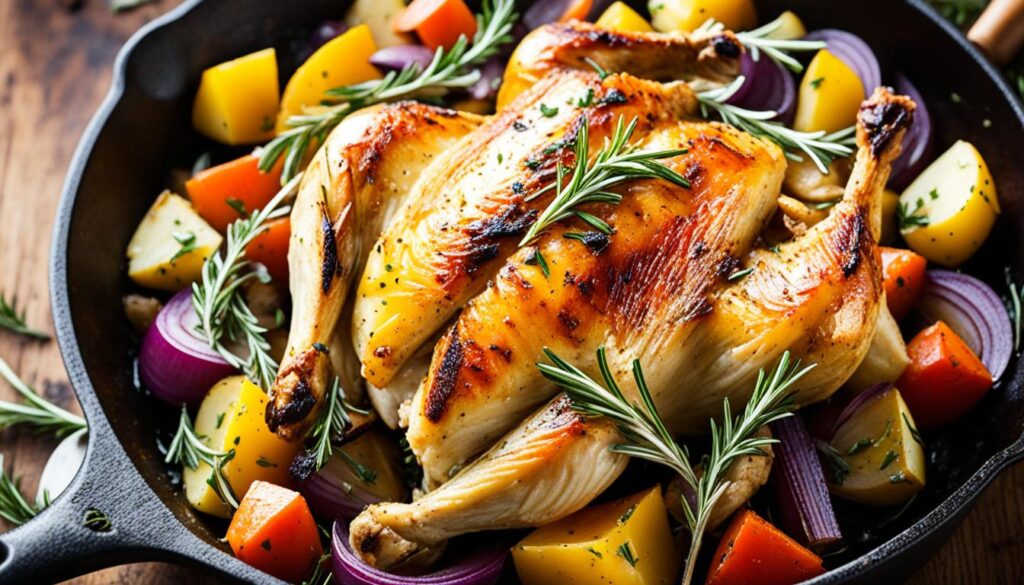
One pan. Complete dinner. One thing to wash afterward. That’s the pitch, and it delivers.
The vegetables go into the cast iron first, and the chicken sits on top. As the thighs roast, fat renders out of the skin and drips down onto the carrots and potatoes below — those vegetables absorb every bit of it. The bottom layer caramelizes. The edges crisp. I’ve caught my sons picking at the vegetables before dinner is plated, which for teenagers who would otherwise claim not to like vegetables is meaningful.
The National Chicken Council reports that Americans eat around 100 pounds of chicken per person annually — more than any other country. Most of it is boneless, skinless breast from a package. Nothing wrong with that. But a bone-in thigh roasted over root vegetables in cast iron is a completely different experience, and if you haven’t made it this way, there’s something worth trying here.
Ingredients (Serves 4)
- 4 bone-in, skin-on chicken thighs
- 2 medium carrots, cut into roughly 1-inch pieces
- 2 medium parsnips, same size
- 1 lb baby potatoes, halved
- 1 medium red onion, cut into wedges
- 6 cloves garlic, whole and unpeeled
- 3 tbsp olive oil, used in two stages
- 1-1/2 tsp kosher salt, split between chicken and vegetables
- 1 tsp black pepper, split
- 1 tsp fresh thyme leaves
- 1 tsp fresh rosemary, chopped
- 1/2 tsp smoked paprika
Instructions
Preheat oven to 425°F. Set the empty cast iron inside while it preheats — you want the pan itself screaming hot before the vegetables hit it.
Toss the carrots, parsnips, potatoes, onion, and garlic with 2 tbsp olive oil, 1 tsp salt, and 1/2 tsp pepper. Lightly coated, not drenched.
Season the chicken with remaining salt, pepper, thyme, rosemary, and smoked paprika. Rub with the last tablespoon of olive oil.
Pull the hot pan from the oven and spread the vegetables in it — they’ll sizzle on contact, which is what you want. Set the chicken thighs skin-side up directly on top, pressing them gently into the vegetables. The skin needs to stay above any pooling moisture; if it’s touching liquid it won’t crisp properly.
Roast 45 to 50 minutes without opening the oven. The vegetables on the bottom will be tender and caramelized at the edges — some will look quite dark. That’s fine. Great, actually. Check the chicken at 165°F internally.
When serving, squeeze those whole roasted garlic cloves out of their skins onto the vegetables. By this point they’re completely sweet and mild — almost like a soft, spreadable garlic — and they’re worth making a point of using.
Nutritional Information (Per Serving)
| Nutrient | Amount per Serving |
|---|---|
| Calories | 520 |
| Carbohydrates | 38g |
| Protein | 34g |
| Fat | 24g |
| Fiber | 6g |
| Sodium | 680mg |
Mediterranean-Inspired Olive and Tomato Chicken
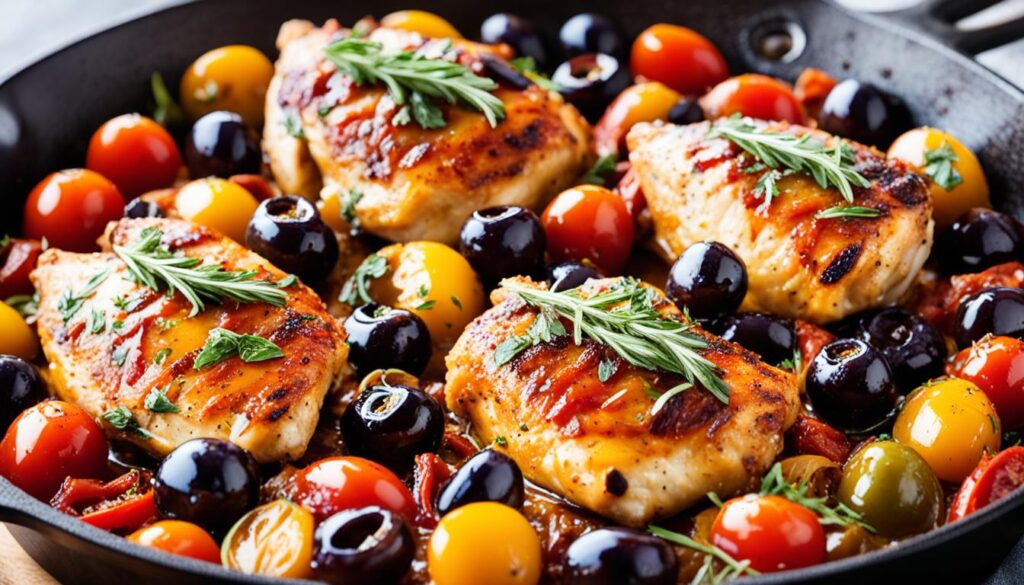
Weekend dinner. My wife specifically. She’s the Mediterranean food person in this house — olives, capers, tomatoes, white wine — and this recipe checks every one of those boxes in a single skillet that goes straight to the table.
The pan sauce that develops underneath the chicken while it roasts is what makes this recipe worth making. Tomatoes burst open. Olive brine bleeds into the liquid. The wine reduces. By the time it comes out of the oven there’s this intensely flavored, glossy sauce pooling in the bottom of the cast iron. My sons mop it up with crusty bread and then argue about who gets the last piece. Every time.
Ingredients (Serves 4)
- 4 bone-in, skin-on chicken thighs
- 1-1/2 tsp kosher salt
- 1/2 tsp black pepper
- 1 tsp dried oregano
- 1/2 tsp garlic powder
- 2 tbsp olive oil, divided
- 1 cup cherry tomatoes, left whole
- 1/2 cup Kalamata olives, pitted
- 2 tbsp capers, drained and roughly chopped
- 4 cloves garlic, sliced thin
- 1/3 cup dry white wine
- 1/4 cup chicken broth
- 2 tbsp fresh basil, torn just before serving
- Crusty bread alongside
Instructions
Season the chicken with salt, pepper, oregano, and garlic powder. Rub with 1 tbsp olive oil.
Heat cast iron over medium-high. Add remaining olive oil. Sear chicken skin-side down — 5 to 6 minutes, until the skin looks genuinely golden and has some structure to it, not pale and limp. Flip and cook another 2 minutes. Remove chicken to a nearby plate — it’s coming back.
Turn the heat to medium. Add the sliced garlic to the fat left in the pan. Cook about 30 seconds, stirring — fragrant, barely golden at the edges. The moment it starts to darken, pour in the white wine. Let it bubble hard for a full minute while you scrape up anything stuck to the pan bottom. Add chicken broth, then scatter in the cherry tomatoes, olives, and capers.
Settle the chicken back in skin-side up, pressing it lightly down into the tomato mixture while keeping the skin above the liquid.
Into a 400°F oven for 25 to 30 minutes. Scatter torn basil over everything when it comes out. Serve right from the skillet.
Nutritional Information (Per Serving)
| Nutrient | Amount per Serving |
|---|---|
| Calories | 380 |
| Carbohydrates | 6g |
| Protein | 33g |
| Fat | 24g |
| Fiber | 2g |
| Sodium | 890mg |
Honey Mustard Glazed Cast Iron Chicken
My younger son’s standing request. This and the jalapeño popper burgers from my other recipes are the two things he’ll specifically ask for — and he’s been asking for this one since he was about twelve.
The glaze goes on twice during cooking: once right after flipping on the stovetop, and once halfway through oven time. Each layer caramelizes on the cast iron heat and the next builds on top of it. By the end there’s a sticky, dark amber coating that looks like something requiring real skill. It didn’t. The technique is simple. The result isn’t.
For nights when I want something different from the same cast iron, I’ll sometimes follow this with a shrimp and dumpling stir-fry the next evening. Different flavor world, same pan.
The National Institutes of Health notes that chicken is one of the best dietary sources of choline — a nutrient essential for brain function and metabolism that most people don’t actually hit their recommended daily intake of. So the chicken underneath this honey mustard is doing real nutritional work, even if that’s not why anyone’s eating it.
Ingredients (Serves 4)
- 4 bone-in, skin-on chicken thighs
- 1-1/2 tsp kosher salt
- 1/2 tsp black pepper
- 1/2 tsp garlic powder
- 1 tbsp olive oil
Honey mustard glaze — make this first:
- 3 tbsp Dijon mustard
- 2 tbsp whole grain mustard
- 3 tbsp honey
- 1 tbsp apple cider vinegar
- 1/2 tsp garlic powder
- 1/4 tsp salt
Instructions
Whisk both mustards, honey, apple cider vinegar, garlic powder, and salt together until smooth and glossy. Taste it raw — it’ll be more tangy and sharp than sweet. That’s fine. The honey intensifies and the mustard mellows significantly under heat, and the finished glaze on the chicken will be a much more balanced sweet-savory thing than what you’re tasting now.
Season the chicken all over with salt, pepper, and garlic powder.
Heat the cast iron over medium-high. Add olive oil. Sear skin-side down 5 to 6 minutes. Flip. Immediately brush the skin with a generous coat of the glaze — use about half the batch. It sizzles and starts cooking onto the surface right away.
Into a 400°F oven for 15 minutes. Pull the pan out, brush on the rest of the glaze, return for another 10 to 15 minutes.
The final skin should look dark amber, sticky, almost lacquered — parts of it slightly caramelized-dark where the honey concentrated. That’s exactly the goal. Internal temp 165°F. Let it rest 5 minutes before cutting; the glaze is still liquidy right out of the oven and needs time to set.
Nutritional Information (Per Serving)
| Nutrient | Amount per Serving |
|---|---|
| Calories | 390 |
| Carbohydrates | 18g |
| Protein | 32g |
| Fat | 20g |
| Fiber | 0g |
| Sodium | 710mg |
Spicy Harissa and Preserved Lemon Roasted Chicken

This one I make on weekend nights when my wife and I want something with actual personality and our sons are willing to try something outside their usual rotation. They’re typically skeptical before the first bite. Typically not skeptical after.
Harissa is a North African chili paste — smoky, built on layers of spice rather than straight heat. It’s not like adding hot sauce. It adds depth. Combined with preserved lemon, which is fermented, intensely salty, and bright in a way fresh lemon isn’t, the marinade works deep into the meat overnight and produces chicken that tastes like it came from a good restaurant.
Heat level here is real but not aggressive. More warmth and complexity than fire — which makes it actually edible for most teenagers.
Ingredients (Serves 4)
- 4 bone-in, skin-on chicken thighs
- 3 tbsp harissa paste (Mina and DEA are both reliable store-bought options)
- 2 tbsp preserved lemon rind, very finely chopped — if unavailable, use zest of 2 lemons plus 1 tsp lemon juice as a substitute
- 3 cloves garlic, minced
- 2 tbsp olive oil
- 1 tsp ground cumin
- 1/2 tsp ground coriander
- 1/2 tsp salt
- 1/4 cup plain Greek yogurt for serving
- Fresh cilantro and warm flatbread alongside
Instructions
Mix the harissa, preserved lemon, garlic, olive oil, cumin, coriander, and salt into a thick paste — it should smell smoky, bright, and a little sharp all at once. Rub it onto every surface of the chicken, getting under the skin too. Cover and refrigerate for at least 2 hours. Overnight is significantly better. The flavor difference between 2 hours and 12 hours is not subtle.
Pull the chicken out 30 minutes before cooking.
Heat the cast iron over medium-high. No extra oil needed — the marinade has enough. Place chicken skin-side down. The harissa darkens fast against the hot metal — keep the heat at medium-high rather than screaming high so the crust deepens rather than scorches. Four to 5 minutes. The surface should look brick-red with some slightly charred patches.
Flip. Transfer to a 425°F oven. Roast 22 to 25 minutes until 165°F internally.
Serve with a generous spoonful of Greek yogurt — it tempers the heat and plays off the spices in a way that genuinely improves the dish. Flatbread and cilantro alongside.
Nutritional Information (Per Serving)
| Nutrient | Amount per Serving |
|---|---|
| Calories | 360 |
| Carbohydrates | 4g |
| Protein | 33g |
| Fat | 23g |
| Fiber | 1g |
| Sodium | 720mg |
Asian-Inspired Soy and Ginger Skillet Chicken
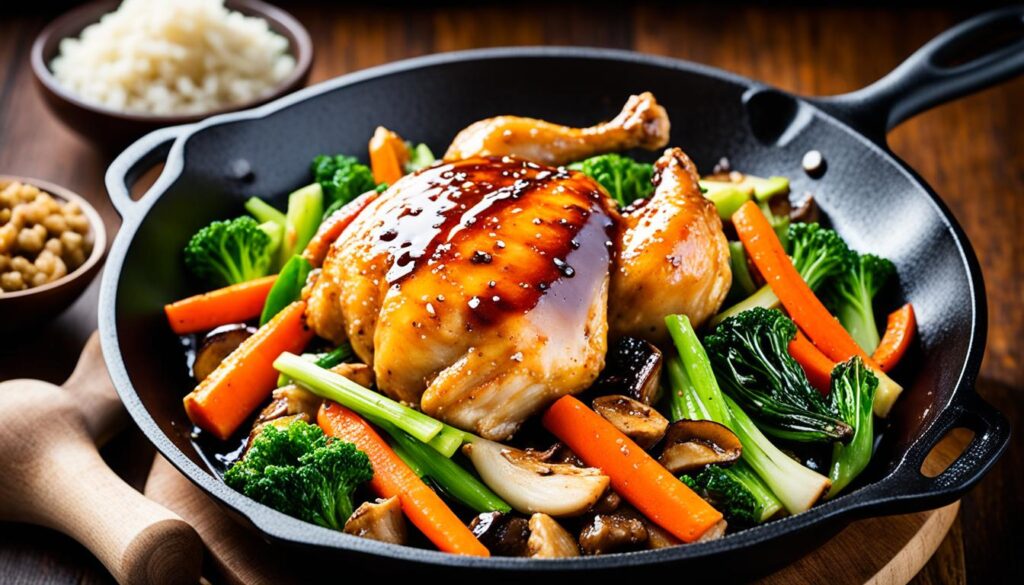
Friday night. My sons want takeout. I make this instead — and we don’t need the takeout. Same dark, sticky, savory glaze that makes a good soy-glazed chicken from a restaurant worth ordering, except it took 35 minutes and cost a fraction of the delivery price.
The soy and brown sugar reduce in the cast iron into something genuinely beautiful. Dark. Lacquered. Caramelized in spots. It doesn’t look like something thrown together on a weeknight, which means you get to look like you have your life organized — rare feeling with two teenagers in the house.
Data from USDA FoodData Central shows a 3.5-ounce serving of cooked chicken breast provides about 31 grams of protein at roughly 165 calories — one of the more efficient lean proteins you can cook. The soy glaze adds sodium and some sugar, but the nutritional core of the meal is solid.
Ingredients (Serves 4)
- 4 bone-in, skin-on chicken thighs
- 1/3 cup low-sodium soy sauce
- 2 tbsp packed brown sugar
- 1 tbsp rice vinegar
- 1 tbsp sesame oil
- 2 tbsp fresh ginger, finely grated
- 4 cloves garlic, minced
- 1/2 tsp red pepper flakes
- 1 tbsp neutral vegetable oil
- 2 green onions, sliced thin on a bias
- 1 tsp sesame seeds
- Steamed jasmine or white rice for serving
Instructions
Whisk together soy sauce, brown sugar, rice vinegar, sesame oil, ginger, garlic, and red pepper flakes. Pour over the chicken and turn to coat all sides. The skin will take on a light tan color from the soy. Marinate at minimum 30 minutes, up to 4 hours — longer than that and the soy pulls too much moisture out.
When ready to cook, lift the chicken out and pat the skin lightly with paper towels. Remove surface wetness so it can sear, not steam. Keep the leftover marinade in the bowl.
Heat cast iron over medium-high. Add vegetable oil. Sear skin-side down 5 to 6 minutes until the skin sets and goes golden. Flip. Pour the reserved marinade into the bottom of the pan — it bubbles immediately and starts reducing.
Into a 400°F oven for 20 to 25 minutes. Baste with the pan sauce once around the halfway mark. The sauce thickens considerably by the end, coating the skin with a dark, lacquered glaze.
165°F internally. Green onions and sesame seeds on top, served over rice.
Nutritional Information (Per Serving)
| Nutrient | Amount per Serving |
|---|---|
| Calories | 400 |
| Carbohydrates | 14g |
| Protein | 33g |
| Fat | 22g |
| Fiber | 0g |
| Sodium | 880mg |
Bacon-Wrapped Herb Butter Stuffed Chicken
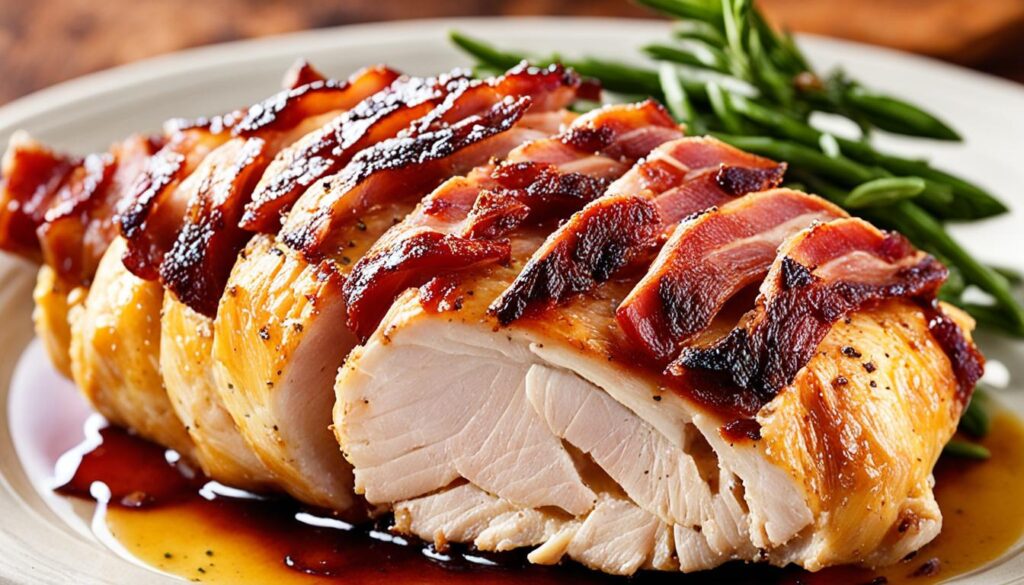
This is the recipe that makes the table go quiet. Not uncomfortably — in the “everyone just started eating and there’s nothing to say” way, which is the best possible outcome for a meal.
Boneless chicken breasts, pocketed and filled with herb compound butter, wrapped in thin-cut bacon, seared in cast iron, finished in the oven. When you cut through the bacon crust and the melted butter runs out into the meat and pools on the cutting board — that’s the moment. Worth the prep.
My wife said “this is the best chicken I’ve ever had” the first time I made it. I’ve tested that claim roughly twenty more times since. It holds.
Ingredients (Serves 4)
- 4 boneless chicken breasts, about 6 to 8 oz each
- 8 strips thin-cut bacon (thin cut matters — thick bacon won’t render and crisp properly in the oven time the chicken needs)
Herb butter — make this first and chill it:
- 4 tbsp unsalted butter, properly softened
- 2 cloves garlic, minced
- 1 tbsp fresh parsley, very finely chopped
- 1 tbsp fresh chives, very finely chopped
- 1 tsp fresh thyme leaves
- 1/2 tsp lemon zest
- 1/4 tsp each salt and black pepper
Outside seasoning:
- 1/2 tsp salt
- 1/4 tsp black pepper
- 1/2 tsp smoked paprika
Instructions
Mix the softened butter with garlic, parsley, chives, thyme, lemon zest, salt, and pepper. Lay a sheet of plastic wrap on the counter, drop the butter in the center, roll it into a rough log, and twist the ends closed. Refrigerate 20 minutes. You want it firm enough to slice into clean rounds — soft butter falls apart when you try to stuff it.
While the butter chills, cut a deep horizontal pocket into each breast. Go in from the thick side, cut almost all the way through, stop about 1/2 inch from the opposite edge — you’re opening it like a book, not cutting through completely. Slice the chilled butter log into 4 rounds and place one inside each pocket. Press the breast firmly closed.
Season the outside with salt, pepper, and smoked paprika. Wrap each breast with 2 bacon strips, overlapping as you go, and tuck the ends underneath so they don’t unravel during cooking.
Cast iron over medium — not medium-high, medium. Thin bacon on a screaming hot pan burns before the chicken inside cooks through. Sear 3 to 4 minutes per side until the bacon is golden and starting to crisp.
Into a 375°F oven for 20 to 25 minutes. The butter melts into the breast from the inside the entire time it roasts, while the bacon renders and crisps around the exterior. Rest 5 full minutes. When you cut in, the residual herb butter runs out — that’s not a problem. That’s the point.
Nutritional Information (Per Serving)
| Nutrient | Amount per Serving |
|---|---|
| Calories | 520 |
| Carbohydrates | 1g |
| Protein | 46g |
| Fat | 36g |
| Fiber | 0g |
| Sodium | 820mg |
Cast Iron Skillet Roasted Chicken Recipes with Beer and Barbecue Sauce
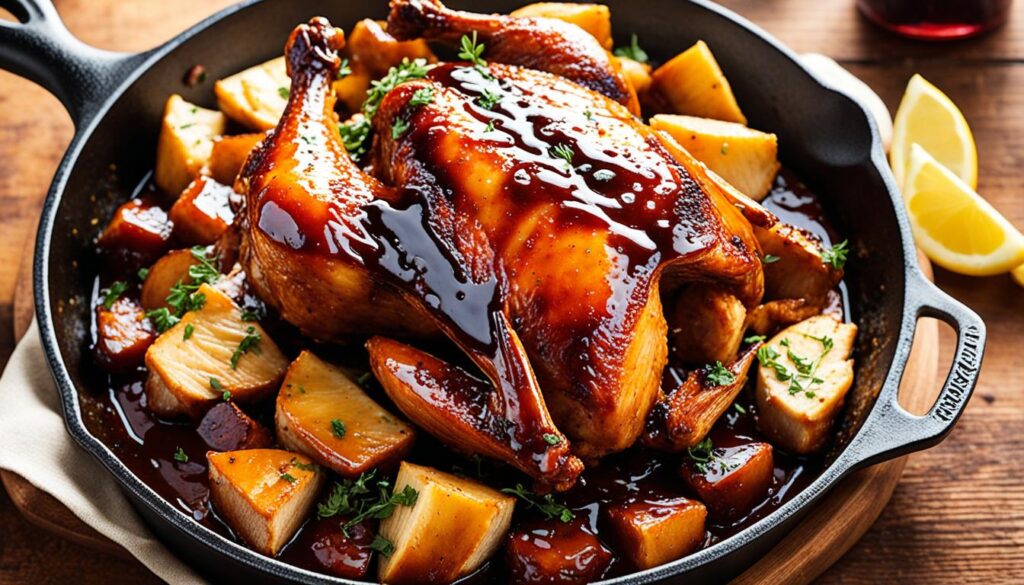
Saturday afternoon. The house starts smelling like this around 3 PM and by dinner everyone has wandered into the kitchen at least once to ask when it’ll be ready.
My sons think this is the best thing I make. That’s a real statement — they eat a lot of food I cook and have opinions about most of it. I tend to agree with them on this one.
The beer — use a dark lager or amber, not a light lager, not an IPA — does two things. First it deglazes the pan and picks up all the dark fond from the searing. Then it braises the chicken gently from below during the covered oven time while the barbecue glaze builds up in layers on top. The beer reduces into a smoky, savory liquid in the pan bottom by the time it’s done. Don’t throw it away. Spoon it over the chicken before serving.
Ingredients (Serves 4)
- 4 bone-in, skin-on chicken thighs plus 4 drumsticks
- 1-1/2 tsp kosher salt
- 1 tsp black pepper
- 1 tsp garlic powder
- 1 tsp smoked paprika
- 1 tbsp vegetable oil
- 1 bottle (12 oz) dark lager or amber beer
- 1 cup barbecue sauce, store-bought or homemade
- 1 tbsp brown sugar
- 1 tbsp apple cider vinegar
- 1 tsp Worcestershire sauce
Instructions
Mix the barbecue sauce with brown sugar, apple cider vinegar, and Worcestershire. Stir until smooth. Set aside — this is your finishing glaze.
Season all the chicken pieces with salt, pepper, garlic powder, and smoked paprika.
Get the cast iron over medium-high and add oil. Sear the chicken in batches — skin-side down first, 5 to 6 minutes per batch. Don’t crowd the pan; crowded pieces steam rather than sear. The skin should be deeply golden and dark, not pale. Remove seared pieces to a plate.
Pour off most of the fat, leaving about a tablespoon in the pan. Now pour the beer in — it will foam and bubble immediately and dramatically. Use a wooden spoon to scrape up everything from the pan bottom while the foam is still active. All that dark stuff stuck down there is flavor.
Return all the chicken to the skillet skin-side up. Brush the tops generously with the barbecue glaze. Cover loosely with foil and put into a 350°F oven for 30 minutes.
Uncover. Brush with more glaze. Raise the temperature to 425°F and roast another 15 to 20 minutes. The glaze will caramelize and turn sticky and very dark. The skin should look deeply colored and lacquered. Internal temp 165°F.
Spoon the reduced beer liquid from the pan over everything before serving.
Nutritional Information (Per Serving)
| Nutrient | Amount per Serving |
|---|---|
| Calories | 490 |
| Carbohydrates | 28g |
| Protein | 38g |
| Fat | 24g |
| Fiber | 0g |
| Sodium | 920mg |
Crispy-Skinned Buttermilk Roasted Chicken
This one requires planning. Brine overnight — there’s no shortcut that produces the same result. But in exchange for that planning, you get the best roasted chicken skin I’ve been able to produce at home. Thin. Shattering. The kind that sounds faintly hollow when you tap it.
The technique comes directly from Southern fried chicken. Buttermilk’s acidity does something to the protein structure of the meat that makes it measurably more tender. Combined with the overnight dry period in the fridge after brining, the skin ends up almost desiccated on the surface — and desiccated skin against a hot cast iron pan becomes something extraordinary.
Research from PMC via the National Library of Medicine confirms that American chicken consumption has more than tripled since the 1960s, with chicken now accounting for 13.9% of the animal protein consumed nationally. People have clearly figured out it’s worth cooking well.
Ingredients (Serves 4)
Buttermilk brine:
- 2 cups full-fat buttermilk
- 2 tbsp kosher salt
- 1 tbsp garlic powder
- 1 tsp onion powder
- 1 tsp black pepper
- 1/2 tsp cayenne pepper
- 1 tsp smoked paprika
For roasting:
- 4 bone-in, skin-on chicken thighs
- 1 tbsp vegetable oil
- 1/2 tsp kosher salt
- 1/4 tsp black pepper
Instructions
Whisk the buttermilk together with the salt, garlic powder, onion powder, pepper, cayenne, and paprika. Add the chicken and make sure every piece is submerged. Cover and refrigerate. Overnight is the target; 4 hours is the bare minimum. The difference in result between 4 hours and 12 is real and noticeable.
Here is the step everyone tries to skip: after pulling the chicken from the brine, pat every surface completely dry with paper towels — aggressively, pressing down and holding. Then set the pieces on a wire rack over a baking sheet and slide them uncovered back into the fridge for at least 1 hour, preferably 2. The surface needs to fully air-dry.
Before it goes in the pan, the chicken should look almost matte. Dry to the touch. If it still looks at all glossy or damp, it needs more time.
Rub with a thin coat of vegetable oil. Season with remaining salt and pepper.
Heat cast iron over medium-high for a full 5 minutes. Lay the chicken skin-side down. Cook 6 to 7 minutes without moving — buttermilk-brined skin takes slightly longer to set than unseasoned skin, and if you try to move it too early you’ll tear the crust you spent all that prep building.
Flip. Into a 425°F oven for 22 to 28 minutes. The skin should be golden-brown and make a faint hollow sound when you tap it with a fingernail. That’s the test for truly crisp. Internal temp 165°F.
Five minutes rest. Actually rest it this time.
Nutritional Information (Per Serving)
| Nutrient | Amount per Serving |
|---|---|
| Calories | 350 |
| Carbohydrates | 4g |
| Protein | 34g |
| Fat | 21g |
| Fiber | 0g |
| Sodium | 740mg |
Tips for Cleaning and Maintaining Your Cast Iron Skillet
Cast iron is not as demanding as its reputation. Most of the rules people follow are either overcautious or wrong.
Clean it warm, not hot. A warm pan releases food residue easily. Cold makes everything grip. Hot water and a stiff brush or chainmail scrubber — that’s it. Works on stuck-on chicken skin, roasted vegetables, caramelized glaze residue, everything.
Soap. The “never use soap” rule is overstated. A small amount of dish soap on a really dirty pan won’t destroy properly built seasoning. Rinse well, dry completely, and you’ll be fine. What you genuinely can’t do is let it soak in water — that actually damages cast iron.
Dry it on the burner. After washing, 2 to 3 minutes over low heat drives off any moisture hiding in the iron’s surface pores. This is how you prevent rust. Moisture left in cast iron will rust it eventually, every time.
A thin oil wipe after drying. A paper towel with a tiny amount of neutral oil — just enough to give the surface a faint sheen, not a wet coat — maintains the seasoning between cooking sessions.
Rust isn’t the end. It happens to everyone eventually. Scrub it off with steel wool, rinse, dry completely on a hot burner, and re-season in a 450°F oven with a thin oil coat for an hour. It comes back fully. Every time.
Here’s what nobody tells you about cast iron: it genuinely gets better with use. Not metaphorically — measurably. The seasoning builds with each cooking session. The surface becomes more naturally non-stick. Heat distributes more evenly as the seasoning fills in microscopic surface irregularities. Every chicken you roast, every Sunday dinner, every weeknight thigh makes the pan slightly better for the next one. That’s a very good deal for a piece of cookware that costs less than a single restaurant meal.