Cast iron skillet ground beef recipes produce better flavor, a real sear, and actual browning that a nonstick pan physically cannot match.
I’ll be honest — I resisted cast iron for ground beef for longer than I should have. Seemed like overkill for tacos. Then one night I ran out of nonstick pans (long story involving my younger son and a camping trip) and grabbed the cast iron out of desperation. The beef browned differently. Like, actually browned — dark and crusty on the bottom, with those little fond bits sticking to the surface that turn into pure flavor when liquid hits them. I haven’t gone back.
My wife now refers to the cast iron as “your other family member.” My sons just know dinner is better when it comes out of the black pan.
Table of Contents
- 1 Why People Love Cooking Ground Beef in Cast Iron
- 2 Selecting the Right Ground Beef for Skillet Cooking
- 3 Essential Tools and Ingredients for Cast Iron Skillet Recipes
- 4 Preparing Your Cast Iron Skillet for Cooking
- 5 1. Classic Skillet Cheeseburger
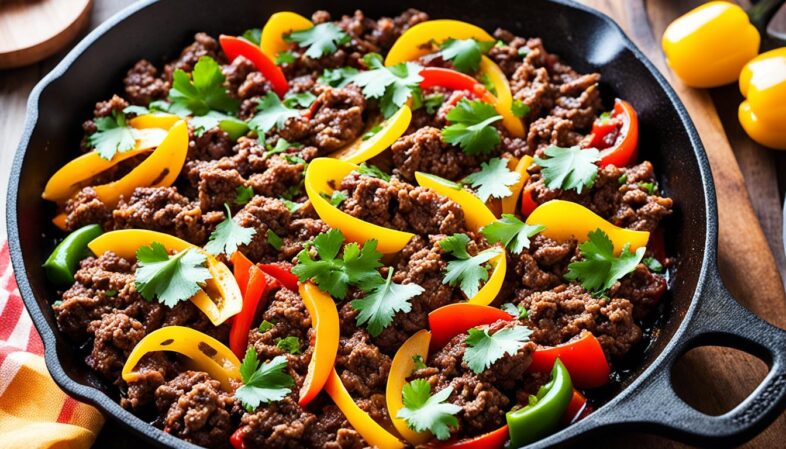
- 6 2. Tex-Mex Ground Beef Skillet
- 7 3. Italian-Style Ground Beef and Pasta Skillet
- 8 4. Hearty Shepherd’s Pie Skillet
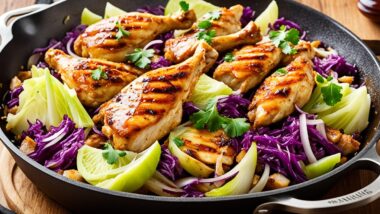
- 9 5. Asian-Inspired Ground Beef Stir-Fry Skillet
- 10 6. Sloppy Joe Skillet
- 11 7. Ground Beef and Quinoa Power Bowl Skillet
- 12 8. Taco Tuesday: Skillet Ground Beef Tacos
- 13 Tips for Cleaning and Maintaining Your Cast Iron Skillet
Why People Love Cooking Ground Beef in Cast Iron
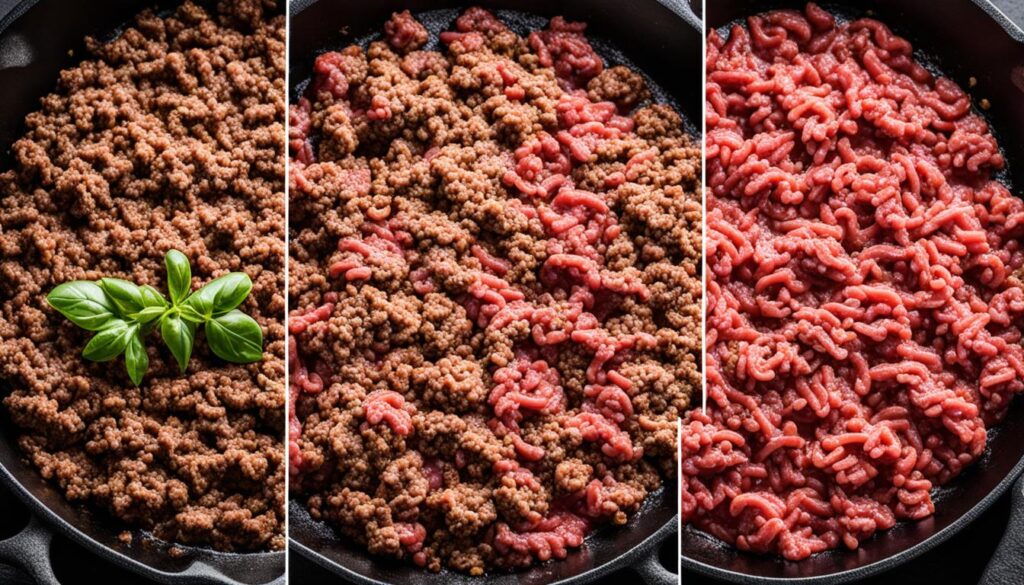
People love cooking ground beef in cast iron because the pan holds heat when cold meat hits it — so browning actually happens instead of steaming.
Here’s the thing most people don’t think about. When you put cold ground beef into a nonstick pan, the pan temperature drops. The moisture coming off the meat can’t evaporate fast enough. So the beef sits in liquid and steams. You get gray meat. Soft, pale, and kind of sad.
Cast iron doesn’t do that. The thermal mass is too high. Temperature holds, moisture evaporates, and the Maillard reaction — the browning — actually gets to happen.
That brown crust on the bottom of the pan? Fond. Using a cast iron skillet means you get fond. Deglaze it with broth or tomatoes and the whole dish gets deeper and richer without doing anything extra.
According to the USDA Agricultural Research Service, a 3-ounce cooked serving of 80/20 ground beef has around 17 grams of protein. Fat carries flavor — cast iron renders that fat properly instead of letting it pool and steam everything.
A few other reasons cast iron works for one-pan stir-fries and ground beef dishes:
- Stovetop to oven, no switching pans — huge for shepherd’s pie and anything with a broiled top
- Keeps food hot at the table while everyone’s still loading their plates
- Builds seasoning over time, which subtly flavors every dish that follows
- Handles genuinely high heat without warping, releasing chemicals, or making that sad nonstick scratching sound
Selecting the Right Ground Beef for Skillet Cooking
The right ground beef for cast iron is 80/20 for most recipes — enough fat to brown properly, not so much that you’re draining constantly.
Fat-to-lean ratio matters more than most people realize. The fat doesn’t just add calories — it carries flavor compounds, helps with browning, and keeps the meat from drying out during the longer simmer recipes need.
Quick breakdown:
- 80/20 — best for tacos, burgers, pasta skillets, anything where beef flavor is the point
- 85/15 — good middle ground, slightly less to drain, still browns well
- 90/10 — fine for lighter dishes like quinoa bowls, but it dries out quickly and the browning suffers noticeably
- 93/7 — technically works. Barely. Add a splash of oil if you use it.
One technique that matters more than fat ratio: don’t break up the beef immediately. Put it in the pan, press it flat, and leave it alone for 90 seconds. Let the bottom crust form. Then break it apart. That crust is the flavor — crumbled gray meat cooked from the start has none of it.
Same principle applies in the Shrimp and Dumpling Stir-Fry recipe. Protein needs undisturbed contact with a hot surface to develop any real color.
Essential Tools and Ingredients for Cast Iron Skillet Recipes
You need less than you think. A 12-inch skillet, something flat to stir with, and a splatter screen if you want your stovetop to survive.
The actual essentials:
- 12-inch cast iron skillet — the 10-inch works, but for browning a full pound and a half of beef without crowding, you want the surface area
- Flat-edged wooden spatula or metal fish spatula — metal scrapes fond better, wood is gentler on the seasoning
- Splatter screen — 80/20 beef in a hot cast iron pan pops aggressively
- Instant-read thermometer for anything finishing in the oven
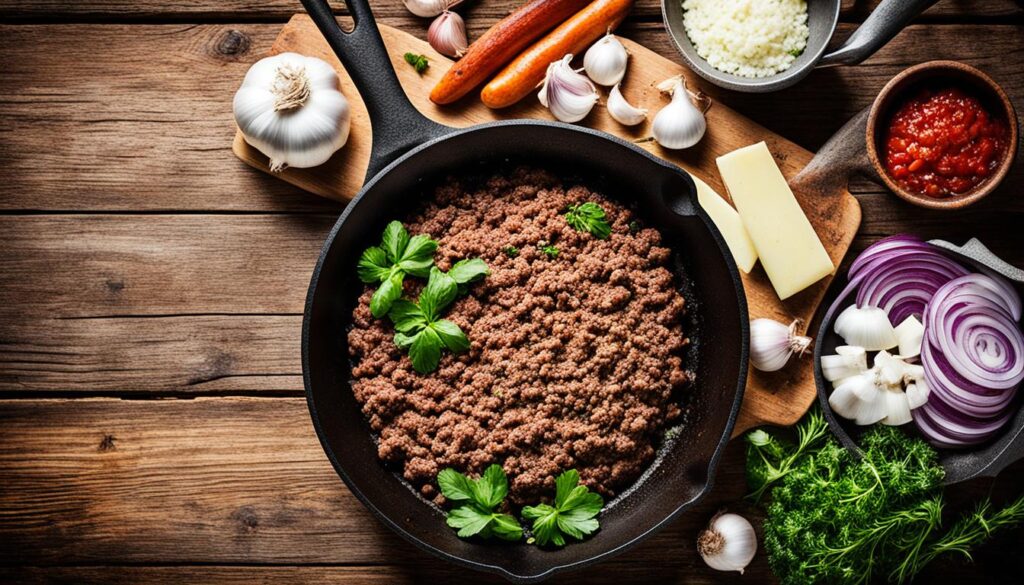
Pantry staples that appear constantly across these recipes:
- Canned whole tomatoes — crush them yourself, the texture is noticeably better than pre-crushed
- Beef broth (not water, not chicken broth — beef broth)
- Fresh garlic — jarred garlic is a genuinely different ingredient
- Yellow onion
- Worcestershire sauce — one tablespoon in a ground beef dish does more than most people expect
Easy cleaning after ground beef while the pan is still warm takes about two minutes. Hot water, stiff brush, dry on the stovetop. That’s the whole routine.
Preparing Your Cast Iron Skillet for Cooking
Preheat your cast iron skillet over medium heat for 3-5 minutes before any beef goes in. Skip this and everything else suffers.
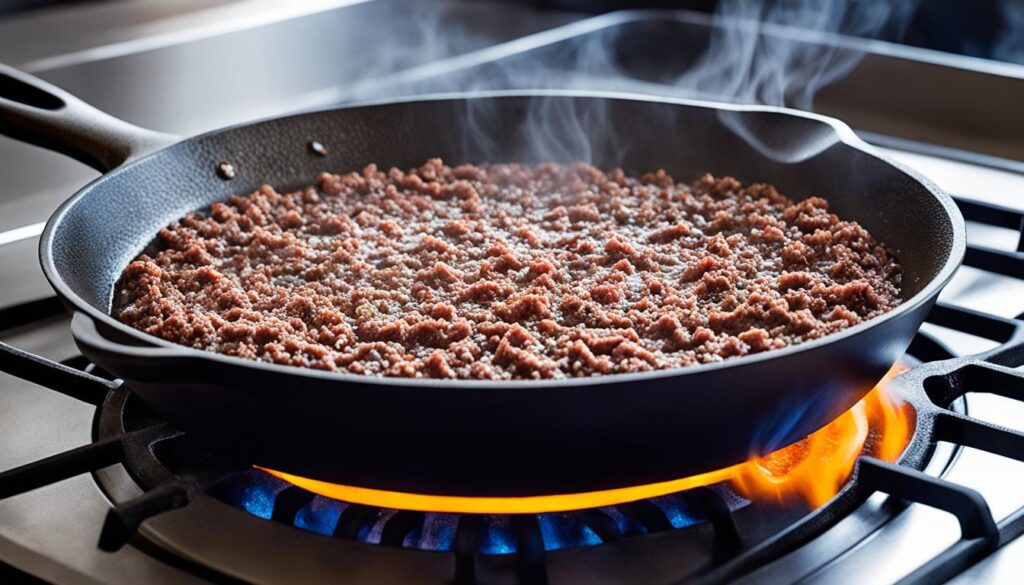
Cold pan plus cold beef equals gray steamed meat. Every time. No exceptions.
How to tell if it’s ready: hold your palm 3 inches above the surface. Should feel hot. Add a thin layer of oil and wait for it to shimmer — that shimmer means the oil is hot enough that moisture will evaporate instantly when meat hits it. That’s the signal.
Don’t crowd the pan. One pound of ground beef per batch in a 12-inch skillet is the limit. More than that and the surface temperature drops, the moisture can’t escape, and you’re braising instead of browning. Brown in batches if you need to. Worth the extra five minutes.
Ceramic electric skillets handle crowding slightly better because their surface temperature stays more consistent — but they don’t touch cast iron for browning quality when the pan is properly preheated. Different tools, different results.
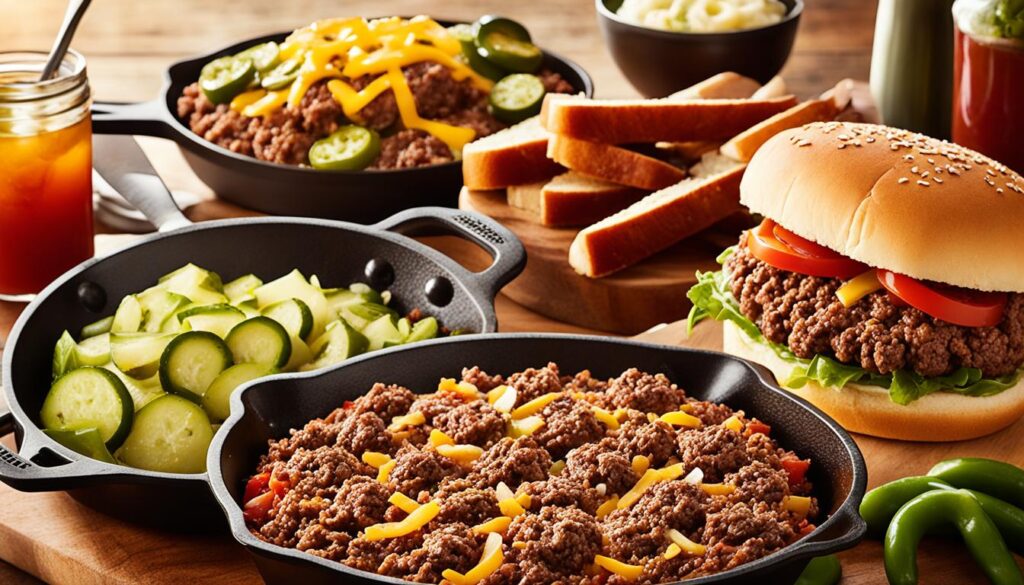
1. Classic Skillet Cheeseburger
My sons ask for this on weeknights when nobody wants to think about dinner. It sounds simple. It is simple. But a properly done smash burger — deep crust, melted cheese, caramelized onions from the same pan — is genuinely hard to beat on a Tuesday.
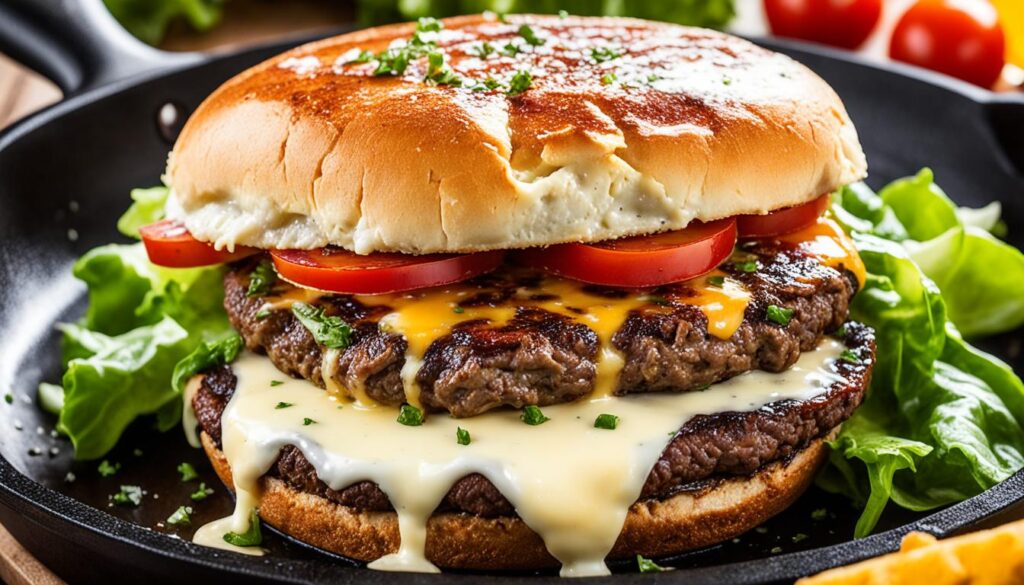
The caramelized onions are what separate this from a fast-food burger. Don’t rush them. This is the one instruction in this recipe that actually matters.
Ingredients
- 1-1/2 lbs 80/20 ground beef
- 1 large yellow onion, thinly sliced
- 1 tablespoon unsalted butter
- 1 teaspoon Worcestershire sauce
- Salt and black pepper
- 4 slices American or sharp cheddar cheese
- 4 burger buns, toasted
- Toppings — lettuce, tomato, pickles, mustard, whatever you want
Instructions
Onions go first. Melt the butter in the preheated skillet over medium-low heat and add the sliced onions. Now just leave them mostly alone. Stir every few minutes. They’ll go translucent, then golden, then a deep amber color that smells sweet and slightly smoky. This takes 20-25 minutes minimum. Turn up the heat to speed things up and you get limp pale onions. Not the same thing. Not even close.
Once the onions are done, push them to the side and raise the heat to medium-high. Divide the ground beef into four loose balls — don’t pack them tight. Season with salt and pepper. Place them in the hot pan and press each one flat with the spatula. Hard. They should sizzle loudly when they hit the surface.
Leave them completely alone for 3-4 minutes. The bottoms should be deeply browned — almost charred at the very edges — when you flip. Cheese goes on immediately after flipping. Cover the pan loosely for about a minute to melt it.
Toast the buns in the same pan after the burgers come out. Pile those onions on. That’s the whole dish.
Nutrition Info (per serving, serves 4)
| Nutrient | Amount per Serving |
|---|---|
| Calories | 580 |
| Carbohydrates | 28g |
| Protein | 38g |
| Fat | 34g |
| Fiber | 2g |
| Sodium | 620mg |
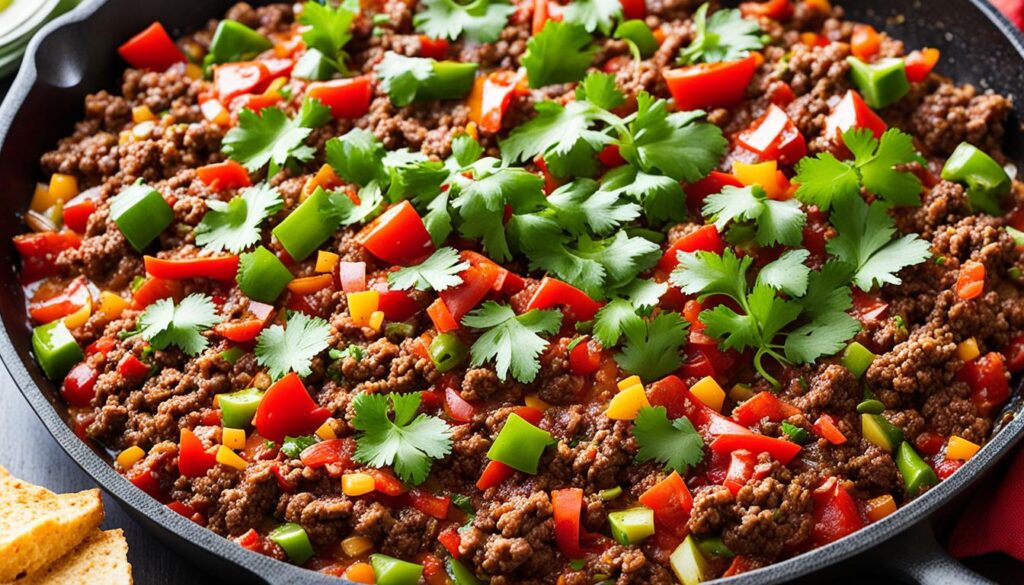
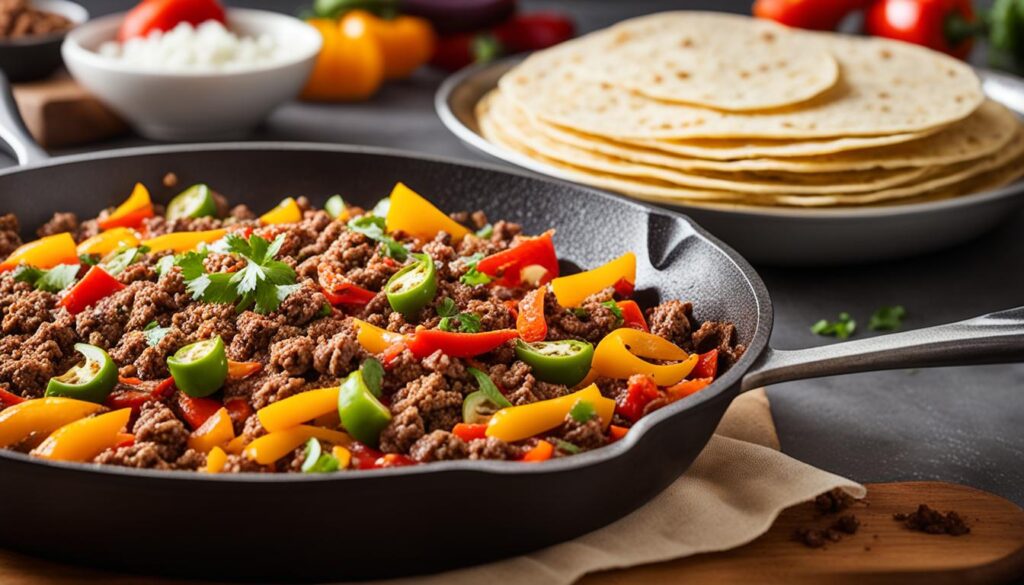
2. Tex-Mex Ground Beef Skillet
My younger son would eat Tex-Mex every single night. Not exaggerating — the kid would eat a variation of this dish seven days a week without complaint. So I make this one a lot. Under 30 minutes, one pan, straight to the table with the cheese still bubbling.
A study from the National Institutes of Health found that black beans are a significant source of folate, magnesium, and plant-based protein. So this skillet is nutritionally doing more than it looks.
Ingredients
- 1-1/2 lbs 80/20 ground beef
- 1 medium yellow onion, diced
- 3 cloves garlic, minced
- 1 can (15 oz) black beans, drained and rinsed
- 1 cup frozen corn kernels
- 1 can (14.5 oz) diced tomatoes with green chiles
- 2 tablespoons taco seasoning
- 1/2 teaspoon cumin
- Salt to taste
- 1-1/2 cups shredded Mexican blend cheese
- Sour cream, fresh cilantro, and lime wedges for serving
Instructions
Hot skillet, medium-high heat, beef goes in. Press it flat and leave it alone for 90 seconds. The bottom needs to crust before you break it up — remember that from earlier. Break it apart once the base is browned, drain most of the fat, and push everything to the sides.
Diced onion into the center. It picks up color fast from the residual fat and fond — three to four minutes and it should look soft, slightly golden at the edges, and smell sweet. Garlic in for one more minute, stirring the whole time. Garlic burns before you notice it burning.
Pour in the diced tomatoes. The pan steams up and everything stuck to the bottom lifts right into the sauce. Add the taco seasoning and cumin, then fold in the black beans and corn. Lower the heat to medium.

Five minutes of simmering and the liquid should reduce enough that the mixture looks thick and glossy rather than soupy. Scatter the cheese over the top and cover the pan for 2 minutes. Bring the whole skillet to the table while the cheese is still bubbling.
Nutrition Info (per serving, serves 4)
| Nutrient | Amount per Serving |
|---|---|
| Calories | 560 |
| Carbohydrates | 34g |
| Protein | 42g |
| Fat | 28g |
| Fiber | 8g |
| Sodium | 890mg |
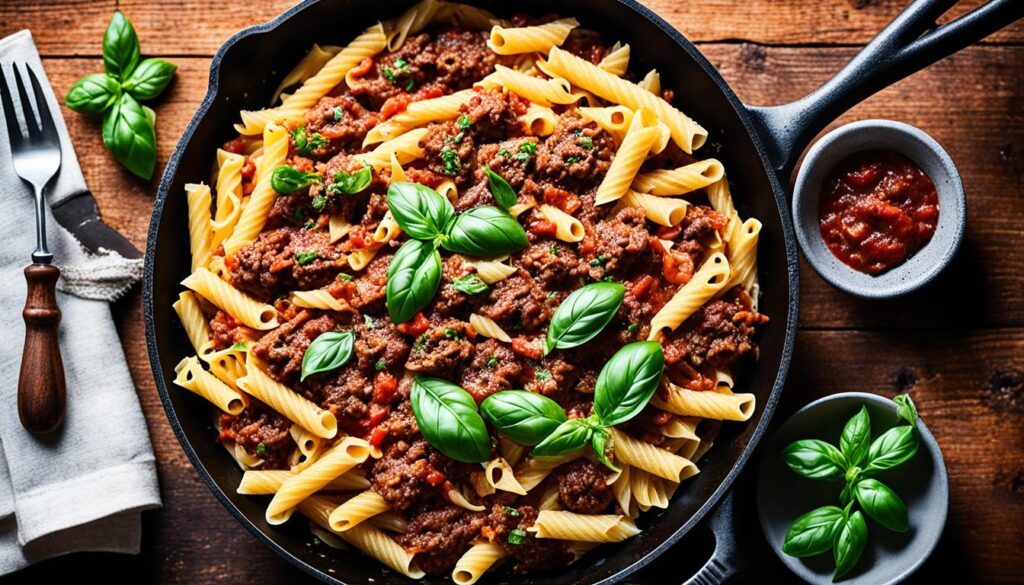
3. Italian-Style Ground Beef and Pasta Skillet
My wife calls this “the one that tastes like you tried harder than you did.” One pan, pasta cooked in the sauce, done in 35 minutes. I’ve made this probably fifty times and it still surprises me how good it is for how little effort it takes.
Ingredients
- 1-1/2 lbs 85/15 ground beef
- 1 medium yellow onion, diced
- 4 cloves garlic, minced
- 1 can (28 oz) crushed tomatoes
- 2 cups beef broth
- 8 oz rotini or penne, uncooked
- 1 teaspoon dried Italian seasoning
- 1/2 teaspoon red pepper flakes
- Salt and black pepper
- 1 cup shredded mozzarella
- Fresh basil for serving
Instructions
Brown the ground beef over medium-high heat until you see real color — not just cooked, actually browned with some crispy edges. This is the flavor foundation for the whole dish. Drain most of the fat, leave about a tablespoon. Add the onion and cook 4 minutes until it goes golden at the edges.
Garlic in. One minute of stirring until the pan smells sharp and fragrant. Crushed tomatoes and beef broth go in next — the liquid should come up around everything. Add Italian seasoning and red pepper flakes.
Now — dry pasta, straight into the liquid. Push it under the surface as much as you can. Bring to a boil, reduce heat to medium, and cover partially with a lid slightly ajar. Cook 12-14 minutes, stirring every few minutes. The pasta will stick to the bottom if you ignore it too long.
Done when the liquid is mostly absorbed and the sauce coats every piece thickly. If it’s still loose, raise the heat and cook uncovered another few minutes. Mozzarella over the top, cover for 2 minutes to melt, and serve from the skillet.
Nutrition Info (per serving, serves 4)
| Nutrient | Amount per Serving |
|---|---|
| Calories | 610 |
| Carbohydrates | 58g |
| Protein | 44g |
| Fat | 22g |
| Fiber | 5g |
| Sodium | 740mg |
4. Hearty Shepherd’s Pie Skillet
Comfort food. That’s the whole description. My wife asks for this one specifically when the weather turns cold — which in our house means anything under 55 degrees, so October through April. The cast iron goes straight under the broiler and the mashed potato peaks go golden brown and slightly crispy on top of the beef filling.
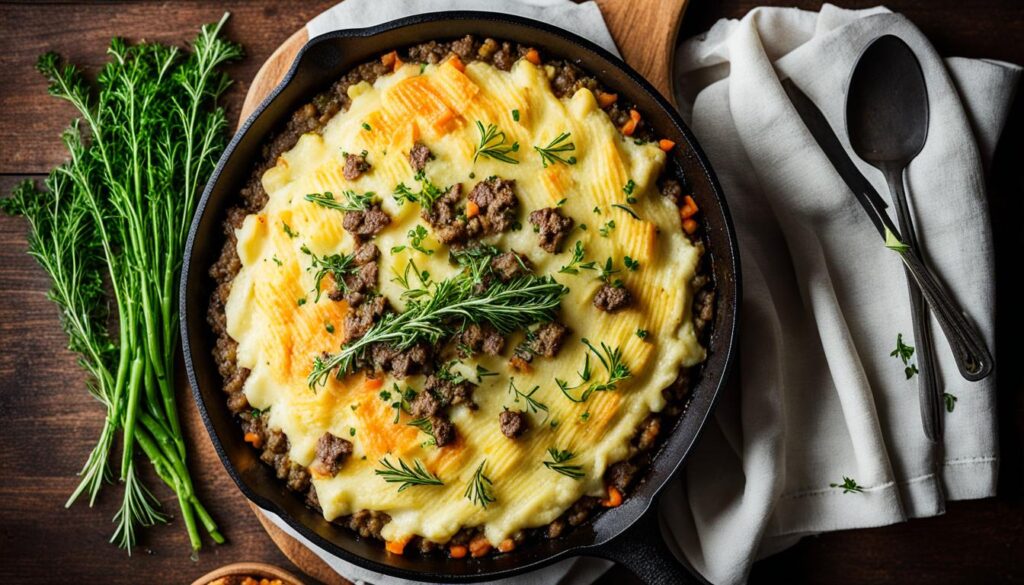
It looks impressive. It’s actually not that hard.
The Harvard T.H. Chan School of Public Health points out that potatoes are a meaningful source of potassium and vitamin C. So the mashed potato topping here isn’t just comfort food cover — it’s doing nutritional work. (Though it is also absolutely comfort food.)
Ingredients
- 1-1/2 lbs 85/15 ground beef
- 1 medium yellow onion, diced
- 2 cloves garlic, minced
- 2 medium carrots, diced small
- 1 cup frozen peas
- 1 tablespoon tomato paste
- 1 tablespoon Worcestershire sauce
- 1 cup beef broth
- 1 teaspoon dried thyme
- Salt and black pepper
Mashed Potato Topping:
- 2 lbs Yukon Gold potatoes, peeled and cubed
- 4 tablespoons unsalted butter
- 1/2 cup whole milk, warmed
- Salt and pepper
Instructions
Boil the potatoes until a fork slides in with zero resistance. Drain them and mash with butter and warm milk until completely smooth. Season well. Set aside.
Preheat the oven broiler.
Brown the ground beef in the skillet over medium-high heat, drain most of the fat. Add the onion and carrots — they’ll soften in the residual fat over about 5 minutes. Add the garlic, tomato paste, and Worcestershire sauce. Stir until the tomato paste darkens slightly, about 2 minutes. That color shift from bright red to deep rust is when it loses the raw edge and turns sweet — watch for it.
Beef broth and thyme in. Simmer until reduced by about half — the filling should look thick and glossy, nothing watery. Stir in the frozen peas.
Spoon the mashed potatoes over the entire filling, spreading to the edges. Then rough up the surface with a fork. Those peaks and ridges brown under the broiler — a smooth flat top won’t give you the same result. Under the broiler for 4-5 minutes, 4-6 inches from the element, until the peaks are golden.
Watch it the whole time. Broilers move fast.
Nutrition Info (per serving, serves 4)
| Nutrient | Amount per Serving |
|---|---|
| Calories | 590 |
| Carbohydrates | 52g |
| Protein | 38g |
| Fat | 24g |
| Fiber | 7g |
| Sodium | 610mg |
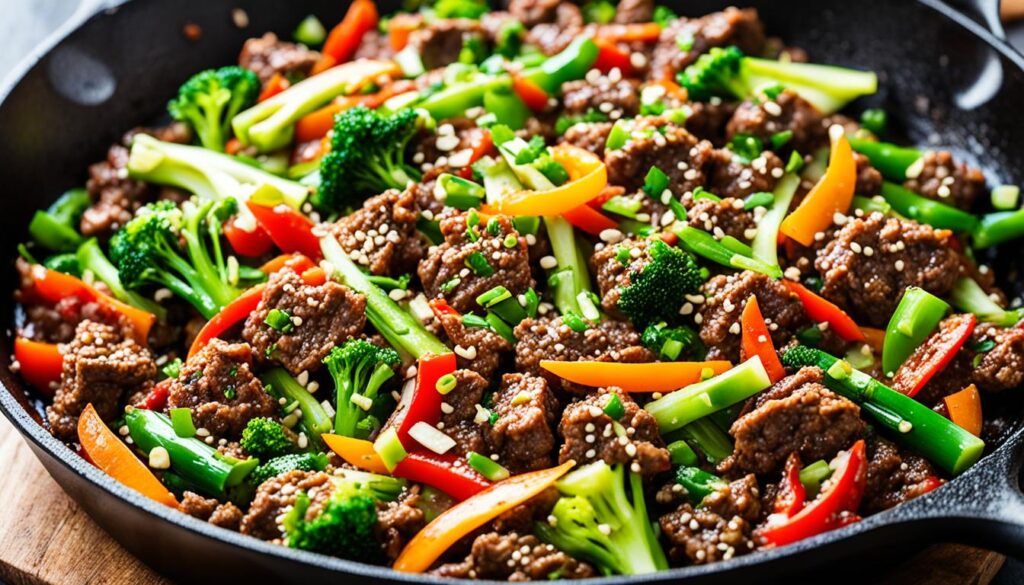
5. Asian-Inspired Ground Beef Stir-Fry Skillet
This one surprised me the first time I made it. I expected it to be decent. It was genuinely great — the soy, ginger, and sesame layered over properly browned ground beef with charred broccoli edges and served over jasmine rice. My older son looked up from his phone after the first bite, which is basically a standing ovation in this house.
Ingredients
- 1-1/2 lbs 85/15 ground beef
- 3 cloves garlic, minced
- 1 tablespoon fresh ginger, grated
- 3 tablespoons soy sauce
- 1 tablespoon oyster sauce
- 1 tablespoon sesame oil
- 1 teaspoon rice vinegar
- 1/2 teaspoon red pepper flakes
- 2 cups broccoli florets
- 1 medium red bell pepper, thinly sliced
- 3 green onions, sliced
- 2 tablespoons vegetable oil
- Cooked jasmine rice for serving
- Sesame seeds for garnish
Instructions
Mix the sauce before you start cooking. Soy sauce, oyster sauce, sesame oil, rice vinegar, red pepper flakes — all in a small bowl. It goes in fast at the end and you don’t want to be measuring while things are browning.
Heat the vegetable oil over high heat. Not medium-high. High. The oil should be shimmering and almost smoking before the beef goes in. Press the ground beef flat. Two full minutes without touching it — let the bottom crust form properly. Then break it apart and cook until fully browned. Remove the beef, leave the fat.
Broccoli and bell pepper go into that hot fat. They’ll sizzle hard immediately. Toss every 30 seconds — some char on the edges, not just soft vegetables. Four minutes and they should be tender with a little bite left.
Garlic and ginger in. Thirty seconds, constant stirring. Ginger burns faster than garlic and it burns bitter — don’t walk away. Beef back in. Sauce over everything. Toss to coat and let it reduce for 1-2 minutes until the sauce turns glossy and thick.
Green onions and sesame seeds on top. Serve over rice right away.
Nutrition Info (per serving, serves 4)
| Nutrient | Amount per Serving |
|---|---|
| Calories | 490 |
| Carbohydrates | 18g |
| Protein | 36g |
| Fat | 30g |
| Fiber | 3g |
| Sodium | 820mg |
6. Sloppy Joe Skillet
My older son ate homemade Sloppy Joes his entire childhood. Not the canned stuff — real tomato sauce, real seasoning, made in a cast iron skillet. He tried the canned version at a friend’s house in middle school and came home baffled. “It tasted like ketchup,” he said.
Yes. That’s correct. That’s what it tastes like.
The American Heart Association recommends whole grain buns for the added dietary fiber. Small swap. Worth doing.
Ingredients
- 1-1/2 lbs 80/20 ground beef
- 1 medium yellow onion, diced
- 1 green bell pepper, diced
- 3 cloves garlic, minced
- 1 can (15 oz) tomato sauce
- 3 tablespoons ketchup
- 1 tablespoon brown sugar
- 1 tablespoon Worcestershire sauce
- 1 teaspoon yellow mustard
- 1 teaspoon apple cider vinegar
- Salt and pepper
- 4 hamburger buns, toasted
Instructions
Brown the ground beef over medium-high heat. Don’t rush this part — the beef should have real color and some crispy bits before anything else goes in. Those crispy bits survive the sauce and give the final dish texture. Drain most of the fat.
Onion and bell pepper in. Five minutes in the residual fat, picking up color from the fond. Garlic for the last minute, stirring to keep it from scorching.
Tomato sauce, ketchup, brown sugar, Worcestershire, mustard, and apple cider vinegar — all in at once. The pan should smell immediately tangy and sweet. Bring to a low simmer and cook down 8-10 minutes, stirring occasionally.
How do you know it’s done? Drag a spoon through the center. The trail should fill in slowly. Not immediately — that’s too wet. Not stay open — that’s too dry. Fill in slowly. That’s the texture.
Taste it now. Add more vinegar if it needs brightness. More brown sugar if it’s too sharp. More Worcestershire if it tastes flat. Every batch is slightly different depending on the tomato sauce brand. Adjust accordingly.
Nutrition Info (per serving, serves 4)
| Nutrient | Amount per Serving |
|---|---|
| Calories | 530 |
| Carbohydrates | 44g |
| Protein | 35g |
| Fat | 22g |
| Fiber | 3g |
| Sodium | 870mg |
7. Ground Beef and Quinoa Power Bowl Skillet
My wife asked for something lighter on weeknights about a year ago. Not diet food — just not heavy. This is what I landed on. Ground beef and quinoa together cover protein from two directions, the vegetables make it genuinely filling, and it doesn’t sit in your stomach the way a pasta dish does at 8 p.m.
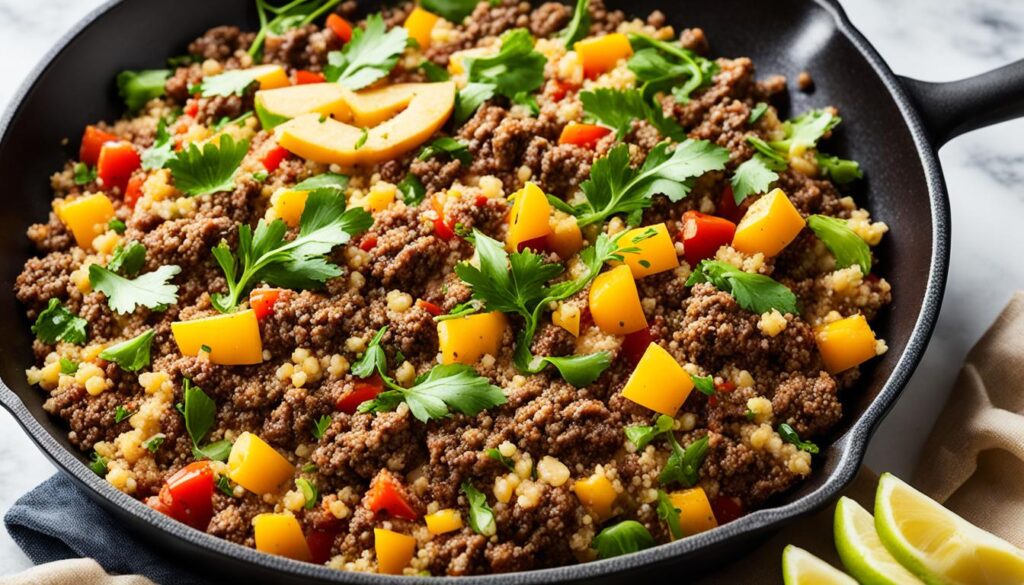
Harvard Health notes that quinoa contains all nine essential amino acids — one of the only plant foods to do that. Which makes this bowl nutritionally unusual in the best way.
Ingredients
- 1 lb 90/10 ground beef
- 1 cup quinoa, rinsed
- 2 cups beef broth
- 1 medium red onion, diced
- 2 cloves garlic, minced
- 1 medium zucchini, diced
- 1 cup cherry tomatoes, halved
- 1 can (15 oz) chickpeas, drained and rinsed
- 2 teaspoons cumin
- 1 teaspoon smoked paprika
- Salt and pepper
- 2 tablespoons olive oil
- Fresh lemon juice and parsley for serving
Instructions
Toast the quinoa first. Dry, straight into the preheated skillet over medium heat. Stir for 2 minutes until it smells nutty and some grains start popping — you’ll hear it. Pour in the beef broth. It steams up hard. Bring to a boil, reduce heat, cover, 15 minutes. Done when the broth is absorbed and tiny spiral tails appear on each grain. Set it aside.
Wipe the skillet out, add olive oil, brown the ground beef over medium-high heat. With 90/10 beef there’s less fat to drain — that’s fine. Push the beef to the edges and add the red onion to the center. Four minutes until it softens. Garlic, cumin, and paprika in. Stir everything together.
Zucchini and chickpeas in. Toss to combine. Four to five minutes — zucchini should be tender but not collapsing, and the chickpeas should develop a little crispiness on the edges where they’re touching the pan.
Fold the cooked quinoa into the skillet. Add the cherry tomatoes last and toss gently — they should warm through and barely soften, not break down into sauce. Lemon juice over the top, fresh parsley, and serve.
Nutrition Info (per serving, serves 4)
| Nutrient | Amount per Serving |
|---|---|
| Calories | 510 |
| Carbohydrates | 52g |
| Protein | 38g |
| Fat | 16g |
| Fiber | 9g |
| Sodium | 540mg |
8. Taco Tuesday: Skillet Ground Beef Tacos
Every Tuesday. Actually every Tuesday — this has been the standing request in my house for years. My sons have had strong opinions about taco seasoning since they were old enough to have strong opinions about anything, which was early. Homemade spice blend, properly browned beef, cast iron that keeps everything hot through second and third helpings.
Ingredients
- 1-1/2 lbs 80/20 ground beef
- 1 small yellow onion, finely diced
- 3 cloves garlic, minced
- 2 teaspoons chili powder
- 1-1/2 teaspoons cumin
- 1 teaspoon smoked paprika
- 1/2 teaspoon garlic powder
- 1/2 teaspoon onion powder
- 1/4 teaspoon cayenne pepper
- 1/2 cup beef broth
- Salt to taste
- 8-12 corn or flour tortillas, warmed
Toppings — build your own:
- Shredded cheddar or Mexican blend cheese
- Shredded cabbage or lettuce
- Pico de gallo or diced fresh tomatoes
- Sour cream
- Fresh lime wedges
- Hot sauce
Instructions
Brown the ground beef in the hot skillet over medium-high heat. Press it flat, leave it alone for 90 seconds, then break it apart. Real browning first — gray meat second. That sequence. Drain most of the fat and leave a thin coat in the pan.
Diced onion right into the hot beef. Three minutes in the residual fat, stirring occasionally, until it softens and goes translucent. Garlic in for one more minute — keep stirring.
All the spices at once. Chili powder, cumin, paprika, garlic powder, onion powder, cayenne — dump them all in and stir to coat everything. The spices hit the hot fat and bloom almost immediately. Thirty seconds and the pan should smell deeply smoky, complex, and completely different from raw ground beef and dried powder. That transformation — that bloom — is where the flavor lives.
Pour in the broth. Hissing. Stir everything together and let it simmer 3-4 minutes until the liquid is mostly absorbed and the beef looks sticky, intensely colored, and thick. Not wet. Not dry. Sticky.
Taste and adjust the salt. Serve from the skillet — it stays hot longer than any bowl you’d transfer it to, and the tacos at the end of the meal taste as good as the ones at the start.
Nutrition Info (per serving, serves 4)
| Nutrient | Amount per Serving |
|---|---|
| Calories | 480 |
| Carbohydrates | 32g |
| Protein | 35g |
| Fat | 24g |
| Fiber | 4g |
| Sodium | 560mg |
Tips for Cleaning and Maintaining Your Cast Iron Skillet
Clean cast iron after ground beef while the pan is still warm — not hot, just warm. Two minutes. That’s all this takes when you do it right.
Wipe out the fat and food debris with a folded paper towel while the pan is warm. Rinse with hot water. Scrub with a stiff brush or chainmail scrubber if anything is stuck. No soap needed for routine cleaning — and definitely not for a pan you’ve spent years seasoning. Dry it immediately on the stovetop over low heat until every drop of water is gone. Then a few drops of oil on a paper towel, wiped across the whole interior surface.
Done.
What not to do — ever, under any circumstances:
- Soak it in water. Even briefly.
- Dishwasher. Not once. Not just this time. Never.
- Air dry. Surface rust forms faster than you’d think.
Here’s what most people don’t realize until they’ve cooked with cast iron for a while: the pan actually gets better the more ground beef you cook in it. Every time fat renders and polymerizes on the surface, the seasoning builds. The pan gets darker, more nonstick, and more flavorful over time. No other pan in my kitchen does that. None of them.